By Emrick Sinitambirivoutin
All you need to know to build your autocompletion search bar with a UITableView and CoreData.

In this article, I’m going to present how I built a custom search field with an autocompletion feature to retrieve data from CoreData. It’s a component that I needed in one of my apps and that can be very useful in many cases to improve the user’s experience.
We will see:
- How to set up a simple app with a search UITextField
- How to configure a TableView to show the search results
- How to make real-time queries to CoreData collections
1. Setting up the project
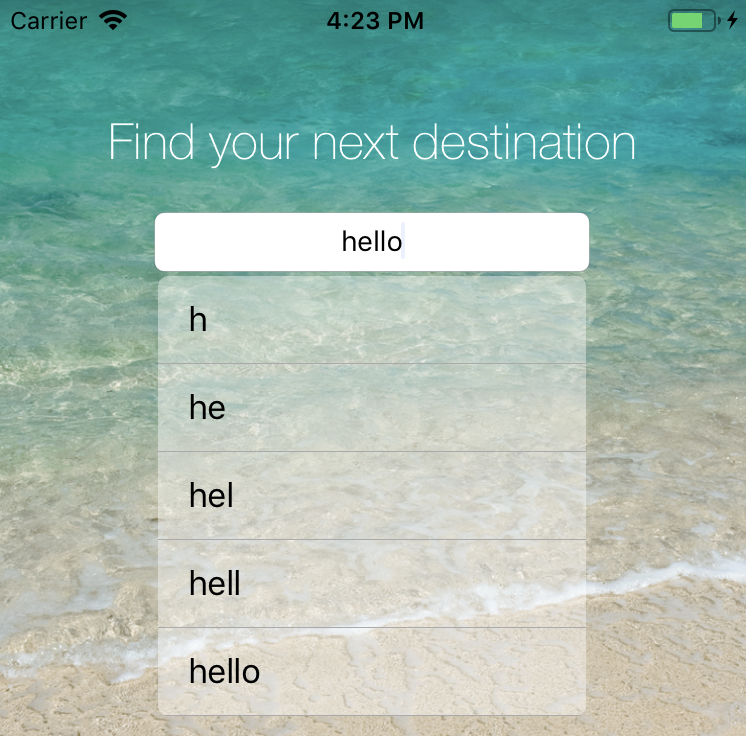
Just create a single view App with the following components (check CoreData at the project creation !). To be more concrete, let’s imagine this is for a travel recommendation App and the user needs to provide a city name to get all the information of the place.

UILabel : We will call it topLabel. We won’t need it.
UITextField: It’s the field that we will customize to have an autocomplete search field, so let’s call it searchTextField.
UIButton : It’s the button that will be pressed when the user will find the place that they want. Let’s call it searchButton.
The tableView will be added programmatically so that you will see how to set it up in any kind of situation.
To have a beautiful render, I added an UIImageView on the background with a wonderful beach image.
To connect all those components to our View Controller, select each of them and drag their reference using (Control (or Ctrl) ⌃ + Click) to your main View Controller swift file.
2. Configure our CustomSearchTextField class
To create our new class, we create a new file called CustomSearchTextField.swift. It’s in this class, that inherits from UITextField, that we will embed all the features that we need to implement our autocompletion search field.
Creating the TableView with the results:
To be able to show the completion results, we need to instantiate a UITableView that will display the most relevant results as below:
To do so we need to create a tableView object and then add it to the current view. In order to handle this new object, we need to override specific methods as shown below. All of the code needed to build the searchTableView will be handled by this method: buildSearchTableView().
Instantiating the tableView is as simple as creating a new UITableView object, but in order to access all of the functionalities of this new tableView object, we need to inherit from the TableViewDelegates and the TableViewDataSource methods. It is important to pay attention to two important variables:
- The tableView delegate: This variable will let us specify which object of the view needs to be informed when some changes occur in the tableView (in our case, this object is our SearchTextField which is in this context the self object)
- The tableView DataSource: This variable will let us specify how all the components of the tableView will be created and from which data. Here again, we need to set it to self.
Setting those two variables allows us to handle some actions related to the UITableView within our CustomSearchTextField class.
Now that the table view is created, we need to add data in it, and more concretely, this data will be stored into cells. We use methods inherited from the TableViewDataSource class to configure our cells and to add them to the tableView. In addition to this, the TableViewDelegates’ method will allow us to trigger where the user clicks and will print the content of the corresponding cell in the console.
But if you try to run the code above, nothing will happen because the tableView frame is not set and we didn’t bring the view to the front. In order to fix this, we now need to add a updateTableView() method:
Our TableView is set and is now supposed to work perfectly! But at this time we have to add data in our dataList if we want to display something. To do it simply for now, we will just add dummy data to our list: the text that the user enters in our search bar.
But the main goal of all of this is to give our users autocompletion results while they are typing in our search bar, so we need to observe when the user types a new letter and to update the tableView data according to that.
As you can see above, we modified the willMove() method in order to set how to handle each of the user interactions with the textField. The one that interests us is when the text field changes (when the user is typing). So each time that this action is activated, we add data to our list and we update our tableView.
Improving the user experience:
Even if our searchField doesn’t search at all, you must have seen that when we type and the results are starting to show up, all of the results are in plain text. This doesn’t look that much like an autocompletion search bar. To be more user-friendly, it would be nice to highlight the part of the text that we already typed in the text field and also to filter the results so that they correspond to what we are actually typing. Let’s do this ?

It’s time to create our filter method. This method will filter the relevant items from the dataList (the ones corresponding to what the user starts typing). We will use NSMutableAttributedString class to be able to highlight the part of the text that the user typed in the text field.
First, we create a SearchItem class that will represent each of our filtered results. As we are building our wonderful travel recommendation app, we will consider that those items are city names. Here is the SearchItem class:
We now need to change our global variable and to add a new one to store our filtered items:
Then let’s create our filter method:
By converting our string to an NSString, we can use the method range() that returns the range of the first occurrence of a given string within the string. By using this method we both know if the string corresponds to what the user is typing and the position of the corresponding string! That’s all we need to highlight this part of our item. We do this using setAttributes methods and we then add our item to the resultsList. Finally, we reload the data in our tableView.
Let’s create new test data to try our implementation:
Everything should work perfectly, we’re almost done! ?
3. Make queries to CoreData
It’s nice to have a beautiful search bar with a custom table view to display our autocompletion filtered results, but without data, it’s not very useful ?.
Let’s connect our search text field to CoreData storage.
Create a CoreData database:
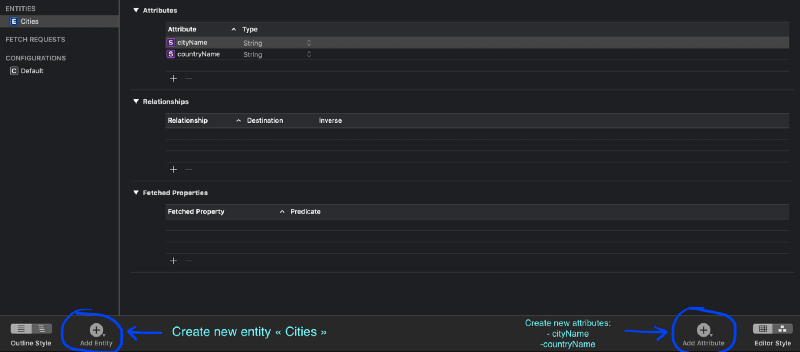
In order to store our persistent data, we will create a new entity (table) in our database with two attributes (rows). To do so we click to the .xcdatamodeld file in the file explorer and create a new entity named Cities, add the two attributes that we need: cityName and countryName.
 CustomSearchField..xcdatamodeld
Then we will modify the type of our dataList in CustomSearchField.swift to be a list of Cities instead of a list of SearchItems:
var dataList : [Cities] = [Cities]()
Make queries to the created database:
Now we need to create some methods to handle the saving and the fetching of new data in the database. To do so we need to create a context. The context is a specific zone where we will store all of our changing before committing them to the database. If you use git, this is like the staging zone. You first add your file to the staging area, and when you are ready with your changes you commit them to your git.
We change the beginning of our filter() method in order to query the data that corresponds to the user input instead of fetching all the data from the database:
The last thing to add is a new addData() method to populate our database. Be careful, this function needs to be called only one time as the data stored will become persistent, so comment the corresponding line in your code (just before the creation of the tableView in buildSearchTableView() ) after the first call! Even if the app is restarted, the data will still be available in the internal memory of the device.
That’s it ! We’re done ! ?

I started to dive into Swift programming a few weeks ago with an interesting MOOC that I found on Udemy. After I had acquired the basics of Swift and Xcode development, I began to work on my own projects with all of the useful documentation that I found on the web. This first tutorial is an opportunity for me to share all that knowledge that I acquired, so I hope that it has helped you!
If you have a question don’t hesitate to tell me in the comments! And don’t forget to give me a clap if you enjoyed the article ???
All the final project code is available here:
sinitame/customSearchField-medium
_Source code for Medium article : How to create an autocompletion UITextField using CoreData in Swift …_github.com