

According to Mathias Biilmann, the CEO & Co-founder of Netlify,"The JAMstack is a modern web development architecture based on client-side JavaScript, reusable APIs, and prebuilt Markup."
The key aspects of a JAMstack application are the following:
- The entire app runs on a CDN (or ADN). CDN stands for Content Delivery Network and an ADN is an Application Delivery Network.
- Everything is in Git.
- Automated builds run with a workflow when developers push the code.
- There's Automatic deployment of the pre-built markup to the CDN/ADN.
- It's practically Serverless. To put it more clearly, we do not maintain any server-side applications but rather make use of already existing services (like email, media, database, search, and so on).
And here's a fun fact: Many of the features that once required a custom back-end can now be done entirely on the front-end.
In this article, we will learn how to build a JAMstack application that has:
- an API service to serve media files,
- and a Static Site Generator(SSG) to create the pre-built markup.
And finally we'll deploy it over a CDN.
So, what are we building today?
We will build an image gallery. I love movies, so I have decided to create an image gallery of my favorite actors. I have a fun name for it to: imaginary.
We will use a media management service called Cloudinary to host and manage our images. It also provides developer APIs to upload and fetch media such as images, videos, and so on
We will use a framework called Gatsby to build the front-end of the image gallery. Gatsby is a React-based open-source framework for creating websites and apps.
Finally, we will learn how to deploy the app to a CDN with an automatic build and deploy process. We will use Netlify CDN for this.
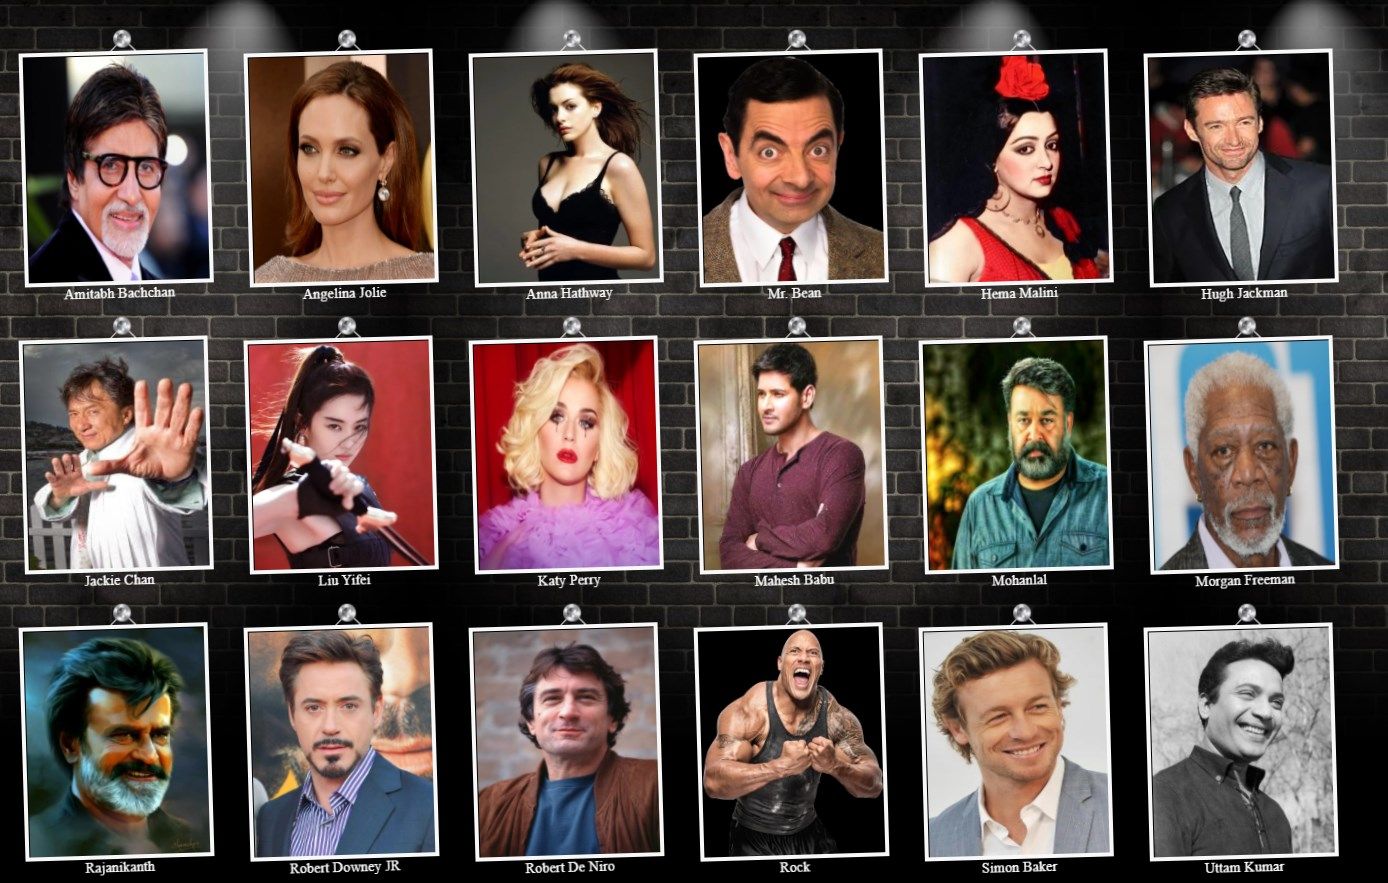
At the end of the article, our imaginary app will look like this:
 Image Gallery app - Final Look
TL;DR
We will learn things with a step-by-step approach in this article. If you want to jump into the source code or demonstration sooner, here are links to them.
- You can access the image gallery demo from here: http://imaginary.netlify.app/
- All the source code used in this article is in my GitHub repo. Feel free to follow it, as I keep updating the source code frequently. If you liked the work, please support it with a star. https://github.com/atapas/imaginary/tree/1-freecodecamp-poc
Now let's get started.
How to Set Up Cloudinary
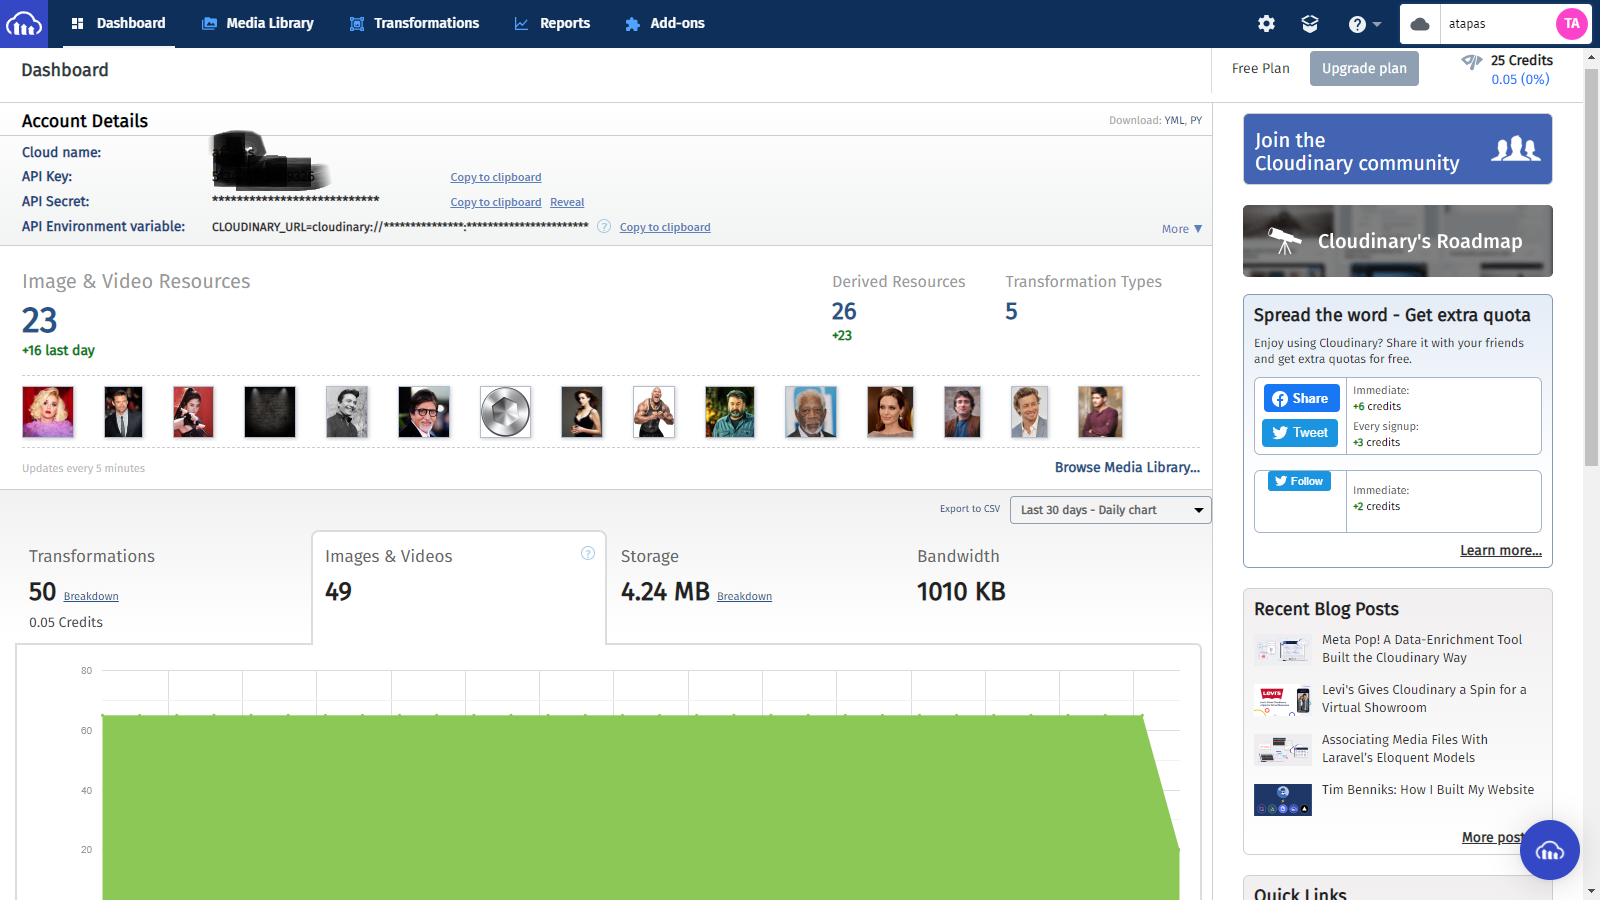
First, create an account with Cloudinary. A free plan is more than enough for our image gallery application.
Login using your account credentials to get to the Cloudinary dashboard. Please note down the Cloud name, API Key and, API Secret as we'll need them in our application.
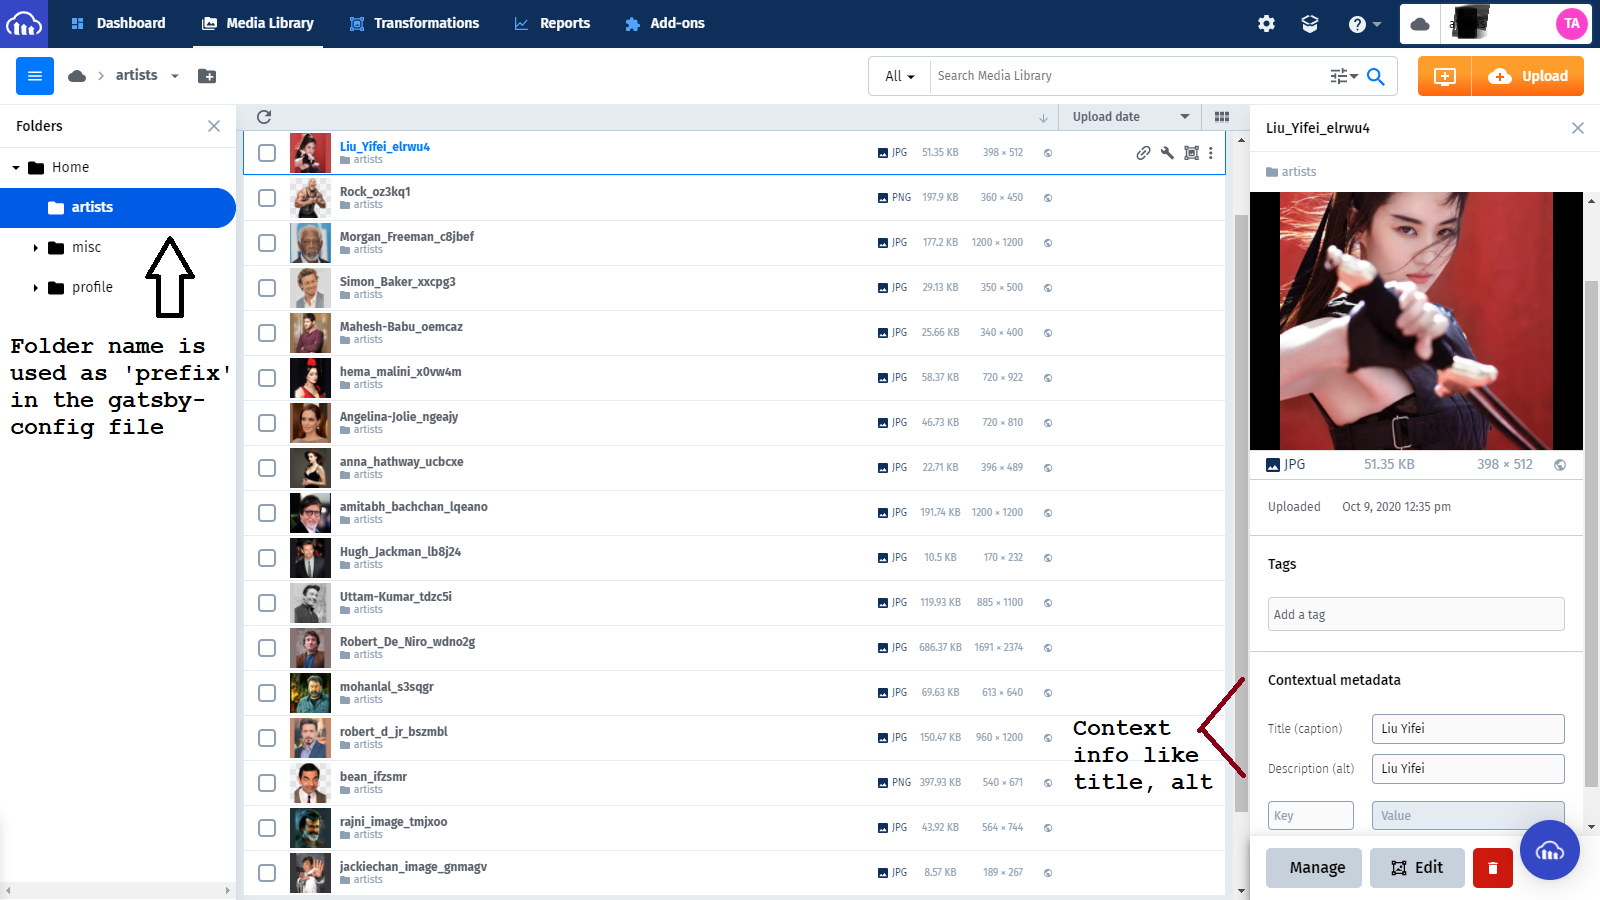
Next, upload the images of your choice to use them in the image gallery. You can create a folder and call it whatever you want. In my case, I have named it artists and uploaded the images into it.
Note that we'll use this folder name later when we integrate Cloudinary with Gatsby.
Please select each of the images and add a Title and Description. We will use these two bits of meta information as image captions and alt-text, respectively, in our image gallery.
That's all. Please do not share the API secret and the key with anyone. Let's now go through the required setup for Gatsby.
How to Set Up Gatsby
A gatsby-based project needs node.js to work. Make sure you have Node.js installed. You can download and install node.js from here.
A successful install will show the Node version using this command:
node -v
Create a project directory
Create a project directory to organize the source code. Let's create a directory with the name imaginary.
mkdir imaginary

cd imaginary
Initialize the project
There are plenty of starter projects to create a gatsby app. While the starter projects simplify many complexities, at the same time they may be a bit overwhelming for a simple app like ours.
Keeping that in mind, we will initialize a simple gatsby project by ourselves.
Open a command prompt and type the following command to initialize a Node.js supported project:
npm init -y
Gatsby: Install and initial setup
Install the gatsby-cli tool globally. This tool will help us work with the Gatsby environment.
npm install -g gatsby-cli
Install the Gatsby, React, and ReactDOM dependencies. You can either use the npm install command as above or the yarn add command if you have yarn installed.
yarn add gatsby react react-dom
Let's also add a .gitignore file with the following content:
.cache
public
node_modules
*.env
You can optionally create a README.md and LICENSE file. At this stage, our project should have these folders and files:

Gatsby projects need a special configuration file called gatsby-config.js. At this time, we will need an empty file. Create a file named gatsby-config.js with the following content:
 module.exports = {
  // keep it empty
 }
Now it is time to create our first page with Gatsby. Create a folder named src at the root of the project folder. Create a sub-folder named pages under src. Create a file named index.js under src/pages with the following content:
import React from 'react';

  export default () => {
   return (
      <>
        <h1>Images to load here...</h1>
      </>
    )
  }
At this stage, our project files and folders should look like this:

Let's run it
Try the following command in the command prompt to run the app locally:
gatsby develop
By default, a gatsby app runs on the 8000 port number. Open your favorite browser and access the app @ http://localhost:8000.
You should see it running like you see in the screen-shot below:

That's all. Now, we've gotten both Cloudinary and Gatsby successfully set up. It's time to bring them together.
Cloudinary & Gatsby, the getting together story
The Gatsby framework has huge community support and there are many plug-ins to satisfy critical needs. In early 2020, the Cloudinary team introduced two super cool Gatsby plugins to the dev community:
Gatsby-Source-Cloudinary- Helps in fetching the stored images at the build time from Cloudinary to a Gatsby app/site.Gatsby-Transformer-Cloudinary- Helps in uploading the local images from a Gatsby app/site to Cloudinary.
As we are only interested in fetching the images to the image gallery here, we will just install the gatsby-source-cloudinary plug-in.
We will also install a utility package called dotenv to handle the environment variables (Secret Key, API key, and so on) locally.
Let's install them. Open a command prompt and use the following command:
yarn add dotenv gatsby-source-cloudinary
Now, follow these steps to fetch the images into our app.
- Create a
.envfile at the root of the project folder and add the following content to it. Please note that the values in thekey-valuepairs are available in theCloudinarydashboard as we have seen before.
CLOUDINARY_CLOUD_NAME=<YOUR_CLOUDINARY_NAME>
CLOUDINARY_API_KEY=<YOUR_CLOUDINARY_API_KEY>
CLOUDINARY_API_SECRET=<YOUR_CLOUDINARY_API_SECRET>
- Edit the
gatby-config.jsfile to add the following content:
require('dotenv').config();

module.exports = {

    plugins:[
        {
            resolve: `gatsby-source-cloudinary`,
            options: {
              cloudName: process.env.CLOUDINARY_CLOUD_NAME,
              apiKey: process.env.CLOUDINARY_API_KEY,
              apiSecret: process.env.CLOUDINARY_API_SECRET,
              resourceType: `image`,
              prefix: `artists/` ,
              context: true,
              tags: true,
              maxResults: 50
            }
          }
    ]

}
There are a few things going on here. We are telling gatsby to use the gatsby-source-cloudinary plug-in with a few parameters.
The parameters cloudName, apiKey and apiSecret are fetched from the .env file using the dotenv package. We also specify the resourceType value as image as we are not interested in fetching other types of media.
The prefix parameter value should be the same as the image folder name in Cloudinary.
We specify context and tags as true to fetch the contextual metadata and tag information of an image. We also set the maxResults as 50 so that we do not get constrained with the default value of 10.
- Next, create a folder called
componentsundersrcand create a file calledGallery.jsinside it.GatsbyusesgraphQLto query the data from various sources like markdown, JSON, and Excel.
In our case, we will use Cludinary as a source to query the images using the gatsby-source-cloudinary plug-in configured already.
- Now edit the
Gallery.jsfile and add the following content:
import React from 'react';
import {useStaticQuery, graphql} from 'gatsby';

const Gallery = () => {
    const data = useStaticQuery(
        graphql`
        query CloudinaryImage {
            allCloudinaryMedia {
            edges {
                node {
                    secure_url
                    context {
                        custom {
                            alt
                            caption
                        }
                    }
                    resource_type
                }
            }
            }
        }`
    );
    const images = data.allCloudinaryMedia.edges;
    return (
        <div className="container">
            {images.map((image, index) => (
                <figure className="wave" key={`${index}-image`}>
                    <img
                        src={image.node.secure_url}
                        alt={image.node.context.custom.alt} >
                    </img>
                    <figcaption>{image.node.context.custom.caption}</figcaption>
                </figure>
                ))
            }
        </div>
    )
};

export default Gallery;
As we see above, we use a graphQL query to fetch the source image paths and the context information. We use the information to loop through and add the images with a caption.
- The next step is to edit the
index.jsfile to import theGallery.jsfile and use it.
import React from 'react';
import Gallery from '../components/Gallery';

export default () => {
    return (
      <>
        <Gallery />
      </>
    )
}
If you are running the gatsby develop already, please stop it and run it again. Access the app again in the browser. You should see the app with all the images fetched from Cloudinary.
But wait, it doesn't look as elegant as was promised. We have to do some css work here.
Create a file called gallery.css under the folder src\components and add the following content in it:
body {
    background: #000000 url("https://res.cloudinary.com/atapas/image/upload/v1602214656/misc/6284_n48wtw.jpg") repeat-x center top;
    color: #FFFFFF;
}

.container {
    margin-top: 55px;
}

.wave {
    float: left;
    margin: 20px;
    animation: wave
               ease-in-out
               1s
               infinite
               alternate;
    transform-origin: center -20px;
}

.wave:hover {
    animation-play-state: paused;
}

.wave img {
    border: 5px solid #f8f8f8;
    display: block;
    width: 200px;
    height: 250px;
    background-color: #000;
}

.wave figcaption {
    text-align: center;
}

.wave:after{
    content: '';
    position: absolute;
    width: 20px;
    height: 20px;
    border: 1.5px solid #ffffff;
    top: -10px;
    left: 50%;
    z-index: 0;
    border-bottom: none;
    border-right: none;
    transform: rotate(45deg);
}

.wave:before{
    content: '';
    position: absolute;
    top: -23px;
    left: 50%;
    display: block;
    height: 44px;
    width: 47px;
    background-image: url(https://res.cloudinary.com/atapas/image/upload/v1602212639/misc/screw-head_oglfcu.png);
    background-size: 20px 20px;
    background-repeat: no-repeat;
    z-index: 16;
}

@keyframes wave {
    0% { transform: rotate(3deg); }
    100% { transform: rotate(-3deg); }
}
- Import the
gallery.cssfile into theGallery.jsfile as
import './gallery.css';
That's all. You should see the app looking much better than before as if the images are hanging from a wall with animation in them.
Let's Deploy the App
The last step is to deploy the app publicly so that we show it off.
First, create a repository in GitHub and push the source code. Then create an account with Netlify to login.
Follow these simple steps to deploy your app to the Netlify CDN with built-in CI/CD support.
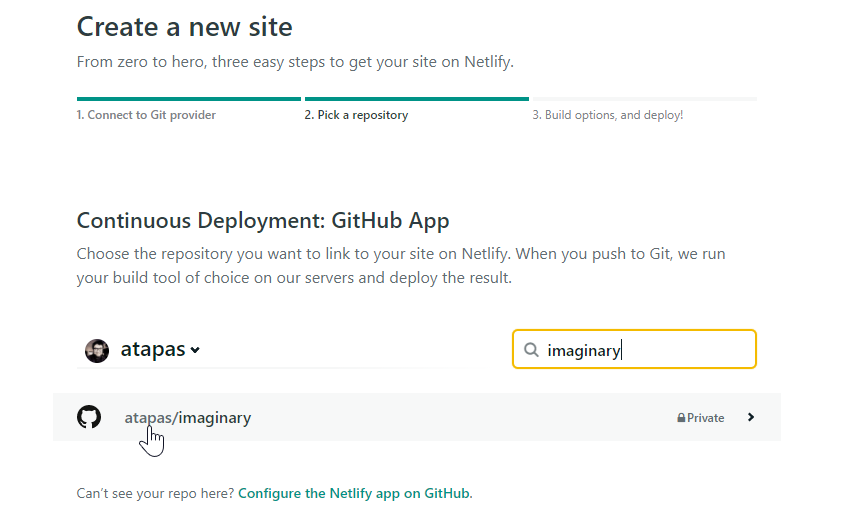
- Create a new site from Git
- Authenticate to your
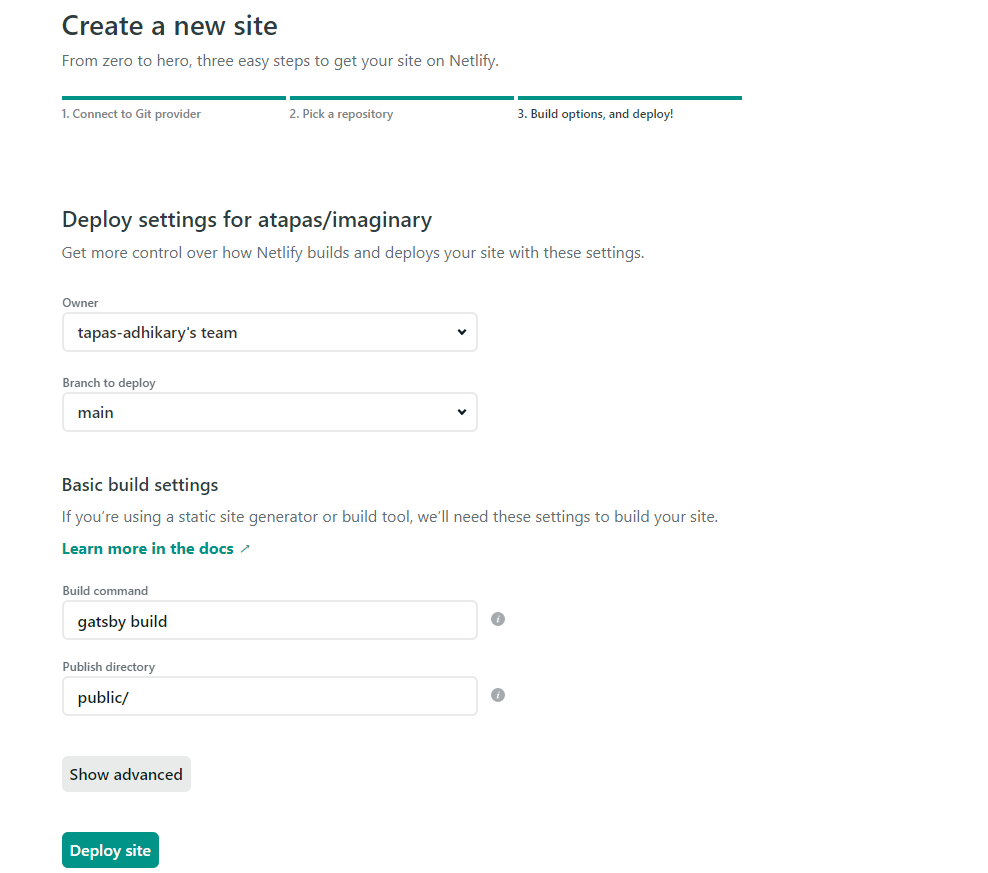
Githubaccount and select the image gallery project. In my case, the project name isimaginary. - In the next step, provide information about the build command as
gatsby buildand publish the directory aspublic/. - Next click on the
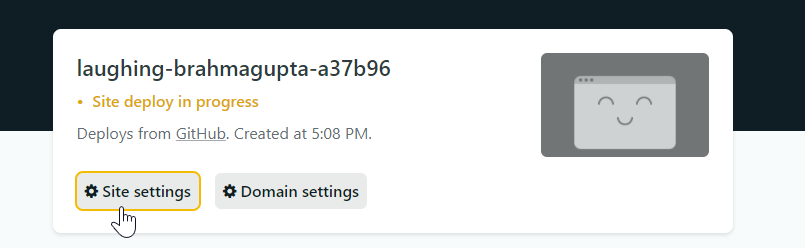
Site settingsto tellnetlifyabout theCloudinarycloud name, secret key, API key, and so on. - Browse to the
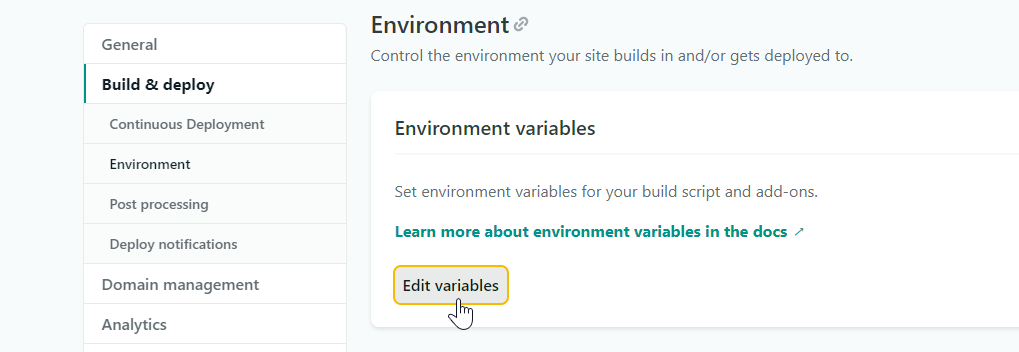
Environmentoption and click on theEdit variablesbutton. - Add three variables as shown below with the values shown in your
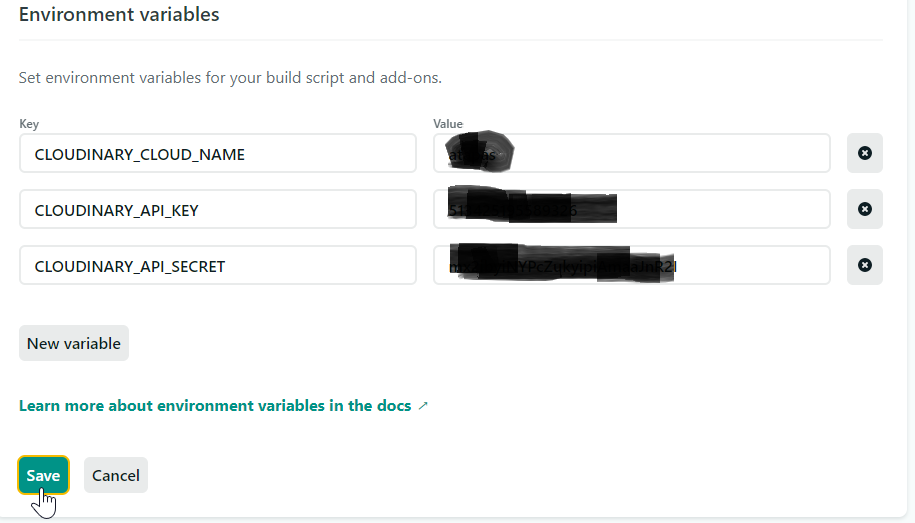
Cloudinarydashboard. - Browse to the
Deploysoption and trigger a fresh deploy. - You can change the site name to something that meets your needs. In my case, it is https://imaginary.netlify.app/:
 New site from Git
 Create a new site
 Parameters for the site
 Site settings
 Add environment variables
 Add all of them
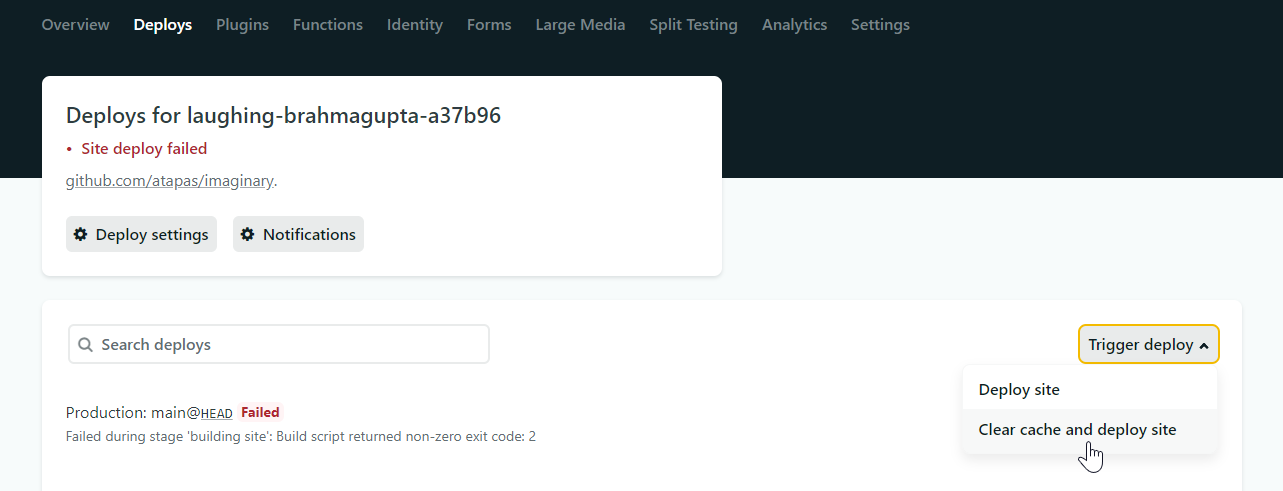 Trigger a fresh deploy
 Optionally to change the site name
Now we're done. We have the app up and running publicly.
In Summary
Hope you enjoyed reading this article. In a future article we will see how to use the other gatsby-cloudinary plug-in to upload an image to the Cloudinary server to add to our image gallery.
You may also like these articles:
- I made a photo gallery with CSS animation. Here’s what I learned.
- JAMstack for All: An Introduction
- What is a Static Site Generator and how to select one?
If this article was useful, please share it so others can read it as well. You can @ me on Twitter (@tapasadhikary) with comments, or feel free to follow me.