
By Ankit Sharma
In this article, we will create an online polling application using ASP.NET Core, Angular 5, and the Entity Framework Core. Since this is the season of Indian Premiere League cricket in India, we will create an online poll for “Who is going to win IPL 2018?” The poll results will be displayed as a column chart that is created using Highcharts.
We will use Visual Studio 2017 and SQL Server 2014.
Take a look at the final application.
Prerequisites
- Install .NET Core 2.0.0 or above SDK from here.
- Install the latest version of Visual Studio 2017 Community Edition from here.
- Download and install the latest version of Node.js from here.
- SQL Server 2008 or above.
Source code
Before proceeding, I would recommend that you to get the source code from GitHub.
Creating the table
We will store the team data in the IplTeams table. Execute the following commands to create the table.
CREATE TABLE IplTeams ( TeamId INTEGER IDENTITY(1,1) PRIMARY KEY, TeamName VARCHAR(30) NOT NULL, VoteCount INTEGER NOT NULL )
Now, we will put in the team names and initialize the vote count to zero. Execute the following insert statements.
INSERT INTO IplTeams VALUES ('Chennai Super Kings',0) INSERT INTO IplTeams VALUES ('Delhi Daredevils',0) INSERT INTO IplTeams VALUES ('Kings XI Punjab',0) INSERT INTO IplTeams VALUES ('Kolkata Knight Riders',0) INSERT INTO IplTeams VALUES ('Mumbai Indians',0) INSERT INTO IplTeams VALUES ('Rajasthan Royals',0) INSERT INTO IplTeams VALUES ('Royal Challengers Bangalore',0) INSERT INTO IplTeams VALUES ('Sunrisers Hyderabad',0)
Create the MVC web application
Open Visual Studio and select File >> New >> Project. After selecting the project, a “New Project” dialog will open. Select .NET Core inside the Visual C# menu from the left panel.
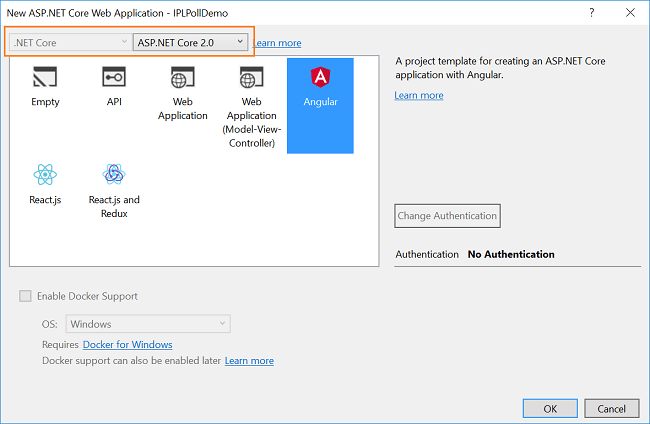
Then, select “ASP.NET Core Web Application” from the available project types. Put the name of the project as IPLPollDemo and press OK.

After clicking on OK, a new dialog will open asking you to select the project template. You will see two drop-down menus at the top left of the template window. Select “.NET Core” and “ASP.NET Core 2.0” from these dropdowns. Then, select the “Angular” template and press OK.
Now our project has been created.
Since we are using Highcharts in our application, we need to install packages for it. Open the package.json file and put the following code into it:
{ "name": "IPLPollDemo", "private": true, "version": "0.0.0", "scripts": { "test": "karma start ClientApp/test/karma.conf.js" }, "devDependencies": { "@angular/animations": "5.2.10", "@angular/common": "5.2.10", "@angular/compiler": "5.2.10", "@angular/compiler-cli": "5.2.10", "@angular/core": "5.2.10", "@angular/forms": "5.2.10", "@angular/http": "5.2.10", "@angular/platform-browser": "5.2.10", "@angular/platform-browser-dynamic": "5.2.10", "@angular/platform-server": "5.2.10", "@angular/router": "5.2.10", "@ngtools/webpack": "6.0.0-rc.10", "@types/chai": "4.1.3", "@types/highcharts": "^5.0.22", "@types/jasmine": "2.8.6", "@types/webpack-env": "1.13.6", "angular2-router-loader": "0.3.5", "angular2-template-loader": "0.6.2", "aspnet-prerendering": "^3.0.1", "aspnet-webpack": "^2.0.1", "awesome-typescript-loader": "5.0.0", "bootstrap": "4.1.1", "chai": "4.1.2", "css": "2.2.1", "css-loader": "0.28.11", "es6-shim": "0.35.3", "event-source-polyfill": "0.0.12", "expose-loader": "0.7.5", "extract-text-webpack-plugin": "3.0.2", "file-loader": "1.1.11", "html-loader": "0.5.5", "isomorphic-fetch": "2.2.1", "jasmine-core": "3.1.0", "jquery": "3.3.1", "json-loader": "0.5.7", "karma": "2.0.2", "karma-chai": "0.1.0", "karma-chrome-launcher": "2.2.0", "karma-cli": "1.0.1", "karma-jasmine": "1.1.1", "karma-webpack": "3.0.0", "preboot": "6.0.0-beta.3", "raw-loader": "0.5.1", "reflect-metadata": "0.1.12", "rxjs": "^6.0.0", "style-loader": "0.21.0", "to-string-loader": "1.1.5", "typescript": "2.8.3", "url-loader": "1.0.1", "webpack": "4.6.0", "webpack-hot-middleware": "2.22.1", "webpack-merge": "4.1.2", "zone.js": "0.8.26" }, "dependencies": { "angular-highcharts": "^5.2.12", "highcharts": "^6.1.0" } }
Here, we have added the Highcharts dependency in lines 22, 64 and 65.
Important Note: If you have Angular version 4 in your package.json file, then copy the full code as above to update your Angular version to 5. If you are already using angular 5, then just copy the lines to include the Highcharts dependency.
Now, close the Visual Studio instance and navigate to the project folder containing the package.json file and open the command prompt. Execute the “npm install” command to install all the required dependencies. Refer to the image below:
After the command executes successfully, open your project in Visual Studio. You’ll see the folder structure in Solution Explorer as shown in the below image.
Here, we have our Controllers and Views folders. We won’t be touching the Views folders for this tutorial, since we will be using Angular to handle the UI.
The Controllers folders will contain our Web API controller. We’re interested in the ClientApp folder where the client side of our application resides.
Inside the ClientApp/app/components folder, we already have a few components created which are provided by default with the Angular template in VS 2017. These components won’t affect our application, but for the sake of this tutorial, we will delete the fetchdata and counter folders from ClientApp/app/components.
Scaffolding the model to the application
We are using the Entity Framework core database’s first approach to create our models. Navigate to Tools >> NuGet Package Manager >> Package Manager Console.
We have to install the package for the database provider that we are targeting, which is SQL Server in this case. So now, run the following command:
Install-Package Microsoft.EntityFrameworkCore.SqlServer
Since we are using Entity Framework Tools to create a model from the existing database, we will install the tools package as well. Run the following command:
Install-Package Microsoft.EntityFrameworkCore.Tools
After you have installed both the packages, we will scaffold our model from the database tables using the following command:
Scaffold-DbContext "Your connection string here" Microsoft.EntityFrameworkCore.SqlServer -OutputDir Models -Tables IplTeams
Note: Do not forget to put in your own connection string (inside “ ”).
After this command is executed successfully, you’ll see that a Models folder has been created and contains two class files: myTestDBContext.cs and IplTeams.cs. We have successfully created our Models using EF core database’s first approach.
Now, we will create one more class file to handle database related operations.
Right click on the Models folder and select Add >> Class. Name your class TeamDataAccessLa_y_er.cs and click the Add button. At this point in time, the Models folder will have the following structure.
Open TeamDataAccessLayer.cs and put in the following code to handle database operations:
using Microsoft.EntityFrameworkCore; using System; using System.Collections.Generic; using System.Linq; using System.Threading.Tasks; namespace IPLPollDemo.Models { public class TeamDataAccessLayer { myTestDBContext db = new myTestDBContext(); //To get the list of all teams from database public IEnumerable<IplTeams> GetAllTeams() { try { return db.IplTeams.ToList(); } catch { throw; } } //To update the vote count of a team by one public int RecordVote(IplTeams iplTeam) { try { db.Database.ExecuteSqlCommand("update IplTeams set VoteCount = VoteCount + 1 where TeamID = {0}", parameters: iplTeam.TeamId); return 1; } catch { throw; } } //To get the total votes count public int GetTotalVoteCount() { try { return db.IplTeams.Sum(t => t.VoteCount); } catch { throw; } } } }
In this class we have defined three methods.
- GetAllTeams — To get the list of all eight teams from the database.
- RecordVote — To update the vote count for each team after the user submits their vote.
- GetTotalVoteCount — To get the sum of votes of all the teams.
Now we will create our web API controller.
Adding the web API controller to the application
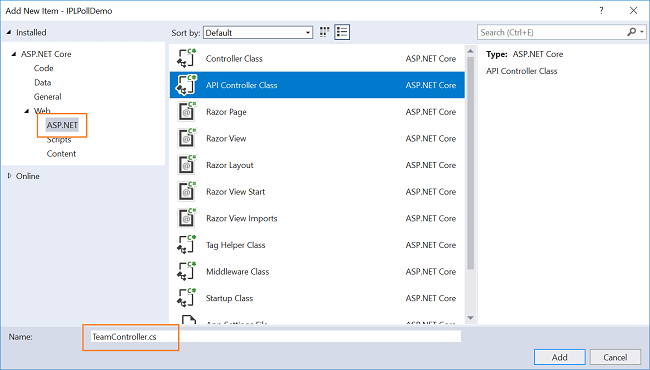
Right click on the Controllers folder and select Add >> New Item.
An “Add New Item” dialog box will open. Select ASP.NET from the left panel, then select “Web API Controller Class” from the templates panel and name it TeamController.cs. Click Add.
This will create our Web API TeamController class. We will put all our business logic in this controller. We will call the methods of TeamDataAccessLayer to fetch data and pass on the data to the Angular frontend.
Open the TeamController.cs file and put the following code into it.
using System; using System.Collections.Generic; using System.Linq; using System.Threading.Tasks; using IPLPollDemo.Models; using Microsoft.AspNetCore.Mvc; namespace IPLPollDemo.Controllers { [Route("api/Team")] public class TeamController : Controller { TeamDataAccessLayer objTeam = new TeamDataAccessLayer(); [HttpGet] [Route("GetTeamList")] public IEnumerable<IplTeams> GetTeamList() { return objTeam.GetAllTeams(); } [HttpGet] [Route("TotalVotes")] public int TotalVotes() { return objTeam.GetTotalVoteCount(); } [HttpPut] [Route("UpdateVoteCount")] public int UpdateVoteCount([FromBody] IplTeams team) { return objTeam.RecordVote(team); } } }
Create the Angular service
We will create an Angular service that will convert the Web API response to JSON and pass it to our component. Right click on the ClientApp/app folder and then Add >> New Folder and name the folder as Se_r_vices.
Right click on the Services folder and select Add >> New Item. An “Add New Item” dialog box will open. Select Scripts from the left panel, then select “TypeScript File” from the templates panel. Name it teamservice.service.ts and click Add.
Open the teamservice.service.ts file and put the following code into it.
import { Injectable, Inject } from '@angular/core'; import { Http, Response } from '@angular/http'; import { Observable } from 'rxjs/Observable'; import { Router } from '@angular/router'; import 'rxjs/add/operator/map'; import 'rxjs/add/operator/catch'; import 'rxjs/add/observable/throw'; @Injectable() export class TeamService { myAppUrl: string = ""; constructor(private _http: Http, @Inject('BASE_URL') baseUrl: string) { this.myAppUrl = baseUrl; } getTeams() { return this._http.get(this.myAppUrl + 'api/Team/GetTeamList') .map((response: Response) => response.json()) .catch(this.errorHandler); } getTotalVotes() { return this._http.get(this.myAppUrl + 'api/Team/TotalVotes') .map((response: Response) => response.json()) .catch(this.errorHandler); } saveVotes(team) { return this._http.put(this.myAppUrl + 'api/Team/UpdateVoteCount', team) .map((response: Response) => response.json()) .catch(this.errorHandler); } errorHandler(error: Response) { console.log(error); return Observable.throw(error); } }
In the constructor, we are injecting the HTTP service and Base URL of the application to enable web API calls. After that, we have defined three functions to call our Web API and convert the result to JSON format. We will call these functions from our components.
At this point in time, you might get the error “Parameter ‘employee’ implicitly has an ‘any’ type” in the empservice.service.ts file. If you encounter this issue, then add the following line inside the tsconfig.jsonfile:
“noImplicitAny”: false
Now, we will go on to create our components.
Creating Angular components
We will be adding two Angular components to our application:
- Poll component — to display the team names and a corresponding button to vote for the team.
- Result component — to display the poll results.
Right click on the ClientApp/app/components folder and select Add >> New Folder and name the folder Poll.
Right click on the Poll folder and select Add >> New Item. An “Add New Item” dialog box will open. Select Scripts from the left panel, then select “TypeScript File” from templates panel. Name it IPLPoll.component.ts and click Add. This will add a typescript file inside the Poll folder.

Right click on the Poll folder and select Add >> New Item. An “Add New Item” dialog box will open. Select ASP.NET Core from the left panel, then select “HTML Page” from templates panel, and name it IPLPoll.component.html. Click Add. This will add an HTML file inside the Poll folder.
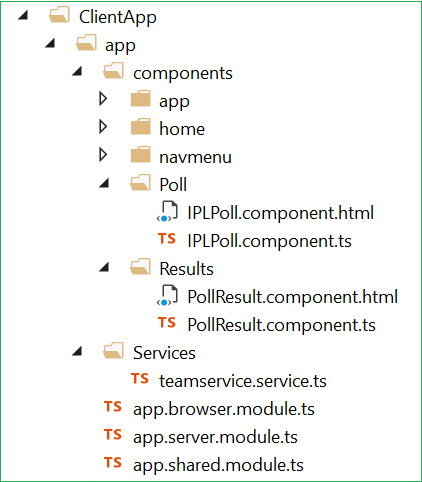
Similarly, create a Results folder inside the ClientApp/app/components folder and add a PollResult.component.ts typescript file and PollResult.component.html HTML file to it.
Now, our ClientApp/app will look like the image below.
Open the IPLPoll.component.ts file and put the following code into it.
import { Component, OnInit } from '@angular/core'; import { Http, Headers } from '@angular/http'; import { PercentPipe } from '@angular/common'; import { Router, ActivatedRoute } from '@angular/router'; import { TeamService } from '../../services/teamservice.service' @Component({ templateUrl: './IPLPoll.component.html', }) export class IPLPoll { public teamList: TeamData[]; constructor(public http: Http, private _teamService: TeamService, private _router: Router) { this.getTeamList(); } getTeamList() { this._teamService.getTeams().subscribe( data => this.teamList = data ) } save(team) { this._teamService.saveVotes(team) .subscribe((data) => { this._router.navigate(['/results']); }) } } export class TeamData { teamId: number; teamName: string; voteCount: number; voteShare: number; }
We have created a class TeamData to hold the details of each team, such as teamId, teamName, voteCount and voteShare. Inside our component class IPLPoll , we have created an array variable teamList of type TeamData.
The getTeamList() method will call the getTeams function of our service TeamService to get the list of teams from the database and assign it to the teamList variable. The getTeamList method is called inside the constructor so that the team data will be displayed as the page loads.
The save method will be invoked when the user votes for their favorite team. This will call the saveVotes function of our service to update the vote count of that particular team. The user will then be redirected to the PollResults component to view the poll results.
Open the IPLPoll.component.html file and put the following code into it.
<h1>Who Will Win IPL 2018 ?</h1> <h3>Vote for your favourite team !!! </h3> <hr /> <p *ngIf="!teamList"><em>Loading...</em></p> <table class='table' *ngIf="teamList"> <thead> <tr> <th>Team Name</th> </tr> </thead> <tbody> <tr *ngFor="let team of teamList"> <td>{{ team.teamName }}</td> <td> <button (click)="save(team)" class="btn btn-primary"> Vote <i class="glyphicon glyphicon-thumbs-up"></i></button> </td> </tr> </tbody> </table>
This HTML page will display the list of teams along with a Vote button next to each team. When the user clicks on any of the vote buttons, it will update the vote count and redirect the user to the PollResults page.
Now open the PollResults.component.ts file and put the following code into it.
import { Component, OnInit } from '@angular/core'; import { Http, Headers } from '@angular/http'; import { PercentPipe } from '@angular/common'; import { Router, ActivatedRoute } from '@angular/router'; import { TeamData } from '../poll/IPLPoll.component'; import { TeamService } from '../../services/teamservice.service'; import { Observable } from 'rxjs/Observable'; import 'rxjs/add/observable/zip'; import { Chart } from 'angular-highcharts'; @Component({ templateUrl: './PollResult.component.html', }) export class PollResult { public chart: any; public totalVotes: number; public resultList: TeamData[]; constructor(public http: Http, private _teamService: TeamService) { Observable.zip(this._teamService.getTotalVotes(), this._teamService.getTeams()) .subscribe(([totalVoteCount, teamListData]) => { this.totalVotes = totalVoteCount; this.resultList = teamListData; for (let i = 0; i < teamListData.length; i++) { teamListData[i].voteShare = (((teamListData[i].voteCount) / this.totalVotes) * 100); } this.createCharts(); }); } createCharts() { this.chart = new Chart({ chart: { type: 'column' }, title: { text: 'Vote share for each team' }, xAxis: { type: 'category', labels: { rotation: -45, style: { fontSize: '13px', fontFamily: 'Verdana, sans-serif' } } }, yAxis: { min: 0, title: { text: 'Percentage of Votes' } }, legend: { enabled: false }, tooltip: { pointFormat: 'Vote: <b>{point.y:.2f} %</b>' }, series: [{ type: 'column', data: [ { name: this.resultList[0].teamName, y: this.resultList[0].voteShare, color: 'rgba(253, 185, 19, 0.85)' }, { name: this.resultList[1].teamName, y: this.resultList[1].voteShare, color: 'rgba(0, 76, 147, 0.85)' }, { name: this.resultList[2].teamName, y: this.resultList[2].voteShare, color: 'rgba(170, 69, 69, 0.85)' }, { name: this.resultList[3].teamName, y: this.resultList[3].voteShare, color: 'rgba(112, 69, 143, 0.85)' }, { name: this.resultList[4].teamName, y: this.resultList[4].voteShare, color: 'rgba(0, 93, 160, 0.85)' }, { name: this.resultList[5].teamName, y: this.resultList[5].voteShare, color: 'rgba(45, 77, 157, 0.85)' }, { name: this.resultList[6].teamName, y: this.resultList[6].voteShare, color: 'rgba(0, 0, 0, 0.85)' }, { name: this.resultList[7].teamName, y: this.resultList[7].voteShare, color: 'rgba(251, 100, 62, 0.85)' } ], }] }); } }
We are fetching the updated list of team data from the database and the total count of votes for all the teams. We will then calculate the vote share of each team and invoke the createCharts() method to create the chart for the poll results.
The percentage of vote share for each team is calculated by dividing the vote obtained by each team with the total number of votes. We are doing all these operations in our constructor to display the result as the page loads.
The createCharts() method will create the column chart with the help of the Highcharts library. The percentage of votes is selected as the Y-axis and the team name is selected as the X-axis. To make things interesting, we are setting the color of each column as the corresponding team jersey color.
Open the PollResults.component.html file and put the following code into it:
<h2>Your vote has been registered successfully !!! </h2> <h3>Here are voting results </h3> <hr /> <p><b>Total votes </b> : {{totalVotes}}</p> <div [chart]="chart"></div>
This HTML page is simple. We are displaying the voting results as a column chart. Just above the chart, we are also displaying the total number of votes.
Defining a route and navigation menu for our application
Open the /app/app.shared.module.ts file and put the following code into it.
import { NgModule } from '@angular/core'; import { CommonModule } from '@angular/common'; import { FormsModule } from '@angular/forms'; import { HttpModule } from '@angular/http'; import { RouterModule } from '@angular/router'; import { ChartModule } from 'angular-highcharts'; import { TeamService } from './services/teamservice.service' import { AppComponent } from './components/app/app.component'; import { NavMenuComponent } from './components/navmenu/navmenu.component'; import { HomeComponent } from './components/home/home.component'; import { IPLPoll } from './components/Poll/IPLPoll.component'; import { PollResult } from './components/Results/PollResult.component'; @NgModule({ declarations: [ AppComponent, NavMenuComponent, HomeComponent, IPLPoll, PollResult ], imports: [ CommonModule, HttpModule, FormsModule, ChartModule, RouterModule.forRoot([ { path: '', redirectTo: 'home', pathMatch: 'full' }, { path: 'home', component: HomeComponent }, { path: 'poll', component: IPLPoll }, { path: 'results', component: PollResult }, { path: '**', redirectTo: 'home' } ]) ], providers: [TeamService] }) export class AppModuleShared { }
Here we have also imported all our components and defined the route for our application as below:
- home — which will redirect to the Home component
- poll — redirects to the IPLPoll component
- results — redirects to the PollResults component
Lastly, we need to define the navigation menu for our application. Open the /app/components/navmenu/navmenu.component.html file and put the following code into it:
<div class='main-nav'> <div class='navbar navbar-inverse'> <div class='navbar-header'> <button type='button' class='navbar-toggle' data-toggle='collapse' data-target='.navbar-collapse'> <span class='sr-only'>Toggle navigation</span> <span class='icon-bar'></span> <span class='icon-bar'></span> <span class='icon-bar'></span> </button> <a class='navbar-brand' [routerLink]="['/home']">IPLPollDemo</a> </div> <div class='clearfix'></div> <div class='navbar-collapse collapse'> <ul class='nav navbar-nav'> <li [routerLinkActive]="['link-active']"> <a [routerLink]="['/home']"> <span class='glyphicon glyphicon-home'></span> Home </a> </li> <li [routerLinkActive]="['link-active']"> <a [routerLink]="['/poll']"> <span class='glyphicon glyphicon-th-list'></span> Ipl Poll </a> </li> </ul> </div> </div> </div>
And that’s it. We have created our IPL Poll application using Angular 5 and the Entity Framework core.
Execution demo
Press F5 to launch the application.
A web page will open as shown in the image below. You can see the URL showing the route for our home component, and the navigation menu on the left showing the navigation link for the Ipl Poll page.
Click on IPL Poll in the navigaton menu. It will redirect tothe Poll component showing all the team names along with a vote button next to them. Notice the URL has “/Poll” in it.
Click on the vote button to vote for your favorite team. You will be redirected to the results page showing the poll results as a column chart.
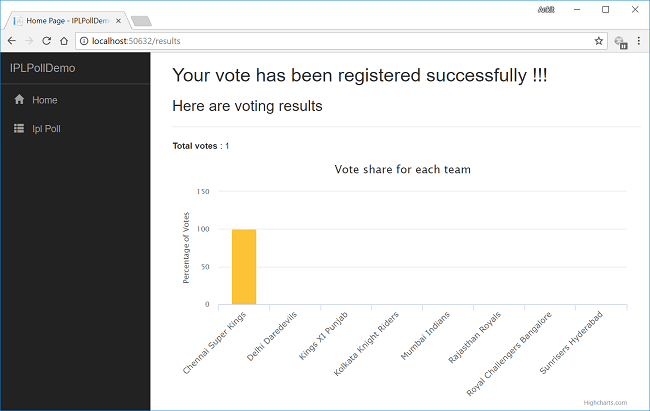
Since this is the first vote, it is showing 100% for one team and 0% for others. After submitting a few votes for all the teams, we will get the voting results chart as shown below.
Conclusion
We have created an online poll using ASP.NET Core, Angular 5, and the Entity Framework core database first approach with the help of Visual Studio 2017 and SQL Server 2014. We also created a column chart using Highcharts to display the poll results.
Get the source code from Github and play around. Do not forget to put in your own connection string before executing the code.
You can also find this article at C# Corner.
You can check out my other articles on Angular 5 here
See Also
- ASP.NET Core — CRUD With React.js And Entity Framework Core
- ASP.NET Core — CRUD Using Blazor And Entity Framework Core
- ASP.NET Core — CRUD Using Angular 5 And Entity Framework Core
- CRUD Operations With ASP.NET Core Using Angular 5 and ADO.NET
- Getting Started With Angular 5 Using Visual Studio Code
- CRUD Operation With ASP.NET Core MVC using Visual Studio Code and ADO.NET
Originally published at ankitsharmablogs.com on May 3, 2018.