
By Shen Huang
In this tutorial, we will go through how to create a group of festival lanterns that arrange themselves into the words you choose. An online demo can be found here.
This tutorial is a little bit more advanced than my previous tutorials. I am going to assume you can figure out a lot of the rudimentary things on your own. I have also made some tutorials for total beginners, which I have attached in the end as links.
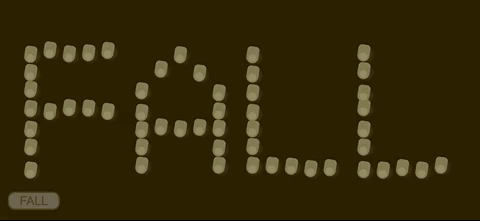 Festival Lanterns Arrange into the Words You Like
Introduction
Since this tutorial is a bit longer, we will go over what you are about to read. First, we will go through how to design a breathing lantern with CSS. After that, we will learn how to dynamically create lanterns through JavaScript. Then we will learn how to create the input box and how to decipher the input text. After that, we will go over some algorithms that arrange the lanterns appropriately. Finally, we will learn about how to animate the lanterns.
Enough said, let’s get started! Before you start you will need a website. If you do not wish to use one of your own, you can copy the code below and save it as an .html file.
<!--Copyright to Shen Huang, you can reach me out at shenhuang@live.ca-->
<!DOCTYPE html>
<meta name = "viewport" content = "width = device-width, initial-scale = 1.0">
<html>
 <head>
  <title>LANTERN DEMO</title>
  <style>
   body {
    background-color : #190f00;
   }
  </style>
 </head>
 <body>
</body>
 <script>
</script>
</html>
1. Designing the Lanterns
We will be using CSS to define the shapes and animations for the lanterns, and then construct them inside the HTML body to test our results.
The lantern consists of 3 parts:
- The Outer Light
- The Lantern Body
- The Inner Light
The Outer Light is placed behind the Lantern Body, and the Inner Light is placed in front of the Lantern Body. These 3 elements are placed within an invisible Lantern object, which is responsible for the shaking left and right animations.
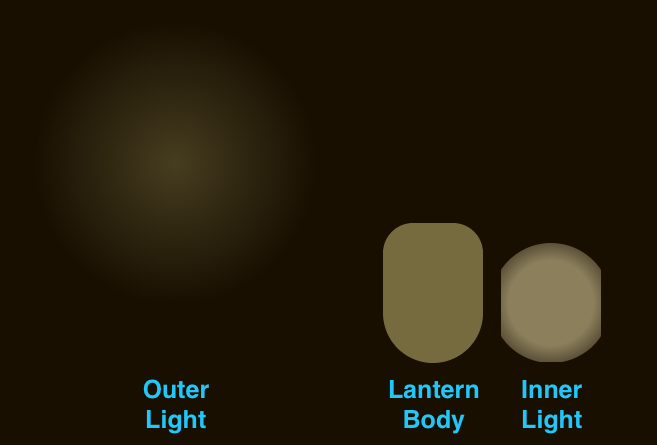 Outer Light, Lantern Body & Inner Light
1.1 Lantern
The Lantern object is essentially an invisible object with the same size as the Lantern Body. It has a pivot at the top center, defining the center of rotation of the pendulum movement. The following CSS code defines the Lantern.
@keyframes shake {
 0% {
  transform : rotate(10deg) scale(1);
 }
 50% {
  transform : rotate(-10deg) scale(1);
 }
 100% {
  transform : rotate(10deg) scale(1);
 }
}
.lantern {
 z-index : 999;
 position : absolute;
 height : 70px;
 width : 50px;
 transform-origin : top center;
 animation : shake 4s ease-in-out infinite;
}
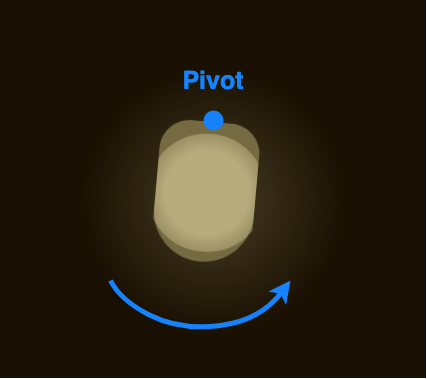 Lantern & Rotational Pivot
1.2 Outer Light
The Outer Light is actually a radial gradient from a bright color to transparency. The animations scale its size to make it breathe. The Outer Light can be defined by the following code:
@keyframes outerlightbreathe {
 0% {
  height : 100px;
  width : 100px;
  top : -10px;
  left : -20px;
 }
 50% {
  height : 200px;
  width : 200px;
  top : -60px;
  left : -70px;
 }
 100% {
  height : 100px;
  width : 100px;
  top : -10px;
  left : -20px;
 }
}
.outerLight {
 z-index : -1;
 position : absolute;
 background-image:
  radial-gradient(rgba(117, 107, 60, 1.0), rgba(117, 107, 60, 0.0), rgba(117, 107, 60, 0.0));
 opacity : 0.5;
 border-radius : 50%;
 animation : outerlightbreathe 3s ease-in-out infinite;
}
1.3 Lantern Body
The Lantern Body is a rectangle with a rounded border, with heavier rounding on the bottom. The Lantern Body can be defined by the following code:
.lanternBody {
 position : absolute;
 background-color : #756b3c;
 height : 70px;
 width : 50px;
 border-radius : 15px 15px 25px 25px;
}
1.4 Inner Light
The Inner Light, similar to the Outer Light, is also a radial gradient from a bright color to transparency, but with a larger bright portion. The animation also chops off the light when it reaches a certain size to make it look like the light is contained by the Lantern Body. The code defining the Inner Light can be found below:
@keyframes innerlightbreathe {
 0% {
  height : 30px;
  width : 30px;
  opacity : 0.1;
  top : 35px;
  left : 10px;
 }
 20% {
  clip-path : inset(0px 0px 0px 0px);
 }
 50% {
  height : 60px;
  width : 60px;
  opacity : 0.5;
  top : 5px;
  left : -5px;
  clip-path : inset(0px 5px 0px 5px);
 }
 80% {
  clip-path : inset(0px 0px 0px 0px);
 }
 100% {
  height : 30px;
  width : 30px;
  opacity : 0.1;
  top : 35px;
  left : 10px;
 }
}
.innerLight {
 position : absolute;
 background-image:
  radial-gradient(rgba(255, 241, 181, 1.0), rgba(255, 241, 181, 1.0), rgba(255, 241, 181, 0.0));
 border-radius : 50%;
 animation : innerlightbreathe 3s ease-in-out infinite;
}
1.5 Lantern Construction
To test our result, we can use the following CSS and HTML code to build a lantern at the center of our HTML page.
CSS:
center {
 position : absolute;
 top : 50%;
 left : 50%;
}
HTML:
<center>
 <div class = "lantern">
  <div class = "outerLight"></div>
  <div class = "lanternBody">
   <div class = "innerLight"></div>
  </div>
 </div>
</center>
A complete demonstration can be found in the CODEPEN below.
2. Creating the Lanterns
Since we’ve learned how to draw and animate a lantern, we can now move onto the JavaScript that creates the lanterns dynamically. In the end of this section, we will also go over how to arrange the lanterns into words.
2.1 Lantern Creation with Java Script
Before we start, we should also change the scale in our lantern animation to make it half as large. The size was okay when trying to show you how a single lantern is constructed, but too large when we want to show batches of them.
@keyframes shake {
 0% {
  transform : rotate(10deg) scale(0.5);
 }
 50% {
  transform : rotate(-10deg) scale(0.5);
 }
 100% {
  transform : rotate(10deg) scale(0.5);
 }
}
Then we can use the following code to dynamically generate lanterns. The brd is just a place holder in case we want to integrate it to other websites. The code creates the lantern in the same sequence of the HTML script we used. There are many other variables inside this code, which will make sense in the upcoming sections.
var brd = document.createElement("DIV");
document.body.insertBefore(brd, document.getElementById("board"));
const speed = 0.5;
const fadeInTime = 3000;
const fadeOutTime = 3000;
var lanterns = [];
function generateLantern(x, y)
{
 var lantern = document.createElement("DIV");
 var ltrBdy = document.createElement("DIV");
 var otrLit = document.createElement("DIV");
 var inrLit = document.createElement("DIV");
 lantern.setAttribute('class', 'lantern');
 ltrBdy.setAttribute('class', 'lanternBody');
 otrLit.setAttribute('class', 'outerLight');
 inrLit.setAttribute('class', 'innerLight');
 ltrBdy.appendChild(inrLit);
 lantern.appendChild(ltrBdy);
 lantern.appendChild(otrLit);
 brd.appendChild(lantern);
 lantern.FIT = fadeInTime;
 lantern.FOT = fadeOutTime;
 lantern.style.opacity = 1.0;
 // 0: ALIVE, 1: DEAD.
 lantern.state = 0;
 lantern.x = x;
 lantern.y = y;
 lantern.bounce = 0;
 lantern.destination = [];
 lantern.destination.x = x;
 lantern.destination.y = y;
 lantern.arrived = true;
 lantern.style.left = lantern.x + "px";
 lantern.style.top = lantern.y + "px";
 if(lanterns == null)
  lanterns = [];
 lanterns.push(lantern);
 return lantern;
}
We can test this code with the following code, which should generate a lantern at x:100, y:100.
generateLantern(100, 100);
2.2 Word Map for Lanterns
Now in order for the lanterns to display a particular word, we will need a map for each alphabet. A lantern word map can be found in this GitHub Gist, which will not be shown here because of the size.
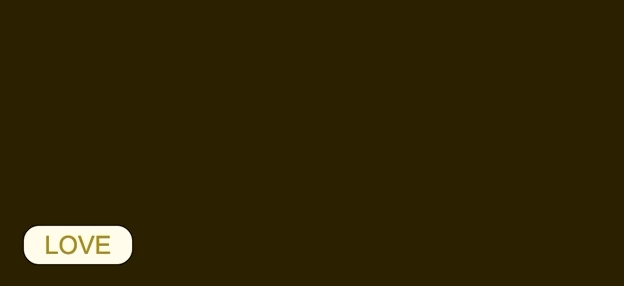
Once done, you can test to see if the word map worked with the code below, which draws the word “LOVE”.
var xstart = 50;
var ystart = 100;
var xspace = 50;
var yspace = 50;
var letter = "L";
for(i = 0; i < ltrMap[letter][0].length; i++)
{
 for(j = 0; j < ltrMap[letter].length; j++)
 {
  if(ltrMap[letter][j][i] == 1)
  {
   generateLantern(xstart + i * xspace, ystart + j * yspace);
  }
 }
}
var xstart = 350;
var letter = "O";
for(i = 0; i < ltrMap[letter][0].length; i++)
{
 for(j = 0; j < ltrMap[letter].length; j++)
 {
  if(ltrMap[letter][j][i] == 1)
  {
   generateLantern(xstart + i * xspace, ystart + j * yspace);
  }
 }
}
var xstart = 650;
var letter = "V";
for(i = 0; i < ltrMap[letter][0].length; i++)
{
 for(j = 0; j < ltrMap[letter].length; j++)
 {
  if(ltrMap[letter][j][i] == 1)
  {
   generateLantern(xstart + i * xspace, ystart + j * yspace);
  }
 }
}
var xstart = 950;
var letter = "E";
for(i = 0; i < ltrMap[letter][0].length; i++)
{
 for(j = 0; j < ltrMap[letter].length; j++)
 {
  if(ltrMap[letter][j][i] == 1)
  {
   generateLantern(xstart + i * xspace, ystart + j * yspace);
  }
 }
}
Check out the CODEPEN demo below:
3. Deciphering Word Inputs
3.1 Creating the Input Box.
The Input Box fades in and takes inputs. Once the inputs have been taken, the lanterns should start to arrange. The Input Box will fade out until the lanterns are fully arranged. In order to accomplish such an effect, we remove the Input Box once it has taken its input and create a Fake Input Box at the same location. We then fade out the Fake Input Box instead.
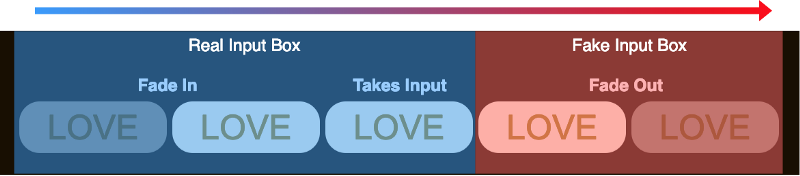 Input Box Mechanisms
To start, first we define the Input Box in HTML, then the style and animations in CSS. For this project our Input Box only accepts 5 upper case letters, and the default contents inside is “LOVE”.
HTML:
<input  id   = "wordBox"
  class  = "wordInput"
  type  = "text"
  maxlength = "5"
  value  = "LOVE"
  onkeypress = "return (event.charCode > 64 && event.charCode < 91)"
>
CSS:
@keyframes fadein {
 0% {
  opacity : 0.0;
 }
 100% {
  opacity : 1.0;
 }
}
@keyframes fadeout {
 0% {
  opacity : 1.0;
 }
 50% {
  opacity : 0.0;
 }
 100% {
  opacity : 0.0;
 }
}
.wordInput, .fakeInput{
 position : absolute;
 bottom : 25px;
 left : 25px;
}
.wordInput {
 height : 30px;
 width : 100px;
 color : #a88600;
 font-size : 25px;
 font-family : Arial;
 text-align : center;
 border : 3px;
 border-radius : 15px;
 border-style : solid;
 background-color : #fff9e5;
 border-color : #fff9e5;
 animation : fadein 1s ease-in;
}
.wordInput:hover,  .wordInput:focus{
 border-color : #a88600;
}
.fakeInput {
 height : 30px;
 width : 100px;
 color : #a88600;
 font-size : 25px;
 font-family : Arial;
 text-align : center;
 border : 3px;
 border-radius : 15px;
 border-style : solid;
 background-color : #fff9e5;
 border-color : #fff9e5;
 animation : fadeout 2s ease-out;
}
Now we should be able to see an Input Box at the bottom right corner of the webpage. We then use the following JavaScript code to make it take inputs. Once the user changes focus, it creates a Fake Input Box with the same input to fade out.
var wordBox = document.getElementById("wordBox");
var word = "";
wordBox.addEventListener("focusout", wordBoxFocusOut);
function wordBoxFocusOut()
{
 word = wordBox.value;
 var fakeBox = document.createElement("DIV");
 fakeBox.setAttribute('class', 'fakeInput');
 fakeBox.textContent = word;
 wordBox.style.display = "none";
 brd.appendChild(fakeBox);
 setTimeout(function(){
  fakeBox.parentNode.removeChild(fakeBox);
 }, 2000);
 arrangeLanterns(word);
 wordBox.addEventListener("focusout", wordBoxFocusOut);
}
We also need to add the following JavaScript to make it fade out after the Enter Key is pressed. The enterPressed is there to prevent the script from executing twice.
window.onkeydown = function(e)
{
 key = e.keyCode;
 if(key == 13)
 {
  wordBox.blur();
 }
};
Once done, we should be able to see an Input Box that fades in, and fades out once the Enter Key is pressed or the box is out of focus.
3.2 Processing the Input
Now that we have the Input Box ready, we should test and see if it can correctly process the input. In order to do so first we append the following code to the end of our wordBoxFocusOut() function.
arrangeLanterns(word);
The we can define our arrangeLanterns() function.
function arrangeLanternsChar(char, charCount)
{
 for(i = 0; i < ltrMap[char][0].length; i++)
 {
  for(j = 0; j < ltrMap[char].length; j++)
  {
   if(ltrMap[char][j][i] == 1)
   {
    generateLantern(xstart + i * xspace + xsplit * charCount, ystart + j * yspace);
   }
  }
 }
}
Once done, we should be able to see something as shown by the following demo, where a batch of lanterns will be printed to match the input.
4. Arranging the Lanterns
Now this part may be a little bit dry. We will not be able to see the effects until we animate the lanterns, and the contents lean towards the theoretical side. But these theories are essential in efficiently creating the cool effects in the end.
We will first go over our problem, and then introduce 2 algorithms that solve the problem in an efficient way. For those who already know, we will be trying to minimize the total distance traveled by the lanterns. In order to do so, we will use a k-d Tree and some Dynamic Programming.
4.2 Shortest Total Distance Calculation
First of all, we have to define our problem. We have some destinations defined by our word inputs, where the lanterns have to end up in those positions to display the word. We would want as many lanterns as destinations, and we will be generating them at random locations on the screen. These lanterns will then fly off to the destinations, but we want the total distances traveled by all the lanterns to be minimal. We also want one lantern per destination.
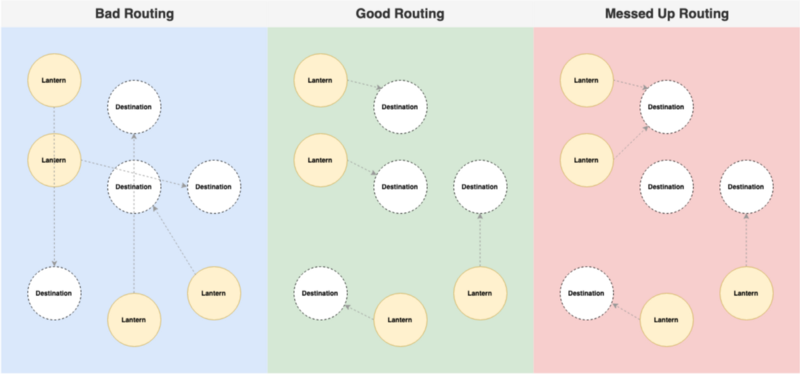 Bad Routing, Good Routing & Messed Up Routing Demonstrated
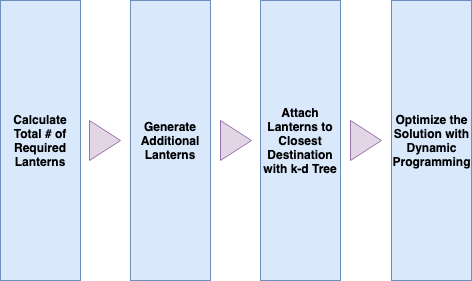
In order to accomplish this, we have to alter our code with the following. The code preforms 4 major operations in sequence:
- Calculate the total number of required lanterns.
- Generate additional lanterns at random locations if there are more required lanterns than we have on the field.
- Set the destination for each lantern to their closest destination with the help of k-d Tree.
- Further optimize the destination of each lantern with Dynamic Programming.
 Steps of Setting the Destination for Lanterns Illustrated
In order to test our code properly, we will have to comment out the parts that we are not there yet. We will go into the details of the code very soon.
var distance = function(a, b){
 return Math.pow(a.x - b.x, 2) +  Math.pow(a.y - b.y, 2);
}
var lanternDesinationTree;
var arrivedCount = 0;
var requiredLanterns = 0;
function arrangeLanterns(word)
{
 requiredLanterns = 0;
 for(c = 0; c < word.length; c++)
 {
  requiredLanterns += ltrMap[word[c]].lanternCount;
 }
 while(lanterns.length < requiredLanterns)
 {
  generateLantern(window.innerWidth * Math.random(), window.innerHeight * Math.random());
 }
 lanternDestinationTree = new kdTree([], distance, ["x", "y"]);
 for(c = 0; c < word.length; c++)
 {
  appendLanternDestinations(word[c], c);
 }
 for(i = 0; i < lanterns.length; i++)
 {
  if(i < requiredLanterns)
  {
   var nearest = lanternDestinationTree.nearest(lanterns[i].destination, 1);
   lanternDestinationTree.remove(nearest[0][0]);
   lanterns[i].destination = nearest[0][0];
   lanterns[i].arrived = false;
  }
  else
  {
   lanterns[i].state = 1;
  }
 }
 optimizeTotalDistance();
}
4.2.1 k-d Tree
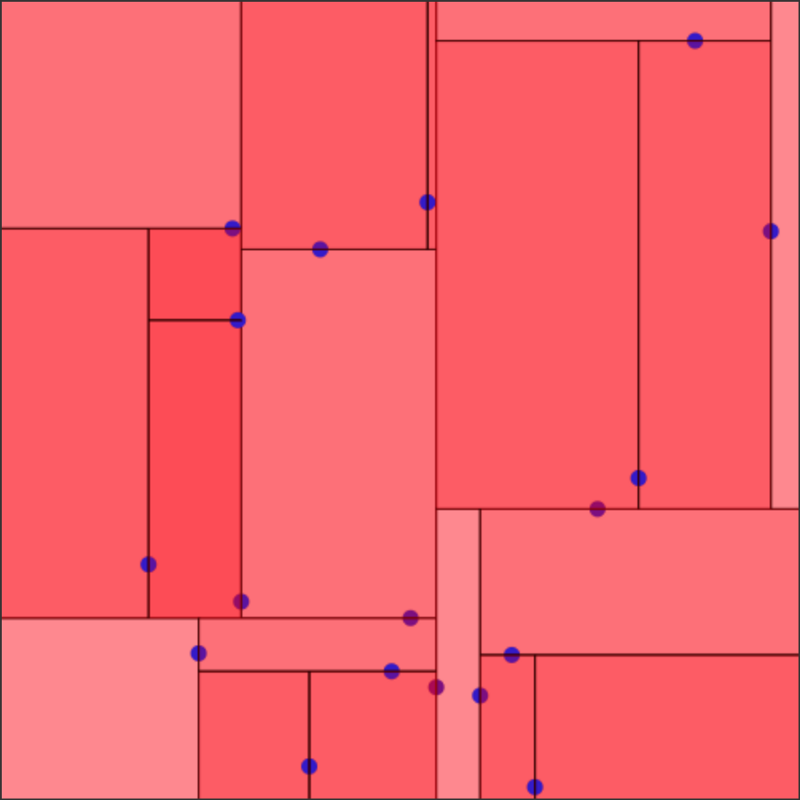
In order to find the shortest total distance, we will need something called the k-d Tree. k-d Tree is a data structure which allows us to map multi-dimensional coordinates and perform actions on them more efficiently. If you are interested in learning about k-d Trees and runtime complexity you can find more about them here.
 Visualization of a k-d Tree
In order to implement the k-d Tree, we will first have to download the k-d Tree from Ubilabs. The .js file can be found here on GitHub and the implementation guides can be found on the main GitHub page here. Once you have it in the same folder with your _._html file, you can reference it with the following HTML scripts:
<script src = "./kdTree.js" type= "text/javascript" ></script>
You can then test to see if your k-d Tree worked with the following code (the 2 returned nearest points should be printed in the console).
var points = [
 {x: 1, y: 2},
 {x: 3, y: 4},
 {x: 5, y: 6},
 {x: 7, y: 8}
];
var distance = function(a, b){
 return Math.pow(a.x - b.x, 2) +  Math.pow(a.y - b.y, 2);
}
var tree = new kdTree(points, distance, ["x", "y"]);
var nearest = tree.nearest({ x: 5, y: 5 }, 2);
console.log(nearest);
 Testing the k-d Tree
And now we can construct our appendLanternDestinations() function with the k-d Tree.
function appendLanternDestinations(char, charCount)
{
 for(i = 0; i < ltrMap[char][0].length; i++)
 {
  for(j = 0; j < ltrMap[char].length; j++)
  {
   if(ltrMap[char][j][i] == 1)
   {
    var destination = {};
    destination.x = xstart + i * xspace + xsplit * charCount;
    destination.y = ystart + j * yspace;
    lanternDestinationTree.insert(destination);
   }
  }
 }
}
To test, we can alter our arrangeLanterns() function to add the following code. We should then see the console printing the nearest distance with the k-d Tree constructed by our word input.
lanternDestinationTree = new kdTree([], distance, ["x", "y"]);
for(c = 0; c < word.length; c++)
{
 appendLanternDestinations(word[c], c);
}
// Test kdTree with Lantern Destinations.
var nearest = lanternDestinationTree.nearest({ x: 200, y: 200 }, 1);
console.log(nearest[0][0]);
 Testing appendLanternDestinations()
Now the code below the append function sets the destination of each lantern to their nearest available destination. For any extra lanterns, their states are set to 1, meaning that they should fade away by the animation controller which we will get to in the next section.
4.2.2 Dynamic Programming
The k-d Tree optimization is good, but not perfect. We will need some Dynamic Programming to ensure the algorithm returns the minimal total distance. Dynamic Programming is the concept where you try to find the optimized solution by incrementally approaching a better state from a previously stored state.
The algorithm we are using is actually similar to Bubble Sort, which can be described by the following:
- We iterate through every pair of lanterns.
- We check to see if swapping the destinations of a pair of lanterns yields a shorter total distance.
- We swap their destinations if the total distance is shorter.
- For lanterns that are _“DEAD”_, their distance to destination is considered as 0, swapping makes the other lantern have a 0 distance to destination.
- Ends when no more swaps can be done to shorten the distance.
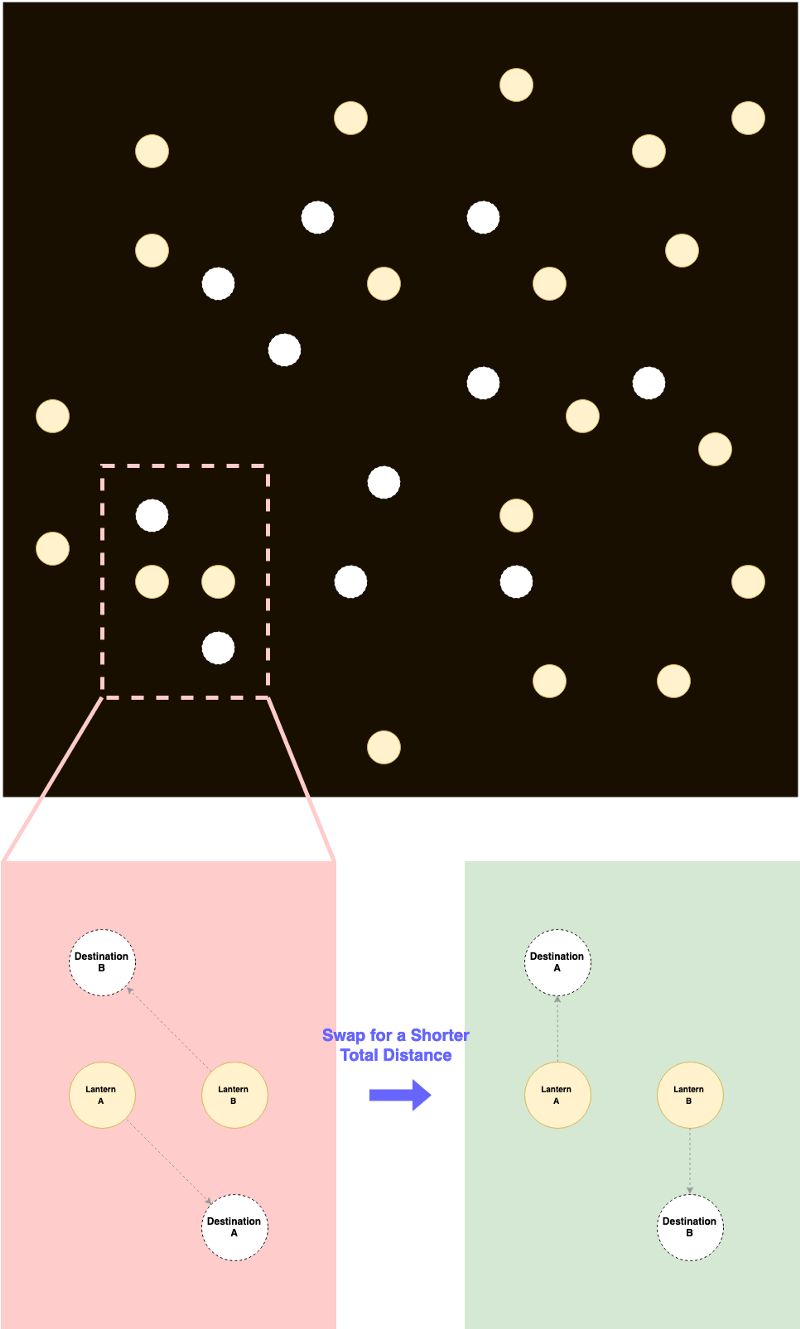 Algorithm Illustrated, Incrementally Swap for Shorter Total Distance
The code implementation to this algorithm can be found below. We also have to deal with their states and arrival status which will be further explained in the next section. Notice that the distance formula is not square rooted, meaning the algorithm will heavily punish longer distances.
function optimizeTotalDistance()
{
 var undone = true;
 while(undone)
 {
  undone = false;
  for(i = 0; i < lanterns.length; i++)
  {
   var lanternA = lanterns[i];
   for(j = 0; j < lanterns.length; j++)
   {
    var lanternB = lanterns[j];
    if(lanternA.state == 0 && lanternB.state == 0)
    {
     var oldDistance = distance(lanternA, lanternA.destination) + distance(lanternB, lanternB.destination);
     var newDistance = distance(lanternA, lanternB.destination) + distance(lanternB, lanternA.destination);
     if(newDistance < oldDistance)
     {
      [lanternA.destination, lanternB.destination] = [lanternB.destination, lanternA.destination];
      undone = true;
     }
    }
    else if(lanternA.state == 0 && lanternB.state == 1)
    {
     var oldDistance = distance(lanternA, lanternA.destination);
     var newDistance = distance(lanternB, lanternA.destination);
     if(newDistance < oldDistance)
     {
      lanternB.destination = {x: lanternA.destination.x, y: lanternA.destination.y};
      lanternA.destination = {x: lanternA.x, y: lanternA.y};
      lanternA.state = 1;
      lanternB.state = 0;
      lanternA.arrived = true;
      lanternB.arrived = false;
      undone = true;
     }
    }
    else if(lanternA.state == 1 && lanternB.state == 0)
    {
     var oldDistance = distance(lanternB, lanternB.destination);
     var newDistance = distance(lanternA, lanternB.destination);
     if(newDistance < oldDistance)
     {
      lanternA.destination = {x: lanternB.destination.x, y: lanternB.destination.y};
      lanternB.destination = {x: lanternB.x, y: lanternB.y};
      lanternA.state = 0;
      lanternB.state = 1;
      lanternA.arrived = false;
      lanternB.arrived = true;
      undone = true;
     }
    }
   }
  }
 }
}
5. Animating the Lanterns
It is finally the last section! We will now complete this project. A lot of the mysteries mentioned in the previous sections will be explained here. Sit tight, the magic show is about to begin.
5.1 Fade In & Fade Out with JavaScript
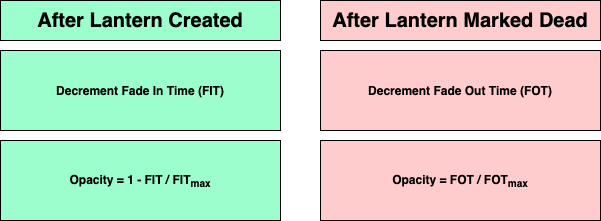
Now in case you were wondering what the lantern.FIT and lantern.FOT does in generateLantern(), here you go: it actually allows the animation controller to fade in the lanterns after creation, and fades it out after it is _“DEAD”_.
Now in order to make this happen, we have to first do some script changes, so that the lanterns will be initially transparent.
We need to change:
lantern.style.opacity = 1.0;
into:
lantern.style.opacity = 0.0;
After that we can construct our animation controller with the code below. The spedFctr defines how fast the lanterns should move. The arivThsh defines how tolerant it is for the program to consider the lantern arrived at its destination. The bonsFctr defines how fast the lantern should bounce up and down, and bonsMrgn defines how wide the bounce is. These parameters will make more sense later.
The animation controller refreshes every 10 milliseconds, resulting in a frame rate of 100fps. Right now, it will slowly decrement the lantern.FIT counter and set the opacity accordingly for newly created lanterns. It’ll do the opposite for lanterns that are dead. Once the lantern.FOT reaches zero for the dead lanterns, it will be removed permanently.
 Fade In & Fade Out Animation Explained
const spedFctr = 0.025;
const arivThsh = 5 * spedFctr;
const bonsFctr = 0.001;
const bonsMrgn = 5;
var before = Date.now();
var id = setInterval(frame, 10);
function frame()
{
 var current = Date.now();
 var deltaTime = current - before;
 before = current;
 for(i in lanterns)
 {
  var lantern = lanterns[i];
  switch(lantern.state)
  {
   case 0:
    if(lantern.FIT > 0)
    {
     lantern.FIT -= deltaTime;
     lantern.style.opacity = 1 - lantern.FIT / fadeOutTime;
    }
    break;
   case 1:
    if(lantern.FOT > 0)
    {
     lantern.FOT -= deltaTime;
     lantern.style.opacity = lantern.FOT / fadeOutTime;
    }
    else
    {
     lantern.parentNode.removeChild(lantern);
     lanterns.splice(i, 1);
    }
    break;
  }
 }
}
5.2 Move Animations
Now in order to animate the lanterns we append the following code under case 1 inside the for loop of the animation controller. The code basically just slowly increments the position of the lanterns towards their destinations. Once the lanterns reach their destination, it will be marked as arrived and the arrive count will be incremented.
var xDiff = lantern.destination.x - lantern.x;
var yDiff = lantern.destination.y - lantern.y;
var dDiff = Math.sqrt(xDiff * xDiff + yDiff * yDiff);
if(!lantern.arrived)
{
 if(Math.abs(dDiff) < arivThsh)
 {
  lantern.arrived = true;
  arrivedCount++;
 }
 else
 {
  lantern.x += xDiff / dDiff * spedFctr * deltaTime;
  lantern.y += yDiff / dDiff * spedFctr * deltaTime;
 }
 lantern.style.left = lantern.x + "px";
}
else
{
 lantern.bounce += bonsFctr * deltaTime;
}
lantern.style.top = lantern.y + Math.sin(lantern.bounce) * bonsMrgn + "px";
We use the following code to check if all the lanterns have arrived every 0.1 seconds. Once all the lanterns have arrived, we bring back the input field again.
var gr = setInterval(check, 100);
function check()
{
 if(arrivedCount == requiredLanterns)
 {
  wordBox.style.display = "inline";
  arrivedCount = 0;
 }
}
function check()
{
 if(arrivedCount == requiredLanterns)
 {
  wordBox.style.display = "inline";
  arrivedCount = 0;
 }
}
Congratulations!!! You have now learned how to create a batch of lanterns that arranges themselves to display the words you like. A demo of the full project can be found here. Hope you have a great Lantern Festival!!!
 Hello World for Lantern Demo
Words In the End
The Chinese Lantern Festival this year is on February 19th. If you live in a small Chinese town, you would see the festival spirit growing throughout the streets. Back in time, this illuminating festival is actually a Chinese equivalent of Valentine’s Day. Boys and girls go out onto the streets hoping to meet their significant other and send hand-crafted lanterns which are believed to grant wishes in the following time of the year.
I have some previous guides on similar projects.
Beginner:
- how to fill your website with lovely VALENTINES HEARTS
- how to add some FIREWORKS to your website
- how to add some BUBBLES to your website
Advanced:
I am passionate about coding and would love to learn new stuff. I believe knowledge can make the world a better place and therefore am self-motivated to share. Let me know if you are interested in reading anything in particular.