
By Kristin Baumann
This tutorials explains how to set up the deployment of a static GatsbyJS project with Heroku and Github. You will learn how to create a staging and production environment for your application so you’re ready for safe continuous deployment.
After finishing this tutorial, …
- ✈️ you will be able to build and deploy a static Gatsby application.
- ? you will be able to trigger automatic deploys to your staging environment by pushing to your git repo. (You can review the staging app and, if suitable, promote it to your production website.)
Requirements:
- Your project will be based on GatsbyJS (a static site generator). You don’t need any knowledge in coding with Gatsby or React, but you should have Node and GatsbyJS installed.
- You will need a Github and Heroku account (both available for free). Git needs to be set up on your machine.
1.) Create a new Gatsby project
First, you need a fresh Gatsby project.
- You can create a new project in the folder
test-projectby executing the following in our console:
gatsby new test-project https://github.com/gatsbyjs/gatsby-starter-hello-world
This creates the essential files for a static Gatsby application from a starter pack. You can start the development server locally by going into the project directory with cd test-project and then running gatsby develop. Your app is now available on localhost:8000.
2.) Set up a git repo
With the project running locally, you can now set up a git repository for your Gatsby project.
- Log into Github and create a new repo.
- Initialise a git repo in your project with:
git init
- Connect your local git repo to your remote repo with:
git remote add origin <remoteURL>
- Make your initial commit of the Gatsby project with:
git add .git commit -m "Initial commit"git push origin master
The changes in your Gatsby project are now tracked with Github, which will provide the trigger to start a deployment later on.
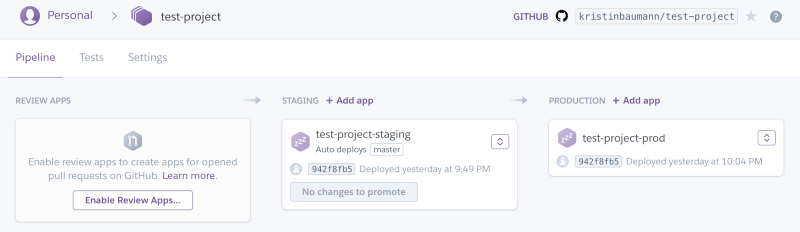
3.) Set up Heroku apps
As a next step, you can configure the continuous deployment environments on Heroku.
- Create a new pipeline called
test-projectin the Heroku app dashboard - Within this pipeline, create a new app for the staging environment called
test-project-stagingand a new app for production calledtest-project-prod - Connect the pipeline (not each app individually) with your previously created Github repo
- Enable automatic deployments from the master branch for the staging app (but not for the production app!)
- Set the buildpacks for both apps to:
"heroku/nodejs"
"https://github.com/heroku/heroku-buildpack-static"
These buildpacks are scripts that run when your app is deployed and are specific for your static Gatsby project. You can configure the static buildpack in the next step.
4.) Prepare your Gatsby project for deployment to Heroku
- After your code is copied to Heroku and the necessary dependencies are installed, the Gatsby project needs to be build and stored in the static /public folder. Therefore add a build script in your
package.jsonfile:
{ // ...
scripts: { // ...
“heroku-postbuild”: “gatsby build”
},
// ...}
- Create a file called
app.jsonin the root directory of your project. This file includes general information required to run an app on Heroku. In our case we state again the usage of the two buildpacks:
{
"buildpacks": [
{ "url": "heroku/nodejs" },
{ "url": "https://github.com/heroku/heroku-buildpack-static" }
]
}
- Create a file called
static.jsonin the root directory of your project. Thestatic.jsonfile is used for the configuration of the static buildpack. You can view more configuration options here. In this case we only define the folder of our built application:
{
"root": "public/"
}
- (Optional) Heroku’s deployment will fail when you have a
package-lock.jsonas well as ayarn.lockfile in your project directory. When this is the case, decide on one. For example, delete thepackage-lock.jsonfile in case you are using yarn.
5.) Test your setup
Congratulations, pretty much done! ?
You can now test your setup by committing the changes from the last step to Github:
git add .git commit -m "Prepared Heroku deployment of Gatsby app"git push origin master
This is should trigger an automatic build and deployment of your Gatsby project to the staging environment. You can then review the staging app and, if suitable, promote it to your production website.
_Thanks for reading this article! Please leave questions or feedback and follow me on Twitter for more JavaScript and React related posts._