
By Gaurav Kaila
Object detection models are some of the most sophisticated deep learning models. They’re capable of localizing and classifying objects in real time both in images and videos. But what good is a model if it cannot be used for production?
Thanks to the wonderful guys at TensorFlow, we have TensorFlow serving that is capable of serving our models in production. There are some really good articles on TensorFlow serving to get you started such as this one and this one.
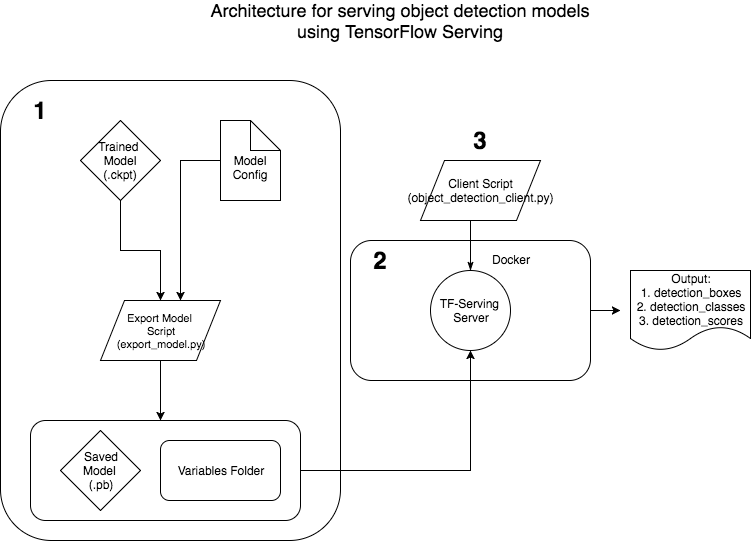
This article will focus on how we can serve Object Detection Models specifically with TF Serving. It is motivated by the lack of a good resource online that explains how to create production-ready object detection models and TF-serving environments using Docker. We’ll also discuss how to serve the model and create a client side script to access it. Our architecture will look something like this:
In the spirit of not reinventing the wheel, I have taken help from resources available in the object detection API for this tutorial. I assume you have cloned the object detection API from TensorFlow — but if not, do the following:
# Clone tensorlfow models repohttps://github.com/tensorflow/models.gitcd models/research/object_detection
1. Create a production ready model for TF-Serving
Assuming you have trained your object detection model using TensorFlow, you will have the following four files saved in your disk:
 Trained model files saved on disk
These files can be used for inference directly. Or we can use _freeze_graph.py_ script to convert the model into a frozen graph consisting of the model architecture and weights in one file. This is useful for testing purposes on your local machine, but is not suitable for a production environment.
To create models ready for serving, we will tweak the exporter.py file available on the object detection API Github. The original script available on the repo does not save the Variables that are required for serving. Use the following exporter.py script instead of the original TensorFlow one.
The following changes have been made to the above exporter.py:
Change to the __write_savedmodel method. This is required, as the original python script does not save variables which are required for serving the model. Now instead of using the _frozen_graphdef, we use the _trained_checkpointprefix that has the weights of the model as variables. (credits to this Github issue)
Change the calling function from _frozen_graphdef to _trained_checkpointprefix by following:
Comment out code that saves files to disk not required during serving:
Now you are all ready to create your model that can be used for serving. The following code can help you achieve that:
Here’s an explanation of that code:
- Each object detection model has a configuration which needs to be passed to the _exportmodel.py. This consists of information regarding the model architecture. For more information, refer to this link.
- The _get_configs_from_pipelinefile method creates a dictionary from the configuration file, and the _create_pipeline_proto_fromconfigs method creates a proto buffer object from this dictionary.
- _inputcheckpoint is the path to model.ckpt of the trained model.
- _model_versionid is an integer for the current version of the model. This is required by TF-serving for the versioning of models.
- _objectdetection.exporter will save the model in the following format:
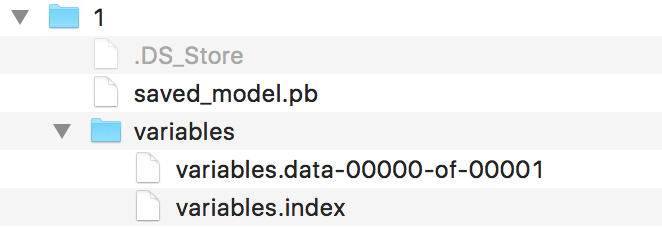 Model ready to be used by TF-Serving
1/ is the model version, _savedmodel.pb. It contains the model architecture, and the variables directory has the weights for the model. This model is ready to be served.
2. Create TF-serving environment using Docker.
About Docker
Docker is a software tool that lets you package software into standardised units for development, shipment and deployment. Docker container image is a lightweight, stand-alone, executable package of a piece of software that includes everything needed to run it: code, runtime, system tools, system libraries, settings.
In short, Docker lets us you isolate your application and its dependancies in a stand-alone package that can be used anywhere and anytime without having to worry about installing code and system dependancies.
Our motivation for using docker for TensorFlow serving is that we can ship our container to run on the cloud and easily scale our service without having to install any dependancies again.
Official documentation of TensorFlow serving describes how to build it from source. It’s good but I (and a lot of the community) had problems compiling it in the docker container. So we will go over the steps one-by-one here.
- Build the container using the official docker image
Assuming you have cloned the official TensorFlow serving repo as described in the last part, you can build the docker image by doing the following:
# Move to the directory of the docker filescd ./serving/tensorflow_serving/tools/docker/
# Build the image (CPU)docker build --pull -t $USER/tensorflow-serving-devel-cpu -f Dockerfile.devel .
or
# Build the image (GPU)docker build --pull -t $USER/tensorflow-serving-devel-gpu -f Dockerfile.devel-gpu .
Before starting the docker container, increase the memory (to 10–12 GBs) and CPUs (to 4–6) available to the container in the preferences section of the docker app. Building TensorFlow serving is a memory-intensive process and the default parameters might not work. Once done, you can start the container like this:
[FOR CPU]docker run -it -p 9000:9000 $USER/tensorflow-serving-devel-cpu /bin/bash
or
[FOR GPU]docker run -it -p 9000:9000 $USER/tensorflow-serving-devel-gpu /bin/bash
In the container, do the following:
[FOR CPU]# Clone the TensorFlow serving Github repo in the containergit clone --recurse-submodules https://github.com/tensorflow/servingcd serving/tensorflow
# Configure TensorFlow./configurecd ..
# Build TensorFlow servingbazel build -c opt --copt=-msse4.1 --copt=-msse4.2 tensorflow_serving/...
or
[FOR GPU]# TensorFlow serving Github repo is already present in the container # so do not need to clone again# Configure TensorFlow with CUDA by accepting (-y) --# with_CUDA_support flagcd serving/tensorflow./configure
# Build TensorFlow serving with CUDA bazel build -c opt --copt=-msse4.1 --copt=-msse4.2 --copt=-mavx --copt=-mavx2 --copt=-mfma --copt=-O3 --copt=/usr/local/cuda tensorflow_serving/...
The build process can take up to an hour depending the host system and docker configuration. Once the build is finished without any errors, you can test if the model server is running:
bazel-bin/tensorflow_serving/model_servers/tensorflow_model_server
The output should look something like this:
Flags:
--port=8500 int32 port to listen on
--enable_batching=false bool enable batching
--batching_parameters_file="" string If non-empty, read an ascii BatchingParameters protobuf from the supplied file name and use the contained values instead of the defaults.
--model_config_file="" string If non-empty, read an ascii ModelServerConfig protobuf from the supplied file name, and serve the models in that file. This config file can be used to specify multiple models to serve and other advanced parameters including non-default version policy. (If used, --model_name, --model_base_path are ignored.)
--model_name="default" string name of model (ignored if --model_config_file flag is set
--model_base_path="" string path to export (ignored if --model_config_file flag is set, otherwise required)
--file_system_poll_wait_seconds=1 int32 interval in seconds between each poll of the file system for new model version
--tensorflow_session_parallelism=0 int64 Number of threads to use for running a Tensorflow session. Auto-configured by default.Note that this option is ignored if --platform_config_file is non-empty.
--platform_config_file="" string If non-empty, read an ascii PlatformConfigMap protobuf from the supplied file name, and use that platform config instead of the Tensorflow platform. (If used, --enable_batching is ignored.)
Your serving environment is now ready to be used. Exit the container and commit the changes in the container to an image. You can do this like so:
- Pressing [Cltr-p] + [Cltr-q] to exit the container
- Find the container Id:
# Find the container Iddocker ps CONTAINER ID IMAGE COMMAND CREATED STATUS PORTS NAMES
- Commit the changes:
# Commit the changes[FOR CPU]docker commit ${CONTAINER ID} $USER/tensorflow-serving-devel-cpu
or
[FOR GPU]docker commit ${CONTAINER ID} $USER/tensorflow-serving-devel-gpu
- Re-enter the container:
docker exec -it ${CONTAINER ID} /bin/bash
Note: For the TensorFlow serving container to access the GPUs on your host system, you need to install nvidia-docker on your system and run the container like this:
nvidia-docker docker run -it -p 9000:9000 $USER/tensorflow-serving-devel-gpu /bin/bash
You can then check your GPU usage inside the container by using the nvidia-smi cmd.
Pre-built Docker images
As I’ve seen on a number of Github issues (see resources), people are unable to compile TensorFlow serving on docker. So I have pre-built docker images for both CPU and GPU support.
You can find them at my Docker Hub page or you can pull the images down like this:
[FOR CPU]docker pull gauravkaila/tf_serving_cpu
or
[FOR GPU]docker pull gauravkaila/tf_serving_gpu
3. Creating a client to request the model server running in the Docker container for inference on a test image
Quick introduction to gRPC (Google Remote Procedure Call) and Protocol Buffers
gRPC (Google’s Remote Procedure Call) is Google’s HTTP2 wrapped RPC protocol. This allows a client running on a computer to access a remote computer, via the computer network, and call a “function” on that remote computer as if the function was local to the client.
TensorFlow serving uses this protocol to serve models for inference. According to the official documentation,
In gRPC a client application can directly call methods on a server application on a different machine as if it was a local object, making it easier for you to create distributed applications and services.
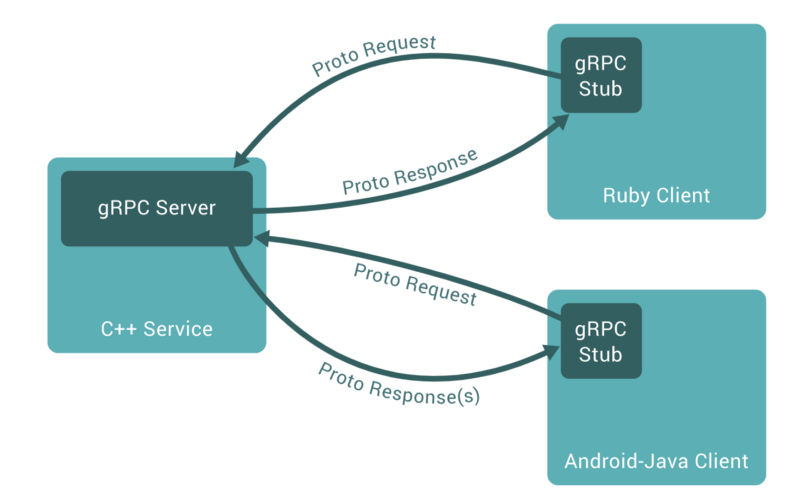 gRPC architecture
Here, the gRPC server is our docker container running the TensorFlow serving service, and our client is in python that requests this service for inference. This article describes how RPC works in a very structured way.
gRPC uses Protocol Buffers to serialise structured data as well as define the parameters and return responses for the callable methods. It is language-neutral and platform-neutral. It has a structured language which then compiles the transport serialisation code into your chosen language to be included in your project. It transmits data in binary format which is smaller and faster compared to good old JSON and XML.
Creating the client
A TensorFlow serving request can be one of three types:
- Classification : Uses classification RPC API that accepts an input tensor (eg. image) and outputs a class and a score.
- Prediction and Regression: Uses prediction RPC API that accepts an input tensor (eg. image) and outputs multiple tensors such as (for object detection) bounding_boxes, classes, scores, etc.
As the problem at hand here is a prediction problem, we will be using the prediction RPC API. For this we need the predict protobuf’s available on the TensorFlow serving github, and we need to convert them into our language-specific code (i.e. Python).
You can do this yourself, or go the easy way and download the python files from this github repo. We will use this protobuf object to create a prediction request in our client.
Template of a Prediction RPC client
Stub is a piece of code that is used to convert parameters during a remote procedure call (RPC). As the client and the server sit in different address spaces, the parameter sent from the client to the server (and vice-versa) needs to be converted so that the remote server computer perceives the RPC as a local function call. The stub used here is the code generated from the predict protobuf as described above.
Launching the TensorFlow serving service
As described in the previous part, our TensorFlow serving service will run in a docker container with ports open to the outside world. Assuming the docker image is available, the container can be started like this:
$ docker run -it -d -P --name tf_serving_cpu -p 3000:3000 gauravkaila/tf_serving_cpu
Here, the port 3000 is open to the world and the client can access the TensorFlow serving service via this port. Export the model directory created in the first part to a folder inside the container:
$ docker cp /path/to/model tf_serving_cpu:/path/to/destination
To run the service, move into the container and start:
# Move to the serving/ directory$ cd serving/
# Start the service$ bazel-bin/tensorflow_serving/model_servers/tensorflow_model_server --port=3000 --model_name=obj_det--model_base_path=/path/to/dest &> obj_det &
Make sure the model_name flag has the same name as specified in the client. The output is logged in obj_det . If all went well, you will be able to see the following output when you type:
$ tail -f obj_det
tensorflow_serving/model_servers/main.cc:288] Running ModelServer at 0.0.0.0:3000 …
The model is being served and is ready to be used by our client.
Visualise bounding boxes on test images
The aim of an object detection model is to visualise the bounding boxes of the located objects on the image. In order to visualise the final image with the bounding boxes, we will use the visualization_utils.py file from the TensorFlow object detection API.
We can access the individual outputs from the result like this:
boxes = result.outputs['detection_boxes'].float_valclasses = result.outputs['detection_classes'].float_valscores = result.outputs['detection_scores'].float_val
This returns protobuf objects that can be fed into the visualization_utils.py file:
image_vis = vis_util.visualize_boxes_and_labels_on_image_array( {input_image}, np.reshape(boxes,[100,4]), np.squeeze(classes).astype(np.int32), np.squeeze(scores), category_index, use_normalized_coordinates=True, line_thickness=8)
The final client script will look like this:
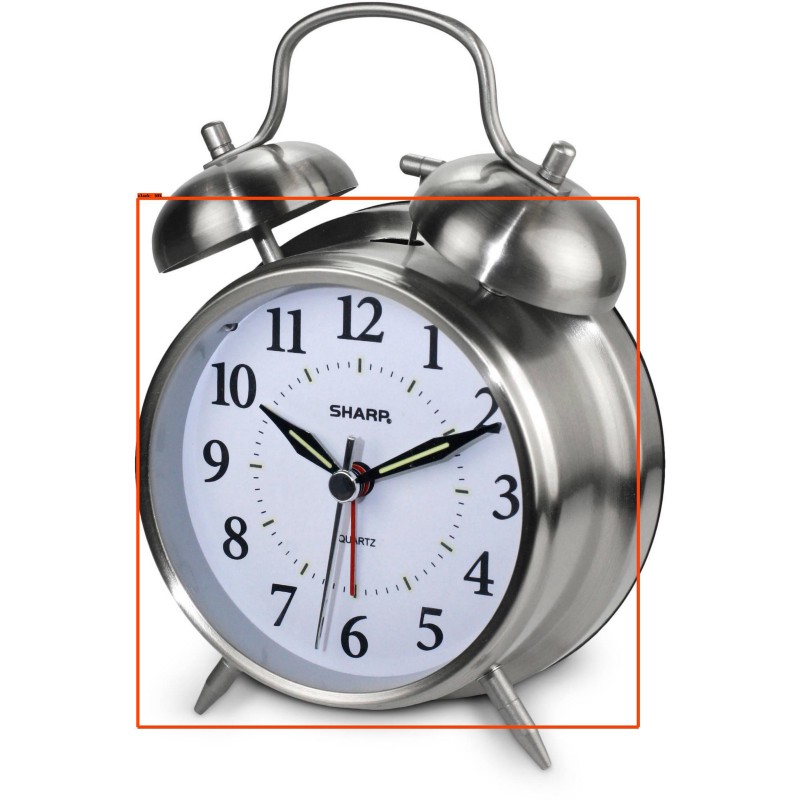
Final Output
Sending in a test image of a clock, our final output should look something like this. Note: the model used here is a faster RCNN pre-trained on COCO dataset for which class number 85 corresponds to a clock.
outputs {key: “detection_boxes”value {dtype: DT_FLOATtensor_shape {dim {size: 1}dim {size: 300}dim {size: 4}}float_val: 0.24750074744224548float_val: 0.17159424722194672float_val: 0.9083144068717957float_val: 0.797699511051178
outputs {key: "detection_classes"value {dtype: DT_FLOATtensor_shape {dim {size: 1}dim {size: 300}}float_val: 85.0
outputs {key: "detection_scores"value {dtype: DT_FLOATtensor_shape {dim {size: 1}dim {size: 300}}float_val: 0.9963208436965942
What have we achieved
We started of with an object detection use-case to demonstrate the power of TensorFlow serving. We exported our trained model to a format expected by TensorFlow serving, compiled TF-serving using Docker, and created a client script that could request the model server for inference.
What does the future hold
- Using this use-case as a template, we can use TensorFlow serving to serve other prediction and classification models.
- We can leverage the GPU version of TensorFlow serving to attain faster inference.
- We can scale our service by deploying multiple docker containers running the TF-serving service.
- You can batch input images instead of sending one image per request.
Resources
Github issues:
- https://github.com/tensorflow/serving/issues/542
- https://github.com/tensorflow/serving/issues/590
- https://github.com/tensorflow/serving/issues/410
- https://github.com/tensorflow/serving/issues/672
- https://github.com/tensorflow/serving/issues/659
About the author: Gaurav is a machine learning engineer at The Dock, Accenture’s premier research and innovation centre in Dublin, Ireland. His interests include building scalable deep learning systems for computer vision applications. Find more at gauravkaila.com