
By Rohit Ramname
Are you a Nodejs developer who loves developing wonderful apps as a hobby but needs some place to show it off?
Are you a person fascinated by Azure and tempted to try it out?
Are you also that person overwhelmed by the configurations that Azure offers?
Well.. today I will be explaining a very simple way to get your app up and running on Azure in a few clicks.
I had published an article about deploying a “cool node app“ to Heroku from Github for free. But now that we have decided to build a “super cool” Node app, we will use another hot cloud service in the market.
Enough of chitchat…now let’s get to the business.
Step 1: Create that super cool Node app
Let’s create that super cool Node app first.
Create a folder on your local machine and give it a name (of your choice), say MySuperCoolApp.
Add a file with the name package.json and paste the below content. This file is basic information of our package. (This can also be created by typing command npm init and accepting all default settings.)
{"name": "supercoolnodeapp","version": "1.0.0","description": "super node app ","main": "app.js","scripts": {"start": "node app.js"},"repository": {"type": "git","url": ""},"author": "","license": "ISC","bugs": {"url": ""},"homepage": ""}
One very important change to notice is this line:
"start": "node app.js"
After the deployment, Azure will run this command to start your application.
Add a file, app.js, and paste the below code. This will be the starting point of our app.
const http = require('http');
const port=process.env.PORT || 3000
const server = http.createServer((req, res) => {
res.statusCode = 200;
res.setHeader('Content-Type', 'text/html');
res.end('<h1>Hello World</h1>');
});
server.listen(port,() => {
console.log(`Server running at port `+port);
});
This code is opening a port on the local server and serving some HTML.
Please note the most important code block here:
const port=process.env.PORT || 3000
This is important when you want to deploy your application to the cloud. The application server is started on a random port on the cloud. If you hard code a port number, like in all Getting Started guides, and deploy to the cloud, the specific port number may not be available. The application will never start. So it’s better to get the port number assigned by the cloud instance and start the HTTP server.
Save the file and run the below command in the command prompt window (which is open inside the folder):
node app.js
With this, Node will start the server and show the below message:
Now, if we open http://localhost:3000/ in the browser, we will see this:
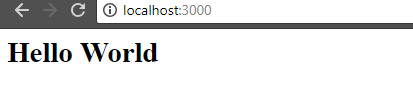
Cool! We created a basic but super cool Nodejs app.
STEP 2: Push to GitHub
Now want to upload our code to GitHub. This way, we will be able to edit our code from anywhere and also deploy the committed changes to the cloud instantly.
Let’s create a Repository on GitHub by clicking New Repository.
Give it a name, some description, and click Create repository:

GitHub will create a repository and give you some commands that you can run locally so that you can clone your local folder with your GitHub repository.
Open command prompt inside your app where the package.json file is located. In the command prompt, run the below commands in this sequence.
- Initialize the Git repository at the root level:
git init
- Add all the files to your local Git (staging). Notice the last dot:
git add .
- Commit your changes to your local Git:
git commit -m “first commit”
- Link to your GitHub repository. (Please change the URL to point to your repository.)
git remote add origin https://github.com/rramname/MySuperCoolNodeApp.git
- And push your change:
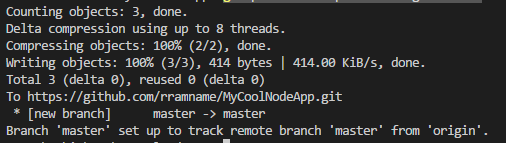
git push — set-upstream origin master
You should see messages like below at the command prompt.
Now if you open GitHub and refresh the repository, you should be able to see the code.
STEP 3: Now, let’s get it up on Azure
This exercise assumes that you have a Microsoft Azure subscription set up and ready for use. If you don’t have one, you can create it for free by going to Microsoft’s Azure website. It will ask you for your credit card information. Your card is never charged unless you purchase paid services (which is not required for this demo).
Open portal.azure.com and login with your credentials.
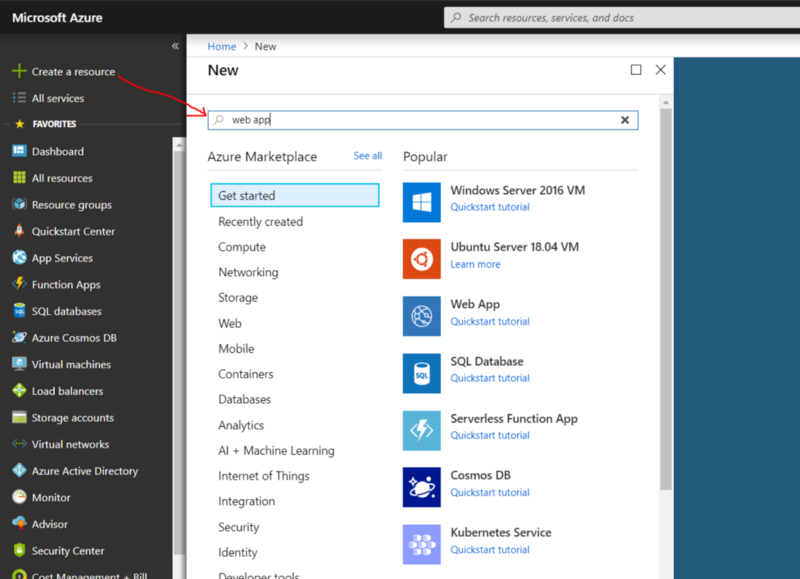
Click Create New Resource on the top left. Enter “web app” in the search box to get the required resource type and hit Enter.
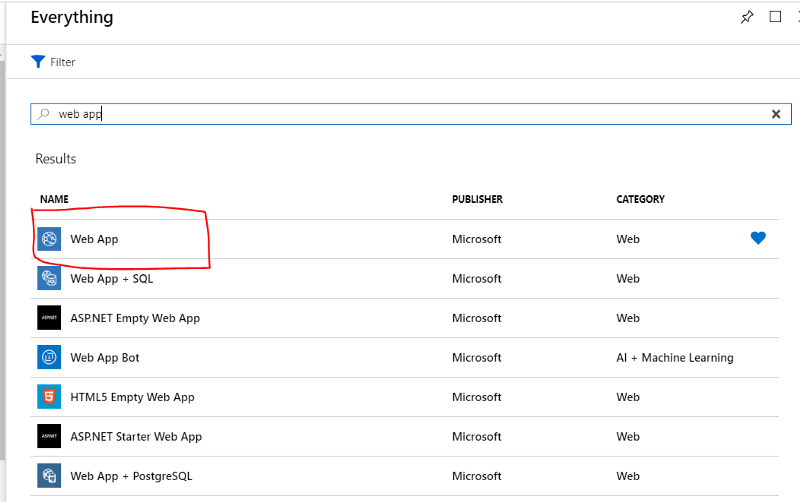
Select Web App from the search results.
And click Create button.
We will be asked to provide some basic information for this App:
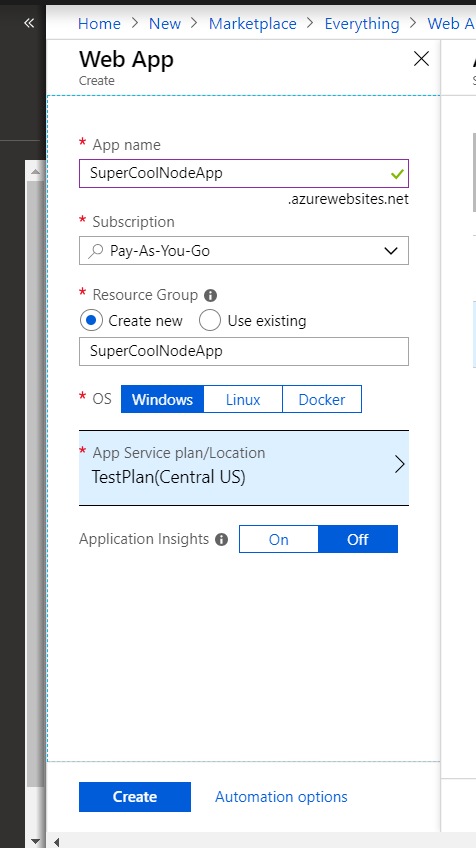
The first box is the name of your app. Which is super easy since its SuperCoolNodeApp :)
The second option is the subscription. I have registered for the “Pay As You Go” subscription since I have already consumed my free trial. You can select your Free Subscription plan here.
Next is the resource group. This is the logical grouping of your apps on Azure. You can create new for this app or use existing ones. I created a new one for this app as SuperCoolNodeApp.
Then, in the end, you will have to select the app service plan. I have created a free plan with the name Test Plan. You can create a new plan if you don’t already have one but make sure you select a Free Version. While selecting, Azure automatically selects S1 tier which is NOT FREE. Make sure you change it to free plan for the demo (Of course, if you want higher capabilities, processing powers etc, go for paid plans.)
Click Create.
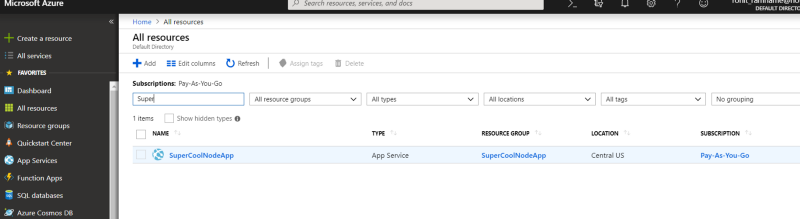
Azure will queue up your request for creating an App with the service plan that you chose and show you a small notification at the top. Creating an app should not take much longer. If you refresh your page in a minute or 2, you should be able to see the app and service plan that was created under all Resources.
Now, click on it to see the details of the app that we just created.
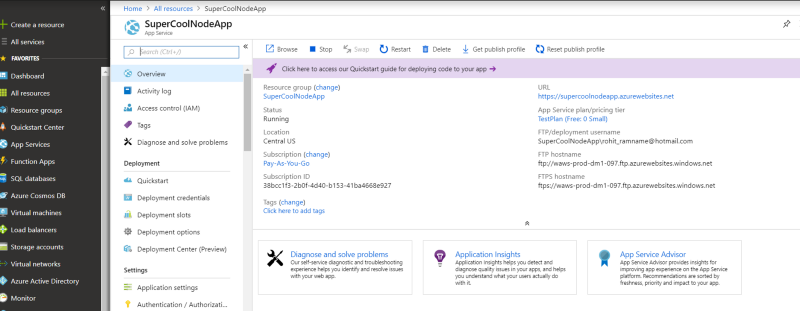
It shows the detail like the subscription the plan is running on, status as Running, Subscription ID, Location on the server that the app is hosted on “Central US” and some FTP details. But the most important thing here is the URL. That is going to be the URL of our application in the cloud.
Now let’s get it there….
A little spoiler alert, :) In this section, we will configuring the deployment strategy for our application.
Scroll down and click on Deployment Options.
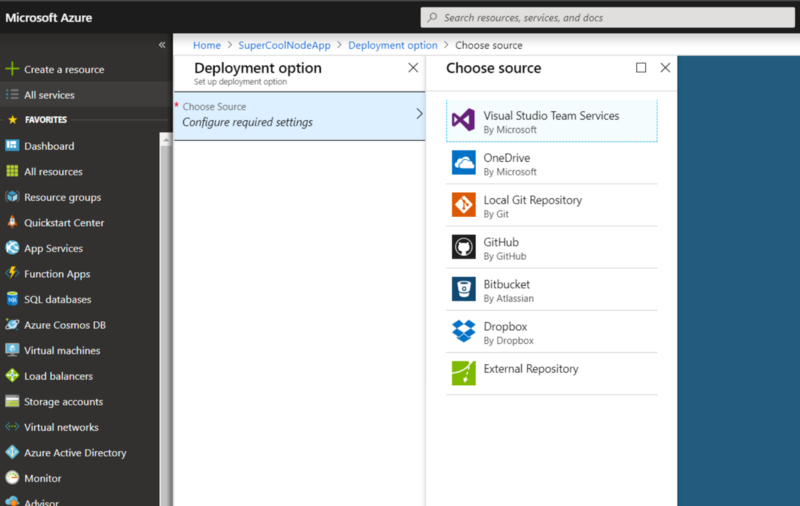
Click on Configure required settings and select GitHub. It should show you the below screen.

Click Choose project. This should show you all the repositories on your GitHub account.
If you are doing this for the first time, you will have to provide Azure the authorization to access your GitHub account.
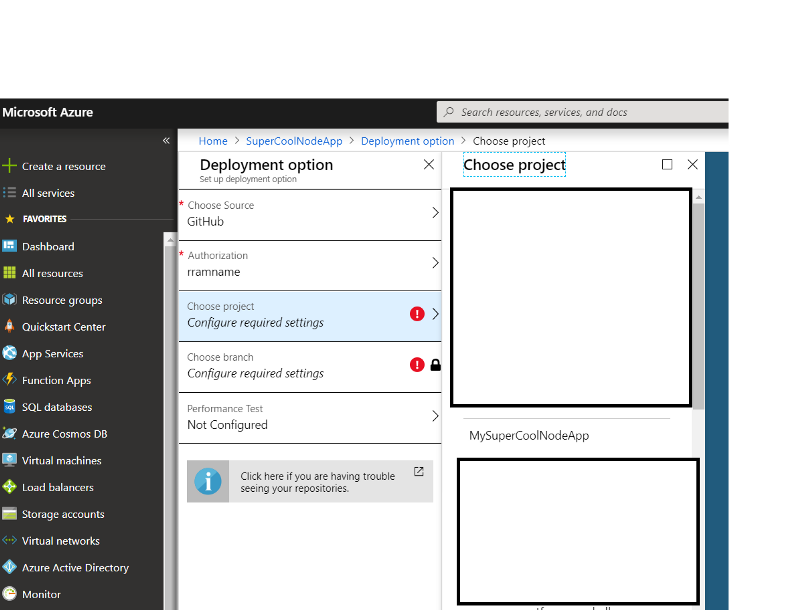
Here you will be selecting that MySuperCoolNodeApp that you pushed to GitHub.
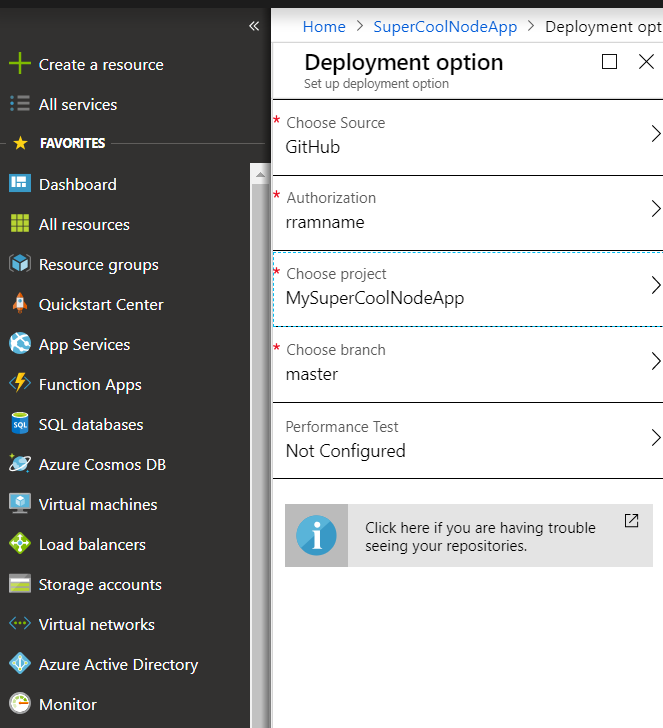
Next, we can select the branch that we want to deploy from.
For now, I only have master so I am leaving the default one.
And that’s it. Click OK.
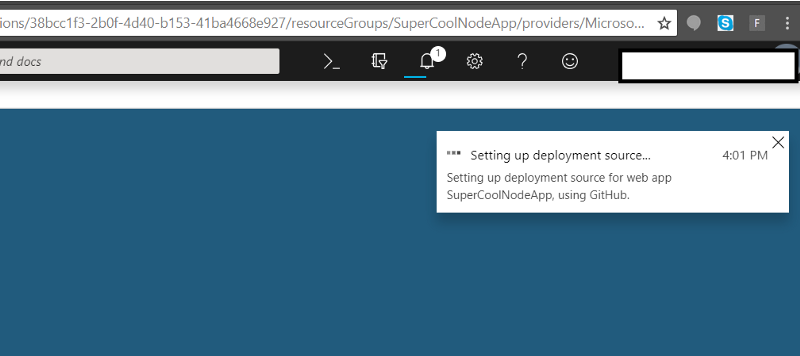
Azure will take care of deploying the app. It will even show you this little notification that Azure is on his way to do this job.
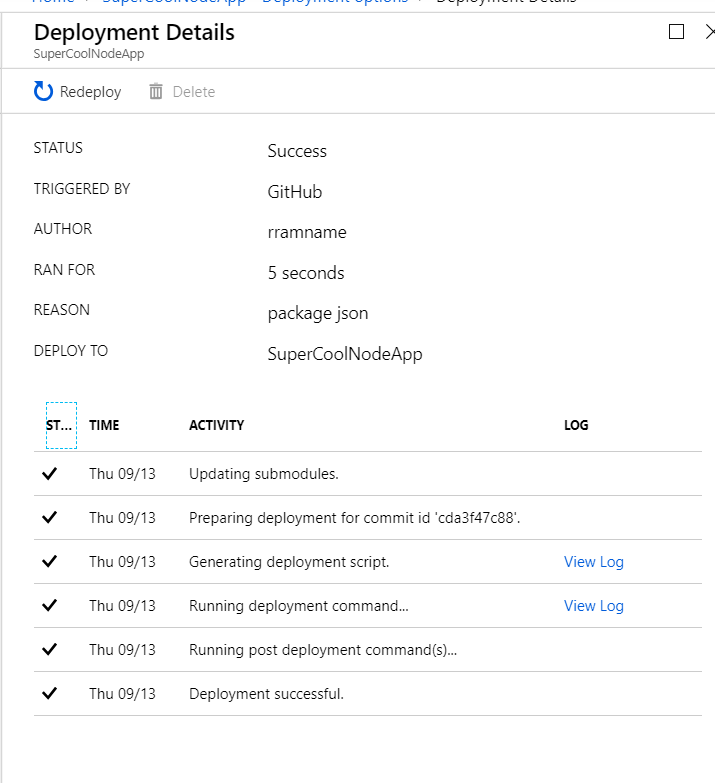
When it’s done (which really shouldn’t take that long), click on the Deployment options again. You should be able to see the last deployment.
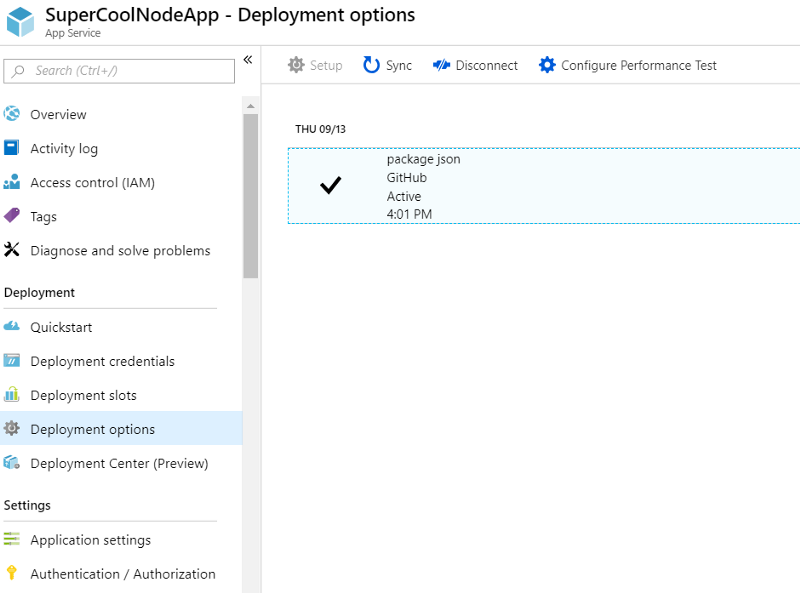
If you click on the record, Azure will even show the log of the deployment event.
Cool. Now, if you open your app by going to the URL mentioned in the overview section https://supercoolnodeapp.azurewebsites.net/, you expect to see the Hello World message but instead you see the error below.
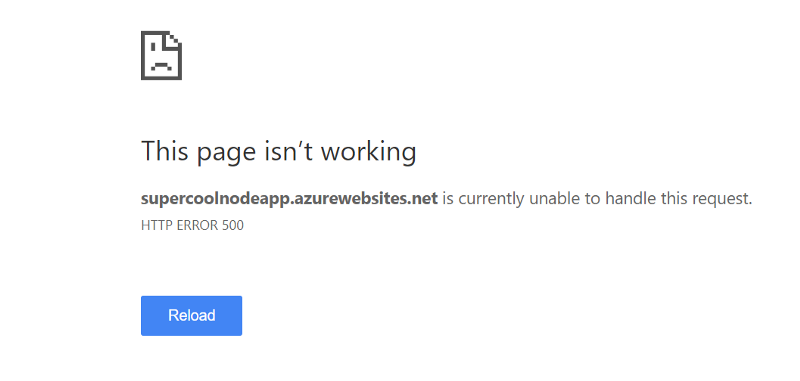
Huh… what is wrong? Logs show that the application was deployed, you don’t see any errors, but the app does not work. It’s a mystery.
There is one small setting that you need to do on the Azure portal to help Azure treat it as a Nodejs app and start it accordingly.
Open the Application Settings and scroll down to the Application Settings section and add the below entry.
App setting name : WEBSITE_NODE_DEFAULT_VERSION
Value: 8.9.0
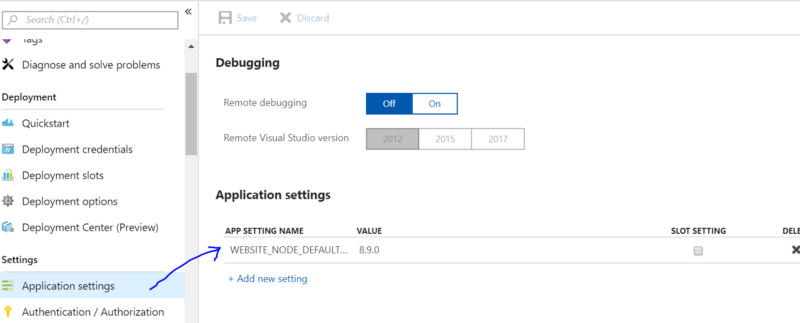
It’s basically telling Azure to use this Node version and open the website.
Click Save at the top.
Now if you go to the URL https://supercoolnodeapp.azurewebsites.net/
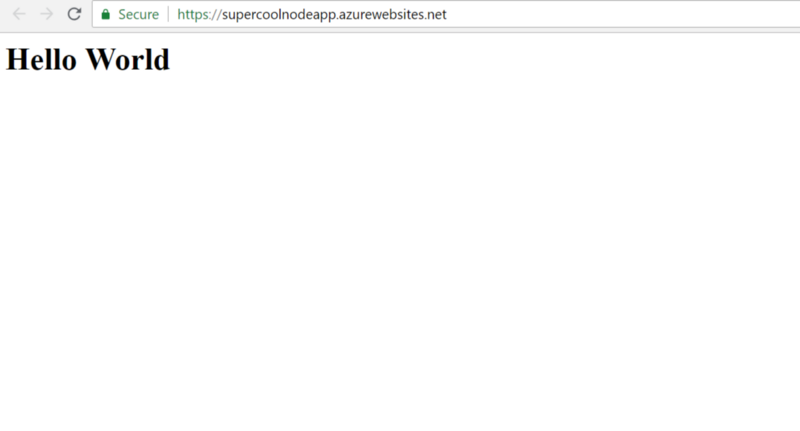
WOOHOO!!! There you go. We just got our super cool Node app up and running in Azure.
Congratulations!! Now every time you make any change to your app and push to GitHub, Azure will catch those and do the continuous deployment.
P.S : If you ever build an app cooler than mine :), then please do share.
If this article helped you , I love applause here and connects on twitter :)
I only write about programming and technology on Twitter.
Have fun!!