By Ranadhir Dey
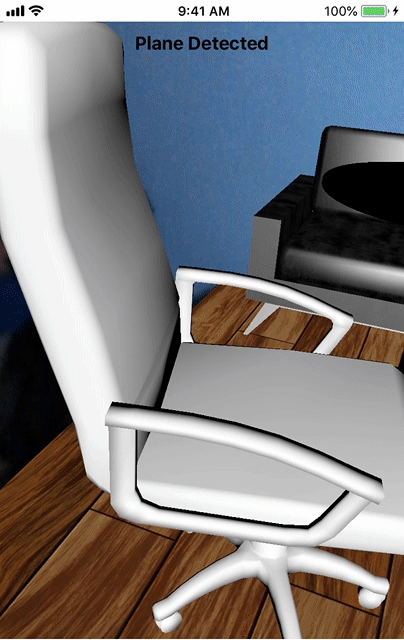
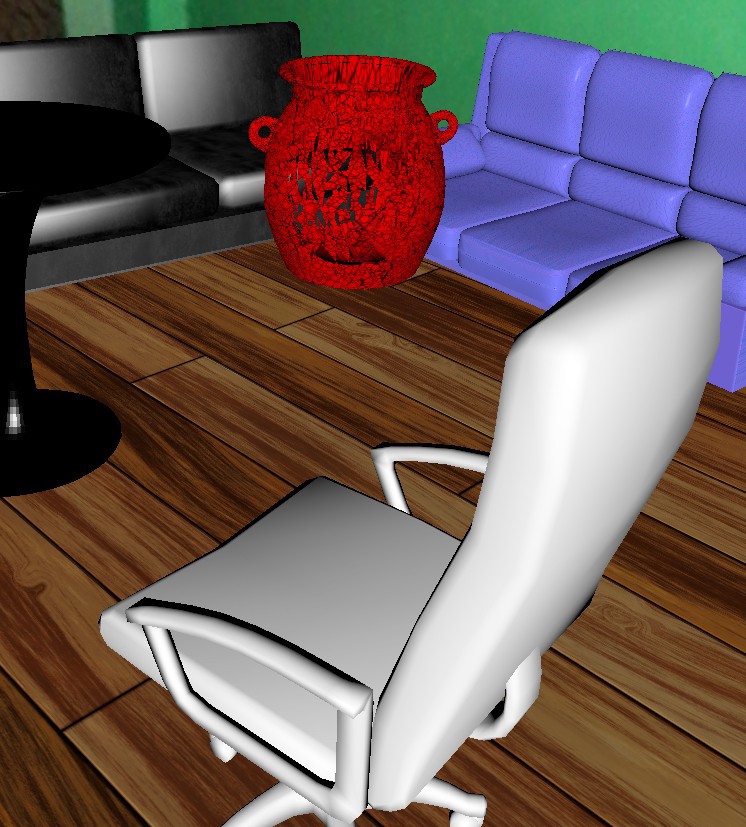
If you’ve read my previous post, you already have a beautiful AR floor in your dining room. That was the first thing we built while learning the basics of AR. And now, it’s time to decorate the room with some cool virtual furniture. At the end of this tutorial, you will have a dining room just like this:
Naming SCNNodes
Let’s get our hands dirty. Fire up Xcode, and open the last project where we decorated our floor. Before viewDidLoad, create a constant floorNodeName.
let floorNodeName = "FloorNode"
We are now going to set the name of the floor node to this constant so that we don’t mix up this node with other furniture nodes. Go to the createFloorNode method and name the floor node.
In line 7 we have just named the floor node — everything else remains the same.
The plan is that, once launched, the app would recognise the floor first and then the user would see through the screen to determine where they want to place the furniture. They would tap on the location and a piece of furniture would sit just there. To achieve this, we need a correlation between the points on screen and the real-world locations. Thankfully, Apple has made this process quite simple.
Gestures and HitTests
An active AR session keeps on finding nearby objects/planes. Once a new object/plane is found, it places AR anchors on top of it. To find exactly on which anchors user has tapped, we need the help of HitTest. HitTest works like this:
- a logical ray is shot from the point of touch to the anchors on the plane
- all the anchors the ray passes through are stored in an array in the format of HitTestResult.
Each HitTestResult contains the information of the real-world surface of an AR anchor. We will use this HitTestResult information to place our furniture.
Let’s create a method that adds the tap gesture to our sceneView to interact with the user. We’ll call this method from viewDidLoad.
Now define the “tapped” method to get the location of the tap and place a furniture there. For now, we print to test if the HitTest is working fine.
In the first line, we are casting tap gesture’s view to ARSCNView. As we know that the tap will come from our sceneView itself, we force-unwrap it. Then we get the location on sceneView where user has tapped. Then a HitTest is performed to get all the HitTestResults from the tapped location to the real-world anchors. “.existingPlaneUsingExtent” gives the estimated size of the detected planes. Now, we check if the user actually has tapped on a detected plane or somewhere else, and we print accordingly.
Now run the app, wait until the world origin loads and the floor is detected. Then tap on the screen to check if we are hitting the planes correctly.
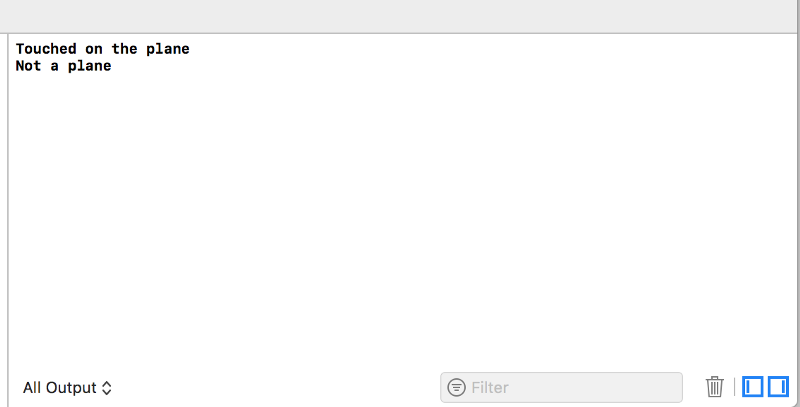
If you tap on the places where the tiles are located, it will print “Touched on the plane.” Touch anywhere else, and it will be “Not a plane.” If there’s no output in the console, you haven’t called the addTapGesture method from viewDidLoad (this happed to me!). Now that we have successfully detected the clicked position, it’s time to bring home some furniture.
Importing 3D models to the project
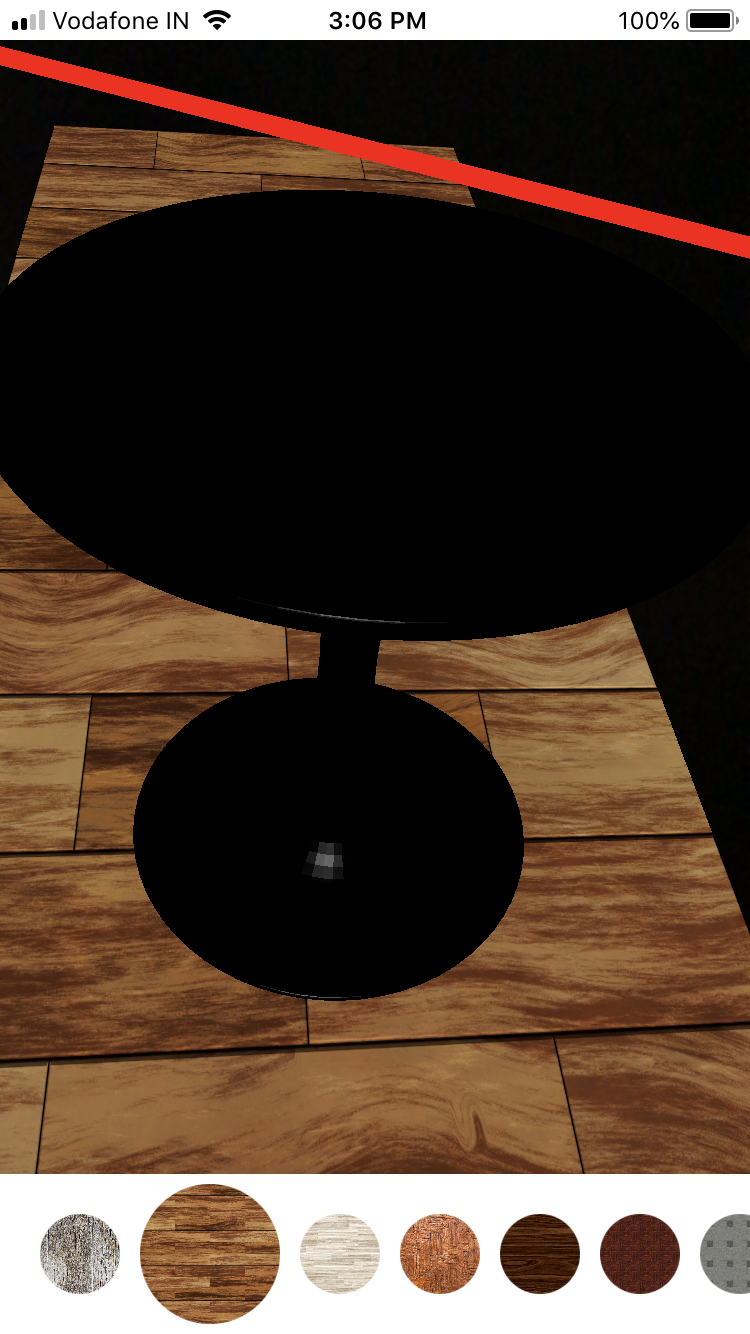
We need some 3D furniture models. I use turbosquid, which is a great repository of 3D models. You need to create a free account there to access their free models. I’ve downloaded a 3D table for now (in the GitHub repo — I’ll add some more furniture as well).
Apple advises you to use collada-formatted(.dae) models in SceneKit. I have used other kinds of models as well in the past, and I have faced problems in many cases. Mostly, if there is a glass, SceneKit tends to make it solid. So, let’s find 3D models with a .dae extension.
Now add an asset folder under the “Home Decor” group.
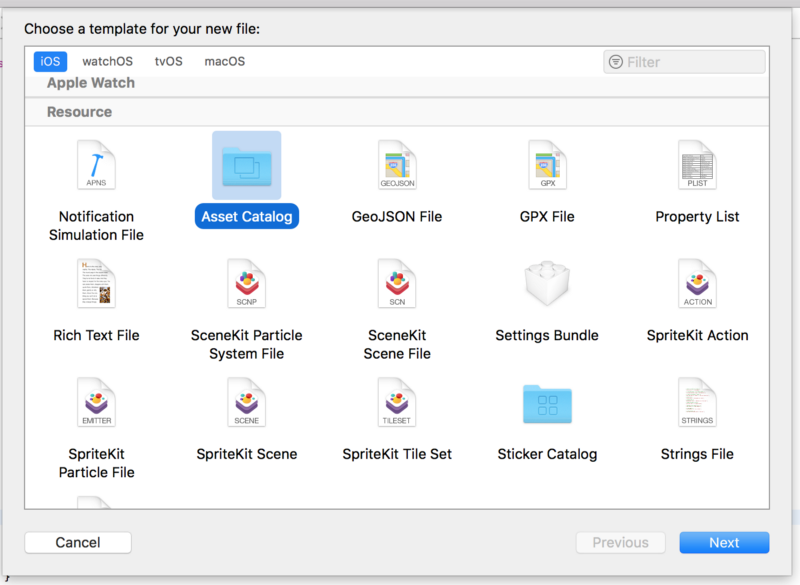
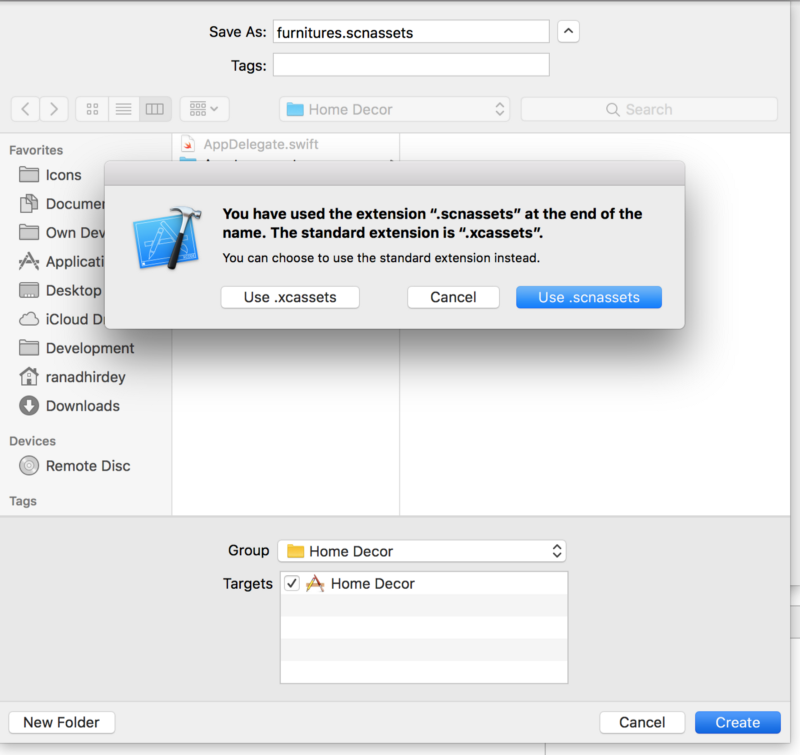
Press next, and in the save dialog, save it as furnitures.scnassets and not xcassets.
Working with Xcode SceneKit Editor
All scene files or models that will be used by SceneKit should reside in a scnassets folder. Now drag and drop the table we just downloaded to the scnassets folder and rename it as “Table”. Click on the Table.dae file (if not already opened) to open it in SceneKit Editor. On the bottom left corner there is a button (marked with a red ellipse below) to open Scene Graph View. Click on it and the editor should appear like below.
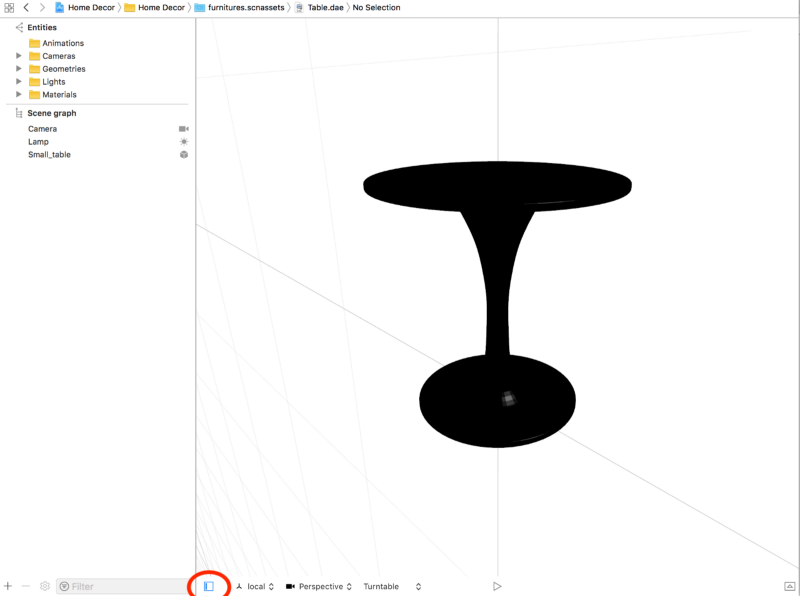
In the Scene Graph there are 3 nodes: a Camera, a light source (Lamp) and the table (Small_table). ARKit has its default camera, so we don’t need this camera anymore. As we will be using sceneView’s default lighting, we don’t need the Lamp either. Remove both of them.
Let’s rename “Small_table” to “Table”, same as the file name. Now the scene graph will look like this:
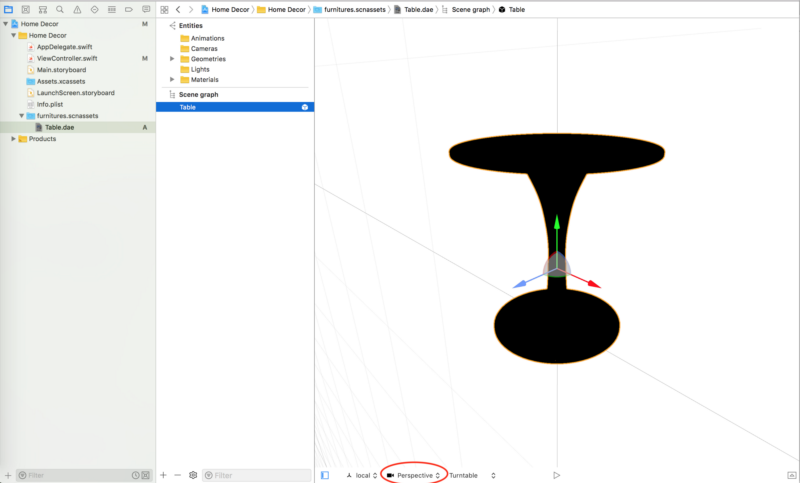
There is something called point of view (marked with a red ellipse above) in the editor which determines how the object will look from a certain point of view. By default, it’s set to Perspective, but we will be seeing the table from the front. So change the point of view to Front.
Oops — it looks like we can see only the top view. Clearly, this isn’t how we would like to see it. We want to see the table as it was shown in the perspective view. Let’s fix this.
Select the Table node, open the Utilities tab (right-top corner button in Xcode) and click on the node inspector(the cube icon). You should see the below window.
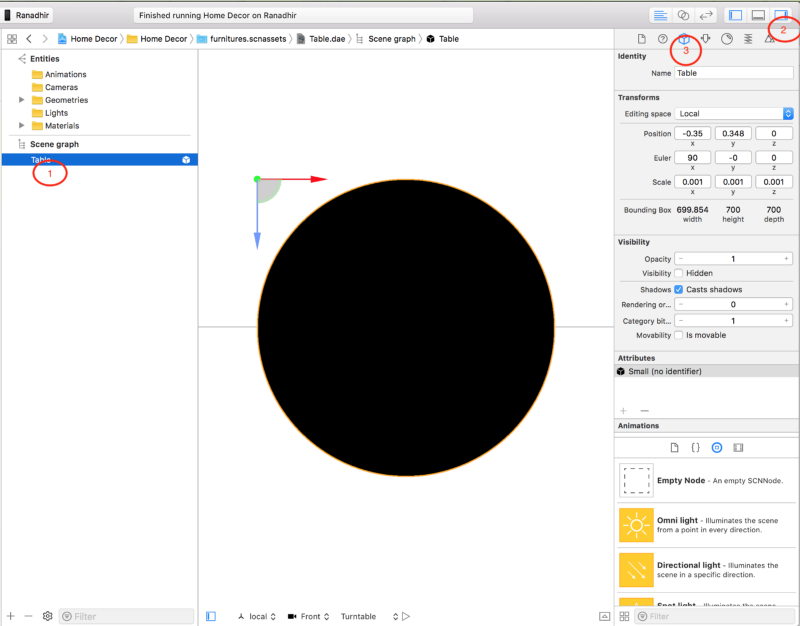
I’ve numbered the steps for your reference. To view the complete table from the front, we need to rotate the table on its X axis. If you can recollect, we did same kind of thing in the first post where we rotated the capsule on its Z axis by changing its Euler angle.
If you see the Transforms matrix, the Euler angle for X is already specified to 90 degree radians, which is causing the table to be rotated incorrectly. Make it zero and the rotation will be fixed. But the positioning has a vector of (-0.35,0.348,0). We will make it (0,0,0) to place the table exactly where the user will tap. Now the Transform will look like this:
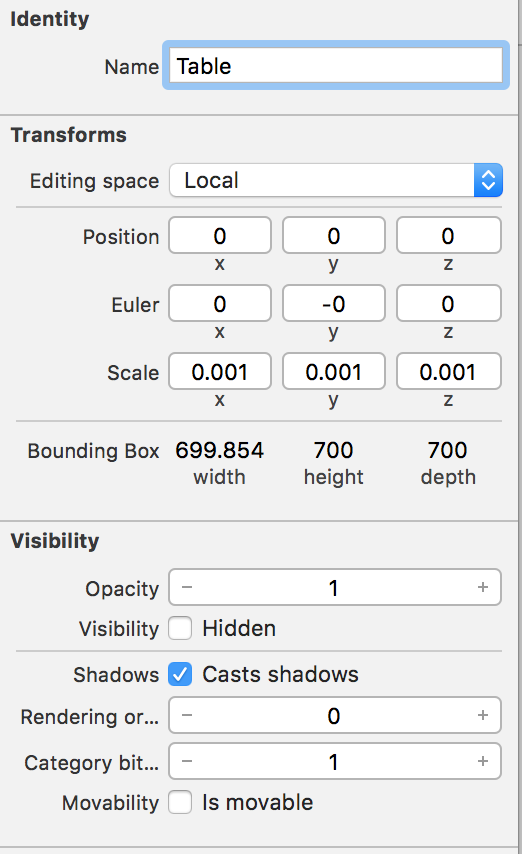
Transform matrix editing is kind of a trial and error task. You might need to go through quite a number of iterations before you reach the exact position.
Now, we change the .dae model to a SceneKit scene file (.scn) which will made it much more efficient for SceneKit to handle. Go to Editor>Convert to SceneKit scene file(.scn).
And…we are done with the 3D object editing. Head back to the ViewController file. First, since we have removed the light source of the table, we should turn on the default lighting of the scene view in viewDidLoad.
sceneView.autoenablesDefaultLighting = true
Positioning 3D objects
Then we create a method to add the table to the scene. It will accept a HitResult as a parameter and place the table based on the position of the HitResult.
Bear with me — this is the last method which needs some explanation!
- A constant is declared to know what furniture scene needs to be added. We will change it to a variable and declare it on top of the viewcontroller when we have more furniture.
- Then we create a scene from the selected furniture file.
- A furniture node is created from the child node of the furniture scene’s root node with the name of the furniture. As we named the first node the same as the furniture name, it doesn’t need to traverse any further. Hence the recursive option is set to false.
- HitResult’s worldTransform property holds the co-relation transform matrix between the real-world position and the scene anchor/node position. And the 3rd column of the transform matrix holds the position information.
- Now that we have successfully extracted the world coordinate of the tapped location, our job is now just to place the furniture node on that exact same coordinate.
- Then we add the node to the root node of the scene. And thats it!
Now we just need to call the method whenever the user taps on the screen. Let’s modify the tapped method to accommodate this change.
Here, if we find a plane, we are just calling the method to add the furniture. As HitTest holds all the positions the ray passes through, we are considering the top most result. Let’s run the app, wait until the floor has tiles on it, and then tap on the screen to place a table. And voilà! You have a new table on your floor. Watch your step :)
I have downloaded some more furniture and have added it into the repo. I’ve also added pinch and rotate gestures to resize and rotate objects. The complete source code will give you an appearance like this:
You can download the full source code from GitHub.
Hope you have enjoyed reading the post as much as I did writing it :)
See you at the next post. Happy reading!!