
By Suchandra Datta
This article a detailed guide that'll help you set up your Firebase database and perform simple CRUD operations on it using Python.
Firebase, as you might know, is a platform provided by Google to accelerate app development. It offers BaaS or backend as a service, which means that Firebase takes care of cloud infrastructure and all your backend needs. This lets you develop and deploy faster.
Firebase offers several amazing products, such as Realtime Database, Cloud Firestore, and Authentication. And it also allows hosting and offers API's for machine learning tasks like text recognition, image labelling and so much more!
Head over to their site linked here and drool over the wonderful options available.
How to Set Up a Firebase Realtime Database
Create a new project on Firebase – let's name it BookStoreProject. Once it has been set up, create a Realtime Database by selecting the Create Database option.
 Creating a Realtime database using Firebase console
When you click on Create Database, you have to specify the location of the database and the security rules. Two rules are available:
- locked mode, which denies all reads and writes to the database, and
- test mode, which allows read and write access for a default 30 days (after which all read and writes are denied unless the security rules get updated).
Since we will be using the database for read, write, and edit, we choose test mode. Once that is done, the database is all ready for our usage!
How to Write to Firebase Realtime Database Using Python
The immediate next step is to find out how we can connect to our database using Python. We are going to use the Admin Database API. You'll need to install the required library.
For more information on using firebase_admin for Python, check out the official docs linked here.
pip install firebase_admin
To connect to Firebase, we need the following lines of code:
import firebase_admin

cred_obj = firebase_admin.credentials.Certificate('....path to file')
default_app = firebase_admin.initialize_app(cred_object, {
    'databaseURL':databaseURL
    })
To make the code work however, we need some prerequisites.
First, we need to specify the path to a Service Account key that will be used for initializing the admin SDK.
Firebase will allow access to Firebase server APIs from Google Service Accounts. To authenticate the Service Account, we require a private key in JSON format.
The path to this JSON file must be provided to create the credentials object. To generate the key, go to project settings, click Generate new private key, download the file, and place it in your directory structure.
 Project Settings on Firebase Console
For an in-depth explanation of this process, refer to the official docs linked here.
Next, we need the databaseURL, which is simply the URL that gives access to our database. It is present on the Realtime Database Firebase Console page itself.
How to Write Using the set() Function
from firebase_admin import db

ref = db.reference("/")
We set the reference to the root of the database (or we could also set it to a key value or child key value). The question that naturally arises is what schema is allowed for storing data in Realtime databases?
All data to be stored must be in JSON format, that is, a sequence of key value pairs. If you need a system generated key, you could opt for using the push() function which we'll cover shortly.
Let's construct a suitable JSON which can be saved in the database. We have information regarding four books as follows:
{
    "Book1":
    {
        "Title": "The Fellowship of the Ring",
        "Author": "J.R.R. Tolkien",
        "Genre": "Epic fantasy",
        "Price": 100
    },
    "Book2":
    {
        "Title": "The Two Towers",
        "Author": "J.R.R. Tolkien",
        "Genre": "Epic fantasy",
        "Price": 100
    },
    "Book3":
    {
        "Title": "The Return of the King",
        "Author": "J.R.R. Tolkien",
        "Genre": "Epic fantasy",
        "Price": 100
    },
    "Book4":
    {
        "Title": "Brida",
        "Author": "Paulo Coelho",
        "Genre": "Fiction",
        "Price": 100
    }
}
We load the required JSON file and save data to the database like this:
import json
with open("book_info.json", "r") as f:
    file_contents = json.load(f)
ref.set(file_contents)
The database now looks like this:
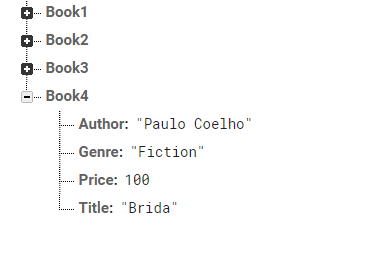 Database schema viewed from Firebase Console
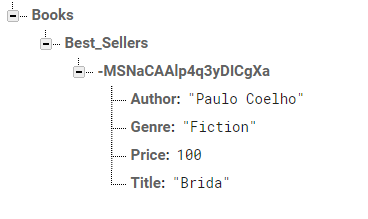
How to Write Using the push() Function
Firebase provides us with the push() function that saves data under a unique system generated key. This method ensures that if multiple writes are being performed to the same key, they do not overwrite themselves.
For example, if multiple sources try to make a write at /Books/Best_Sellers/ then whichever source makes the last write, that value will persist in the database. This introduces the possibility that data will be overwritten. push() solves this issue by using unique keys for each new child that's added.
ref = db.reference("/")
ref.set({
    "Books":
    {
        "Best_Sellers": -1
    }
})

ref = db.reference("/Books/Best_Sellers")
import json
with open("book_info.json", "r") as f:
    file_contents = json.load(f)

for key, value in file_contents.items():
    ref.push().set(value)
 Database schema after executing push() method
Please note that push() and set() aren't atomic. This means that there is no guarantee that both functions will execute together without interruption as a single indivisible unit.
Whilst the database is being updated, if we try to fetch the data, it may happen that push() has finished but set() hasn't – so the JSON we receive will have a system generated key without a value field.
How to Update Your Firebase Database Using Python
Updating the database is as simple as setting the reference at the required point and using the update() function. Let's say that the price of the books by J. R. R. Tolkien is reduced to 80 units to offer a discount.
ref = db.reference("/Books/Best_Sellers/")
best_sellers = ref.get()
print(best_sellers)
for key, value in best_sellers.items():
    if(value["Author"] == "J.R.R. Tolkien"):
        value["Price"] = 90
        ref.child(key).update({"Price":80})
 Database schema after using update() function
How to Retrieve Data from Firebase Using Python
We have already retrieved data using the get() method when we were trying to update a particular key. Now we'll see a few more methods and club them together to make complex queries.
Let's get all books in order sorted by price using the order_by_child() method. To apply this method, we have to first set the key by which we are ordering as the index field via .indexOn rule in Firebase Security rules.
If we want to sort by price, then price must be listed as the index. You can set the value like this:
 Go to Rules tab and type in the schema structure at which you want to set the index
ref = db.reference("/Books/Best_Sellers/")
print(ref.order_by_child("Price").get())
The return value of the method is an OrderedDict. To order by key, use order_by_key(). To get the book with maximum price, we use the limit_to_last() method as follows:
ref.order_by_child("Price").limit_to_last(1).get()
Alternatively, to get the least priced book, we write this:
ref.order_by_child("Price").limit_to_first(1).get()
To get books that are exactly priced at 80 units, we use this:
ref.order_by_child("Price").equal_to(80).get()
For more examples and methods to query the database as per your requirements, check out the official documentation here.
How to Delete Data from Firebase Using Python
Deleting data is pretty simple. Let's delete all best seller books with J.R.R. Tolkien as the author.
ref = db.reference("/Books/Best_Sellers")

for key, value in best_sellers.items():
    if(value["Author"] == "J.R.R. Tolkien"):
        ref.child(key).set({})
 Database Schema after deleting
Conclusion
In this post, we learned how to create a Firebase Realtime database, populate it with data, and delete, update and query the data using Python.
I hope this helps a Python developer out there who's just discovered the beauty of Firebase but is feeling overwhelmed with so many different options and methods to choose from. If you've read this far, thank you so much! Take care, and happy coding!