
By Kathy Dinh
A quick search for React Native biometric authentication would give you several tutorials. That was the first thing I did when there was a need for such a feature in one of my projects. Depending on the level of risk acceptable for your app, one of those solutions might be suitable. For a high risk app like ours, it would not pass security testing.
If you want to add a secure biometric authentication to aa React Native iOS app, you are in the right place.
What is wrong with react-native-touchid?
Most implementations use the react-native-touchid package. At line 65 in the TouchID.m file, the authenticate method calls the following LAContext method when attempting TouchID/FaceID authentication:
evaluatePolicy:localizedReason:reply:^(BOOL success, NSError *error)
The method relies on a Local Authentication check if the provided fingerprint matches the one enrolled on the device. When the check passes, a success boolean is returned and the user has authenticated successfully with TouchID/FaceID.
There have been reports of the possibility to bypass Local Authentication by sending a success signal to Apple’s APIs on jailbroken or non-jailbroken iOS devices. Thus, biometric authentication via Local Authentication is vulnerable to spoofing by an attacker who could interfere with the check at runtime.
What is the secure way to implement biometric authentication?
To implement biometric authentication in an iOS app, there are two ways — either through Apple’s Local Authentication APIs or through access control of Keychain Services natively provided by the underlying system.
Authenticating with Local Authentication is simpler but generally not recommended for critical applications. As described in the previous section, Local Authentication is a high level API whose behaviour can be overridden, i.e. an attacker could fake a successful authentication by changing the API’s response.
It is acknowledgedly best practice to use Keychain Services for implementing biometric authentication in high risk apps. Keychain Services enforces access control on its stored content using functionality provided by iOS and Secure Enclave. The process executes at the hardware and operating system layer and thus minimises exposure to the less trustworthy application layer. Security risks do exist when user is on a jailbroken or malware-infected device, but these threats can be mitigated by mobile device management (MDM) technology.
How do we implement biometric authentication with Keychain Services?
In order to access Keychain Services in our React Native app, we are going to use the package react-native-keychain. The example code is in TypeScript, which should easily be converted to JavaScript.
First, install react-native-keychain and its type declaration as your project dependency:
npm i -S react-native-keychain
npm i -S @types/react-native-keychain
Next, we have to link the library as it depends on the native component. There are two ways of linking libraries in a React Native app: automatic linking and manual linking. I encountered many errors with CocoaPods while performing automatic linking. Manual linking works but involves many steps.
I discovered that the library is linked properly without errors if you run react-native link after temporarily removing Podfile under the iOS folder. To save you the hassle, let’s follow such a hybrid approach. Assuming your code is under version control so that it is possible to safely revert any changes, delete your Podfile, then run the linking command:
react-native link react-native-keychain
Now, undo your Podfile deletion. For iOS 10 you’ll need to enable the Keychain Sharing entitlement in the Capabilities section of your build target.

Add the following key value pair to Info.plist:
<key>NSFaceIDUsageDescription</key><string>Enabling Face ID allows you quick and secure access to your account.</string>
Then rebuild your project with:
react-native run-ios
In case you encounter difficulty in installing react-native-keychain, refer to this GitHub README.
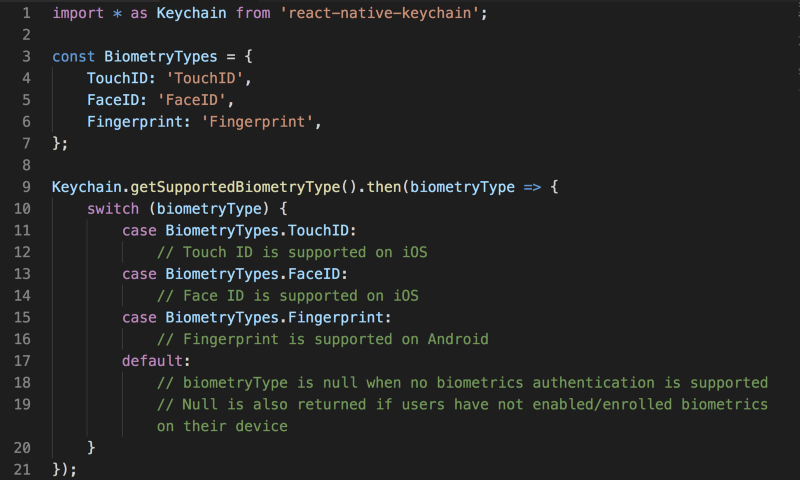
Before asking the user to authenticate with TouchID/FaceID, it is wise to check if the user’s iOS device supports such capability by calling [getSupportedBiometryType](https://github.com/oblador/react-native-keychain#getsupportedbiometrytype):
After confirming that biometric authentication is supported, you need to save some content in the keychain and set access control flags. The content could be user credentials or some access token. Keychain entry is encrypted and stored in secure storage. To store a value in the keychain, call [setGenericPassword](https://github.com/oblador/react-native-keychain#setgenericpasswordusername-password--accesscontrol-accessible-accessgroup-service-securitylevel-) :

A few points to note here:
- Setting accessControl to any of these
[Keychain.ACCESS_CONTROL](https://github.com/oblador/react-native-keychain#keychainaccess_control-enum)enum valuesBIOMETRY_ANY,BIOMETRY_CURRENT_SET,BIOMETRY_ANY_OR_DEVICE_PASSCODE,BIOMETRY_CURRENT_SET_OR_DEVICE_PASSCODEmandates that the user authenticate with TouchID/FaceID whenever we attempt to retrieve the keychain item. - We also set accessible to
Keychain.ACCESSIBLEenum valueWHEN_PASSCODE_SET_THIS_DEVICE_ONLY. This is the strictest accessible constraint, which enforces:
Your device must be unlocked for the secret to be accessible.
Your device must have a device passcode set.
If you turn off your device passcode, the secret is deleted.
The secret cannot be restored to a different device.
The secret is not included in iCloud backups.
Finally, we trigger the TouchID/FaceID authentication prompt by attempting to access the previously stored keychain value with [getGenericPassword](https://github.com/oblador/react-native-keychain#getgenericpassword-authenticationprompt-service-) :
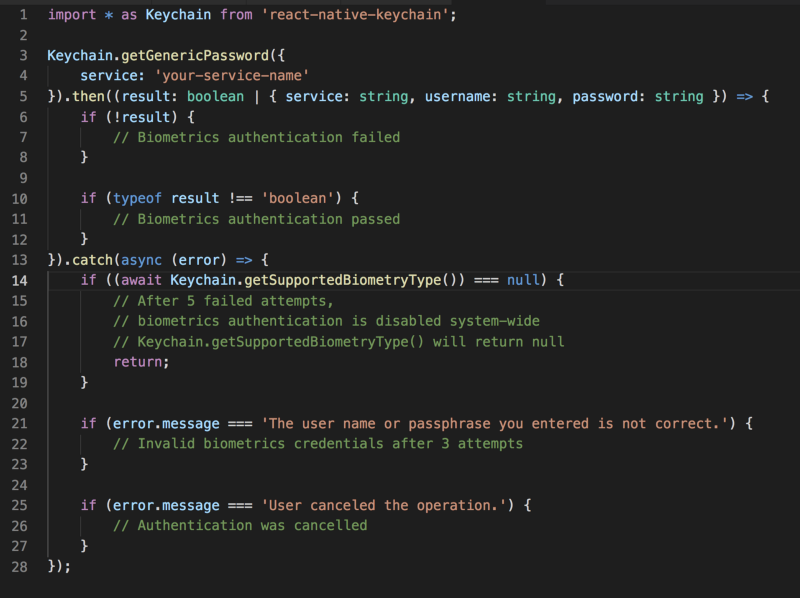
Since we saved our secret with access control previously, accessing the item requires user to pass biometric authentication. When authentication is successful, the result returns an object, whose username is ‘your-secret-name’, password is ‘your-secret-value’, and service is ‘your-service-name’.
After 5 failed attempts of TouchID/FaceID authentication system-wide, biometric authentication is turned off everywhere on the device. The user must lock and unlock the device with a passcode to re-enable TouchID/FaceID. That’s why at line 14 we have to check for supported biometry type and handle the case appropriately, e.g. asking the user to login with their username/password.
Caveats
Though biometric authentication with react-native-keychain is suitable for critical applications, there are a few caveats I would like to bring to your attention:
There is no passcode fallback. You may receive a requirement to allow the user to authenticate with their device passcode. Looking at the package’s README, you should find Keychain.ACCESS_CONTROL enum keys DEVICE_PASSCODE , BIOMETRY_ANY_OR_DEVICE_PASSCODE , BIOMETRY_CURRENT_SET_OR_DEVICE_PASSCODE .
Unfortunately, setting an access control value when calling setGenericPassword to any of those three enum keys do not enable an “Enter Password” fallback. The issue has been reported on GitHub, but there has been no response at the time of publishing this article.
You may think of implementing passcode fallback with a different library. Be aware that your system is only as secure as your weakest link. If your passcode fallback implementation executes at the application layer, it is a potential target for a security attack and defeats the purpose of relying on Keychain Services for biometric authentication.
Also, authenticating with react-native-keychain on Android devices may not be considered secure as there is no equivalence of Keychain Services in Android.
Wrapping up
Thank you for reading this far. I hope you’ve found the tutorial useful. One improvement you may want to make is asking the user whether they would like to opt-in for biometric authentication before enabling it in your app. Also, you may add a setting to let the user turn on or off TouchID/FaceID authentication in your app settings page.