
By Roberto Iriondo
As developers and users of the internet, we often come across websites that display many pop-ups, from subscription requests to paywalls, advertisements to notifications, and so on.
Many times, we use those websites daily for all kinds of things, and seeing those pop-ups over and over gets old!
Developers can get around these by going to the console and finding selectors to manipulate the website's document object model (DOM) by adding or modifying CSS or JavaScript.
But now, thanks to Google Chrome and its extension store, anyone can inject code into any website automatically. We'll go through to the process step by step in this small guide.
1. Installing the Extension to Inject the Code
The following only applies if you use Google Chrome. Install the extension custom JavaScript for websites. This small extension allows you to run JavaScript on any website automatically, and it saves the code for future visits in your web browser.
First, visit the website with annoying pop-ups that you use often. For this tutorial, I am using The Washington Post’s website:
 Screenshot showing The Washington Post’s website with an article mentioning Andrew Yang, also Chrome’s developer tools.
2. Locating DOM Elements and Creating the Injection Code
Open your Chrome developer tools by pressing F12, then identify the element with the pop-up.
In this example, the iframe element with ID wallIframe contains the pop-up with some fading background in the back.
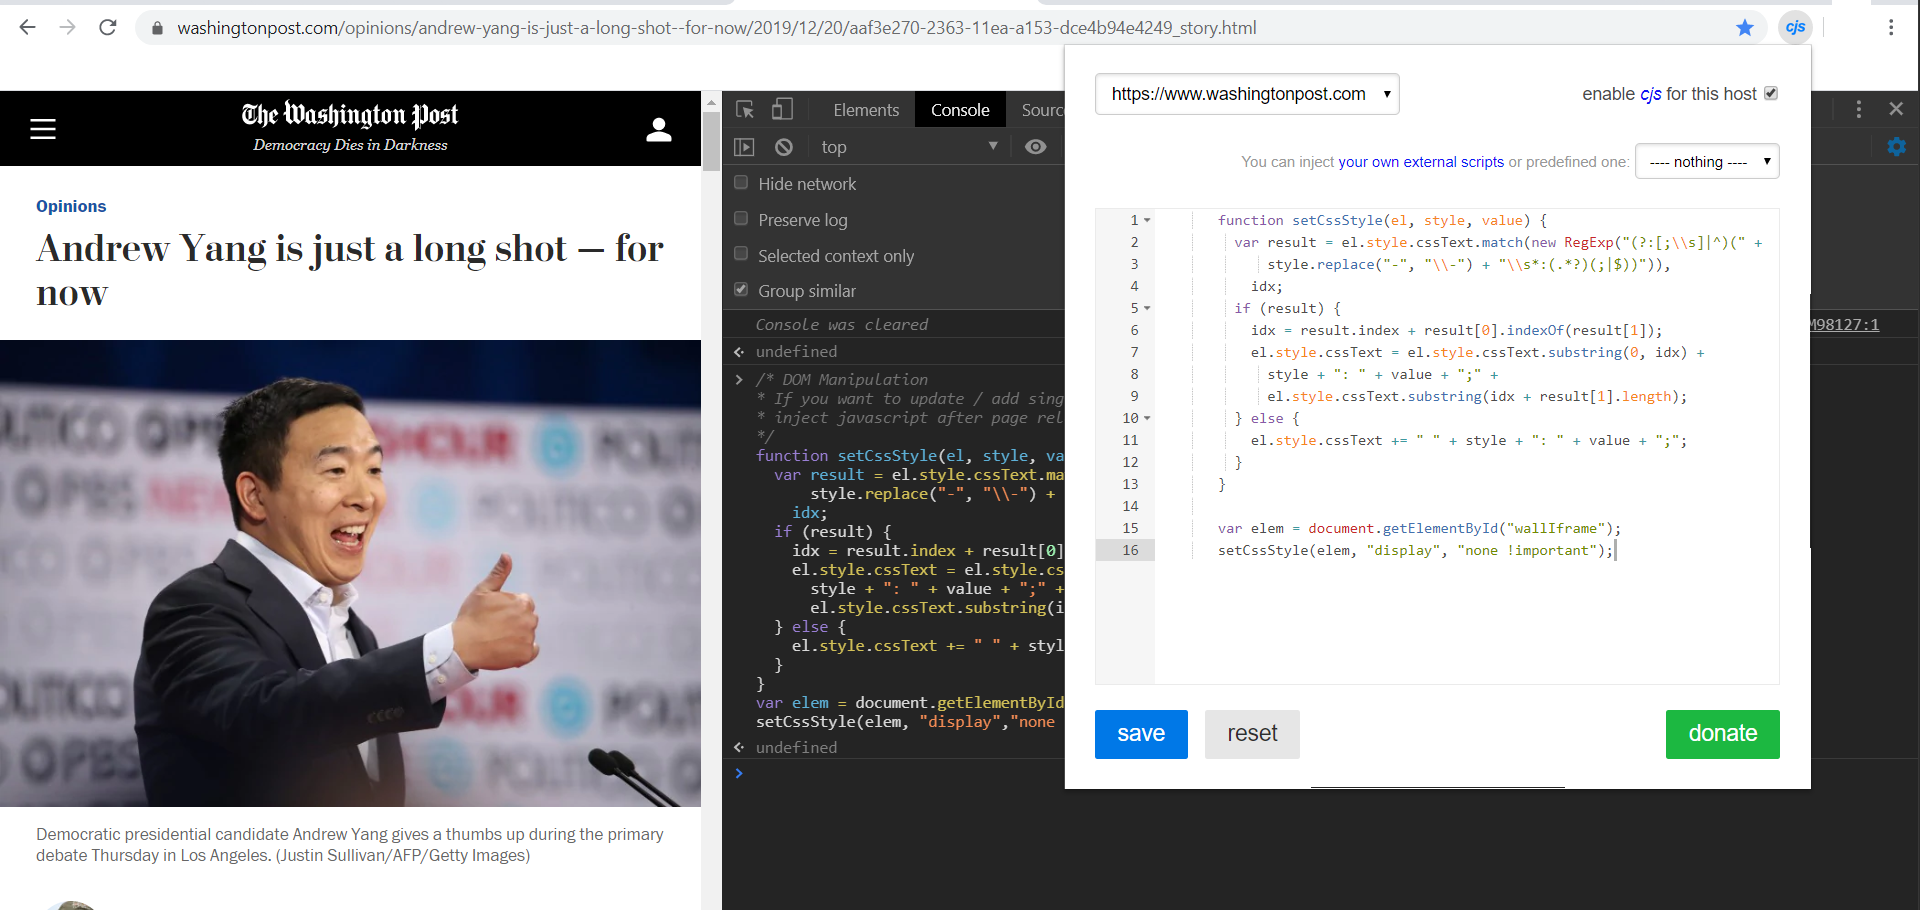
Now, we’ll be using a small JavaScript snippet to add custom CSS and check if we can hide the pop-up.
/* DOM Manipulation
* If you want to update / add single style in DOM Element style attribute you can use this function:
* inject javascript after page reloads.
*/

function setCssStyle(el, style, value) {
  var result = el.style.cssText.match(new RegExp("(?:[;\\s]|^)(" +
      style.replace("-", "\\-") + "\\s*:(.*?)(;|$))")),
    idx;
  if (result) {
    idx = result.index + result[0].indexOf(result[1]);
    el.style.cssText = el.style.cssText.substring(0, idx) +
      style + ": " + value + ";" +
      el.style.cssText.substring(idx + result[1].length);
  } else {
    el.style.cssText += " " + style + ": " + value + ";";
  }
}
var element = document.getElementById("wallIframe");
setCssStyle(element, "display","none !important");
As you can see, in the code above we are highlighting the element wallIframe and hiding it by adding inline CSS.
3. Testing the Injection Code
Test your code in the Chrome developers’ console to make sure that it works.
 Screenshot showing The Washington Post’s website with an article mentioning Andrew Yang, also Chrome’s developer tools.
As you can see above, the code works.
Now it's time to add it to the extension, custom JavaScript for websites, and test if the code will work on future visits. To add it, left-click on the extension icon on your address bar and add the custom snippet, then click save.
The page will immediately reload to try and test your added code.
 Screenshot showing The Washington Post’s website with an article mentioning Andrew Yang, also Chrome’s developer tools.
4. The Injection Code Didn't Work, What Now?
After testing it, the iframe didn’t disappear as it did when we tested it in the console. One of the reasons could be that the iframe loads after X seconds of the page loading.
We could dig in the network log to see if that’s the case. But for time-saving measures, we are going to try adding a timeout function to our original snippet to see if that helps.
setTimeout(
     function() {
       function setCssStyle(el, style, value) {
         var result = el.style.cssText.match(new RegExp("(?:[;\\s]|^)(" +
             style.replace("-", "\\-") + "\\s*:(.*?)(;|$))")),
           idx;
         if (result) {
           idx = result.index + result[0].indexOf(result[1]);
           el.style.cssText = el.style.cssText.substring(0, idx) +
             style + ": " + value + ";" +
             el.style.cssText.substring(idx + result[1].length);
         } else {
           el.style.cssText += " " + style + ": " + value + ";";
         }
       }

       var element = document.getElementById("wallIframe");
       setCssStyle(element, "display", "none !important");
     }, 10000);
Now the code waits 10 seconds before it executes, and voilà it works perfectly.
You can also add an event listener to wait for the page to load completely.
5. Final Thoughts
For instance:
document.addEventListener("DOMContentLoaded", function() {
    // Your function goes here
}
But, if we add the pop-up code after X seconds, the function above won’t work, so better stick to the timeout function.
You can also use the extension to add many other cool snippets, such as to block ads, block pop-ups, increase the standard font of the website, increase responsiveness, update its appearance, and so on. Once the JavaScript snippets are added, they will always run on future visits to those websites.
A special thanks to Abbey Rennemeyer from freeCodeCamp for editorial feedback in preparation of this article.
DISCLAIMER: The views expressed in this article are those of the author(s) and do not represent the views of Carnegie Mellon University, nor other companies (directly or indirectly) associated with the author(s). These writings are not intended to be final products, yet rather a reflection of current thinking, along with being a catalyst for discussion and improvement.
You can find me on: My personal website, Medium, Instagram, Twitter, Facebook, LinkedIn or through my SEO company.