
By Leonardo Lima
At my current company, we have recently migrated our CI infra from CircleCI to GoCD. After a few months using the new CI platform, I was comfortable enough to juice it up. One of the things that I was planning was integrating DangerJS — an amazing tool to expedite pull request reviews by performing configurable auto-checks on new code. What does it mean? No more time spent on writing PR comments like: “Oh, I believe you forgot X… Y… Z…”.
My goal with this article is to help the next person pursuing this mission to improve their team’s Code Quality and PR review processes.
Context
I have used Danger’s powers before (though integrated with Ruby) and I already knew that the initial setup would be quite straightforward…if only we were still using CircleCI!
On my first attempt to integrate, I tried googling “Integrating DangerJS with GoCD” with no luck. Also, after reading DangerJS’ documentation, I’ve found that there was no such thing as a native-straightforward integration with GoCD that I could use.
That meant that I wouldn’t be able to easily integrate Danger’s checks into my CI flow. So I was left with a few options:
- Trying to make developers incorporate local manual runs of DangerJS commands;
- Build a specific pipeline in (CircleCI/CodeShip/FooBar) to run just DangerJS;
- Give up.
I didn’t like either of my options, and I was really frustrated after a few hours spent in Danger and GoCD settings. Then I stumbled upon the “Using danger and fake being on a CI” section in the DangerJS docs. That’s it! If I can fake being on a CI in my local machine, what’s the difference from faking a CI in a GoCD machine?
Afterwards, it was just a matter of figuring out how to emulate the same local behaviour inside GoCD’s infra.
First steps
Before anything, you have to go through the official documentation in order to set up and start using DangerJS.
Basically, what you need is to:
- Create your dangerfile.js file. There are a few examples here.
- Create a bot account on GitHub/BitBucket for Danger to use
- Open a PR with changed files to check your changes
- Run DangerJS locally against a PR link (the one you’ve just opened)
- Try to fake a CI environment in your local machine
In the next section, I’ll go deeper in this last step since it is the critical part to make DangerJS work with GoCD.
Configuring a fake CI in GoCD’s environment
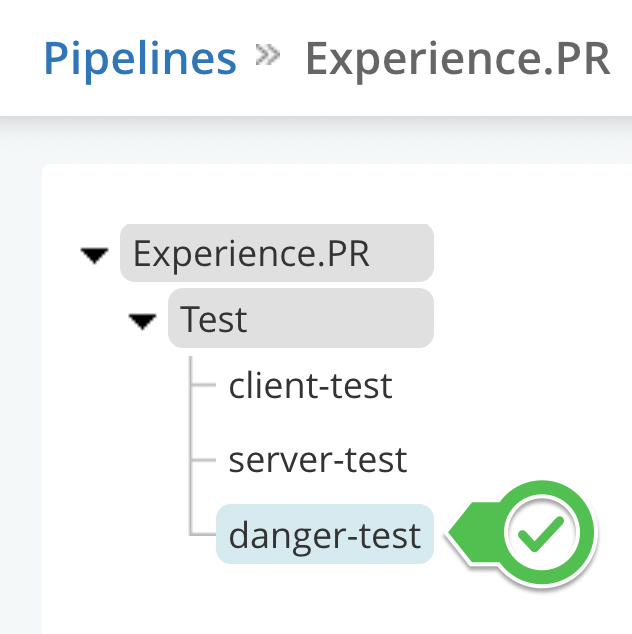
First, if you still don’t have a detached GoCD pipeline to run only Pull Requests builds, I strongly recommend you to do so. Here is a guide if you need some help setting that up.
Secondly, after creating your PR pipeline, create a new Job just for Danger:
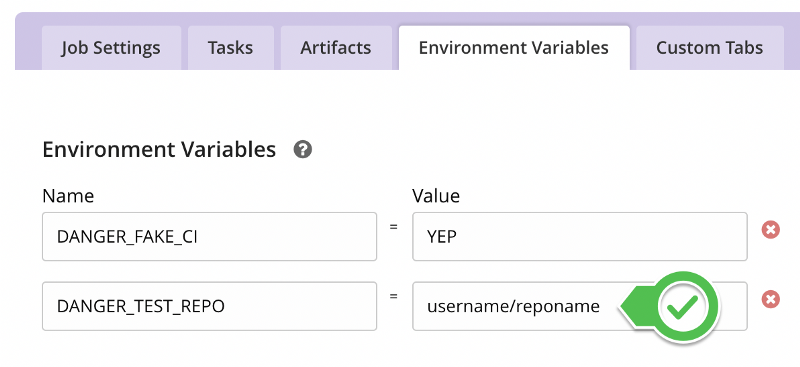
Now, to be able to fake a CI using Danger, you need to set a bunch of environment variables such as:
export DANGER_FAKE_CI="YEP"
export DANGER_TEST_REPO="username/reponame"
In GoCD’s Pipeline Job settings, navigate to the Environment Variables tab and set those two env variables replacing the username/reponame placeholders with your own settings.
After this first batch of configurations, in order to actually run Danger’s tests in GoCD, you can use a shell script that executes the same commands used to fake a CI in a local environment. Let’s call this file danger-build.sh.
# danger-build.sh

echo '— — START DANGER JS VERIFICATION —'

echo Testing against commits on PR: ${GO_SCM_PIPELINE_PR_URL}

DANGER_TEST_PR=${GO_SCM_PIPELINE_PR_ID} npx yarn danger ci

echo ‘ — — END OF DANGER JS VERIFICATION — — ‘
Please note that you’ll need node, npm/yarn previously installed in the GoCD available machine.
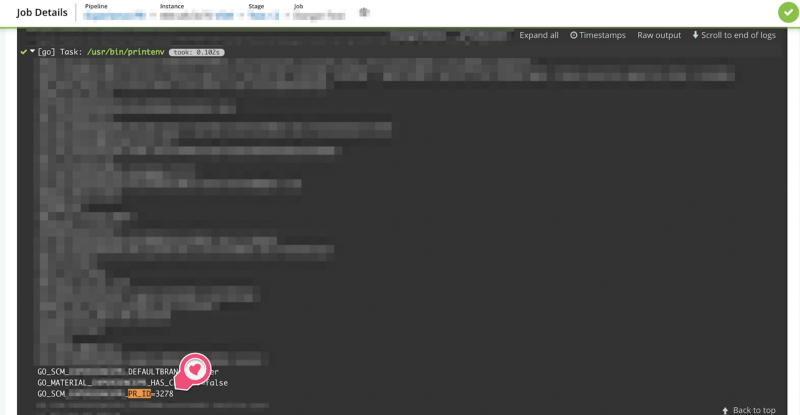
Did you notice those two GO_SCM variables? They are the catch that let you run your Danger verifications inside a GoCD machine.
Please pay special attention to the PR_ID variable since it’s the one that provides the PR reference to let Danger read, interpret the changes, and then write suggestions in the Pull Request.
In case you’re curious, those environment variables were generated by GoCD’s machines. They can be assessed by running the /usr/bin/printenv UNIX command in a build and inspecting the output.
And that’s it!
After mapping the proper env variables in your Shell script, the DangerJS verifications will start running in GoCD’s pipelines next to your current test suite.
To wrap up the steps:
Setup the first DangerJS local files and settings
Create a specific Pipeline/Job in GoCD
Discover and then map the proper environment variables inside a shell script to let GoCD run DangerJS
I hope that you’ve found the walkthrough helpful. If you have enjoyed the article please share with your fellow developers & managers and help spread the word.
For any questions please feel free to ask in the comments section!
PS: Danger also has a lot of plugins options, check them out!