
By Timur (Tima) Zhiyentayev
If you are a blogger, publisher, or business owner who does content marketing, having a newsletter is a must. In this tutorial, you will learn how to add Mailchimp integration to a simple JavaScript app. You’ll ultimately build a form for guest users to subscribe to a newsletter.
I wrote this tutorial for a junior/mid-career web developer. The tutorial assumes some basic knowledge of React, JavaScript, and HTTP.
You’ll start the tutorial with a boilerplate app, gradually add code to it, and finally test Mailchimp API integration.
The boilerplate app is built with React, Material-UI, Next, Express, Mongoose, and MongoDB. Here’s more about the boilerplate.
As mentioned above, our goal is to create a feature that allows a guest user to subscribe to a MailChimp newsletter. The user subscribes by manually adding their email address to a form on your website. Here is an overview of the data exchange that will occur between the client (browser) and server:
- A user adds their email address to the form and clicks
submit - The click triggers a client-side API method that sends the email address from the user’s browser to your app server
- The client-side API method sends a POST request to a unique Express route
- The Express route passes the email address to a server-side API method that sends a POST request to Mailchimp’s server
- The email address is successfully added to your Mailchimp list
Specifically, you will achieve the following by the end of this tutorial:
- Create a
Subscribepage with a subscription form - Define an API method called
subscribeToNewsletter()using thefetch()method - Define an Express route
'/subscribe' - Define a
subscribe()API method that sends a POST request to Mailchimp's API server - Test out this data exchange with Postman and as a guest user
Getting started
For this tutorial, we’ll use code located in the 1-start folder of our builderbook repo. If you don’t have time to run the app locally, I deployed this example app at: https://mailchimp.builderbook.org/subscribe
To run the app locally:
- Clone the builderbook repo to your local machine with:
git clone git@github.com:builderbook/builderbook.git
- Inside the
1-startfolder, runyarnornpm installto install all packages listed inpackage.json.
To add Mailchimp API to our app, we will install and learn about the following packages:
Let’s start by putting together the Subscribe page. In addition to learning about the Mailchimp API, you will get familiar with Next.js, a framework for React apps.
A key feature of Next.js is server-side rendering for initial page load. Other features include routing, prefetching, hot code reload, code splitting, and preconfigured webpack.
Subscribe page
We will define a Subscribe component as a child of ES6 class using extends.
Instead of:
const Subscribe = React.createClass({})
We will use:
class Subscribe extends React.Component {}
We will not specify ReactDOM.render() or ReactDOM.hydrate explicitly, since Next.js implements both internally.
A high-level structure for our Subscribe page component is:
import React from 'react';// other imports
class Subscribe extends React.Component { onSubmit = (e) => { // check if email is missing, return undefined // if email exists, call subscribeToNewsletter() API method };
render() { return ( // form with input and button ); }}
export default Subscribe;
Create a subscribe.js file inside the pages folder of 1-start. Add the above code to this file. We will fill the // other imports section as we go.
Our form will have only two elements: (1) an input element for email addresses and (2) a button. Since our boilerplate app is integrated with Material-UI, we’ll use TextField and Button components from the Material-UI library. Add these two imports to your subscribe.js file:
import TextField from 'material-ui/TextField';import Button from 'material-ui/Button';
Put the TextField and Button components inside a <form> element:
<form onSubmit={this.onSubmit}> <p>We will email you when a new tutorial is released:</p> <TextField type="email" label="Your email" style={styleTextField} required /> <p /> <Button variant="raised" color="primary" type="submit"> Subscribe </Button></form>
You can see that we passed some props to both TextField and Button components. For a complete list of props you can pass, check out the official docs for TextField props and Button props.
We need to get an email address specified in TextField. To access the value of TextField, we add React's ref attribute to it:
inputRef={(elm) => { this.emailInput = elm;}}
We access the value with:
this.emailInput.value
Two notes:
- We did not use
ref="emailInput", since React documentation recommends using the contextual objectthis. In JavaScript,thisis used to access an object in the context. If you configure Eslint properly, you would see an Eslint warning for this rule. - Instead of
ref, we usedinputRefsince theTextFieldcomponent is not aninputHTML element.TextFieldis a component of Material-UI and uses theinputRefprop instead ofref.
Before we define our onSubmit function, let's run our app and take a look at our form. Your code at this point should look like: pages/subscribe.js
import React from 'react';import Head from 'next/head';import TextField from 'material-ui/TextField';import Button from 'material-ui/Button';
import { styleTextField } from '../components/SharedStyles';import withLayout from '../lib/withLayout';
class Subscribe extends React.Component { onSubmit = (e) => { // some code };
render() { return ( <div style={{ padding: '10px 45px' }}> <Head> <title>Subscribe</title> <meta name="description" content="description for indexing bots" /> </Head> <br /> <form onSubmit={this.onSubmit}> <p>We will email you when a new tutorial is released:</p> <TextField inputRef={(elm) => { this.emailInput = elm; }} type="email" label="Your email" style={styleTextField} required /> <p /> <Button variant="raised" color="primary" type="submit"> Subscribe </Button> </form> </div> ); }}
export default withLayout(Subscribe);
A few notes:
- In Next.js, you can specify page title and description using
Head. See how we used it above. - We added a
styleTextFieldstyle. We keep this style incomponents/SharedStyles.js, so that it's reusable and can be imported into any component or page. - We wrapped the
Subscribecomponent withwithLayout. The higher-order componentwithLayoutensures that a page gets aHeadercomponent and is server-side rendered on initial load.
We access the Subscribe page at the /subscribe route, since Next.js creates the route for a page from the page's file name inside the pages folder.
Start your app with yarn dev and go to [http://localhost:8000/subscribe](http://localhost:8000/subscribe:)
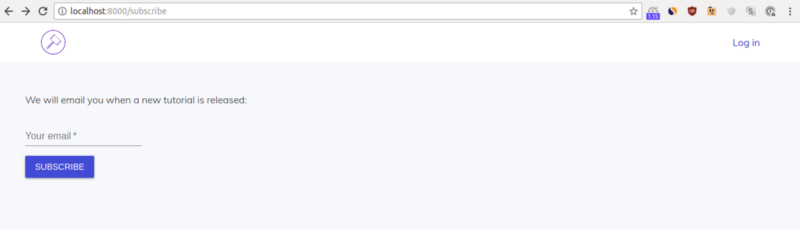
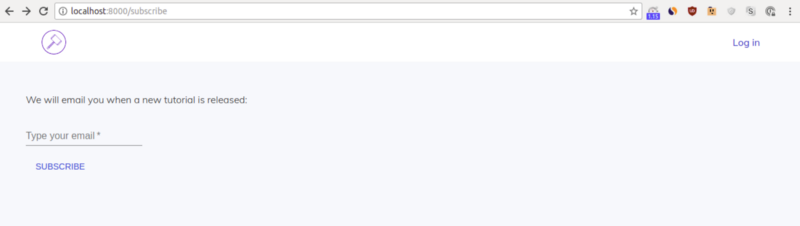
The form looks as expected. Try changing the values passed to different props of the TextField and Button components. For example, change text for the label prop to Type your email and change the Button variant prop to flat:
Before we continue, click the Log in link in the Header. Note the loading progress bar at the top of the page. We implemented this bar with Nprogress, and we will show it while waiting for our code to send an email address to a Mailchimp list.
Our next step is to define the onSubmit function. The purpose of this function is to get the email address from TextField, pass that email address to an API method subscribeToNewsletter, and then call the method.
Before we call subscribeToNewsletter(email), let's prevent a default behavior of our <form> element and define email:
- Prevent the default behavior of sending form data to a server with:
e.preventDefault();
- Let’s define a local variable
email. It has the valuethis.emailInput.valueif boththis.emailInputandthis.emailInput.valueexist, otherwise it is null:
const email = (this.emailInput && this.emailInput.value) || null;
- If
emailis null, the function should return undefined:
if (this.emailInput && !email) { return;}
So far we have:
onSubmit = (e) => { e.preventDefault();
const email = (this.emailInput && this.emailInput.value) || null;
if (this.emailInput && !email) { return; }
// call subscribeToNewsletter(email)};
To call our API method subscribeToNewsletter(email), let's use the async/await construct together with try/catch. We cover async callbacks, Promise.then, and async/await in detail in our book.
To use async/await, prepend async to an anonymous arrow function like this:
onSubmit = async (e) =>
Providing subscribeToNewsletter(email) should return a Promise (and it does — we define this method later in this tutorial using JavaScript's fetch()method that returns a Promise). You can prepend await to subscribeToNewsletter(email):
await subscribeToNewsletter({ email })
You get:
onSubmit = async (e) => { e.preventDefault();
const email = (this.emailInput && this.emailInput.value) || null;
if (this.emailInput && !email) { return; }
try { await subscribeToNewsletter({ email });
if (this.emailInput) { this.emailInput.value = ''; } } catch (err) { console.log(err); //eslint-disable-line }};
JavaScript will pause at the line with await subscribeToNewsletter({ email }); and continue only after subscribeToNewsletter({ email }) returns a response with a success or error message.
In the case of success, let’s clear our form with:
if (this.emailInput) { this.emailInput.value = ''; }
Before we define our subscribeToNewsletter API method, let's make a UX improvement. Use NProgress.start(); to start bar loading and use NProgress.done(); to complete bar loading:
onSubmit = async (e) => { e.preventDefault();
const email = (this.emailInput && this.emailInput.value) || null;
if (this.emailInput && !email) { return; }
NProgress.start();
try { await subscribeToNewsletter({ email });
if (this.emailInput) { this.emailInput.value = ''; }
NProgress.done(); } catch (err) { console.log(err); //eslint-disable-line NProgress.done(); }};
With this change, a user who submits a form will see the progress bar.
Code for your Subscribe page should look like: pages/subscribe.js
import React from 'react';import Head from 'next/head';import TextField from 'material-ui/TextField';import Button from 'material-ui/Button';import NProgress from 'nprogress';
import { styleTextField } from '../components/SharedStyles';import withLayout from '../lib/withLayout';import { subscribeToNewsletter } from '../lib/api/public';
class Subscribe extends React.Component { onSubmit = async (e) => { e.preventDefault();
const email = (this.emailInput && this.emailInput.value) || null;
if (this.emailInput && !email) { return; }
NProgress.start();
try { await subscribeToNewsletter({ email });
if (this.emailInput) { this.emailInput.value = ''; }
NProgress.done(); console.log('non-error response is received'); } catch (err) { console.log(err); //eslint-disable-line NProgress.done(); } };
render() { return ( <div style={{ padding: '10px 45px' }}> <Head> <title>Subscribe</title> <meta name="description" content="description for indexing bots" /> </Head> <br /> <form onSubmit={this.onSubmit}> <p>We will email you when a new tutorial is released:</p> <TextField inputRef={(elm) => { this.emailInput = elm; }} type="email" label="Your email" style={styleTextField} required /> <p /> <Button variant="raised" color="primary" type="submit"> Subscribe </Button> </form> </div> ); }}
export default withLayout(Subscribe);
Start your app with yarn dev and make sure your page and form look as expected. Submitting a form won't work yet, since we haven't defined the API method subscribeToNewsletter().
subscribeToNewsletter API method
As you may have noticed from the import section of pages/subscribe.js, we will define subscribeToNewsletter() at lib/api/public.js. We placed subscribeToNewsletter() to the lib folder to make it universally accessible, meaning this API method will be available on both client (browser) and server. We do so because in Next.js, page code is server-side rendered on initial load and client-side rendered on subsequent loads.
In our case, when a user clicks a button on the browser to call subscribeToNewsletter() , this method will run only on the client. But imagine that you have a getPostList API method that fetches a list of blog posts. To render a page with a list of posts on the server, you have to make getPostList universally available.
Back to our API method subscribeToNewsletter(). As we discussed in the introduction to this tutorial, our goal is to hook up a data exchange between client and server. In other words, our goal is to build an internal API for our app. That's why we call subscribeToNewsletter() an API method.
The purpose of subscribeToNewsletter() is to send a request to the server at a particular route called an API endpoint and then receive a response. We discuss HTTP and request/response in detail here.
To understand this tutorial, you should know that a request that passes data to the server and does not require any data back is sent with the POST method. Usually, the request's body contains data (in our case, email address).
In addition to sending a request, our subscribeToNewsletter() method should wait for a response. The response does not have to contain any data — it could be a simple object with one parameter { subscribed: 1 } or { done: 1 } or { success: 1 }.
To achieve both sending a request and receiving a response, we use the fetch() method. In JavaScript, fetch() is a global method that is used for fetching data over a network by sending a request and receiving a response.
We use the isomorphic-fetch package that makes fetch() available in our Node environment. Install this package with:
yarn add isomorphic-fetch
Here’s an example of usage from the package’s README:
fetch('//offline-news-api.herokuapp.com/stories') .then(function(response) { if (response.status >= 400) { throw new Error("Bad response from server"); } return response.json(); }) .then(function(stories) { console.log(stories); });
Let’s use this example to write a reusable sendRequest method that takes path and some other options, passes a request object (object that has method, credentials and options properties), and calls the fetch()method. fetch() takes path and the request object as arguments:
async function sendRequest(path, options = {}) { const headers = { 'Content-type': 'application/json; charset=UTF-8', };
const response = await fetch( `${ROOT_URL}${path}`, Object.assign({ method: 'POST', credentials: 'include' }, { headers }, options), );
const data = await response.json();
if (data.error) { throw new Error(data.error); }
return data;}
Unlike the example from isomorphic-fetch, we used our favorite async/await construct instead of Promise.then (for better code readability).
Object.assign() is a method that creates a new object out of three smaller objects: { method: 'POST', credentials: 'include' }, { headers }, and options. The object options is empty by default, but it could be, for example, the request's body property. Since we need to pass an email address, our case indeed uses the body property.
As you may have noticed from the code, we need to define ROOT_URL. We can write conditional logic for ROOT_URL that takes into consideration NODE_ENV and PORT, but for simplicity’s sake, we define it as:
const ROOT_URL = 'http://localhost:8000';
It’s time to define our subscribeToNewsletter method with the help of the sendRequest method:
export const subscribeToNewsletter = ({ email }) => sendRequest('/api/v1/public/subscribe', { body: JSON.stringify({ email }), });
As you can see, we pass { body: JSON.stringify({ email }), } as an options object to add an email address to the body of the request object.
Also we chose /api/v1/public/subscribe as our path, that is the API endpoint for our internal API that adds a user email address to our Mailchimp list.
Put it all together and the content of the lib/api/public.js should be: lib/api/public.js
import 'isomorphic-fetch';
const ROOT_URL = 'http://localhost:8000';
async function sendRequest(path, options = {}) { const headers = { 'Content-type': 'application/json; charset=UTF-8', };
const response = await fetch( `${ROOT_URL}${path}`, Object.assign({ method: 'POST', credentials: 'include' }, { headers }, options), );
const data = await response.json();
if (data.error) { throw new Error(data.error); }
return data;}
export const subscribeToNewsletter = ({ email }) => sendRequest('/api/v1/public/subscribe', { body: JSON.stringify({ email }), });
Good job reaching this point! We defined our subscribeToNewsletter API method that sends a request to the API endpoint /api/v1/public/subscribe and receives a response.
Start your app with yarn dev, add an email address, and submit the form. In your browser console (Developer tools > Console), you will see an expected POST 404 error:

That error means that the request was successfully sent to the server, but the server did not find what was requested. This is expected behavior since we did not write any server code that sends a response to the client when a request is sent to corresponding API endpoint. In other words, we did not create the Express route /api/v1/public/subscribe that handles the POST request we sent using the subscribeToNewsletter API method.
Express route/subscribe
An Express route specifies a function that gets executed when an API method sends a request from the client to the route’s API endpoint. In our case, when our API method sends a request to the API endpoint /api/v1/public/subscribe, we want the server to handle this request with an Express route that executes some function.
You can use the class express.Router() and syntax router.METHOD()to modularize Express routes into small groups based on user type:
const router = express.Router();router.METHOD('API endpoint', ...);
If you’d like to learn more, check out the official Express docs on express.Router() and router.METHOD().
However, in this tutorial, instead of modularizing, we will use:
server.METHOD('API endpoint', ...);
And place the above code directly into our main server code at server/app.js.
You already have enough information to put together a basic Express route:
- The method is POST
- The API endpoint is
/api/v1/public/subscribe - From writing
onSubmitandsubscribeToNewsletter, you know about an anonymous arrow function - From writing
onSubmit, you know about thetry/catchconstruct
Put all this knowledge together, and you get:
server.post('/api/v1/public/subscribe', (req, res) => { try { res.json({ subscribed: 1 }); console.log('non-error response is sent'); } catch (err) { res.json({ error: err.message || err.toString() }); }});
A couple of notes:
- We wrote
error: err.message || err.toString()to handle both situations: when the error is a type of string and when the error is an object. - To test out our Express route, we added the line:
console.log(‘non-error response is sent’);
Add the above Express route to server/app.js after this line:
const server = express();
It’s time to test!
We recommend using the Postman app for testing out a request-response cycle.
Look at this snapshot of request properties in Postman:
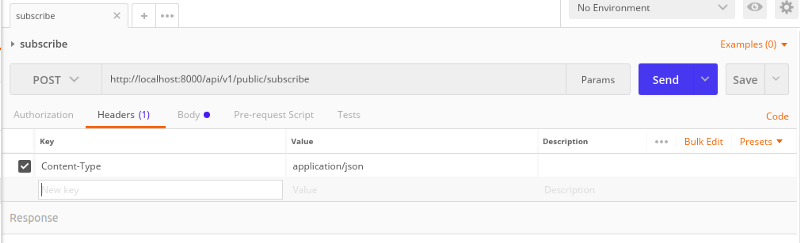
You need to specify at least three properties (similar to when we wrote the subscribeToNewsletter API method):
- Select POST method
- Specify the full path for the API endpoint:
[http://localhost:8000/api/v1/public/subscribe](http://localhost:8000/api/v1/public/subscribe) - Add a
Content-Typeheader with the valueapplication/json
Make sure your app is running. Start it with yarn dev. Now click the Send button on Postman.
If successful, you will see the following two outputs:
- On Postman, you see the response has code 200 and the following body:
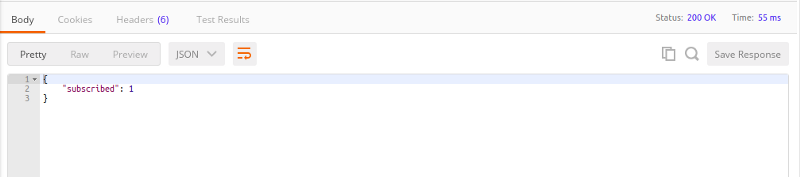
- Your terminal prints:

Good job, you just wrote a working Express route!
At this point, you showed that two events happen successfully in your app: a request gets sent and a response is received. However, we did not pass an email address to a function inside our Express route. To do so, we need to access req.body.email, because this is where we saved the email address when defining the subscribeToNewsletter API method:
const email = req.body.email;
With ES6 object destructuring, it becomes shorter:
const { email } = req.body;
If the email local variable does not exist, then let's send a response with an error and return undefined (exit with blank return):
if (!email) { res.json({ error: 'Email is required' }); return;}
Also, modify the console.log statement to print out email.
After these modifications, you get:
server.post('/api/v1/public/subscribe', async (req, res) => { const { email } = req.body;
if (!email) { res.json({ error: 'Email is required' }); return; }
try { res.json({ subscribed: 1 }); console.log(email); } catch (err) { res.json({ error: err.message || err.toString() }); }});
Let’s test it out. Open Postman, and add one more property to our request: body with value team@builderbook.org. Make sure that you selected the raw > JSON data format:
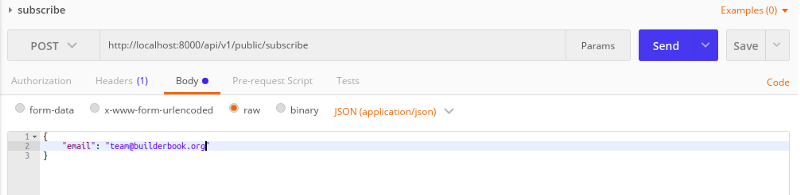
Make sure that your app is running and then click the Send button.
Look at the response on Postman and the output of your terminal:
- Postman will display
Loading...but never finish - Terminal outputs an error:
TypeError: Cannot read property 'email' of undefined
Apparently, the email variable is undefined. To read the email property from req.body, you need a utility that decodes the body object of a request from Unicode to JSON format. This utility is called bodyParser, read more about it here.
Install bodyParser:
yarn add body-parser
Import it to server/app.js with:
import bodyParser from 'body-parser';
Mount JSON bodyParser on the server. Add the following line right after const server = express(); and before your Express route:
server.use(bodyParser.json());
An alternative to using the external bodyParser package is to use internal Express middleware express.json(). To do so, remove the import code for bodyParser and replace the above line of code with:
server.use(express.json());
We are ready to test. Make sure your app is running and click the Send button on Postman.
Take a look at the response on Postman and your terminal:
- Postman successfully outputs:
"subscribed": 1 - Terminal has no error this time, instead it prints:
team@builderbook.org
Great, now the request’s body is decoded and available inside the Express route's function as req.body.
You successfully added the first internal API to this app! Data exchange between client and server works as expected.
Inside the Express route that we wrote earlier, we want to call and wait for a subscribe method that sends a POST request from our server to Mailchimp's. In the next and final section of this tutorial, we will discuss and write the subscribe method.
Method subscribe()
We wrote code for proper data exchange between our server and a user’s browser. However, to add a user’s email address to a Mailchimp list, we need to send a server to server POST request. POST request from our server to Mailchimp’s server.
To send a server to server request, we will use the request package. Install it:
yarn add request
As with any request, we need to figure out which API endpoint and what request properties to include (headers, body and so on):
- Create a
server/mailchimp.jsfile. - Import
request. - Define
request.post()(POST request) with these properties:uri,headers,json,body, and callback.
server/mailchimp.js :
import request from 'request';
export async function subscribe({ email }) { const data = { email_address: email, status: 'subscribed', };
await new Promise((resolve, reject) => { request.post( { uri: // to be discussed headers: { Accept: 'application/json', Authorization: // to be discussed, }, json: true, body: data, }, (err, response, body) => { if (err) { reject(err); } else { resolve(body); } }, ); });}
All properties are self-explanatory, but we should discuss uri (or API endpoint) and Authorization header:
uri. Earlier in this chapter, we pickedhttp://localhost:8000/api/v1/public/subscribeas our API endpoint. We could've picked any route for our internal API. However, Mailchimp’s API is external. Thus we should check the official documentation to find the API endpoint that adds an email address to a list. Read more about the API to add members to a list. The API endpoint is:
https://usX.api.mailchimp.com/3.0/lists/{LIST_ID}/members
Region usX is a subdomain. Follow these steps to find the subdomain for an API endpoint:
- sign up or log in to Mailchimp
- go to
Account > Extras > API keys > YourAPI keys - your API key may look like
xxxxxxxxxxxxxxxxxxxxxxxxxxxxxx-us17
That means the region is us17 and your app will send requests to the Mailchimp subdomain:
https://us17.api.mailchimp.com/3.0/lists/{LIST_ID}/members
Variable LIST_ID is the List ID of a particular list in your Mailchimp account. To find List ID, follow these steps:
- On your Mailchimp dashboard, go to
Lists > click the list name > Settings > List name anddefaults - Find the section
List ID Get the
xxxxxxxxxxvalue from this section, it's yourLIST_IDAuthorizationheader. We need to send ourAPI_KEYinsideAuthorizationheader to Mailchimp's server. This tells Mailchimp's server that our app is authorized to send a request. Read more about Authorization header here (headers.Authorization). Syntax forAuthorizationheader:
Authorization:
- In our case:
Authorization: Basic apikey:API_KEY
The API_KEY must be base64 encoded. Follow this example.
After encoding:
Authorization: `Basic ${Buffer.from(`apikey:${API_KEY}`).toString(‘base64’)}`
To find API_KEY:
- On your Mailchimp dashboard, go to
Account > Extras > API keys > YourAPI keys - Your API key may look like
xxxxxxxxxxxxxxxxxxxxxxxxxxxxxx-us17
Where are we going to store listId and API_KEY values? You can store all environmental variable in a .env file and manage them with the dotenv package. However, to stay focused in this tutorial, we add values directly to our server/mailchimp.js file:
const listId = 'xxxxxxxxxx';const API_KEY = 'xxxxxxxxxxxxxxxxxxxxxxxxxxxxxx-us17';
Plug in the above code snippets:
import request from 'request';
export async function subscribe({ email }) { const data = { email_address: email, status: 'subscribed', };
const listId = 'xxxxxxxxxx'; const API_KEY = 'xxxxxxxxxxxxxxxxxxxxxxxxxxxxxx-us17';
await new Promise((resolve, reject) => { request.post( { uri: `https://us17.api.mailchimp.com/3.0/lists/${listId}/members/`, headers: { Accept: 'application/json', Authorization: `Basic ${Buffer.from(`apikey:${API_KEY}`).toString('base64')}`, }, json: true, body: data, }, (err, response, body) => { if (err) { reject(err); } else { resolve(body); } }, ); });}
Remember to add real values for listId and API_KEY.
Testing
It’s time to test out the entire MailChimp subscription flow.
We exported our subscribe method from server/mailchimp.js, but we haven't imported/added this method to the Express route at server/app.js. To do so:
- Import to
server/app.jswith:
import { subscribe } from ‘./mailchimp’;
- Add an
async/awaitconstruct to the Express route, so we call and wait for thesubscribemethod. Modify the following snippet of code like this:
server.post('/api/v1/public/subscribe', async (req, res) => { const { email } = req.body; if (!email) { res.json({ error: 'Email is required' }); return; }
try { await subscribe({ email }); res.json({ subscribed: 1 }); console.log(email); } catch (err) { res.json({ error: err.message || err.toString() }); }});
We were able to use await for subscribe because this method returns a Promise. Recall the definition of subscribe — it has a line with new Promise().
Let’s add a console.log statement to the onSubmit function from pages/subscribe.js. Open your pages/subscribe.js file and add console.log like this:
try { await subscribeToNewsletter({ email });
if (this.emailInput) { this.emailInput.value = ''; } NProgress.done(); console.log('email was successfully added to Mailchimp list');} catch (err) { console.log(err); //eslint-disable-line NProgress.done();}
At this point, we can skip testing with Postman. Instead, let’s start our app, fill out the form, submit the form, and check if the email was added to the Mailchimp list. Also, we will see the output of our browser console.
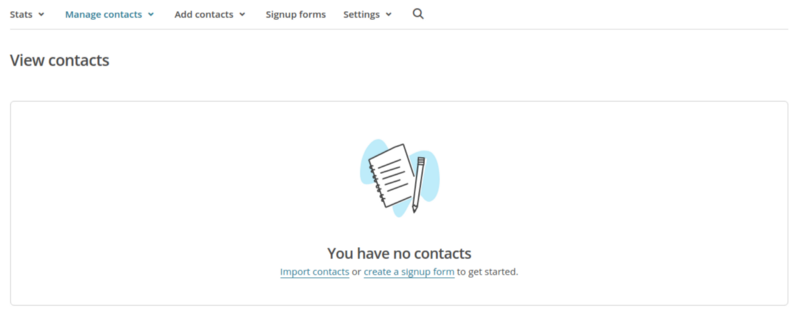
Start your app with yarn dev. Go to http://localhost:8000/subscribe. Take a look at the empty list on your Mailchimp dashboard:
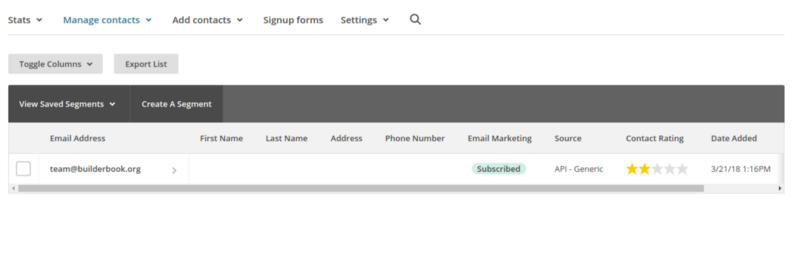
Fill out the form and click Subscribe. Refresh the page with the Mailchimp list:
And the browser console prints:

In case you are not running the app locally, you can test on the app I deployed for this tutorial: https://mailchimp.builderbook.org/subscribe. You’ll get a test email to confirm that MailChimp API worked.
Boom! You just learned two powerful skills: building internal and external APIs for your JavaScript web application.
When you complete this tutorial, your code should match code in the 1-end folder. This folder is located in the tutorials directory of our builderbook repo.
If you found this article useful, consider giving a star to our Github repo and checking out our book where we cover this and many other topics in detail.
If you are building a software product, check out our SaaS boilerplate and Async (team communication philosophy and tool for small teams of software engineers).