By Shen Huang
Firebase is a mobile app development platform developed by Firebase, Inc. in 2011, and then Acquired by Google in 2014. It provides various features such as Cloud Storage, Authentication and an ML kit, which are essential to developing modern mobile applications.
Additionally, it provides services such as Performance Monitoring, Crashlytics and Google Analytics to help you improve the quality of your applications.

In this tutorial I am going to show you how to connect your Flutter iOS application to the Firebase Platform on a Mac Computer, so you can utilize the powerful services provided by the firebase API in your future endeavors…
1. Readying a Gmail Account and a Flutter Project
In order to utilize services from Firebase and Google Cloud Platform, you will need a Google Account. If you do not have one, simply following the page instructions here to register for one.
This tutorial is going to show you how to connect your existing Flutter application to the Firebase platform. If you are interested in how to create your first Flutter application, I have a tutorial on How to create your first iOS Flutter app on MacOS. By the end of that tutorial, you should have a _helloworld application ready in the simulator and understand how to alter the application by modifying the main.dart file.
2. Creating a Firebase Project
In order to integrate your Flutter application with the Firebase Platform, first you have to create a Firebase Project. And here are the steps.
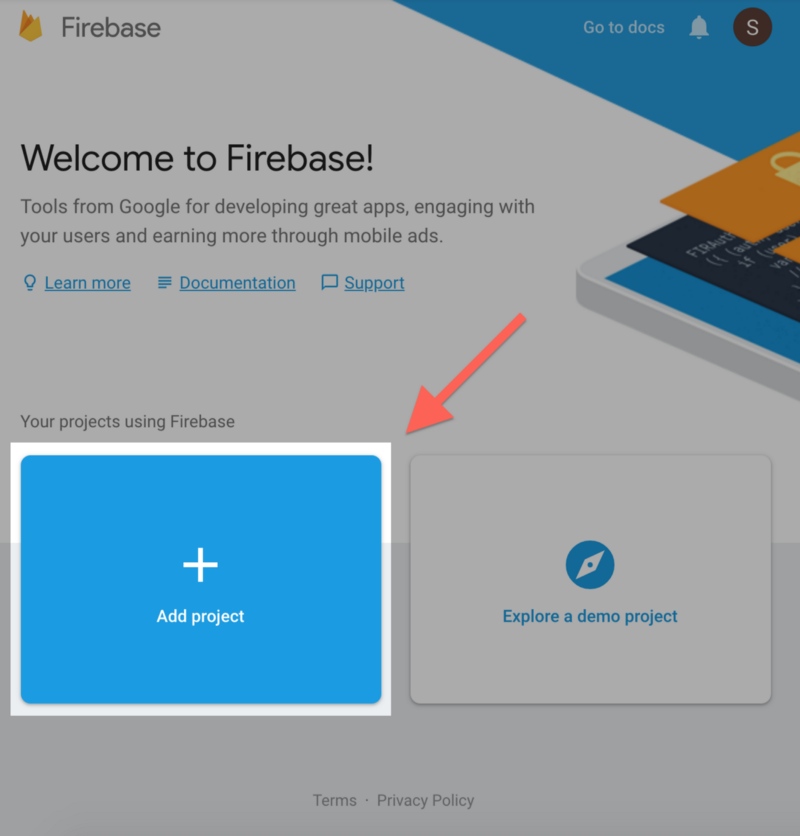
Go to the Firebase Console.
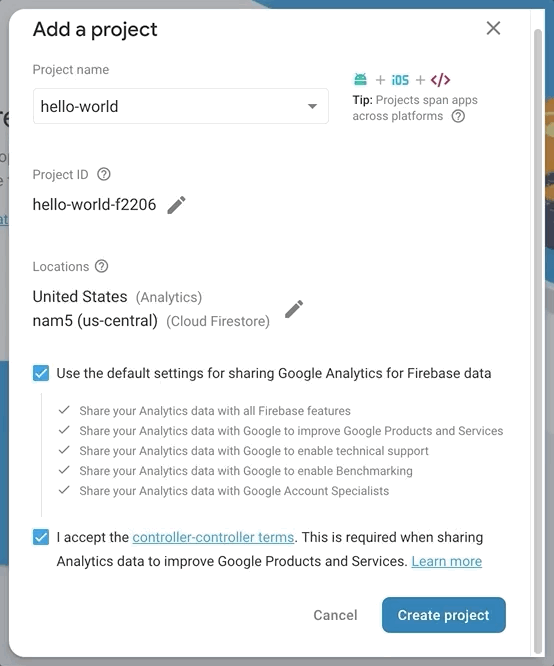
Click on the big Add project button.
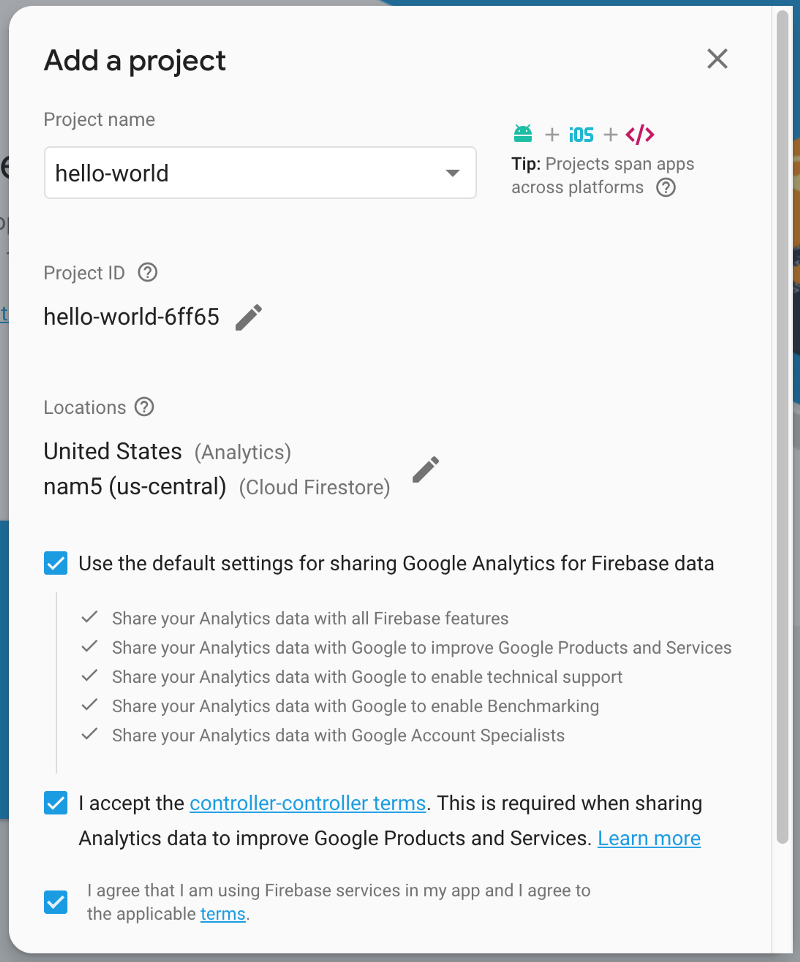
Enter your Project name.
I used hello-world for this example. Firebase automatically appends a unique ID to your project name — for example, the project I created ended up with the name hello-world-f2206.
You can pick a Cloud Firestore Location.
I left it as nam5 (us-central) because I live in Los Angeles, but the Cloud Functions are not available on us-west2, and the traffic in between will create additional charges. You can find more about service availabilities and server locations here.
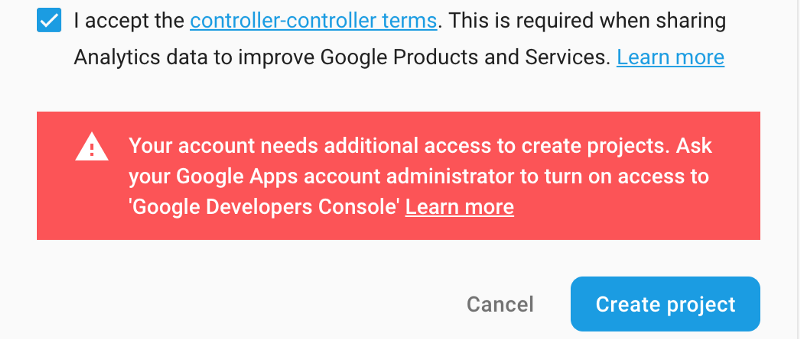
Accept the Terms and Conditions.
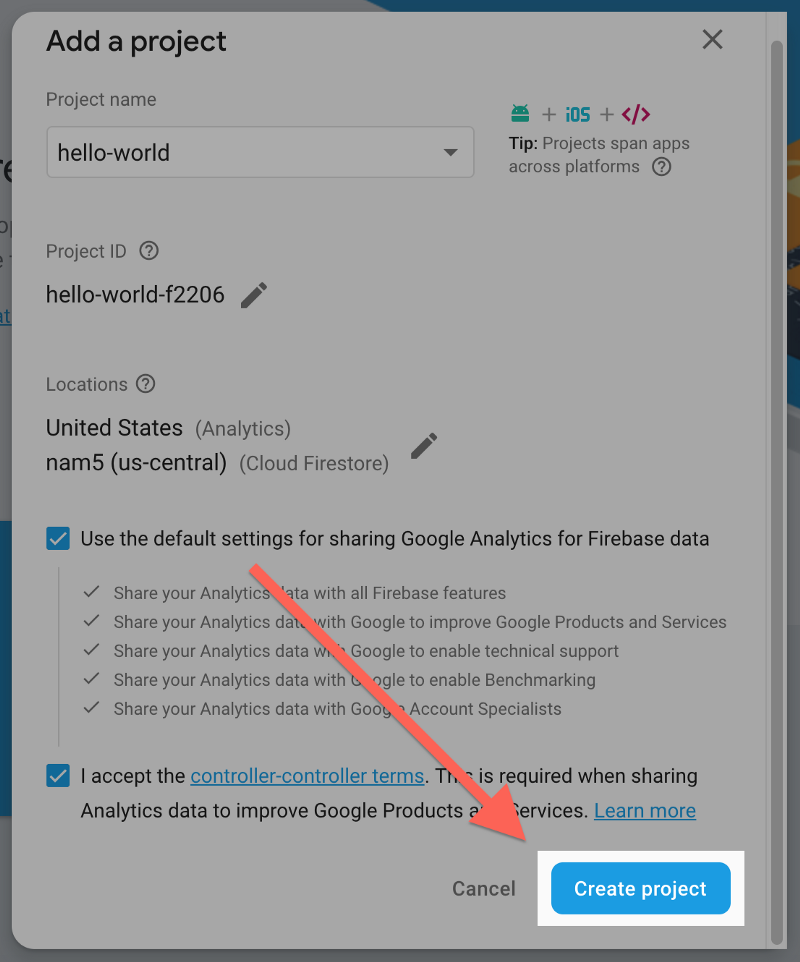
- Once you are done, scroll to the bottom and click Create Project.
- See 3.1 Switching to Administrator Account in the appendix at the end of this article if you encountered an error message asking for an administrator account.
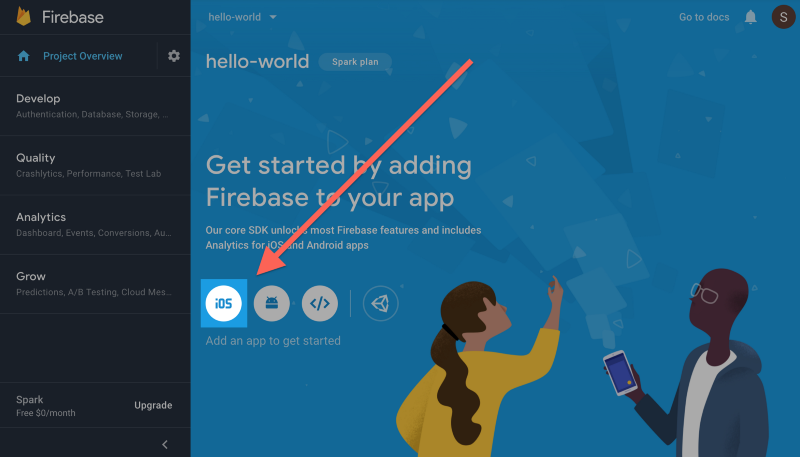
Firebase will take some time to ready your application. Once done, click on the Continue button to open up the Firebase Project Overview Page.
4. Configure an iOS Application
- In your Firebase Project Overview Page, launch the setup wizard for iOS.
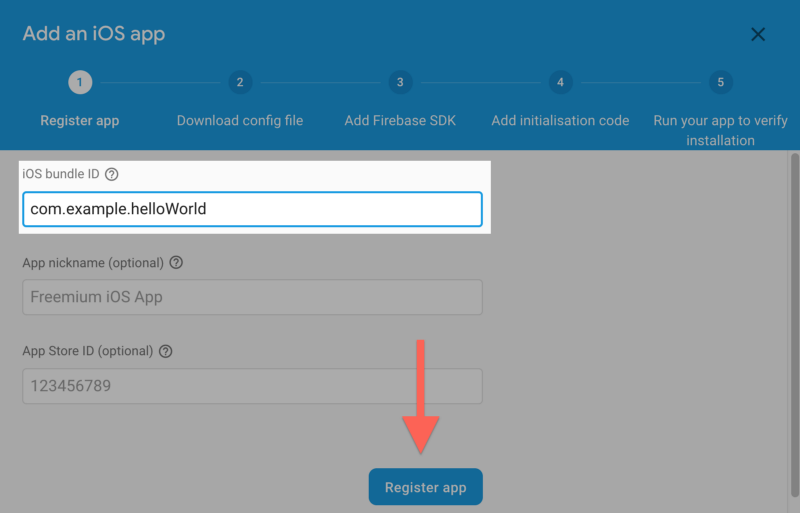
Inside the setup wizard, put in the iOS bundle ID. The Register app button should then light up, click on it.
A guide on how to find the iOS bundle ID can be found the below in section 4.1 Finding iOS Project root folder & Acquiring Bundle ID of the appendix.
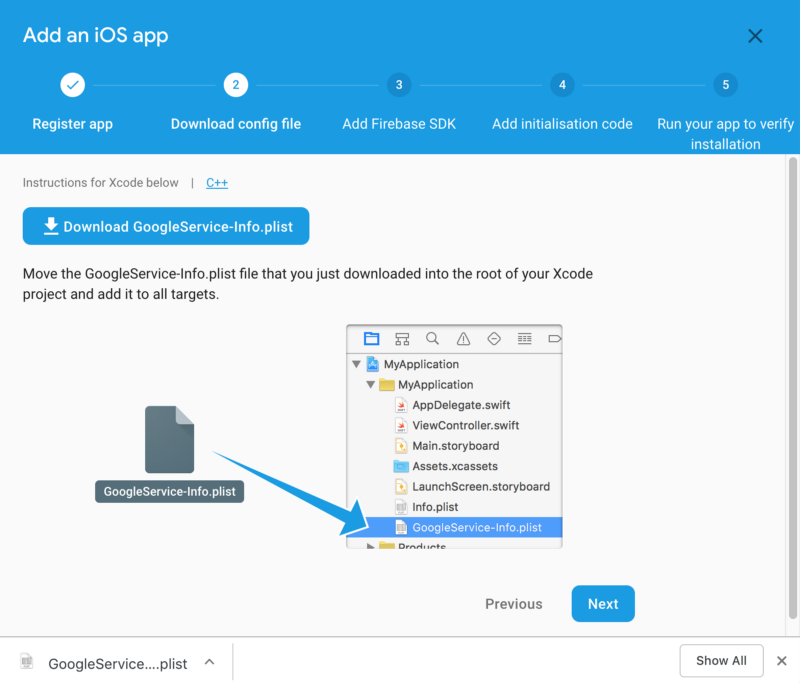
Download the GoogleService-Info.plist configuration file and put it into the iOS Project root folder, then click Next.
A guide on how to find the iOS bundle ID can be found below in section 4.1 Finding iOS Project root folder & Acquiring Bundle ID of the appendix.
- Follow the instructions to add the Firebase SDK, then click Next.

A detailed guide on how to install CocoaPods and Firebase SDK can be found below in section 4.2 Installing CocoaPods and Firebase SDK.
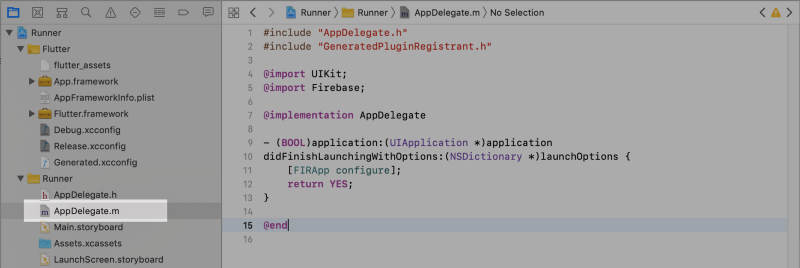
Modify the code inside the main AppDelegate as instructed by the setup wizard then click Next. For this example, I used Objective-C, and therefore replaced the contents inside AppDelegate.m with the following code.
#include "AppDelegate.h"
#include "GeneratedPluginRegistrant.h"

@import UIKit;
@import Firebase;

@implementation AppDelegate

- (BOOL)application:(UIApplication *)application
didFinishLaunchingWithOptions:(NSDictionary *)launchOptions {
[FIRApp configure];
return YES;
}

@end
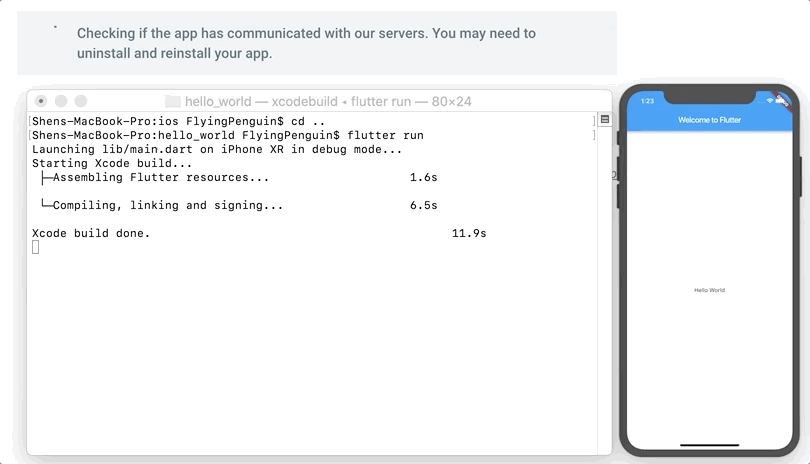
- Get back to the root folder and run your app, after a while you should see the setup wizard showing that your app is added to Firebase. Click Continue to the Console to finish the setup.
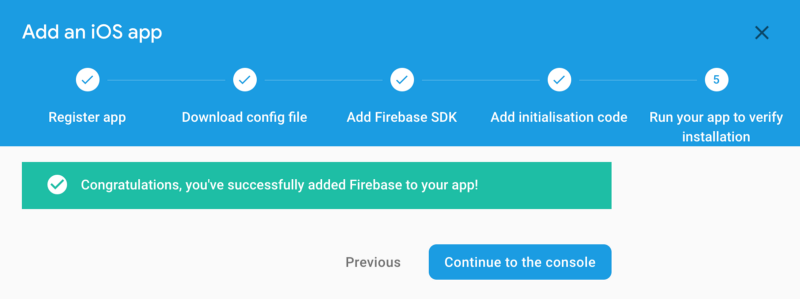
Congratulations! You have successful added Firebase to your Flutter application. Despite the fact that having both Firebase and Flutter from Google is supper cool, it is actually a good Software Engineering practice to always have a plan B, as well as plan C, D,E, F, and G. In the future I will write another guide on an example application utilizing Firebase, and more on Flutter.
Have fun coding!!!
Appendices:
3.1 Switching to Administrator Account
If you ran into the following message, it means that you need to contact the organization of your Gmail account to grant you access to Google Developers Console.
4.1 Finding iOS Project root folder & Acquiring Bundle ID
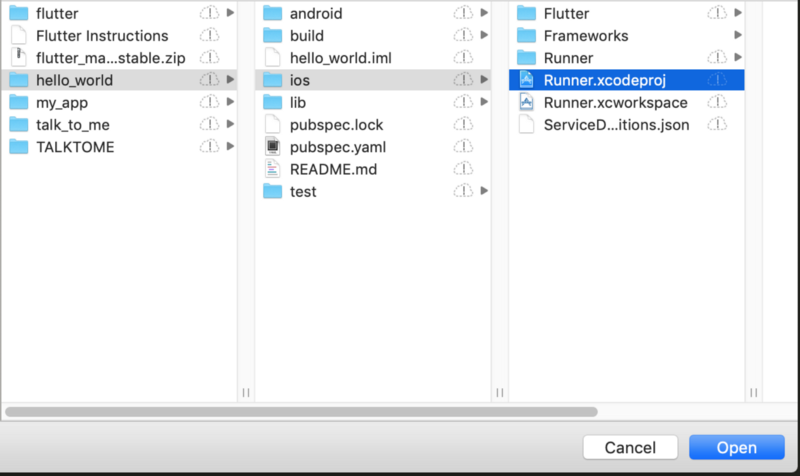
Launch Xcode from the Launchpad.
Select “Open another project…” at the bottom of the prompt screen.

- Navigate to your Flutter project folder, open the “ios” folder and select “Runner.xcodeproj”. This should automatically open up the project in Xcode.
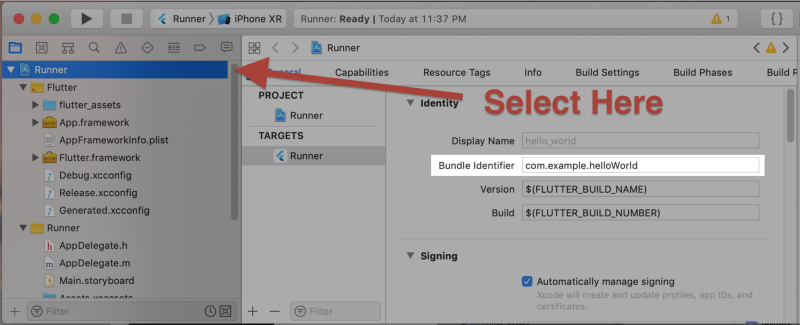
- Select the Runner project on the left, you should now see the Bundle Identifier under Identity.
4.2 Installing CocoaPods and Firebase SDK
In case the instructions inside the setup wizard did not work out, you will have to remove the existing Podfile in order to reinstall them correctly.

- CocoaPods is built with Ruby and is installable with the default Ruby available on MacOS. Use the following commands to install it.
sudo gem install cocoapods

- Initialize the Podfile with the following command.
pod init
- Then, add the following code to the initialized Podfile.
pod 'Firebase/Core'
- Once done, save the changes made to the Podfile, and install the Firebase SDK with the following command.
pod install

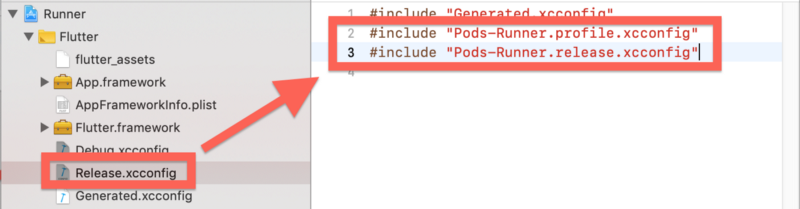
- After the installation, you will likely have to configure the .xcconfig files. First you will have to copy the files from the Pods/Target Support Files/Pods-Runner folder to Flutter folder.

- Then you will have to include them into the Debug.xcconfig and Release.xcconfig files inside the Flutter folder.
In Debug.xcconfig:
#include "Pods-Runner.debug.xcconfig"

In Release.xcconfig:
#include "Pods-Runner.profile.xcconfig"
#include "Pods-Runner.release.xcconfig"