By Dane David
React Hooks have been here for a while, and there are many packages, recipes and discussions going on about the same. This article goes through a similar path. It explains through two custom hook implementations to show how well code can be reused. There may be libraries or gists that perform the exact (or maybe improved) functionality that this article explains. It always helps to write code tailored for your needs, code that you can reason about.
This article assumes basic understanding and knowledge of React and React hooks. If not, you can read the docs and find out more about the React Hooks API.
The Setup
Instead of being revealed at the end, we can first take a look at what functionality we’re trying to build. The live version of what we’re about to build is hosted here: https://danedavid.github.io/use-focus.
The app consists of a horizontal list of React components that can be scrolled through. Each component may be different or the same ( here, two different types of components are used, only to show that code can be reused across components ). The one thing they all have in common: an input field.
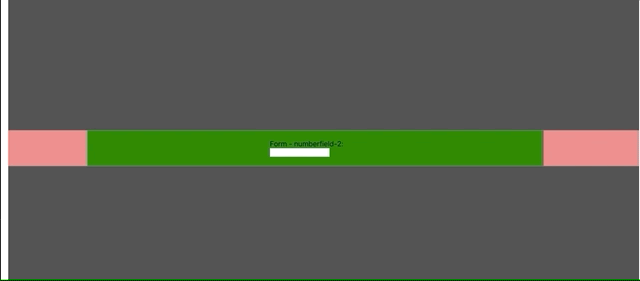 The element in the viewport is always the active element ( highlighted in green ) and has focus.
Our Goal: Always make the element inside the viewport the “active” element. Give focus to the input field inside that component, throughout scrolling.
We can manage an activeElement state inside our root component, which stores an ID corresponding to the element active at any given time. The code for the root component is then:
Components NumberInputFormElement and TextInputFormElement are very similar components. The first one renders an input[type="number"]. While the latter renders a text input field. That’s the only difference.
useActiveOnIntersect
The first hook to be added is the one that will set the active element once the element reaches the viewport. That is, the hook useActiveOnIntersect must call setActiveElement passed from the parent, once the element is on the viewport. There is a well-known browser API for the same: window.IntersectionObserver. If you’re not familiar, I suggest you read more about it here.
The hook must basically create an instance of IntersectionObserver and listen for when it comes into view. We have given an id=intersector attribute for the outermost div. This div will act as the root element for IntersectionObserver. The element must listen to when it is totally (or at least 95%) inside this root element. We use the useEffect hook for registering the IntersectionObserver instance. And pass a callback function that invokes setActiveElement on the intersection ( in our case, when the intersection ratio is greater than 95% ). The code for useActiveOnIntersect is given below:
The hook does what it’s supposed to do: register an observer instance that listens for intersection with the root element, given in the options as document.querySelector('#intersector'), and invoke setActiveElement if the element is intersecting. elementRef is the React ref pointing to the DOM container element.
How does setActiveElement know which element is the active one? We’ll pass it from inside the component when we call this hook:
useActiveOnIntersect(() => setActiveElement(id), containerEl);
Here, id is the value to be set as the activeElement in App component. containerEl is the React ref referencing the input field’s container.
useFocusOnActive
Now that we are sure that activeElement always points to the element that is inside the viewport ( root element ) at any given time, we need to make sure that the input field inside the component gets focus. Again, we use the useEffect hook for focusing the input field once it is active, and the cleanup function blurs the input field once it is not the active element anymore. The code is concise and straightforward:
inputRef is the React ref pointing to the input field, and active is the active state of the containing element.
Conclusion
The code for a component that uses both these hooks is given below:
We have used useRef hook to create refs for container and input elements and pass it on to their respective hooks. The functionality can even be written inside a single hook. The reason behind writing two separate hooks is because each represents a different effect.
The complete code can be found here: https://github.com/danedavid/use-focus.
Hope this article was helpful & short! Go ahead and write your own custom React hook now!
If you liked the article, hit the clap button below. You can also follow me on medium or twitter for more!!
Happy coding…!