
By Edo Rivai
Let’s say you’ve decided to test your codebase, and you’ve read that unit and integration tests shouldn’t perform I/O. You’ve figured you need to mock out the outbound HTTP requests that your app is making, but you’re not sure where to start.
I decided to ask Kent C. Dodds on twitter how he approaches HTTP mocking:
Fair enough, Kent! I guess this topic is worth a more elaborate write-up.
TL;DR
When you need to test code that sends out HTTP requests, try the following.
- Split up the HTTP requests from your business logic of processing the response. Very often the code that handles the HTTP level protocol stuff is not very interesting, and arguably doesn’t require testing. Use your mocking tool of choice to mock out your API wrapper.
- If you really need to test HTTP-specific code, and the response from the external API is relatively simple, use Nock, and manually mock out requests.
- If the response you need to test against is fairly complex, use
nock-recordto record a response once, and use that recording for subsequent tests.
Since the testing community is obsessed with pyramids, here ya go:
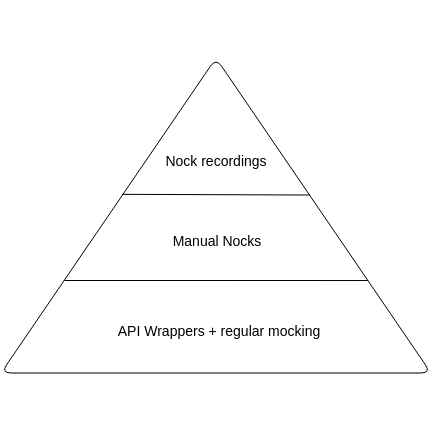 HTTP Mocking pyramid. “API Wrappers + regular mocking” at the base. “Manual Nocks” in the middle. “Nock recordings” at the top.
Enter Nock
I would say that the general consensus in NodeJS land is to use [nock](https://github.com/node-nock/nock) , which works by patching Node’s native http module. This works really well, because even if you’re not using the http module directly, most user-land libraries like axios, superagent , and node-fetch still use http under the hood.
Writing and using a Nock looks like this:
// Set up an interceptornock('http://www.example.com') .post('/login', 'username=pgte&password=123456') .reply(200, { id: '123ABC' });
// Run your code, which sends out a requestfetchUser('pgte', '123456');
In the above example, fetchUser will send a POST request to example.com/login . Nock will intercept the request, and immediately respond with your predefined response, without actually hitting the network. Awesome!
It’s not that simple
When I first got started with Nock, I eagerly started using it with my unit tests. However, I was quickly getting the feeling that I was spending more time writing Nocks than actually testing business logic. One solution to this is to split your requesting code from your business logic. Let’s look at some code.
async function getUser(id) { const response = await fetch(`/api/users/${id}`); // User does not exist if (response.status === 404) return null;
// Some other error occurred if (response.status > 400) { throw new Error(`Unable to fetch user #${id}`); } const { firstName, lastName } = await response.json(); return { firstName, lastName, fullName: `${firstName} ${lastName}` };}
The above code sends out a request to /api/users/<user id>, and when a user is found, it receives an object containing a firstName and lastName. Finally, it constructs an object, which has an additional field fullName, which is computed from the first and last name received from the request.
A test suite for this function could look like this:
it('should properly decorate the fullName', async () => { nock('http://localhost') .get('/api/users/123') .reply(200, { firstName: 'John', lastName: 'Doe }); const user = await getUser(123); expect(user).toEqual({ firstName: 'John', lastName: 'Doe, fullName: 'John Doe' });});
it('should return null if the user does not exist', async () => { nock('http://localhost') .get('/api/users/1337') .reply(404); const user = await getUser(1337); expect(user).toBe(null);});
it('should return null when an error occurs', async () => { nock('http://localhost') .get('/api/users/42') .reply(404); const userPromise = getUser(42); expect(userPromise).rejects.toThrow('Unable to fetch user #42');});
As you can see, there is quite a lot going on in these tests. Let’s split the function up into two parts:
- code that sends and handles the HTTP request
- our business logic
Our example is a bit contrived, as the only business logic that we have is to “compute” the fullName . But you can imagine how a real-world app would have more complex business logic.
// api.jsexport async function getUserFromApi(id) { const response = await fetch(`/api/users/${id}`); // User does not exist if (response.status === 404) return null;
// Some other error occurred if (response.status > 400) { throw new Error(`Unable to fetch user #${id}`); }
return response.json();}
// user.jsimport { getUserFromApi } from './api';
async function getUserWithFullName(id) { const user = await getUserFromApi(id); if (!user) return user;
const { firstName, lastName } = user; return { firstName, lastName, fullName: `${firstName} ${lastName}` };}
For the sake of not boring you to death, I’m only going to show you the tests for our business logic. Instead of using Nock to mock out the HTTP request, you can now use your mocking library of choice to mock out our own API wrapper. I prefer Jest, but this pattern is not tied to any specific mocking library.
// The function we're testingimport { getUserWithFullName } from './user';
// Only imported for mockingimport { getUserFromApi } from './api';
jest.mock('./api');
it('should properly decorate the fullName', async () => { getUserFromApi.mockResolvedValueOnce( { firstName: 'John', lastName: 'Doe } ); const user = await getUserWithFullName(123); expect(user).toEqual({ firstName: 'John', lastName: 'Doe, fullName: 'John Doe' });});
it('should return null if the user does not exist', async () => { getUserFromApi.mockResolvedValueOnce(null); const user = await getUserWithFullName(1337); expect(user).toBe(null);});
As you can see, our tests look a bit cleaner. All of the HTTP overhead is now contained within the API module. What we’ve effectively done is minimize the surface of our code that knows about the HTTP transport. And in doing so, we minimize the need for using Nock in our tests.
But the HTTP logic is exactly what I want to test!
I hear you. Sometimes the connection to an external API is exactly what you want to test.
I’ve already shown how you can use Nock to mock out a very basic HTTP request. Writing explicit Nocks for such simple request/response pairs is very effective, and I would recommend sticking to it as much as possible.
However, sometimes the content of the request or the response can get fairly complex. Writing manual Nocks for such cases quickly becomes tedious, and also brittle!
A very clear example of such a case would be testing a scraper. The main responsibility of a scraper is to convert raw HTML into useful data. However, when testing your scraper, you don’t want to be manually constructing an HTML page to feed into Nock. Moreover, the site that you intend to scrape already has the HTML that you want to process, so let’s make use of that! Think Jest Snapshots, for HTTP mocking.
Scraping topics from Medium
Let’s say I want to know all of the topics that are available on Medium.
 Screenshot of medium.com homepage, showing the list of available topics
We’ll use scrape-it to request the Medium homepage, and extract the texts from all elements that match .ds-nav-item :
import scrapeIt from "scrape-it";
export function getTopics() { return scrapeIt("https://medium.com", { topics: { listItem: ".ds-nav-item" } }).then(({ data }) => data.topics);}
// UsagegetTopics().then(console.log);// [ 'Home', 'Tech', 'Culture', 'Entrepreneurship', 'Self', 'Politics', 'Media', 'Design', 'Science', 'Work', 'Popular', 'More' ]
? Looking good!
Now how would we go about mocking the actual request in our test? One way to achieve this would be to go to medium.com in our browser, view-source, and copy/paste that into a Nock manually. That is tedious and error-prone. If we really want the entire HTML document, we might just as well let the computer handle that for us.
It turns out Nock has a built-in mechanism called “Recording”. This let’s you use the Nock interceptors to intercept actual HTTP traffic, then store the request/response pair in a file, and use that recording for future requests.
Personally, I found the functionality of Nock recordings very useful, but the ergonomics of it could be improved upon. So here’s my shameless plug for nock-record , a more ergonomic library to leverage recordings:
Let’s see how we could test our scraper using nock-record :
import { setupRecorder } from 'nock-record';import { getTopics } from './index';
const record = setupRecorder();
describe('#getTopics', () => { it('should get all topics', async () => { // Start recording, specify fixture name const { completeRecording } = await record('medium-topics');
// Our actual function under test const result = await getTopics(); // Complete the recording, allow for Nock to write fixtures completeRecording(); expect(result).toEqual([ 'Home', 'Tech', 'Culture', 'Entrepreneurship', 'Self', 'Politics', 'Media', 'Design', 'Science', 'Work', 'Popular', 'More' ]); });});
The first time we run this test, it will send out the actual request to fetch the HTML of the Medium homepage:
✓ should get all topics (1163ms)
After that first run, nock-record has saved the recording to a file at__nock-fixtures__/medium-topics.json . For the second run, nock-record will automatically load the recording, and setup a Nock for you.
✓ should get all topics (116ms)
If you’ve used Jest snapshots before, this workflow will feel very familiar to you.
We have now gained 3 things by leveraging recordings:
- Deterministic: your test will always run against the same HTML document
- Fast: subsequent tests will not hit the network
- Ergonomic: no need to manually juggle response fixtures
Let me know what you think
The approach that I’ve outlined in this article has worked well for me. I’d love to hear about your experience in the comments or on twitter: @EdoRivai .