

Note: This the third video in the Git for beginners series. Watch the first video here.
In Git terminology, we call the Git repository on your computer a local repository.
A Git remote is the same repository stored somewhere else on the internet. It can serve as a backup. If your computer crashes, you can always get the latest version from the remote back onto your computer.
Before we talk about Git remotes, we have to talk about different services that provide you with Git remotes. Let’s look at some examples.
Differences between Git services
There are no differences between these three services where Git itself is concerned.
The only differences between the services are their popularity, web interface, and pricing.
Many people like to use Github because Github is the most popular one out of the three. This is also why most open source projects are hosted on Github. (Note: open source projects can also be hosted on Bitbucket and Gitlab as well).
Sometimes you may want to create private repositories. A private repository is a Git repository that can only be read by you and the people you give permission.
If you want to create private repositories, you might want to consider Bitbucket or Gitlab. They let you create private repositories for free.
If you want to create a private repository on Github, you need to pay $7 a month.
This article shows you how to set up a remote on Github. The other services follow the same instructions.
Creating a repository on Github
Sign in to Github. Create an account if you don’t have one already.
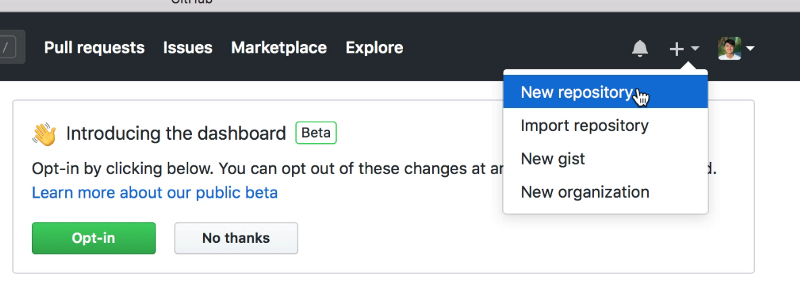
Once you sign in, you’ll see a plus (+) button on the right-hand corner of the page. Click on this plus button and select “new repository.”
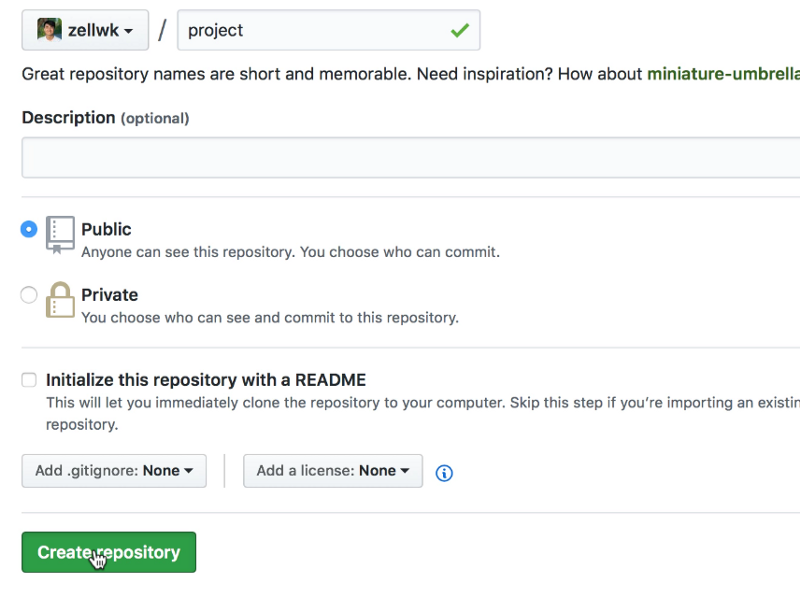
To create a new repository, you need to give your repository a name.
The description provides details so other people can understand your project. It is optional. You can leave it out for now.
Set the project to public or private, depending on what you want.
Then, ignore the rest and click on the create repository button.
Once you click on create repository, you’ll come to a page with some Git instructions.
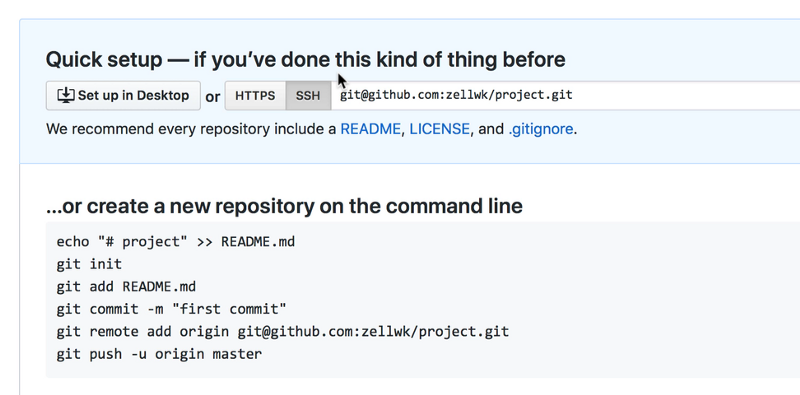
Ignore these instructions for now. This knowledge requires you to use the Git command line. You’re going to learn how to do that in a few lessons.
For now, we want to link up our local repository in Fork to the remote repository we just created.
Copy the URL you see on the page.
Make sure you select SSH (not HTTPS!).
SSH lets you push (put things into the remote repository) and pull (copy the remote back to your local) without entering your Github username and password every time. It makes things a lot easier.

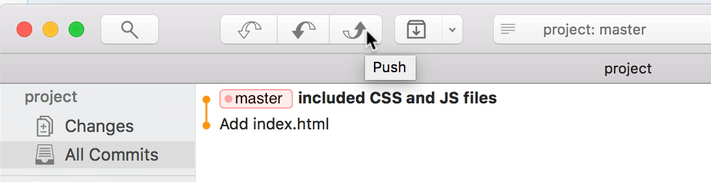
Next, open the project in Fork and click the Push button.
It is the fourth button from the left. It looks like an arrow that goes upwards.
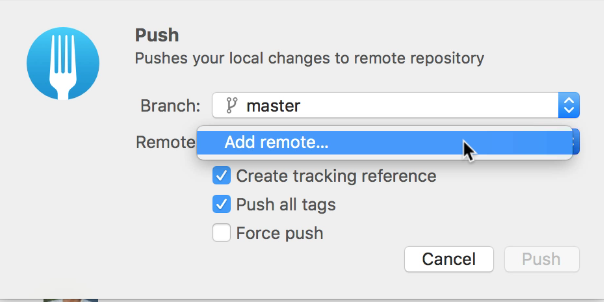
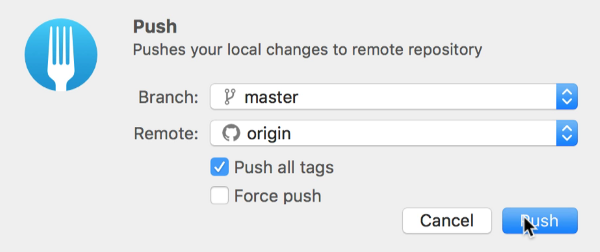
Once you click on the push button, Fork will ask you to select a branch and a remote to push to.
In this case, our branch will be master (because we only have one branch).
We need to add the remote we just created. To add the remote, click on the select box and select add remote.
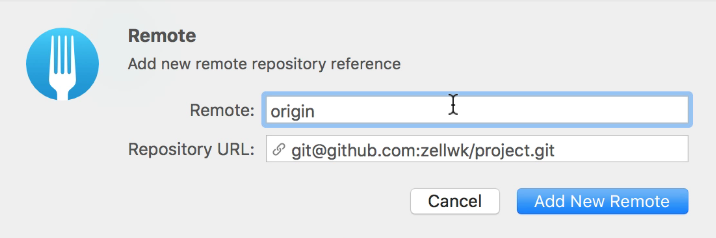
Next, you need to name your remote.
The default name for most remotes will be origin. If you have multiple remotes, you will want to rename the remote according to where they are from (like Github, Heroku, and Bitbucket).
The repository URL should be the URL you copied from Github.
Select Add new remote when you’re done.
Pushing to the remote for the first time
When you push your files onto the remote for the first time, make sure the create tracking reference checkbox is checked.
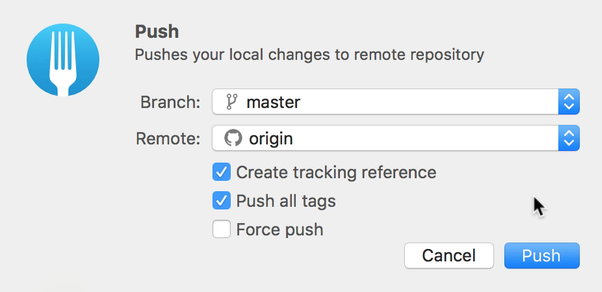
A tracking reference tells Git to track the current branch (master in this case) and to push or pull to the same branch on the remote.
If you don’t create a tracking reference, you will need to specify which branch to push to (or pull from) every time.
Note: if branching sounds foreign to you right now, don’t worry about it. We’ll talk about branching in a later lesson. For now, just remember you need to create a tracking reference.
Once that is checked, you can click push and Fork will push your project onto Github.
Once it is pushed, you can look at the All Commits section. (In other Git clients, that will be Git History).
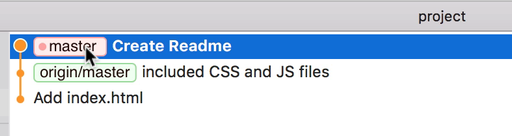
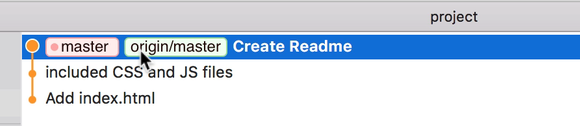
In all commits, you’ll see two tags. One is called master (the master branch on our computer). And the other is called origin/master (the master branch on the remote named origin). In this case, our origin is Github, so origin/master refers to the master branch on Github.
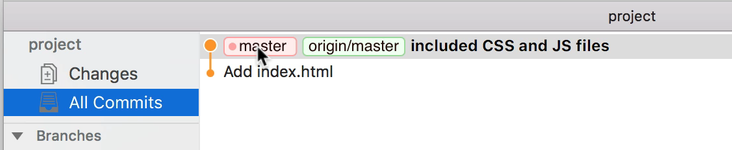
When these two tags are on the same commit, it means the files we have on our local master branch is the same as the files we have on Github’s master branch.
You can verify this is true if you go back to the page where you got the Git remote URL from. Refresh this page and you’ll see what you’ll usually see on Github (a project page).
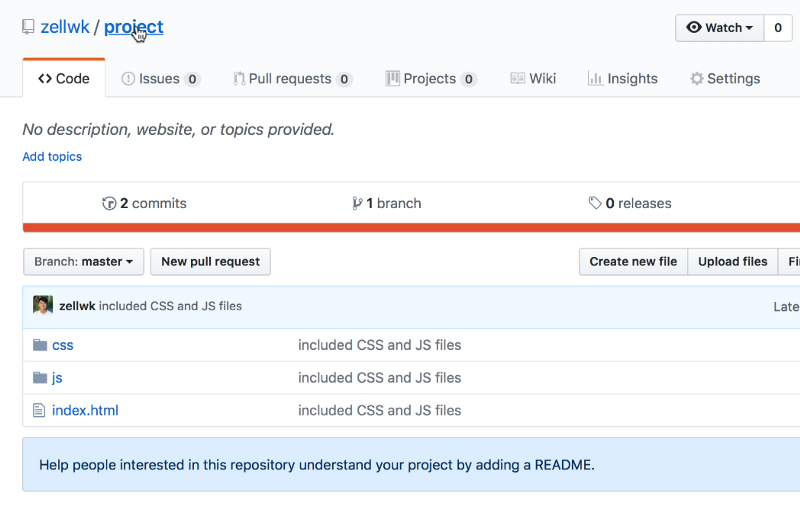
If you look at the files, you’ll notice that the files are exactly the same as the files you have on your computer.
Pushing for the second time
Subsequent pushes are much easier.
Let’s say we make a change to our repository. This time, we want to create a README.md file. A README.md file shows up the Git project page and helps people understand what the project is about.
You want to create a README.md file for every repository you create.
Once we have created the file, we’ll see the changes in Fork if we click on the changes tab.
As before, we want to stage the file and commit the file. In this case, the commit message can be “Create Readme.md”.
When you create a new commit, take a look at the sidebar on the left. You’ll see a number, one, and an arrow that points upwards beside the master branch.
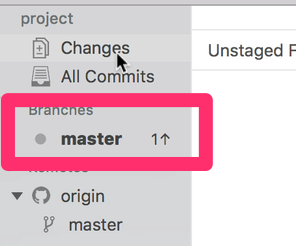
This tells us our master branch is one commit ahead of the remote branch. This means our master branch is more up to date compared to the remote branch.
If you look at the Git history, you can the “Create readme.md” commit is on the local branch, but this commit did not make it to the remote yet.
To push the new commit onto the remote, you need to click on the push button again.
Then, click push once more.
That’s it.
Once the commit is pushed to the remote branch, you can see that the origin/master tag gets moved to the same commit as the master tag.
To prove that this is working, you can refresh the Github repository page and you’ll be able to see your new README.md file!
Wrapping up
A Git remote is kind of like a backup that is stored on someone else’s computer. To create a Git remote, you can use one of the popular services like Github, Bitbucket, and Gitlab.
Create a remote repository, then link your local repository to the remote repository. When you link them up, you can push to the remote repository.
Thanks for reading. Did this article help you in any way? If I did, I hope you consider sharing it; you might just help someone who felt the same way you did before reading the article. Thank you.
This article was originally posted at my blog.
Sign up for my newsletter if you want more articles to help you become a better front-end developer.