
By Julius
Continuous Deployment is a beautiful thing. Committing your project and seeing it being built and deployed without having to do anything is mesmerizing.
And in this article, I want to show you how to get it done in your home project with ease.
To clear it up, here is a flowchart showing the differences between Continuous Delivery and Continuous Deployment.
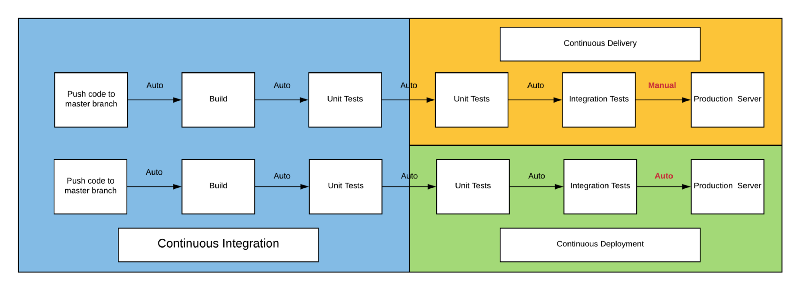
Since most of the time no one but you depends on your home project, we’re going for a workflow with Continuous Deployment since you want to see your changes immediately deployed. If that’s not the case, you can change the workflow later.
You will learn about the following:
- How to make a Dockerfile
- How to push your project to GitHub
- Automatically building the docker image on Docker Hub
- Automatically downloading and running the image with Watchtower
Prerequisites:
- Some knowledge about Docker and the Dockerfile, though I will explain some of it along the way
- Have git installed
- A Docker Hub account
- A (Linux) server (either physical or virtual) running Docker
For reference, this is the example GitHub repository, and this is the example docker hub repository that I’ll be using.
Thus this tutorial will only be useful if you intend to run your software with Docker (which I recommend as Docker is fantastic).
Why use Docker?
Docker enables you to have the same environment for development and production which eliminates Heisenbugs and the “it works on my machine” problem. Also, containers are isolated which gives us security benefits.
There’s more to it, but these two benefits make me always deliver my software in Docker containers.
Setting up your Dockerfile
First, we will make a Dockerfile for the project. This special file is always called “Dockerfile” without an extension and sits at the top directory of your project.
A Dockerfile starts with the FROM statement which tells Docker which base image you want to start with. You can imagine this as using a canvas with the background already drawn and only the central part (your program) missing.
Most of the time the image you want to pull is the base image of your programming language, which you can find at the before mentioned Docker Hub.
Next, we copy our project files into the docker container with the COPY.. command. What does this do?
It takes the files from the first directory (the dot refers to the current directory of the file, which includes all your project files) and puts it in the current directory of your Docker container (remember your docker container is its own OS). Your files are now at the base directory there, which you may want to change.
Next, we need to install dependencies, which I will use python pip for, but any equivalent package management system depending on your language of choice will do. The critical thing to learn here is how to execute commands in the container with RUN.
From python:3.7COPY . .RUN pip install -r requirements.txt
Easy, isn’t it? Now we have to start our program in the container.
CMD ["python", "./my_script.py"]
The CMD statement is unique. Every Dockerfile has to have it as its last line because it starts the primary process in the container.
You have finished your Dockerfile! You can now manually build your image and container, but we’re going to skip that for now.
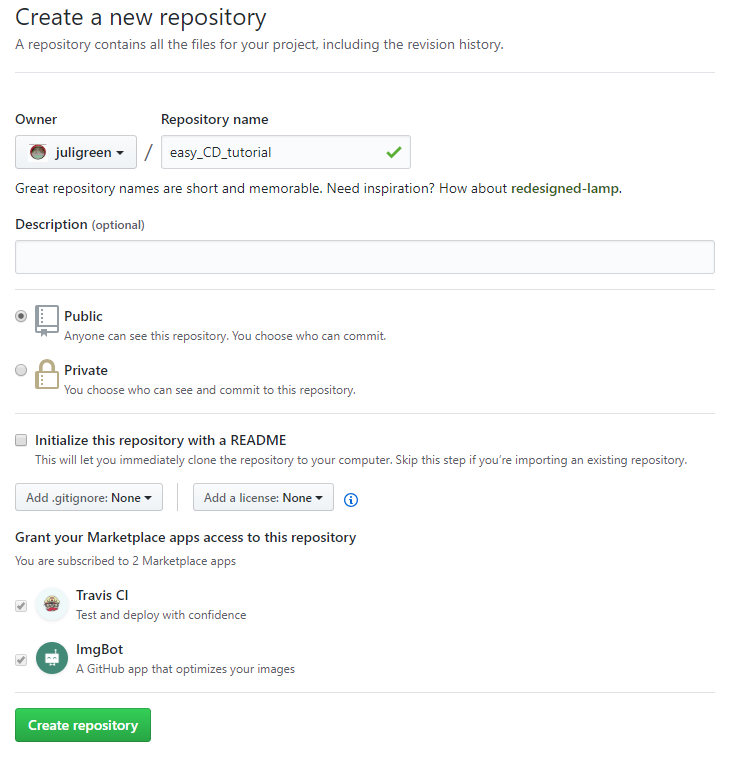
Now, we’ll create our repository on GitHub, but remember to leave “Initialize this repository with a README” unticked.
Then you’d need to copy the remote URL.
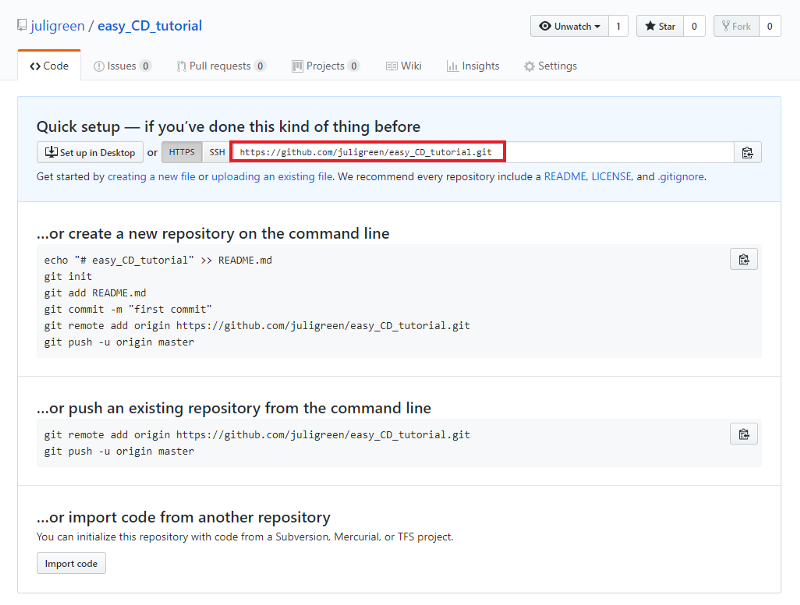
Open a cmd/shell in the root directory of your project.
You need to initialize your git repository, add your files, configure the remote, commit the files and push your project to GitHub.
git initgit add *git remote add origin https://github.com/<user>/<repository>.gitgit commit -a -m "Make Dockerfile ready for CD"git push -u origin master
Now, your GitHub Repository should look like this:
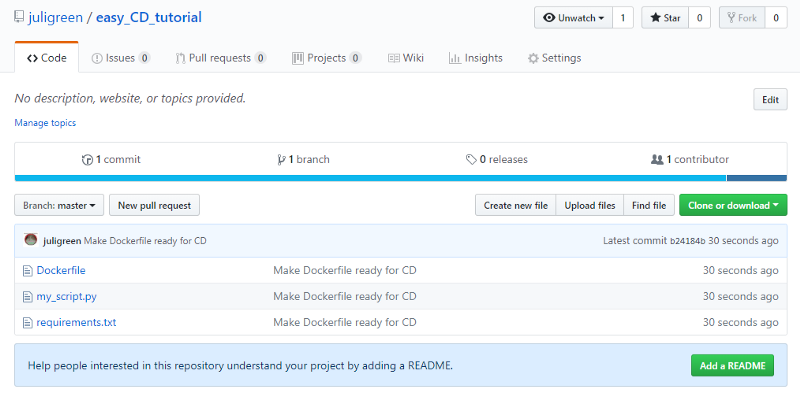
Congratulations, you’re about halfway done!
The next step is to connect GitHub to Docker Hub. For this, you go to the account settings.
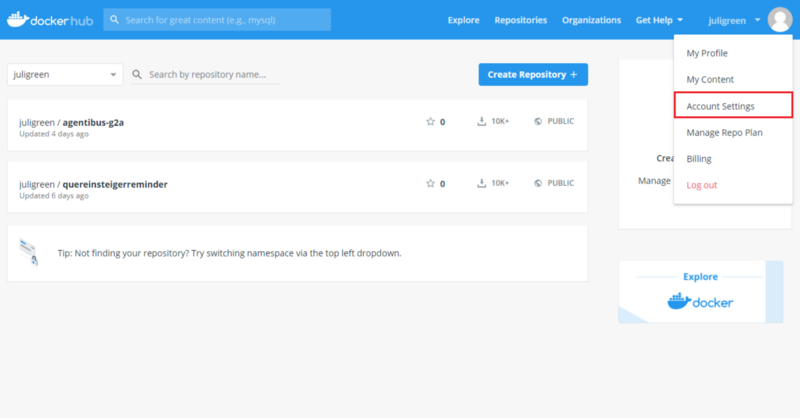
Scroll down and connect your git host.

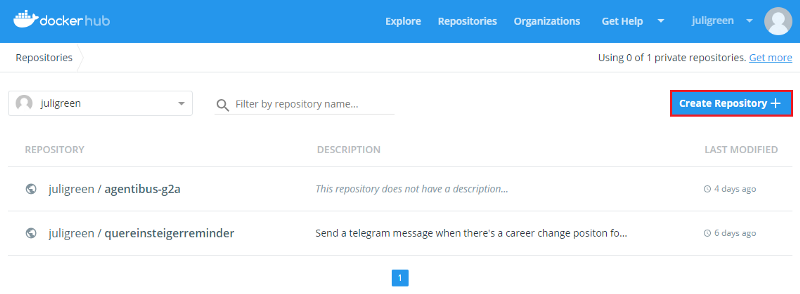
Create your repository on docker hub now.
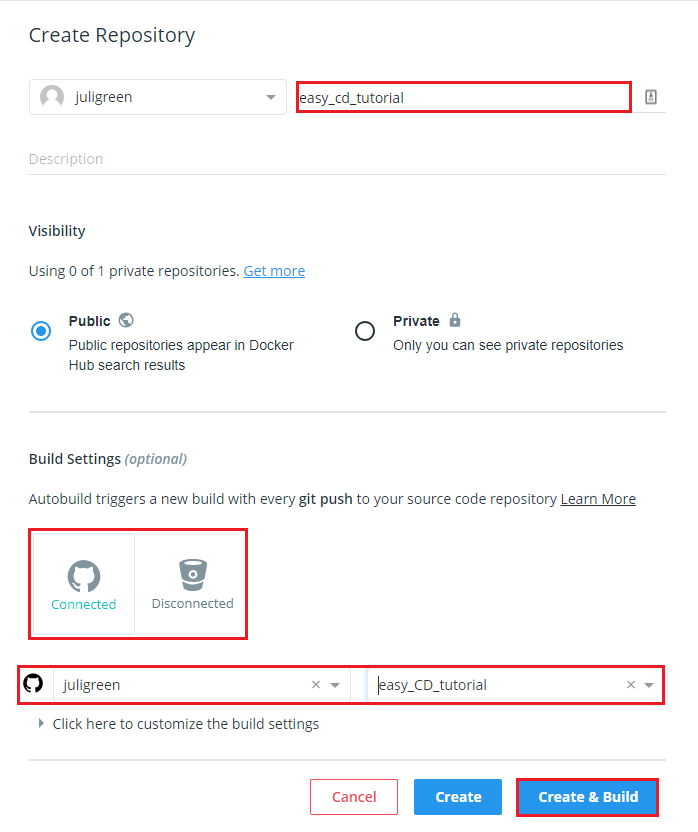
Give the repo a name and click the GitHub icon (or Bitbucket, if that’s your thing). Now choose your organization (usually your username) and your project’s name. If you want to use your master image for the build and always push to latest, you can now click “Create & Build” and watch your image being built for you. Otherwise, you have to edit the build settings.
Last steps! Now you need Watchtower on your target machine.
Watchtower is a program that pulls your running docker images and checks for updates. If there are any updates, it gracefully shuts down the original container and creates a container from the new image with the same settings.
The best thing is that we can also install Watchtower with Docker!
Enter the following into your terminal:
docker run -d --name watchtower -v /var/run/docker.sock:/var/run/docker.sock v2tec/watchtower
Then you need to run the Docker container for your project!
docker run -d --name <my-project> <username>/<my-project>
The “-d” option makes your program run in the background, so the program doesn’t shut down if you close the terminal.
So to summarize, if you push a commit to your GitHub repository, Docker hub will automatically build a Docker image for you. This image then gets pulled by WatchTower and is run with all original options.
If you need help at any point don’t be afraid to ask, I’m happy to help.
If it is a technical problem, an issue on the GitHub project would be awesome!
But what about tests?
Good question!
You can use Travis CI to run your tests at the same time.
You can read about this here, but the gist of it is, that you add another file to your repository which has instructions for an external server to execute unit tests or any other instructions.
But what if I only want my docker image to build if the tests pass?
This breaks our workflow a bit.
We now can’t rely on docker hub to build our images anymore. Instead, it’s also going to be Travis CI that produces the image and then pushes it to your Docker Hub repository. Read about this here.