As a software engineer, you may consider having a professional email account along with your own website, like "info@example.com". But this may cost a certain amount that you'll not be willing to pay.
But do you know you can do it for free? There is actually a way to do it, and besides the fact that having the professional email account is free, it will help you be more efficient, reliable and secure in your daily work.
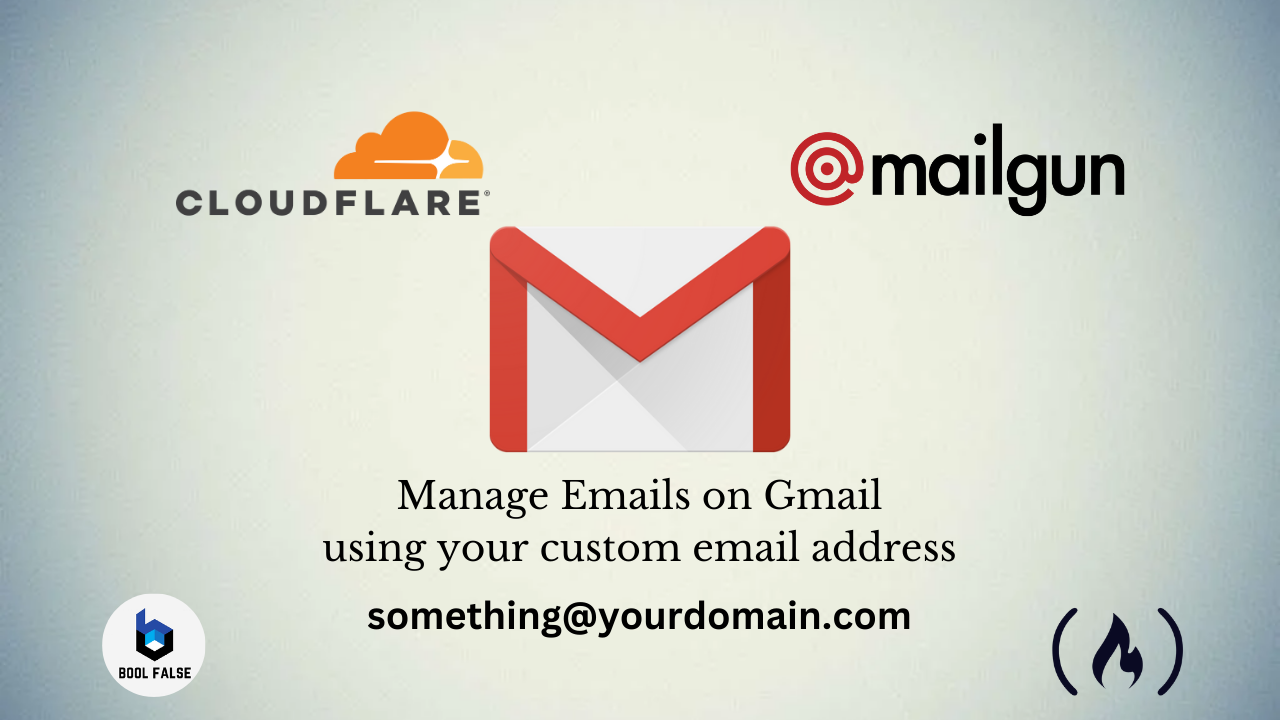
In this article, you'll learn how to create and set up your own email address using Cloudflare and Mailgun to manage emails in Gmail. This means that you can send and receive emails directly in your Gmail inbox.
I've done this already for personal use and have taken screenshots of the entire process that you'll see in this article. So I'll share all the necessary steps you need to follow to set up your own email.
Let's figure out what you need to have before you start, what you are going to do, and how it will work.
What you need to have before you start
I assume that you already have a domain, let's call it "yourdomain.com". Specifically, you need to have accessibility to connect your domain with Cloudflare and setup DNS records there. A classic example of that is having a domain on some domain registrar (like GoDaddy, Namecheap), and adding your domain to Cloudflare by setting DNS records provided by Cloudflare on your domain registrar account.
Adding a domain to Cloudflare involves updating your domain's DNS nameservers to point to Cloudflare's nameservers. Once the domain is added, Cloudflare acts as an intermediary for web traffic, providing security features like DDoS protection, firewall, and SSL encryption, as well as performance enhancements through caching and content optimization.
If you haven't done that yet, here's the official video on YouTube on how to connect your domain to Cloudflare.
Additionally, Cloudflare manages DNS records for your domain, allowing you to control how traffic is routed and ensuring reliable delivery of services like email.
So, our work in this article will be focusing exactly on that: how to setup your domain on Cloudflare Email.
Cloudflare Email has been one of the services of Cloudflare since 2021, which can be used for free (as of now, at least).
The second assumption is that you have Gmail account, and you have access to its email settings. Simply, if you just have a regular "youremail@gmail.com" email, which isn't under the control of any administrator, then you have nothing to worry about. We'll explore and work on email settings later on.
What you are going to do
In simple words, you're going to create a custom email like "something@yourdomain.com", which you can use to send and receive emails using Gmail's platform. So you will be receiving and reading emails sent to "something@yourdomain.com" in Gmail, as well as sending emails from that custom email using Gmail.
You'll use Cloudflare Email for the email routing, and Mailgun's SMTP server for sending emails.
How it will work
When composing an email from Gmail with the sender set as "something@yourdomain.com", Gmail utilizes Mailgun's SMTP server through the provided credentials, transmitting the email. Mailgun then processes the message and forwards it to the recipient's email server, likely involving DNS lookups to find the recipient's server.
Emails sent to "something@yourdomain.com" are received by Cloudflare's email servers, configured via MX records in the domain's DNS settings. Cloudflare stores the received emails in the associated account, accessible through Gmail, which periodically connects to Cloudflare's servers (using IMAP or POP3 protocols) to retrieve new messages, enabling seamless access to incoming emails.
Email Routing on Cloudflare
Cloudflare Email Routing is designed to simplify the way you create and manage email addresses, without needing to keep an eye on additional mailboxes. With Email Routing, you can create any number of custom email addresses to use in situations where you do not want to share your primary email address, such as when you subscribe to a new service or newsletter. Emails are then routed to your preferred email inbox, without you ever having to expose your primary email address. (Cloudflare Docs)
Sign in to your Cloudflare account and navigate to the Dashboard.
Choose and click on the desired website. For me it's "boolfalse.com", as I want to create a custom email like "email@boolfalse.com".
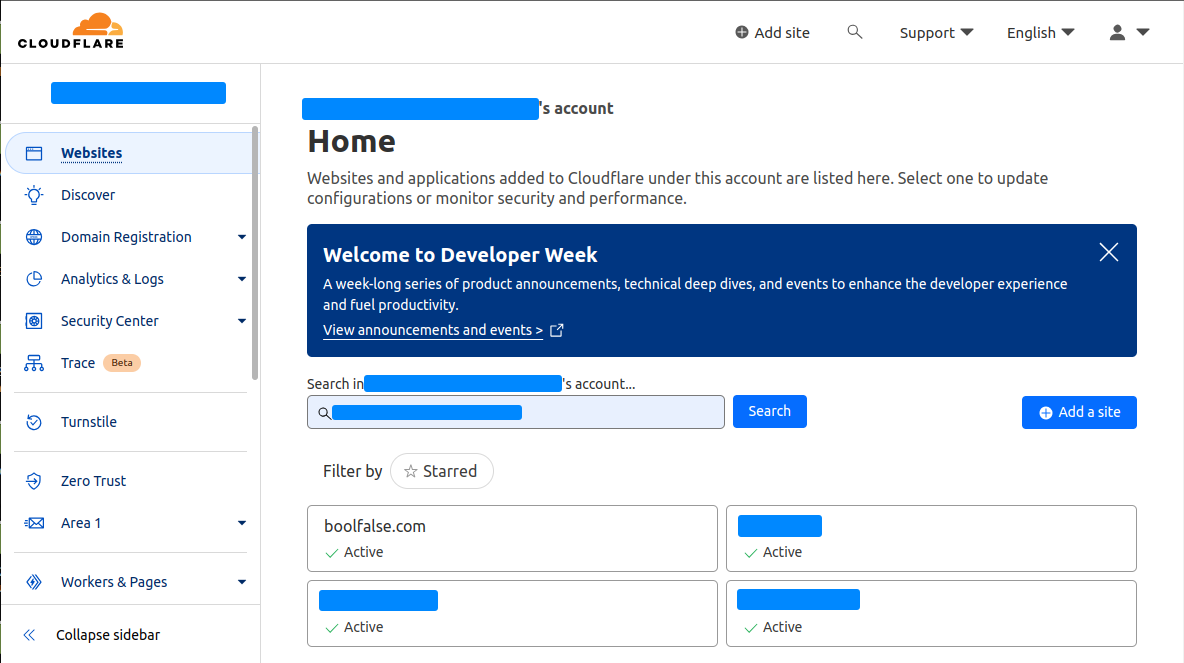 Cloudflare: Websites
Navigate to Email Routing for the selected website.
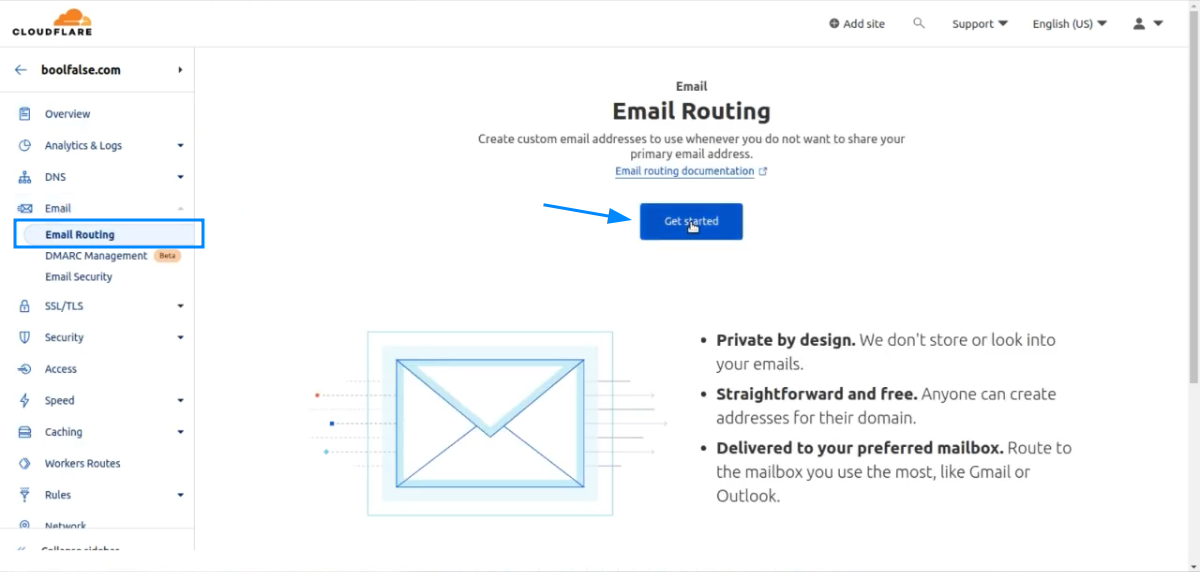 Cloudflare: Email Routing
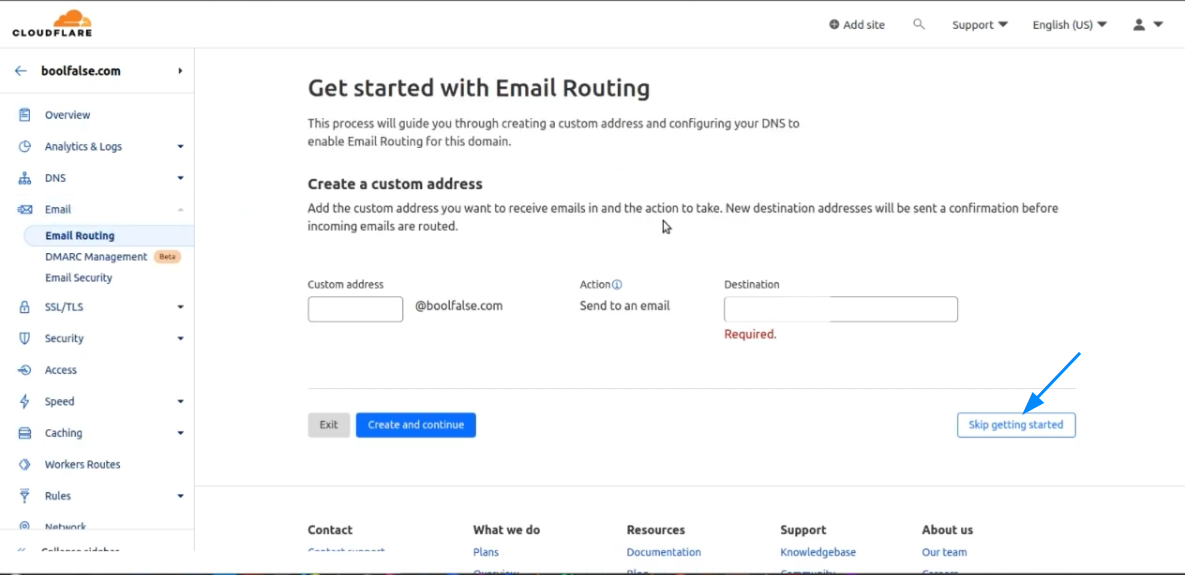
If you don't have email routing configured, you may see something similar to the screenshot above. Click "Get started". You may be able to create your own address to receive emails and take action.
We'll skip this without creating our own address because we'll do it manually.
 Cloudflare: Custom Email
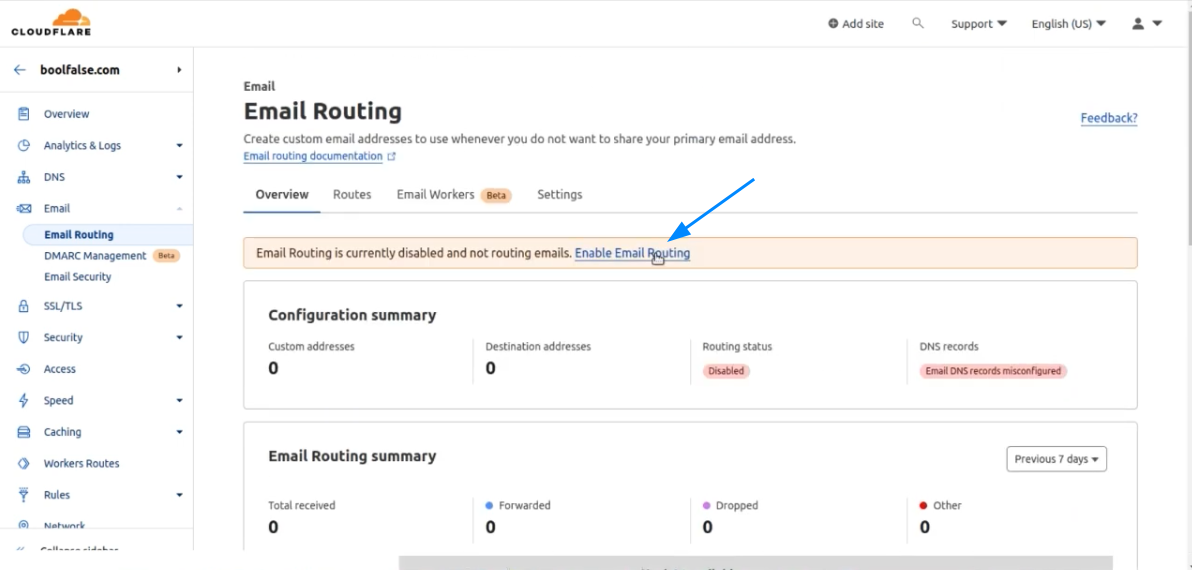
By default, email routing is disabled, so you need to enable it. Click the link to navigate to the Email Routing page.
 Cloudflare: Email Routing
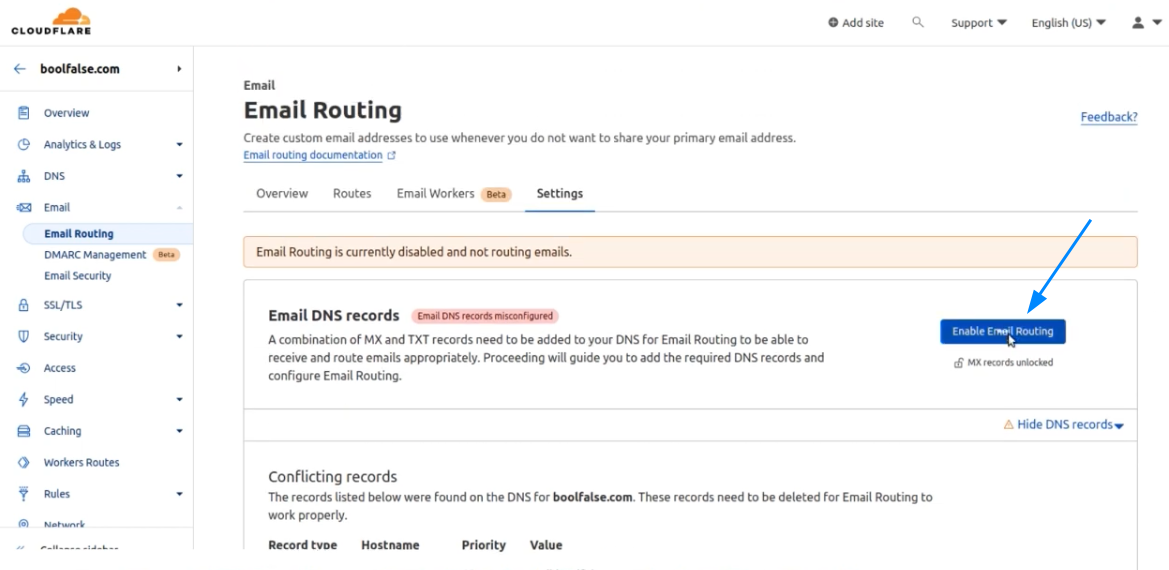
Submit it by clicking "Enable Email Routing".
 Cloudflare: Enable Email Routing
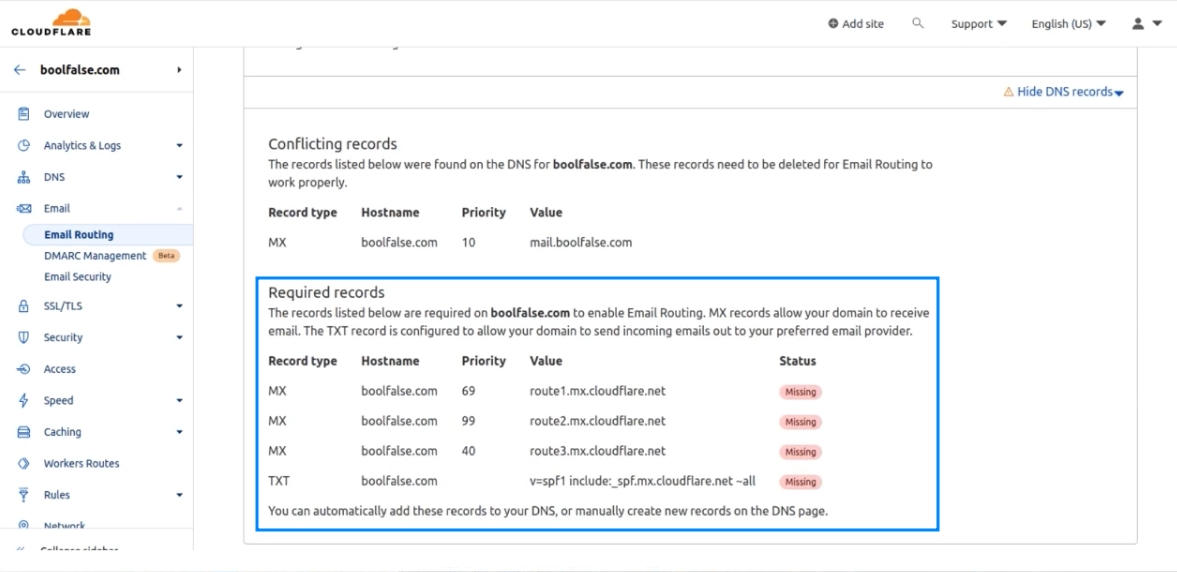
You need to have three MX and one TXT records:
- Type: MX; Name: @; Mail Server: route1.mx.cloudflare.net; TTL: Auto; Priority: 69
- Type: MX; Name: @; Mail Server: route2.mx.cloudflare.net; TTL: Auto; Priority: 99
- Type: MX; Name: @; Mail Server: route3.mx.cloudflare.net; TTL: Auto; Priority: 40
- Type: TXT; Name: @; TTL: Auto; Content: _v=spf1 include:spf.mx.cloudflare.net ~all
You can see them at the bottom of the Email Routing page.
 Cloudflare: DNS records for Email Routing
So, as already said, in the left menu, go to "DNS" -> "Records" and add the following records there.
 Cloudflare: DNS records added
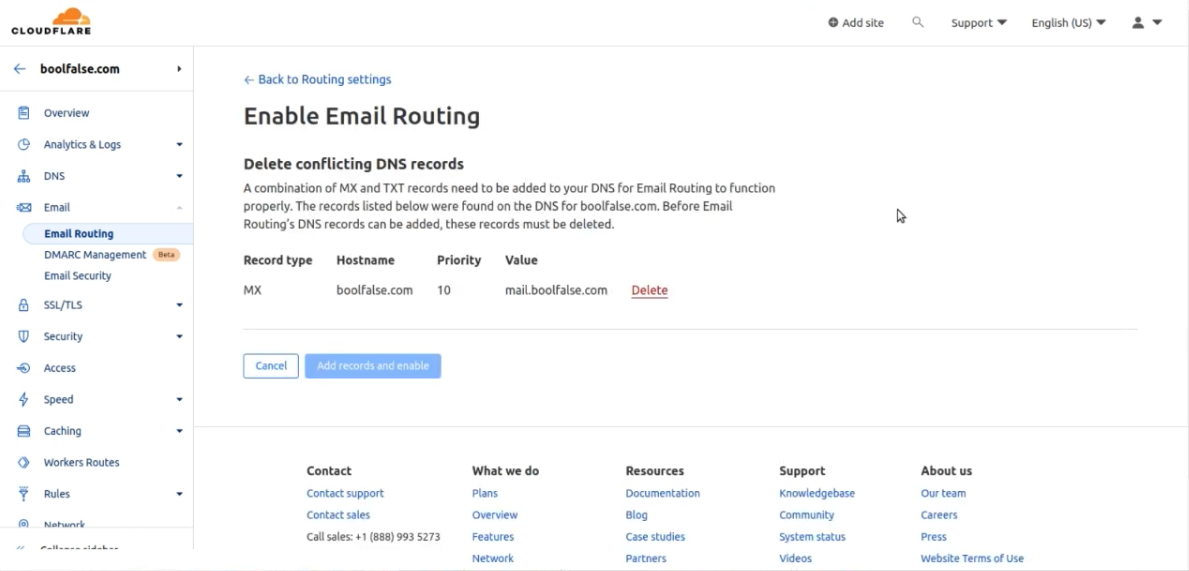
After creating these records, go to the Email Routing page again.
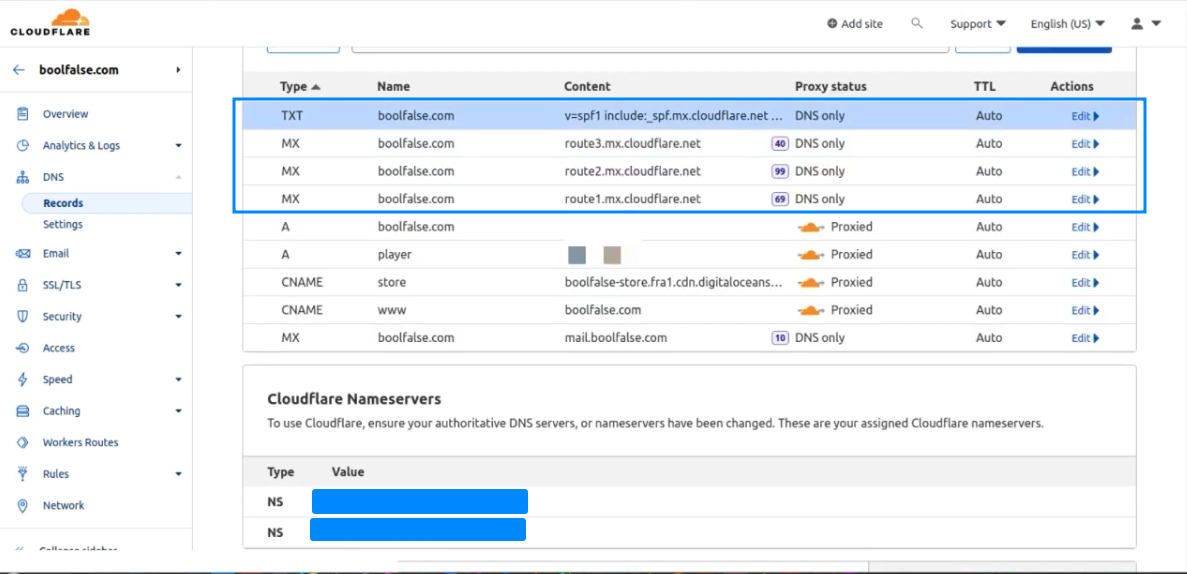
Here, you only need to have the records you just created. So if you have any other records, just delete them.
For example, I already had an unnecessary entry there that I should delete.
 Cloudflare: existing records for Email Routing
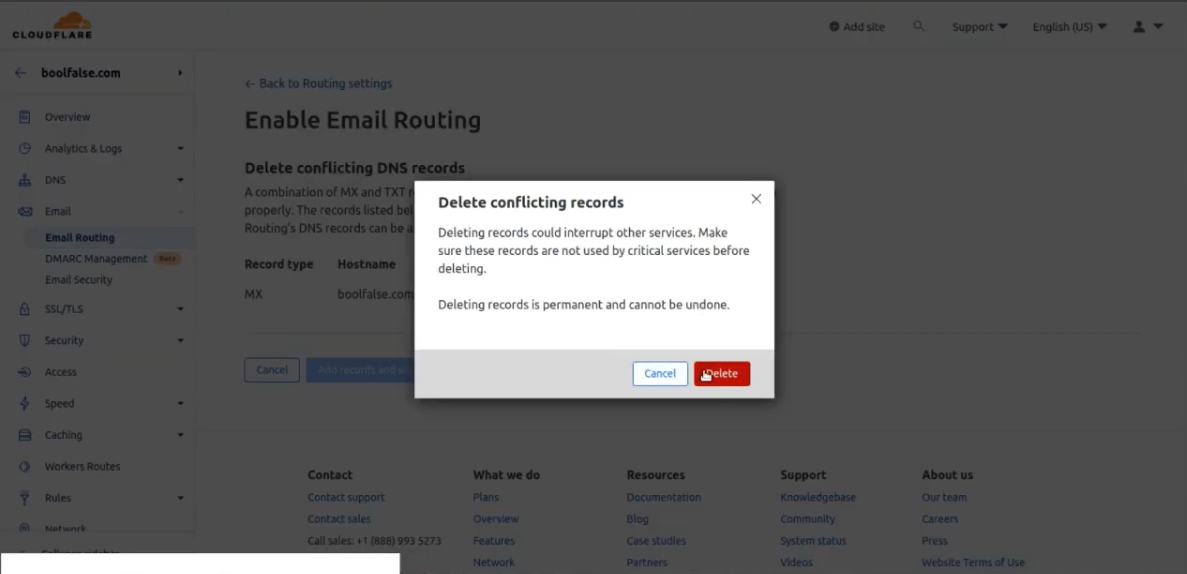
Submit to delete existing unnecessary records.
 Cloudflare: deleting unnecessary records
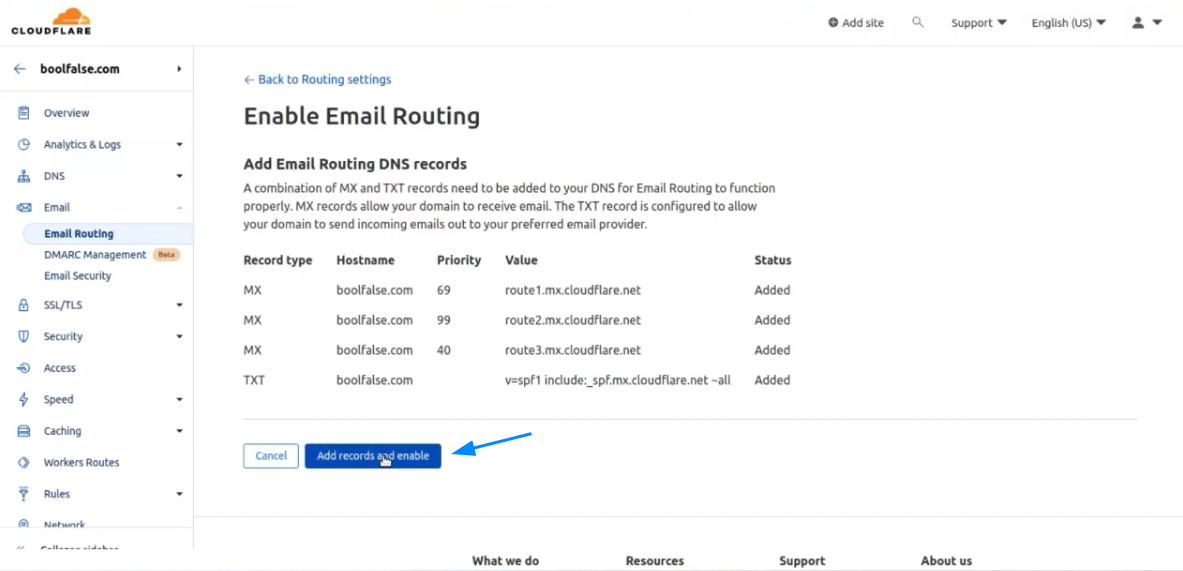
After removing unnecessary DNS records, you will see only the ones you need there.
You will now be able to enable email routing by clicking the "Add records and enable" button.
 Cloudflare: Enable Email Routing
After enabling it you should see something like this:
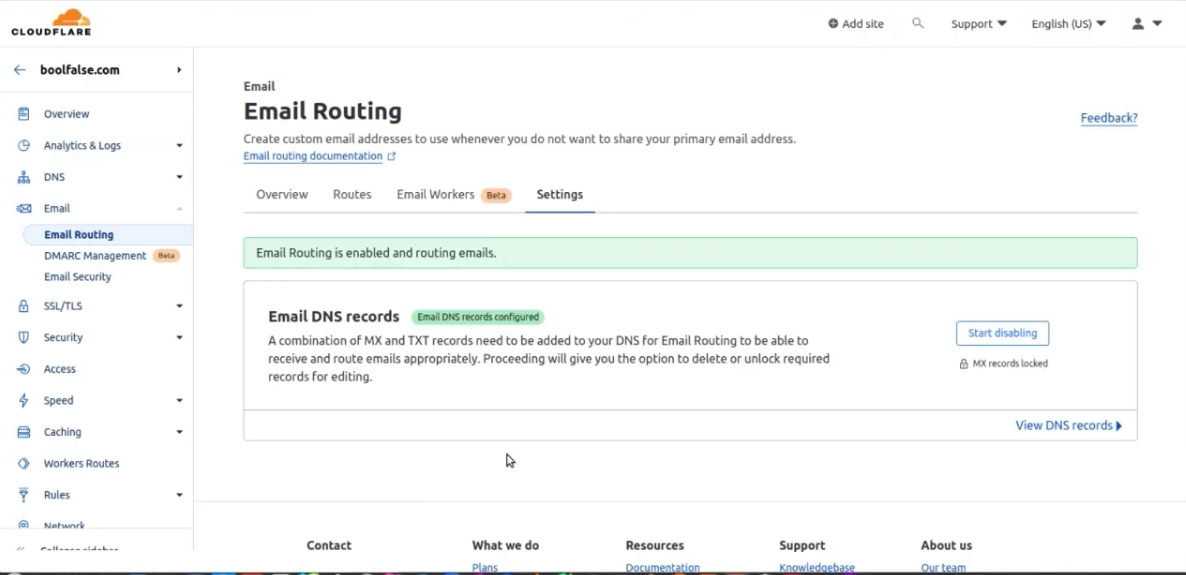 Cloudflare: Email DNS records configured
How to Create a Custom Email on Cloudflare
Now go to the Routes tab and create an email by clicking the "Create address" button.
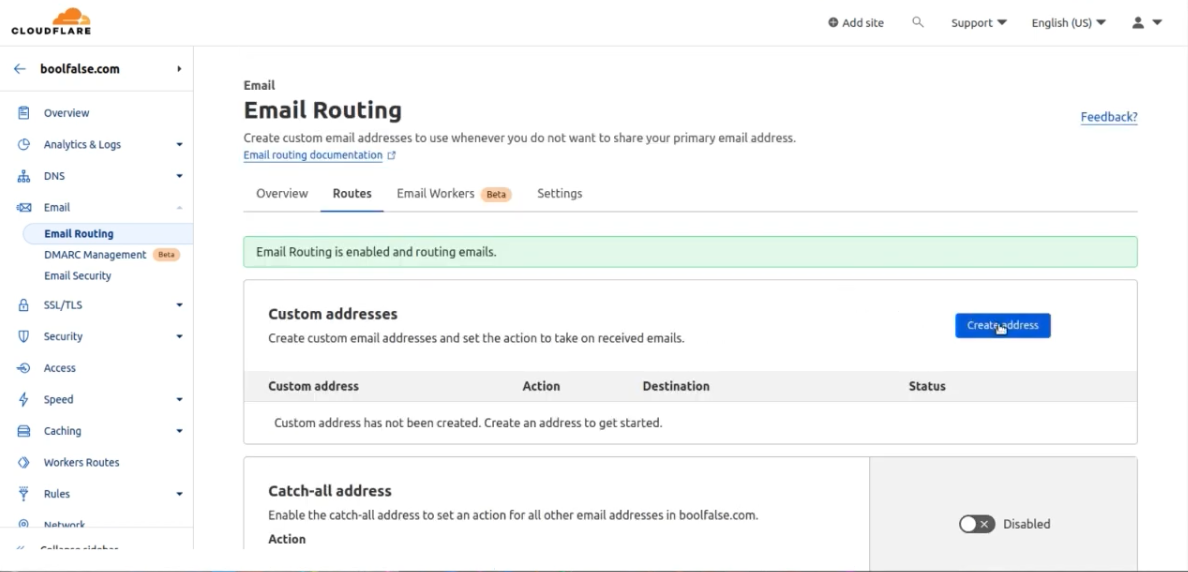 Cloudflare: Email Routing (enabled)
In this example, we'll create "email@boolfalse.com" email address, by adding "email" as a custom address, and a destination email address, where I'll be able to receive emails.
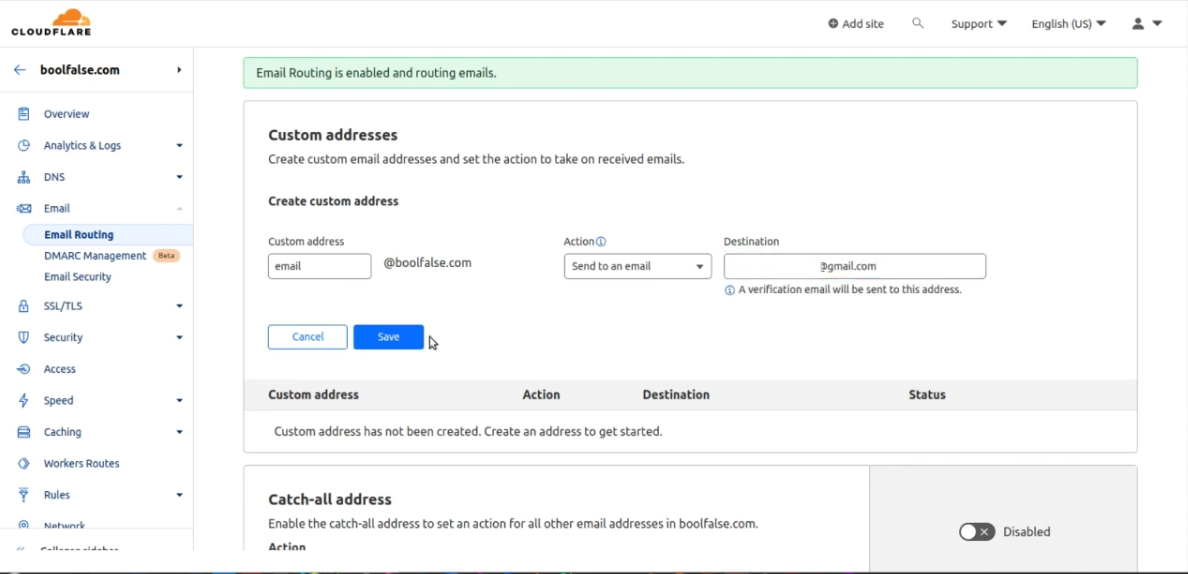 Cloudflare: Email Routing
You should see a notification about that.
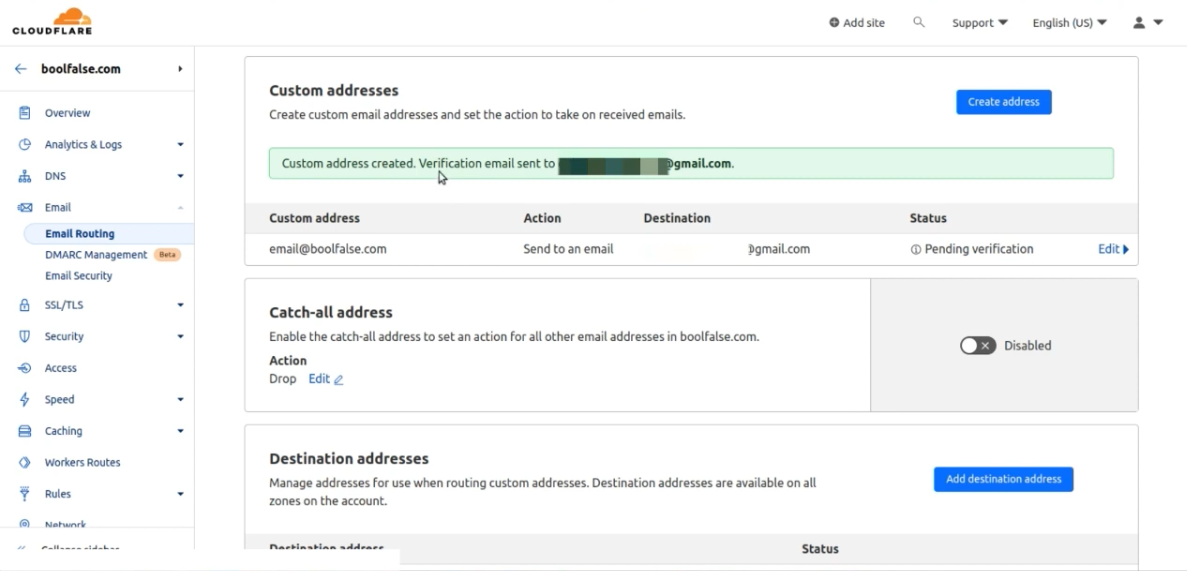 Cloudflare: creating a custom email
You should also get an email for confirming this action.
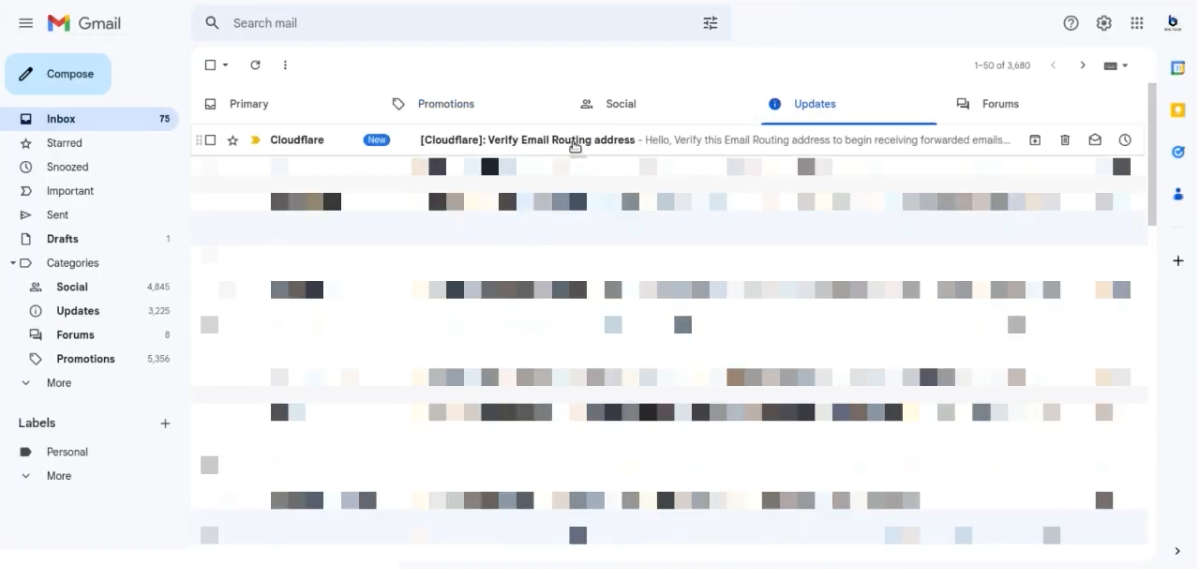 Verifying the destination email
Go on and verify the email address.
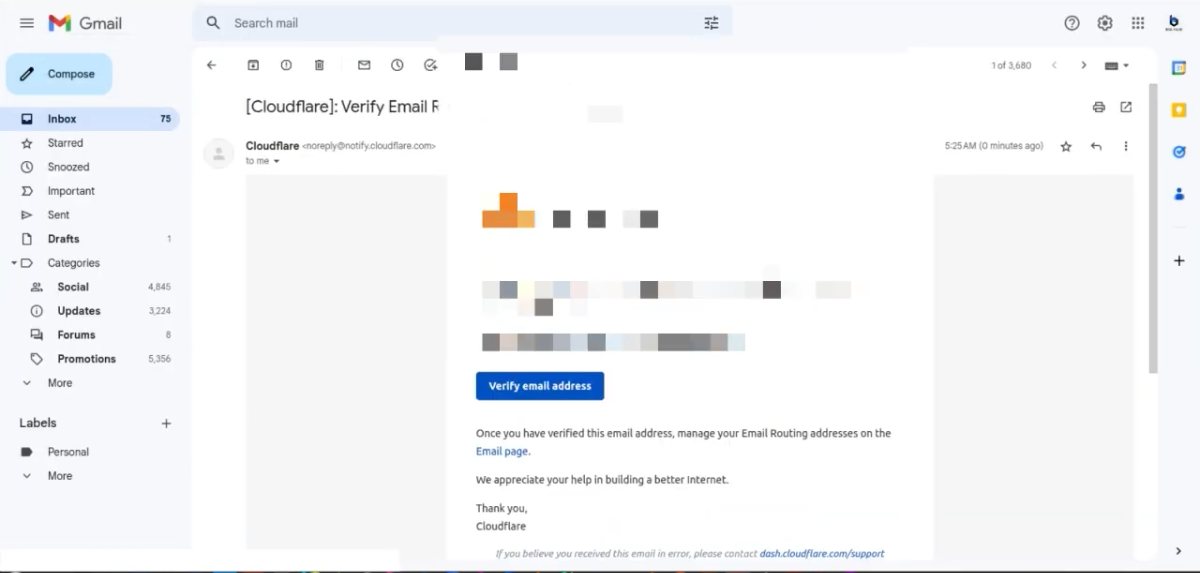 Verify email address
Once you've verified the email address, you may get this page:
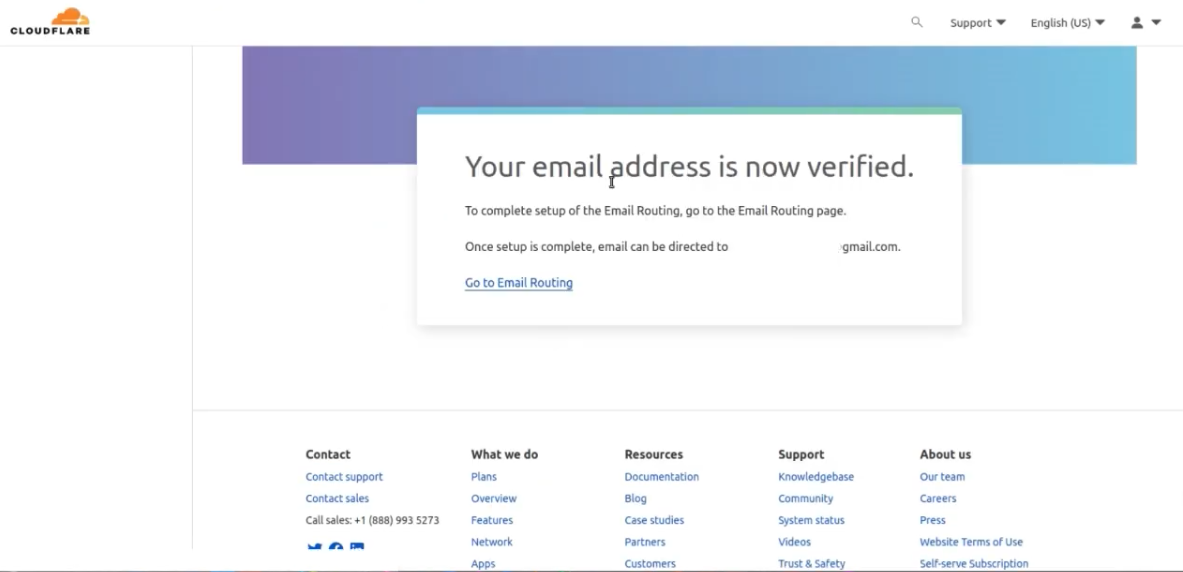 Cloudflare: custom email address is verified
You will probably get an email that you've verified your domain with Mailgun:
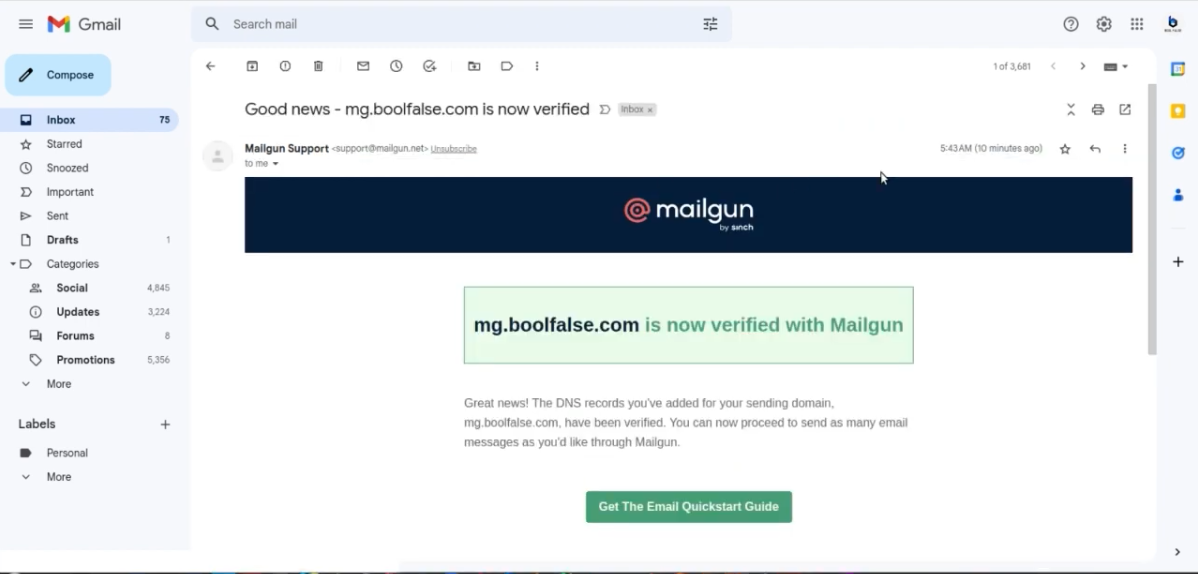 Notification about custom email address verification
How to Receive Emails in the Custom Email
Now, your email address is activated, and you can see that here:
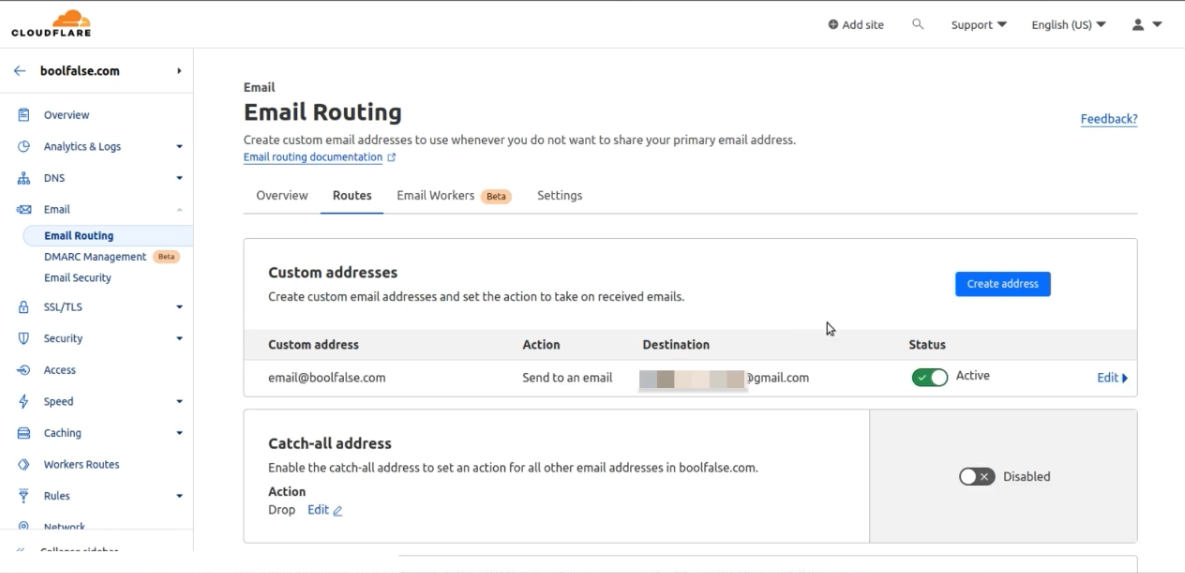 Cloudflare: custom email address is active
At this point you can send emails to the custom email you just set up. In this case, it's "email@boolfalse.com".
Below is a test email sent from a different email.
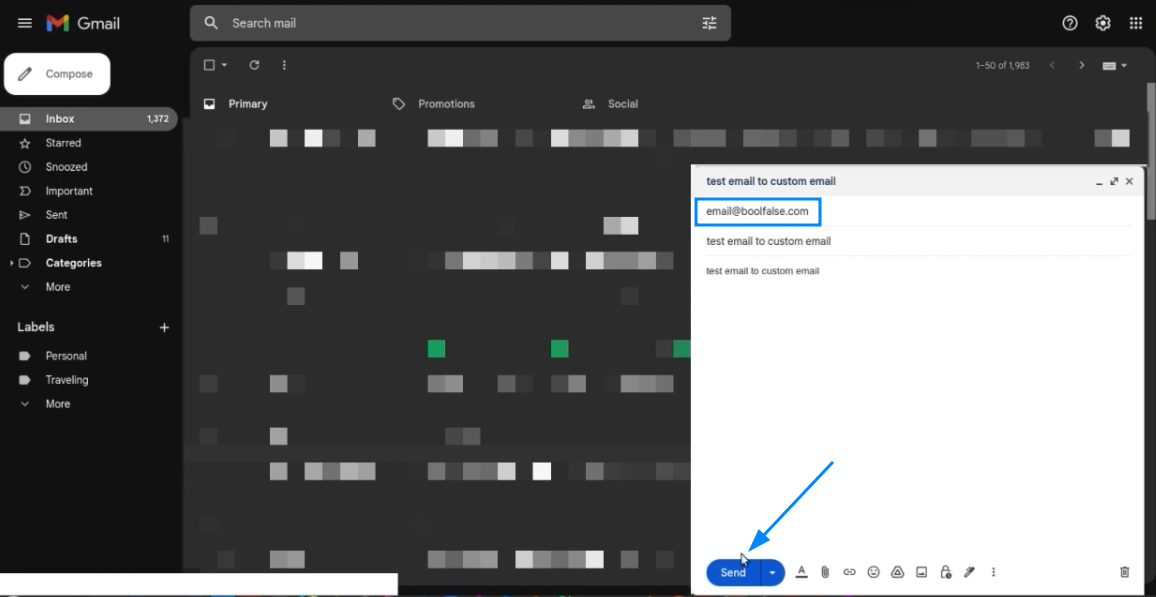 Testing email receiving
You'll receive a test email to the custom email.
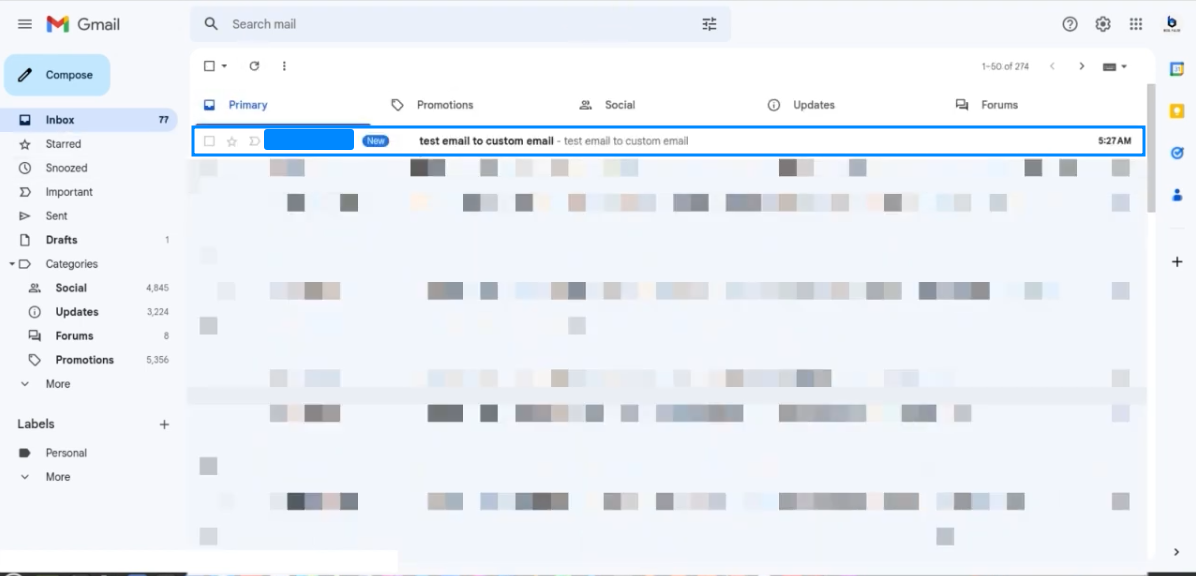 Test email has been received
Mailgun: Adding New Domain
You can now successfully receive emails, but you can't send emails from that custom email yet.
So, it's time to switch to the mail service provider. In our case, it will be Mailgun.
To do this, you just need to register and attach the card to your Mailgun account. After activating your account with the card attached, you can set up a domain for your email.
You don't have to worry about the card, because Mailgun does not charge for limited quantities. I think the amount it gives is quite suitable for a free package.
You can find the price packages in detail here.
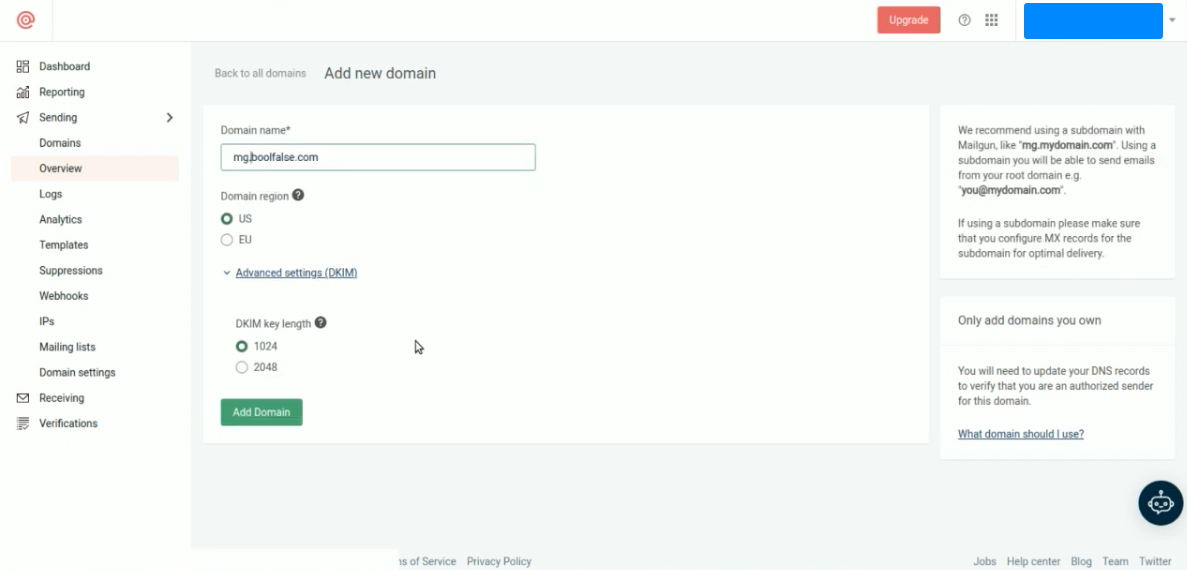
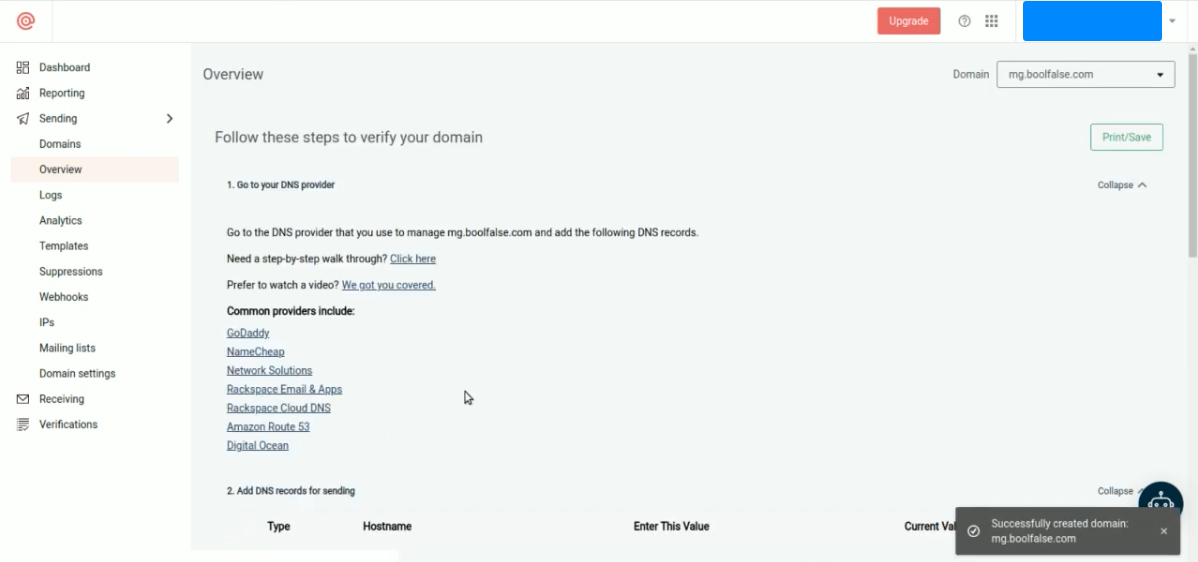
Go to Sending -> Domains page, and click the "Add New Domain" button.
In our case it will be "mg.boolfalse.com", as Mailgun recommends that to be able to send emails from your root domain, that is: "email@boolfalse.com".
You should see that recommendation on the right in below image:
 Mailgun: create a new domain
You can also select the domain region and DCIM key length, but you can leave everything as default.
I will leave DCIM key length as 1024 and "US" as a domain region.
After creating the domain, you may be shown some tips on how to verify your domain.
 Mailgun: adding a new domain
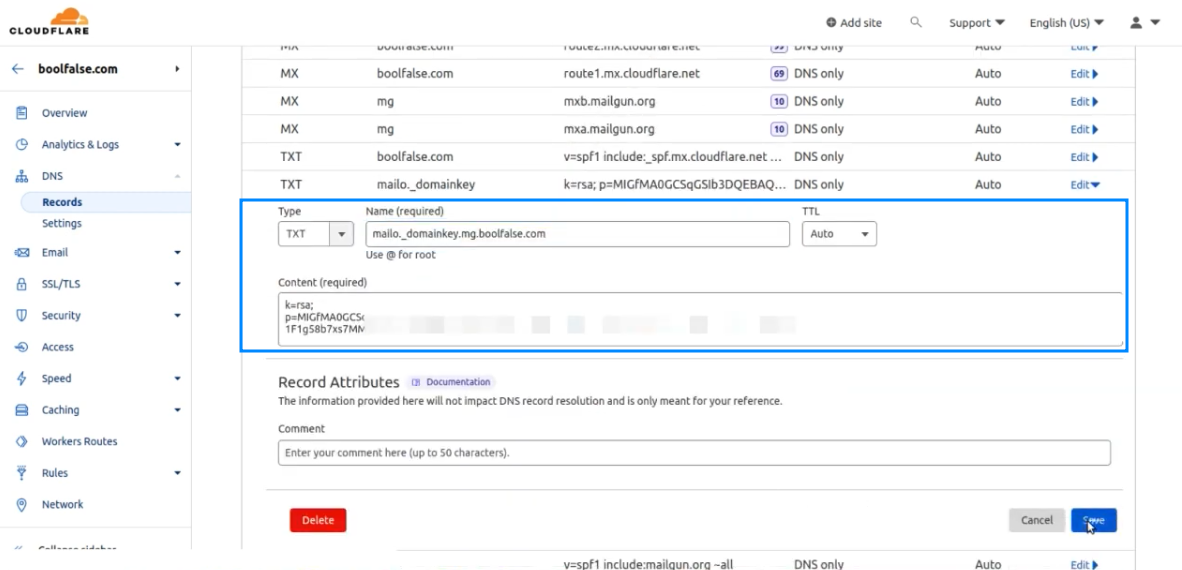
Mailgun will give you two TXT records, two MX records and one CNAME record to add to your provider.
- Type: TXT; Name: _mailto._domainkey.mg.boolfalse.com_; TTL: Auto; Content:
- Type: TXT; Name: mg.boolfalse.com; TTL: Auto; Content: v=spf1 include:mailgun.org ~all
- Type: MX; Name: mg.boolfalse.com; Mail Server: mxa.mailgun.org; TTL: Auto; Priority: 10
- Type: MX; Name mg.boolfalse.com; Mail Server: mxb.mailgun.org; TTL: Auto; Priority: 10
- Type: CNAME; Name: email; Target: mailgun.org; TTL: Auto; Proxy Status: On
In our case, we will add them to Cloudflare.
Below is the first TXT record:
 Mailgun: first TXT record for a new domain
Below is the second TXT record:
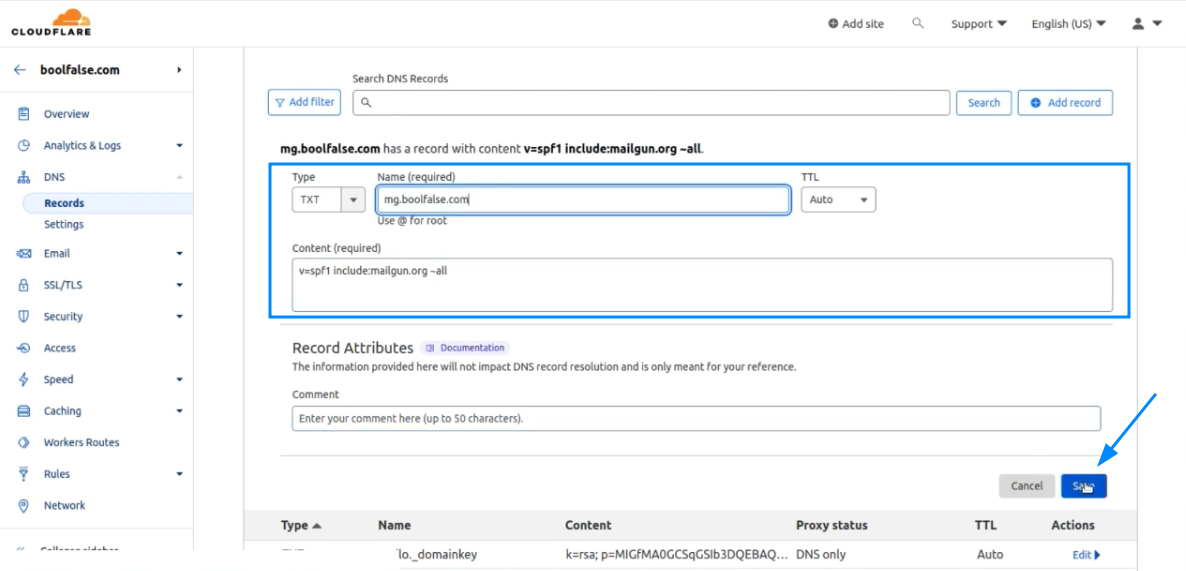 Mailgun: second TXT record for a new domain
Below is the first MX record:
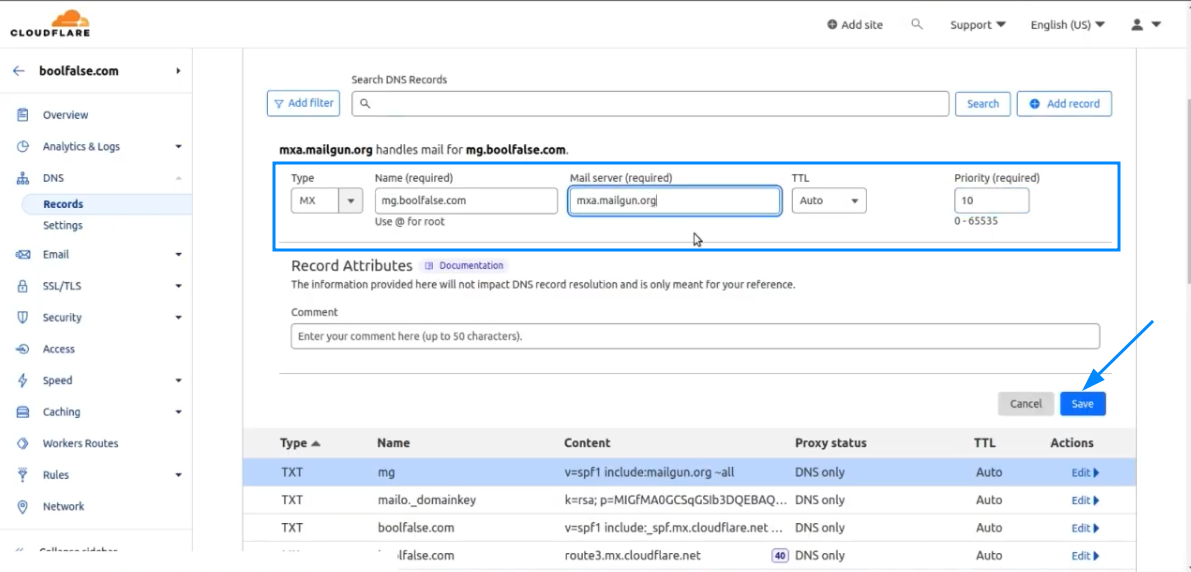 Mailgun: first MX record for a new domain
Below is the second MX record:
 Mailgun: second MX record for a new domain
After you've added two TXT and two MX records, you can check and verify them by clicking the "Verify DNS Records" button.
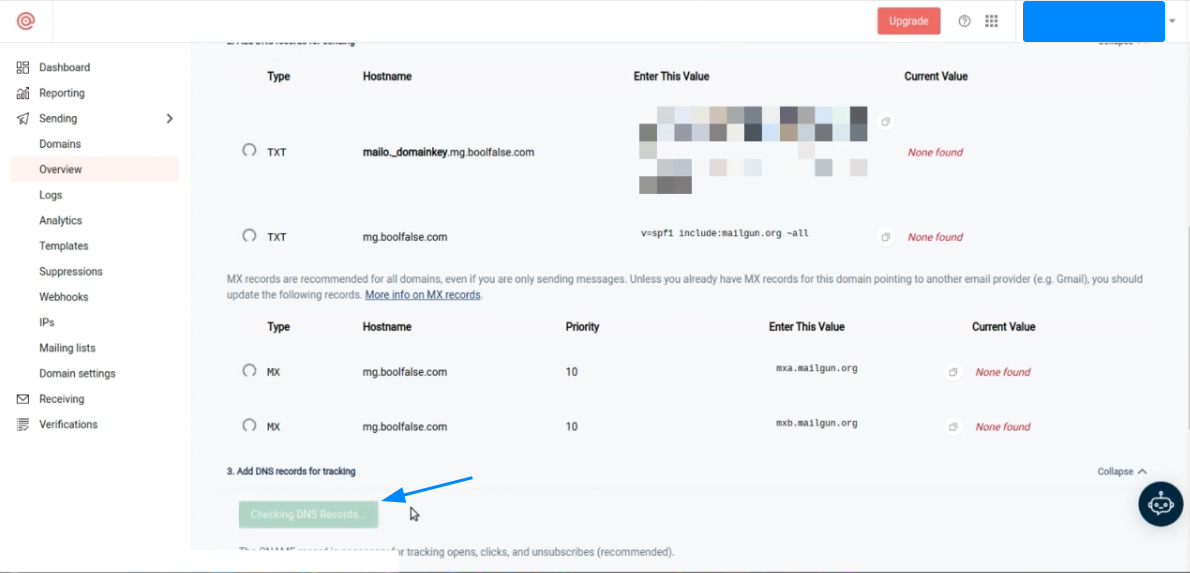 Mailgun: checking TXT and MX records for a new domain
Lastly, add CNAME record.
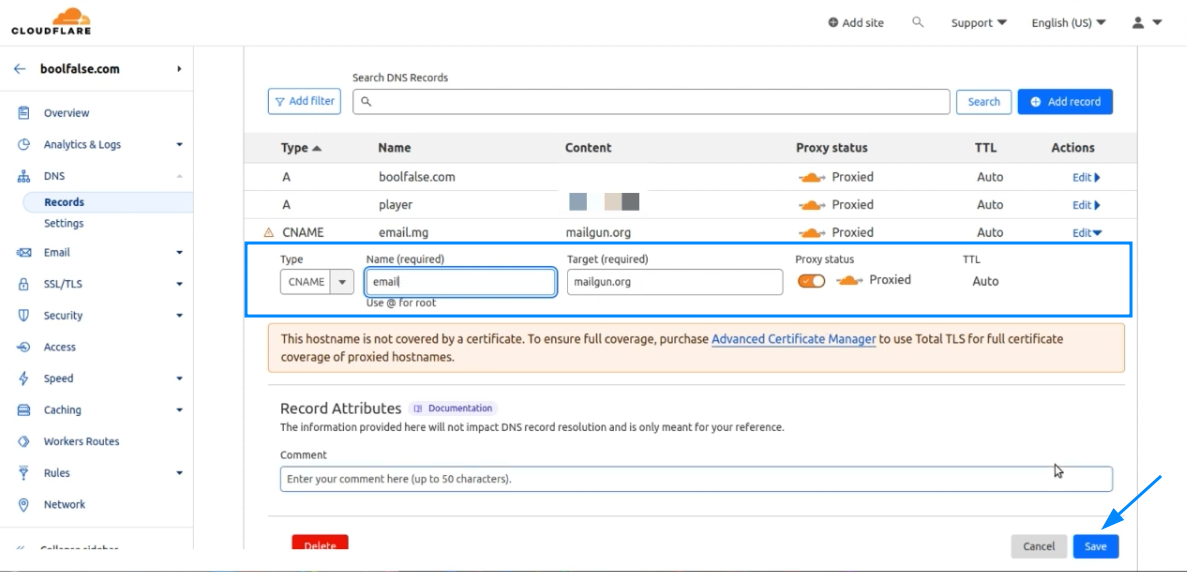 Mailgun: adding CNAME record for a new domain
You may see a warning icon on the left of the CNAME record. You don't need to worry about that. Here's what official documentation says about it:
If you recently added your domain to Cloudflare - meaning that your zone is in a pending state - you can often ignore this warning.
Once most domains becomes Active, Cloudflare will automatically issue a Universal SSL certificate, which will provide SSL/TLS coverage and remove the warning message.
After adding a CNAME record, you can check and verify it again by clicking the second "Verify DNS Records" button.
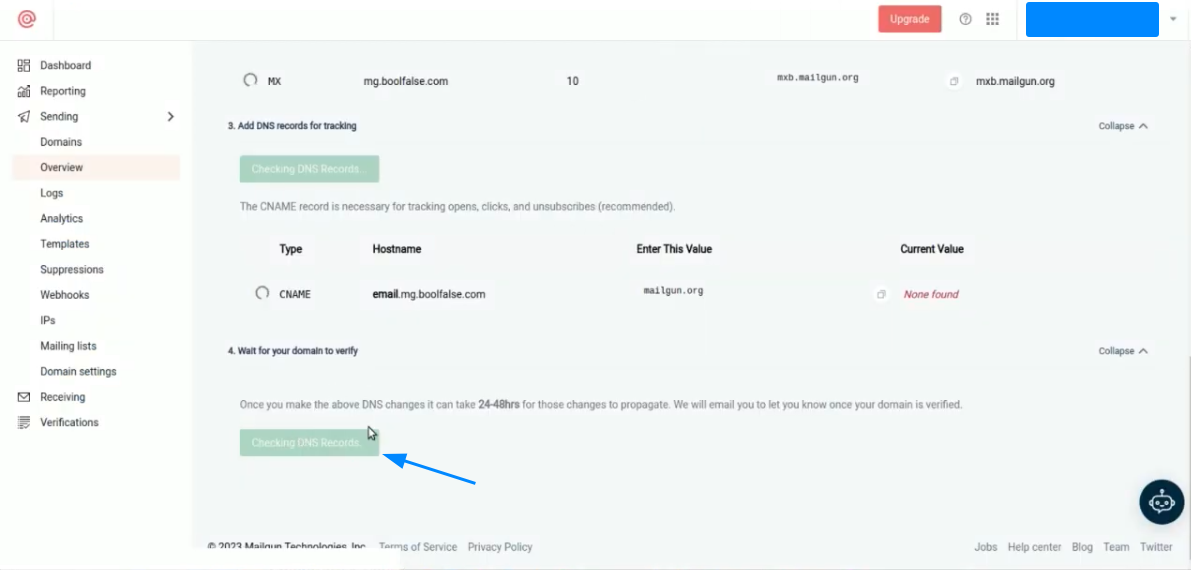 Mailgun: checking CNAME record for a new domain
If you have added all 5 records on the Cloudflare successfully, after clicking the verifying button, Mailgun will automatically redirect you to the Overview page.
 Mailgun: 2 TXT, 2 MX and 1 CNAME records added for a new domain
It means you're ready to add a Sending API key on Mailgun.
Mailgun: Sending API key & SMPT User
Go to Sending -> Domain Settings page. Choose the Sending API keys tab at the top. You probably won't see any API keys there. You just need to create a new Sending API key.
Click "Add sending key" from the top right corner, and in the pop-up, fill the name of the key you're about to create.
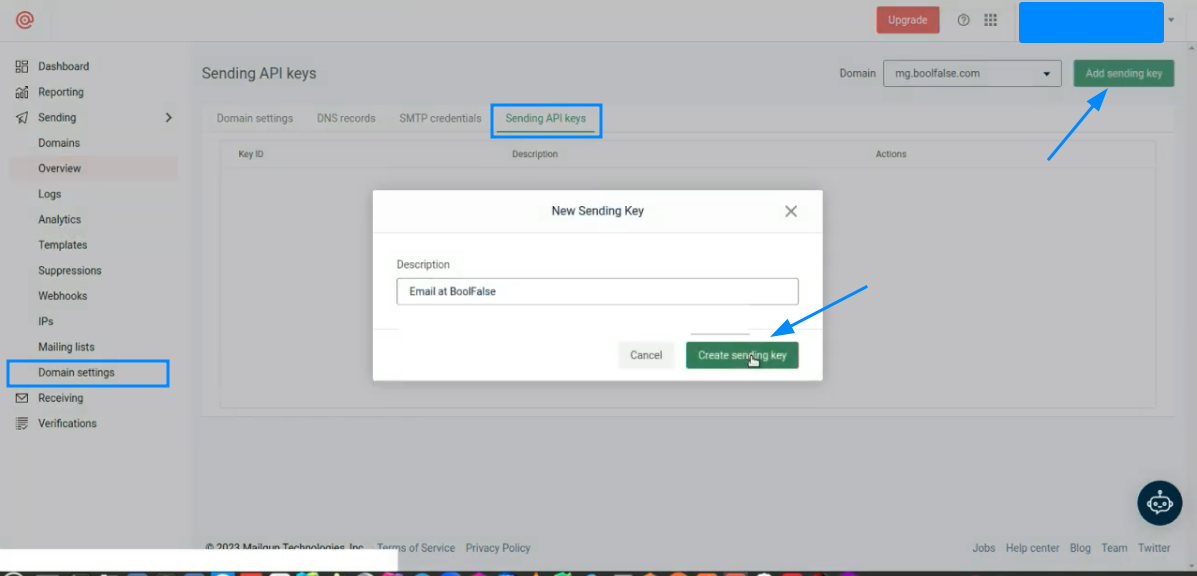 Mailgun: creating a Sending API key
After pressing "Create sending key", you'll get the secret API key that you need to copy and save somewhere safe. After saving the key, you can just close the pop-up.
You should see the created key listed:
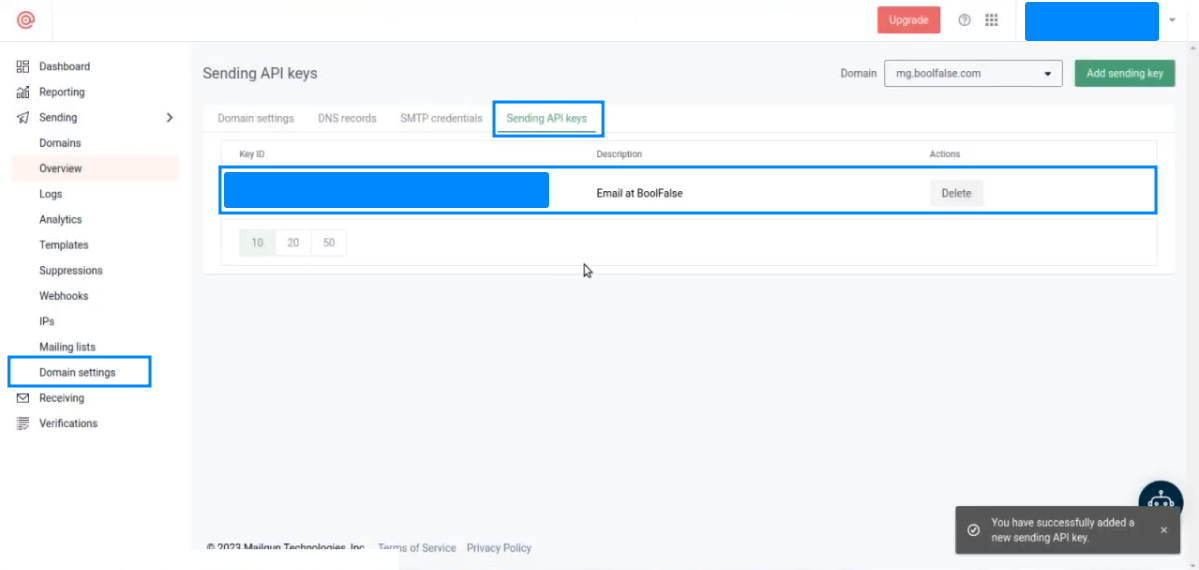 Mailgun: Sending API key created
You also need to create a new SMTP user in the Mailgun dashbaord.
Go to Sending -> Domain Settings page. Choose the SMTP credentials tab at the top and click the "Add new SMTP user" button on the top left corner. It will open up a pop-up.
Type user credentials there. In our case I'll create a user with the name "email". It will be like a login for your email on Gmail.
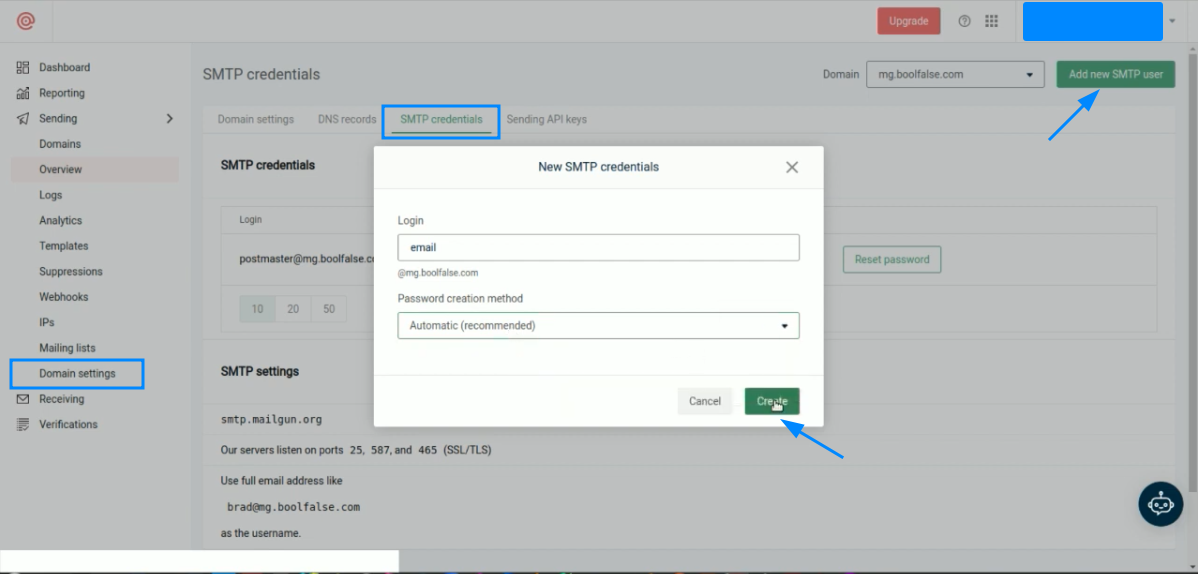 Mailgun: creating SMTP user
Once you create an SMTP user in Mailgun, you'll see it listed and a password for that user will be generated automatically. To get this password, copy it by clicking the "Copy" button in the pop-up notification in the lower right corner.
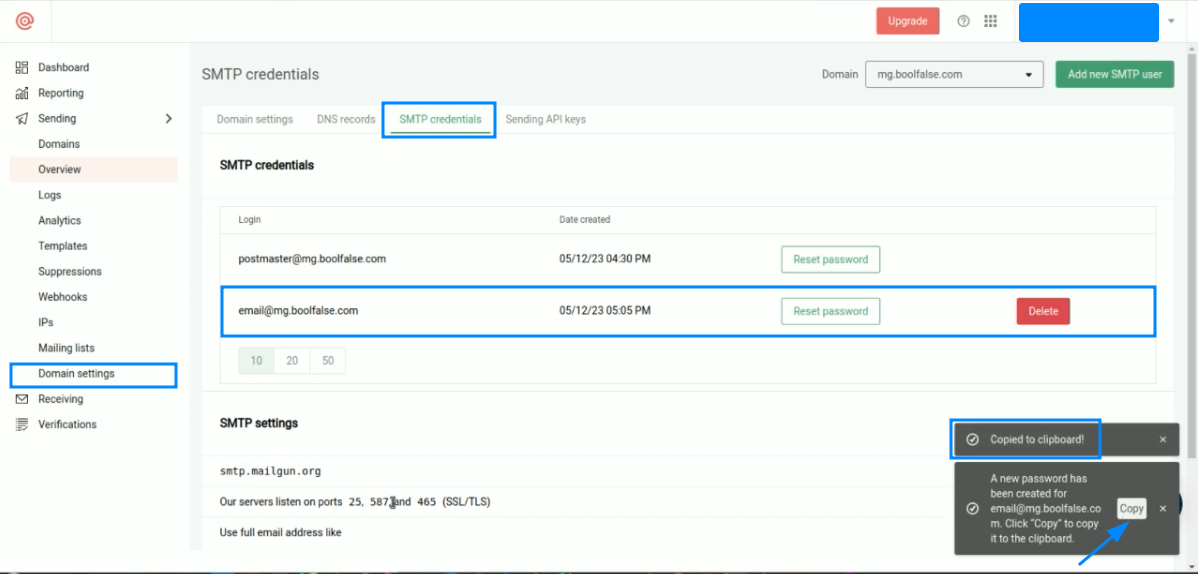 Mailgun: SMTP user created
Keep this in a safe place for future use. You will need this login and password to authenticate on Gmail.
You are now ready to set up email configurations with your email provider. In our case, we will do this in Gmail.
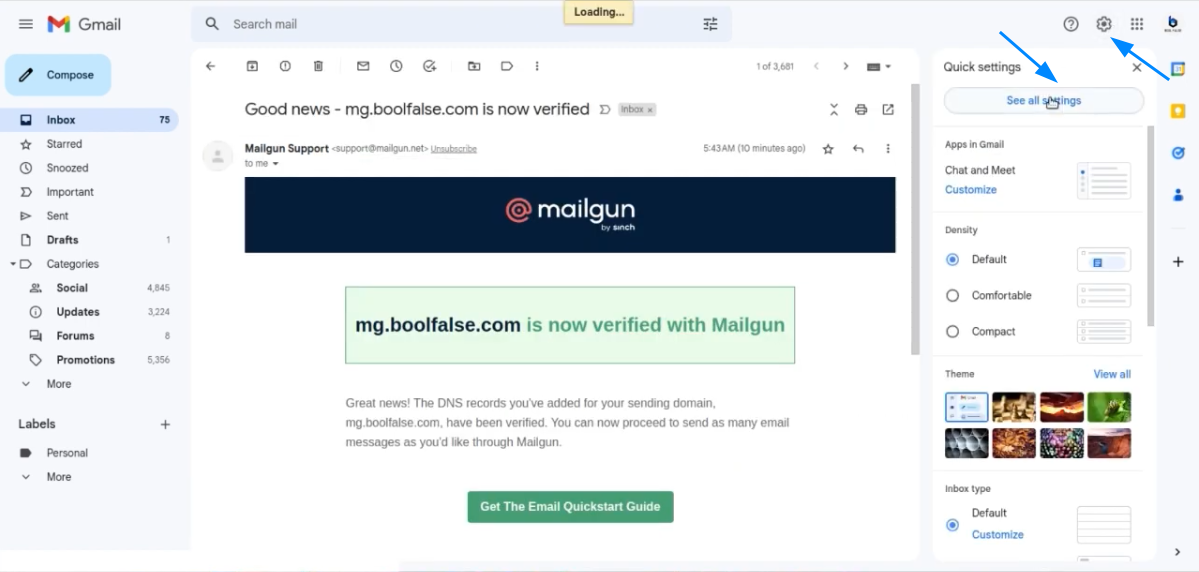
Open your Gmail account in your desktop browser and go to Settings by clicking the settings icon in the top right corner and click the "See all settings" button.
 Mailgun: new domain is verified
Gmail Authentication with Mailgun SMTP Server
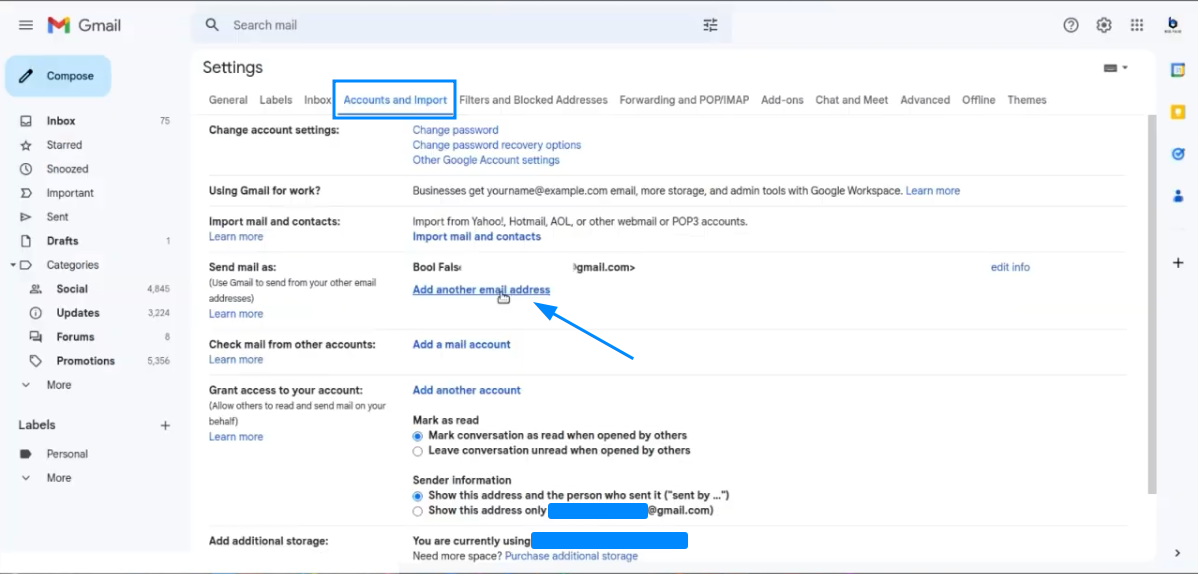
In the Gmail settings page choose the Accounts and Import tab and click on the "Add another email address" from the "Send mail as" section:
 Gmail: Settings
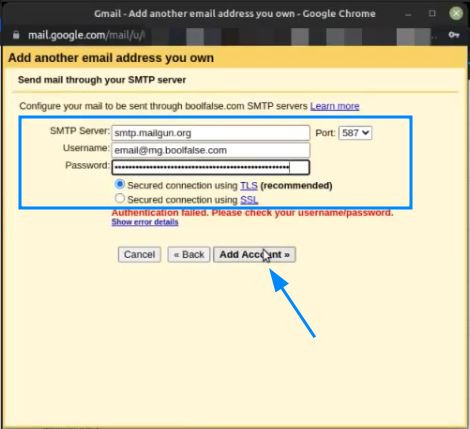
It will open a pop-up for the authentication. Use the login and the password you just got by creating an SMTP user on Mailgun. Make sure to fill out the credentials correctly.
 Gmail: authenticate a new user using a created SMTP server on Mailgun
Submit the form by clicking the "Add Account" button. It'll probably ask you to save the username/password in your browser. It's up to you.
And the last important thing here: it'll ask you to verify adding an account.
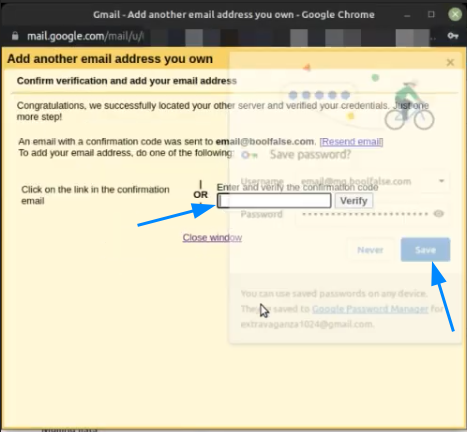 Gmail: authentication confirmation for a new user
For the verification, the confirmation email will be sent to your primary email.
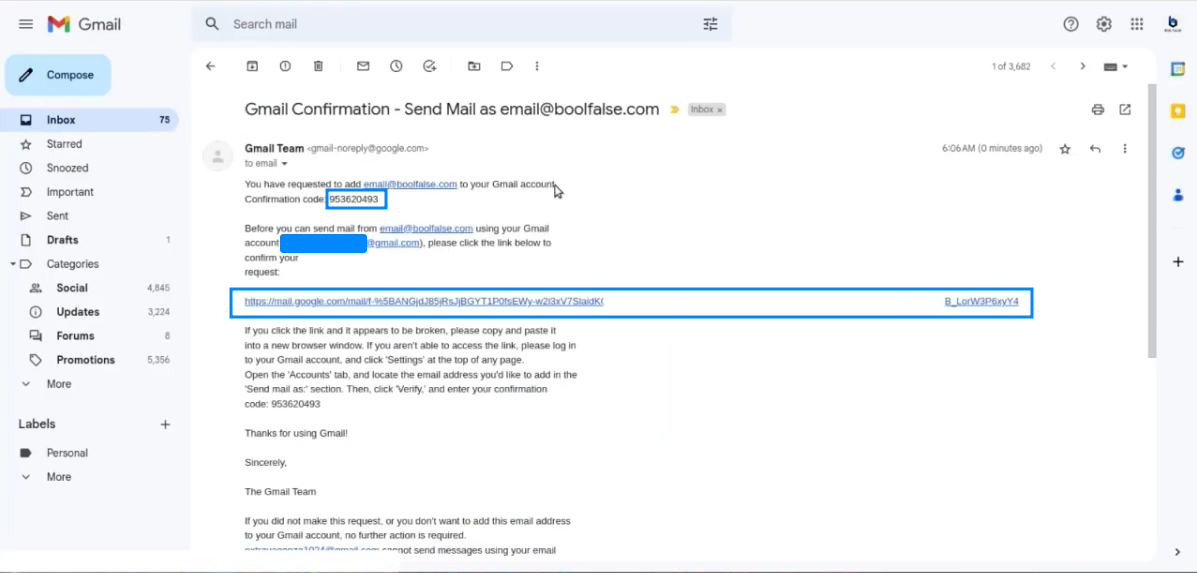 Gmail: authentication verification email
You can either use the confirmation code to verify it using the pop-up window or simply follow the link provided in the confirmation email.
In this case, we'll click on a link which will open the page, where you'll be asked to confirm. Click on "Confirm" and simply close the previously opened pop-up window without worrying.
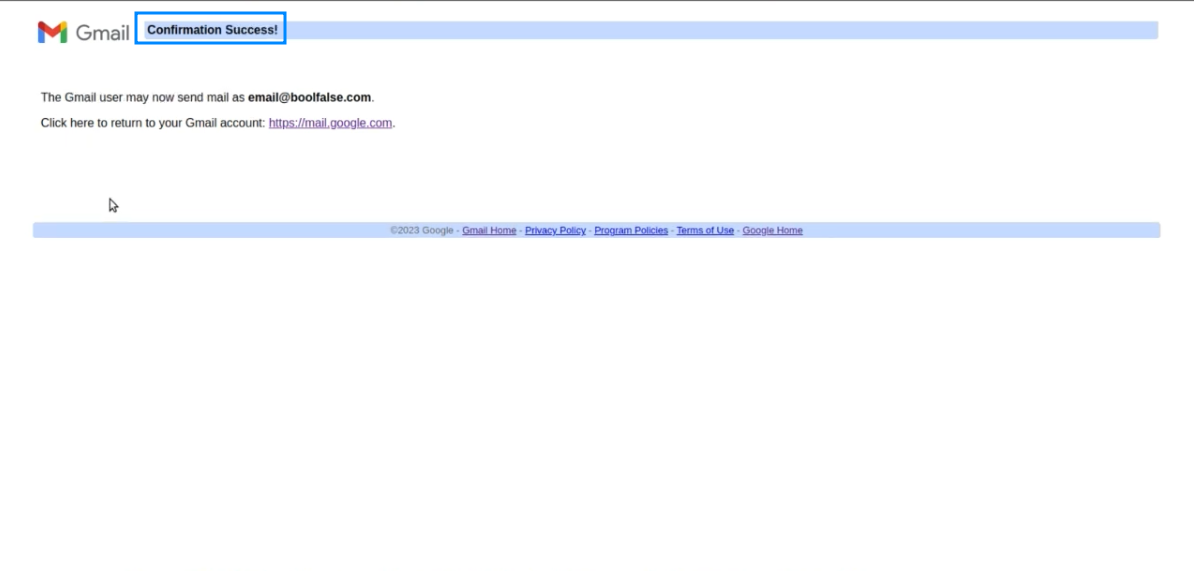 Gmail: verifying the authentication
Now you're ready to send and receive emails from the custom email you just created.
For sending an email from the custom email, you just need to choose that email as a sender email:
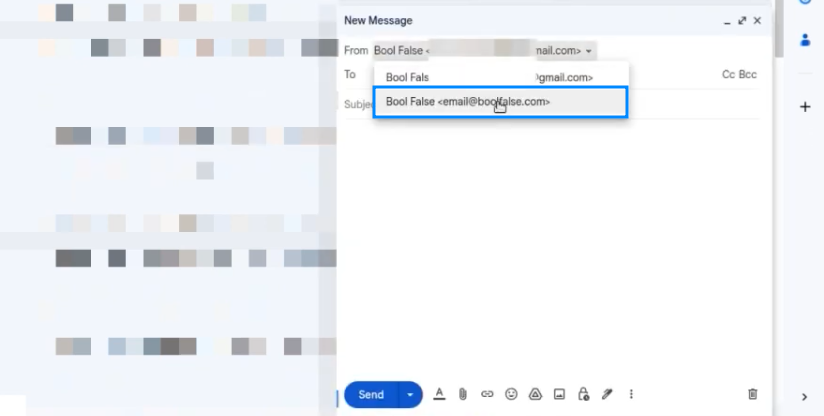 Gmail: sending emails
That's it!
An additional thing that may be useful to you is that you can set the custom email address you just created as the default address for sending emails from Gmail.
You can set this on the settings page in the "Send mail as" section:
 Gmail: Settings (default sender)
I hope this guide will be a good resource for setting up your custom email.
Conclusion
In this article, you learned how to set up your own email to manage emails in Gmail using Cloudflare Email and Mailgun.
In conclusion, it is worth noting that the choice of tools is not mandatory, other tools can be used instead, but the basic idea and logic will be similar.
You can check out my website at: boolfalse.com
Feel free to share this article. 😇