
By Michael Ozoemena
TL;DR
GatsbyJS is a framework that uses GraphQL and ReactJS to enable you to create feature-rich, super fast and dynamic web apps. It gives you the ability to consume data from virtually anywhere and use them in your app. In this tutorial, I’ll be showing you how to use Auth0 which is an authentication and authorization platform to add authentication to your GatsbyJS application and to your serverless function on Netlify.
I’ll assume you have at least a basic understanding of React, Node, and GraphQL.
Here’s the Github Repository if you want to take a look at the source code.
Enter GatsbyJS.
Created in 2015, Gatsby is a simple way to build a website with React. Today, Gatsby is known to be used to build websites like blogs, portfolio pages, and even e-commerce applications. Gatsby sites are known for being blazingly fast, and that is because when you build a website using Gatsby, it comes with tons of performance optimizations out-the-box, unlike some other frontend frameworks that leave you to figure out how to make your website more performant. Gatsby’s secret to being fast is in the fact that it follows the PRPL architectural pattern, which stands for:
- Push critical resources for the initial URL route using
<link preload>and http/2. - Render initial route.
- Pre-cache remaining routes.
- Lazy-load and create remaining routes on demand.
It is a pattern developed by Google for structuring and serving Progressive Web Apps (PWAs), with an emphasis on the performance of app delivery and launch. You can read more about this pattern here.
What is Auth0?
Auth0, pronounced as “Auth Zero” is a robust authentication and authorization platform. It makes it super easy to do add things like user registration, password retrieval, sign in, social login, multi-factor authentication, enterprise login, single sign-on, and more, into your production application.
Auth0 pays close attention to the developer’s experience with their excellent blogs posts and robust and easy to understand documentation. With Auth0 you can make use of various identity standards:
- OAuth 1
- OAuth 2
- Open ID Connect
- JSON Web Tokens (JWT)
- Security Assertion Markup Language (SAML)
- WS-Federation
In this tutorial, we’ll focus on using a combination of JSON Web Tokens and Social logins with OAuth 2.
Serverless Functions and Netlify.
Netlify is a platform that lets you deploy your project without worrying about certain overheads like Continuous Deployment, HTTP Certs, and more, created as a way to deploy and manage static websites that don’t have a backend.
Now, because not everyone wants to deploy a static website and there’s the need for support for a backend, Netlify added a feature called “Serverless functions” which are backends where you don’t have to worry about the server infrastructure.
Behind the scenes, Netlify functions stand between you and something called Amazon Web Services (AWS) Lambda which is where the real “serverless” happens, and it lives on Amazon’s AWS cloud platform. Netlify functions help simplify things for you, so you don’t have to deal directly with AWS and also be able to keep using all of Netlify’s other cool features like Continuous Deployment.
The word “serverless” doesn’t imply without a server; it means that you as a developer need not worry about the server infrastructure (physical and otherwise).
You can read more about Netlify and their Serverless Functions.
Our App: Micro Blog.
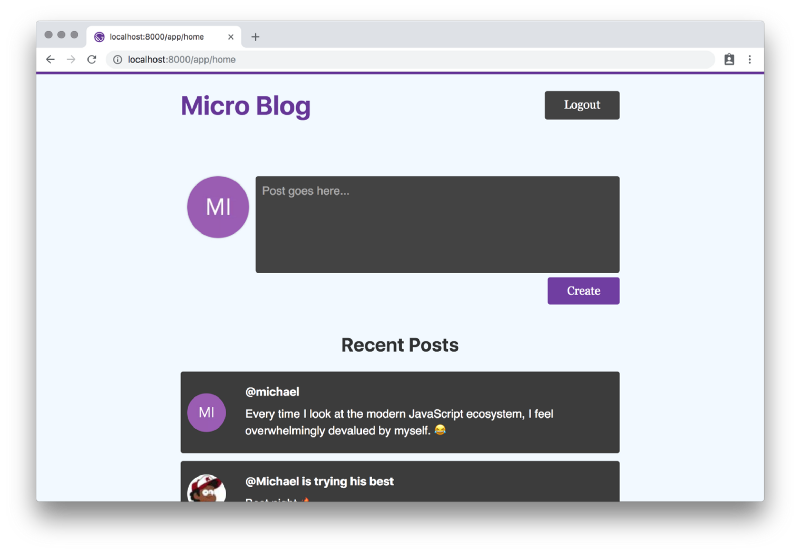
Our app is called “Micro Blog”. It’s a platform that allows users to create short, frequent posts. Each post contains some text content, username and profile image of the person making the post.
Anyone can open the web app and view posts of every other person, but to make a post themselves, they need to log in. The app supports social logins and an email login.
If you are already familiar with most of this stuff and want to see the code, you can head over to the source code on Github.
Building the Front-End.
Our front-end is a GatsbyJS app, and that means the first thing we need to do is install the Gatsby CLI node package from npm.
Note: Use node version “>= 6.9.0 <7.0.0 || >= 8.9.0” else you get an error when you try to create a new Gatsby site, this is because of the dependency “css-loader@1.0.1”.
# install the Gatsby CLI globallynpm install -g gatsby-cli
# create a new Gatsby site using the default startergatsby new micro-blog
After the commands are done running, you should be able to enter into the directory called “micro-blog”, relative to where you executed the commands above.
cd micro-blog
When you take a look at the contents of this directory, you’ll find a ton of generated content. At this point, you can fire up your Gatsby site and see it working. To do that, in your terminal run this:
gatsby develop
This will start up your Gatsby site on [http://localhost:8000/](http://localhost:8000/).
Next step is to add and modify content specific to our application.
We’ll start with gatsby-config.js. Replace the contents of the file with:
You might want to update the “” author placeholder value.
This file contains your Gatsby app settings, stuff like your site metadata and plugins. It’s a pretty important file Gatsby looks for when you start up your app. Within the app, we can use GraphQL to query the contents of this file.
Up next, src/components/header.js:
This file is our shared header component. Now, a few things are going on here:
- We are importing some things from
gatsbylibrary:Linkandnavigate.Linkis a React component used to link to other pages that are within your app like “/app/home”, whilenavigateis a function that accepts a URL and programmatically navigates the user to the specified URL. isLoggedIn,logout, andgetUserNicknameare methods that check if the user is logged in, log out the user, and get a logged in user’s nickname for display purposes, respectively.Buttonis a component that displays a button element for the user. It accepts several props that help us easily give the button varying looks.
Here’s what Button looks like:
As you’ll see, we are going to be making use of Styled Components a lot and specifically emotion, which is one of the many supported CSS-in-JS packages for GatsbyJS.
Later, we will take a look at src/services/auth.js.
Next important file to look at is /src/components/layout.js:
This file is the wrapper file for our application. It includes the header, a footer, and renders children passed to it. We also see the imported graphql package from gatsby alongside StaticQuery component. StaticQuery accepts a query prop which is a GraphQL query. Whatever value resolved from the query is made available in the StaticQuery component’s render prop.
Taking a closer look at the query, we can see that it’s getting data from the gatsby-config.js file.
Our accompanying CSS /src/components/layouts.css stays almost the same with the generated one with the only difference being from line 8:
body {
margin: 0;
background-color: #f2f9ff;
}
Let’s leave the /src/components directory for now and take a look at /src/pages/index.js :
All files in /src/pages/ become pages in your Gatsby App. For example, index.js becomes the homepage and /src/pages/app/home.js becomes [http://yourdomain.com/app/home](http://yourdomain.com/app/home).
On our homepage, we want our users to see the recent posts and ask them to log in or sign up if they want to create a post.
To get our recent posts, we need axios, which is a promise-based library for making network requests in JavaScript. Install axios by running this in your terminal:
npm install axios
When our component mounts, we check if the user is logged in and we redirect them to /app/home because we don’t want them being on this page if they are logged in. Admittedly, this is a pretty naïve approach, and we could make use of “Protected Routes” instead. Using “Protected Routes” means that this component will not even get the chance to be mounted at all. Due to the small size of this project, I’ve decided not to make use of Protected Routes.
In case you want to implement Protected Routes in your Gatsby App, please refer to this guide on the official Gatsby website.
We create a request to get the posts when our component mounts and then update the state with the returned data. Updating the state causes our component re-render the childRecentPosts component since it makes use of the said state.
Notice that the URI in the network request to fetch the posts data is an environment variable process.env.API_URI. These environment variables aren’t the typical environment variables you find in a Node app. To create these environment variables, you need two files in your Gatsby application root directory: env.production and env.development. These files will be automatically loaded by Gatsby in the appropriate environment when you start up your app.
As I mentioned earlier, these environment variables aren’t the same with your Node environment variables and what makes them different is that they aren’t private files that you typically exclude in your .gitignore file. You have to push these files when you want to deploy your app because GatsbyJS will need to read these files on startup.
Mine looks something like:
AUTH0_DOMAIN=micro-blog.auth0.com
AUTH0_CLIENTID=cIovhIQvYOr6fk3yhDtKjB5EiIvLevxf
REDIRECT_URI='http://localhost:8000/callback'
API_URI='http://localhost:9000/.netlify/functions/'
In production, it’s a bit different:
AUTH0_DOMAIN=micro-blog.auth0.com
AUTH0_CLIENTID=cIovhIQvYOr6fk3yhDtKjB5EiIvLevxf
REDIRECT_URI='https://angry-shaw-7a81ce.netlify.com/callback'
API_URI='https://angry-shaw-7a81ce.netlify.com/.netlify/functions/'
In order to get these values for your own app, you need to create an Auth0 account if you don’t already have one.
Note that you can use Auth0 for free with limited features.
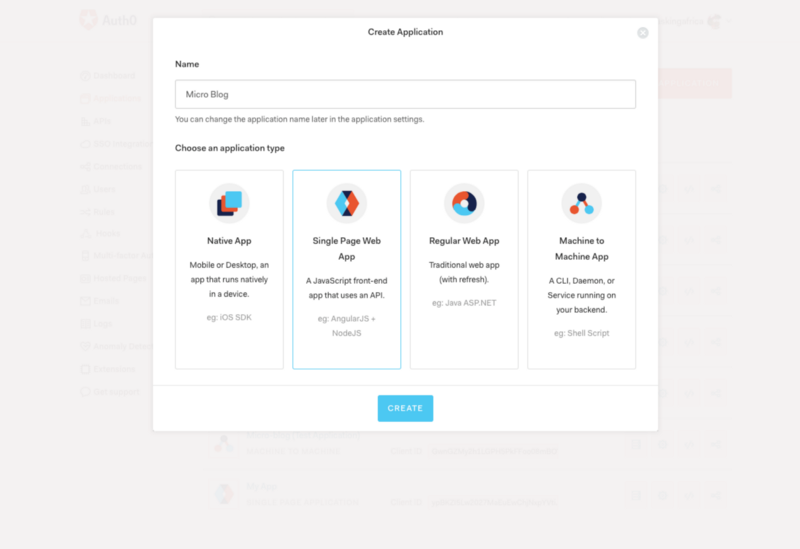
After you’ve created an account, log in to your Auth0 management dashboard and create a new Auth0 Application. You can do that by clicking on the Applications menu item and then the Create Application button. You can update the application name from “My App” to whatever else you want to use. You can change this later if you wish. In my case, I use “Micro Blog”.
Next, you select “Single Page Web App” and click on Create. This will immediately create your application.
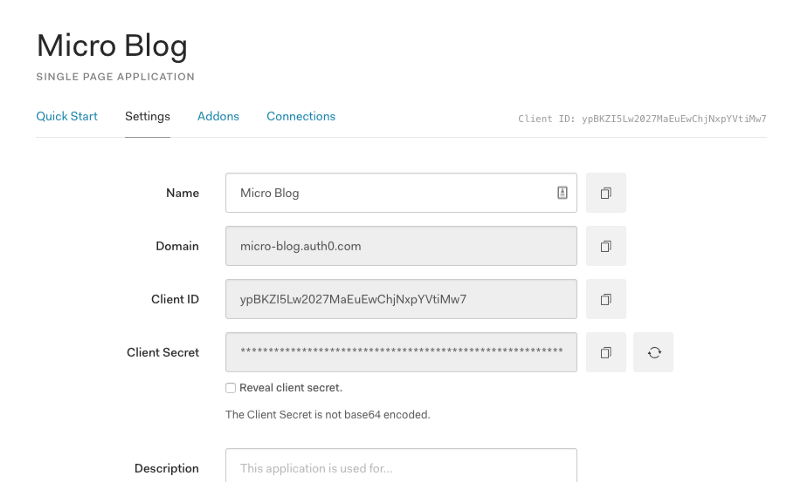
Once you are done with creating your application, you should navigate to “Settings”, there you will find your **AUTH0_CLIENTID** and **AUTH0_DOMAIN** values.
Note: For your .env.production, you don’t have the **REDIRECT_URI** and **API_URI** at this point. Later on, after we create our Netlify app, we will get the application URL which we can then put in there appropriately.
Now, let’s take a look at src/components/recentPosts.js:
Again, here we make use of Styled Components. We also make use of a React lifecycle method shouldComponentUpdate to prevent unnecessary re-renders when the RecentPosts component is used in another component.
When a user clicks on the login button, we navigate the user to an Auth0 login page. After they have been authenticated, we redirect the user to a URL in our app called /callback where we check that the user has been logged in properly and then save their details in localStorage. Here’s what the /callback page looks like:
We call the handleAuthentication method which will get data from the URL, parse it, save the extracted data to localStorage and then call the () => naviage('/app/home') method to redirect the user to the main app.
Now, we take a look at the /pages/app/home.js page, where only logged in users can access:
There isn’t much that is new here. The only things I’d mention are:
- We create new posts in the
handlePostSubmitmethod and in there, we make a regularaxioscall but with aheadersoption containing the JWT token “id_token”. We do that because, in our Serverless Function, we will be needing that value in the headers to authenticate a request, making sure that only a logged in user can create a new post and that the token saved on the client side is actually valid and not tampered with. This greatly improves the security and reliability of our app. - We redirect the user to
/when they aren’t logged in properly and they manage to land on this page. We do that in thecomponentDidMountlifecycle method. Again, Protected Routes are a better option in your production apps.
Finally, we get to /src/services/auth.js. We have been using functions from this file throughout the app, it’s time to take a look at it:
In this file we use auth0-js a JavaScript library by Auth0 to handle the authentication parts of our app. Add it to your app by running this in your terminal:
npm install auth0-js
Next thing you see in this file is the creation of isBrowser which states if our file is currently being executed within the context of a browser. This is important because during the build process you might run into errors trying to call things like window.localStorage.
Let’s take a look at some of the methods in this file:
The getUser method gets the user details from the access token previously stored in the localStorage, after our user has been logged in. It uses the getAccessToken method to fetch the access token stored.
The handleLogin method is called when the user tries to log in. It redirects them to the Auth0 login page which in turn redirects the user to /callback once they’ve been logged in.
The isLoggedIn method checks that the JWT token “id_token” expiration date saved in localStorage as expiresAt hasn’t been exceeded, thereby invalidating the user’s session.
The handleAuthentication method is what you see being used in the /callback page. This method parses the URL hash and gets important values which we later save in localStorage in the setSession method.
Finally, the logout method logs the user out by deleting saved credentials. This works well but you could take it a step further by calling an endpoint on Auth0 which will invalidate the session completely. I stopped here for the sake of this tutorial.
Finally, we update line 6 on /src/components/seo.js:
const SEO = ({ description = null, lang = "eng", meta = [], keywords = [], title }) => {
Making it use an ES6 arrow function and default values.
Building the Back-End.
Next, we are going to build an API to serve a list of posts and to collect new posts. They are serverless functions hosted on Netlify. Our API needs to do a few things:
- Have an endpoint to serve the list of posts:
/.netlify/functions/postsRead. - Have an endpoint to collect new posts:
/.netlify/functions/postsCreate. - Authenticate requests to create new posts using Auth0.
To get started, we need to install a few npm packages:
npm install netlify-lambda mongoose jwks-rsa jsonwebtoken dotenv
Next step is to create a directory called utils in the root directory of our Gatsby App. Inside that directory is where our files that aren’t quite the API will live. One of such files is our /utils/db.js file:
In this file, we establish a connection to our MongoDB database.
Something missing here is our .env file (yes, a third one!). Mine looks something like this:
DATABASE_PROD='mongodb://<username>:<password>@<db_url>'DATABASE_DEV='mongodb://localhost:27017/micro-blog'
I use mLab to host my database online and I have MongoDB installed on my development machine. You can follow this guide to install MongoDB on your development machine too.
The next file to focus on is /utils/index.js, this file contains some other methods we will make use of in our Netlify functions.
The first method respondWith is abstracting the logic of responding to requests that get to our Netlify functions. And the second method verifyToken is verifying that the tokens sent in the headers of requests are valid.
Finally, into the Netlify functions. Create a new directory in your application root called functions (or anything else you find appealing) and in that directory, create three files:
postsCreate.jspostsRead.jspostsModel.js
The first two files will hold our implementation for creating and reading posts while the last file will describe our Posts Database Schema.
Here’s what the postsModel.js looks like:
And postsCreate.js:
Lastly, postsRead.js:
Now, to run our functions locally, we first create a new script in our package.json file:
"scripts": {// other scripts
"start:lambda": "NODE_ENV=development netlify-lambda serve functions"
}
I use “serve functions” because the “functions” directory is where I put my Netlify functions, yours could be different.
After creating that script, we run it in our terminal:
npm run start:lambda
Deploying the App.
The last thing we will do is to deploy our app to Netlify and to do that we need to first create a file on our application root called netlify.toml. This file is a configuration file which Netlify will read while trying to build and deploy the app. Here’s what that file looks like:
[build] functions = "lambda" Command = "npm run prod"
The functions = lambda instructs Netlify put the built functions in a folder called “lambda”. And the Command = "npm run prod" specifies a script to run in order to build the entire app. This is pretty important because we need to build both our Gatsby App and our Netlify functions. Here’s what that script looks like in our package.json:
"scripts": {
// previous scripts
"build:lambda": "netlify-lambda build functions",
"prod": "NODE_ENV=production npm run build; npm run build:lambda"
Here, we first run npm run build which builds our Gatsby App and then run npm run build:lambda which builds our Netlify functions. Again, here I use “functions” because that is the name of the folder where I put my Netlify functions.
After doing all that, we create a new Github Repository and push our code there. Create a new Netlify account if you don’t already have one. I prefer using the Github signup option in this case. When you are logged in, you click on the New site from Git button which will then take you through the process of creating a new Netlify app.

If during the process of creating a new Netlify app, you don’t find your repository in the list shown, be sure that you have given Netlify access to all your repositories or at least that repository in particular.

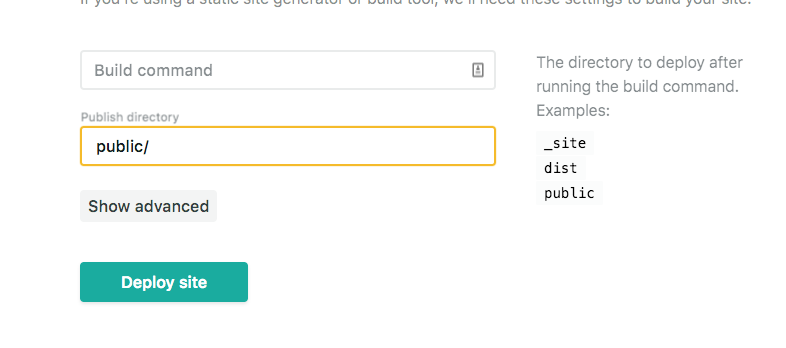
Before you deploy, click on the Show Advanced button and create a new variable called DATABASE_PROD, setting the value to what’s in your .env file. Remember that this file is excluded from your app in your .gitignore so there’s no way for your app to read this value unless you do this.
Also, add public/ as the Publish directory since that is the directory where Gatsby builds and dumps the files.
Netlify will automatically handle deploying the Functions. After the app has been deployed, you should see the URL of your app on your dashboard.

And now that you have the app URL, you can update your .env.production file accordingly.
Thanks for reading!