

Zigbee2MQTT is an open-source tool that lets you manage all of your Zigbee devices locally, so you don’t need cloud services or multiple proprietary hubs. This gives you more control and flexibility, whether used on its own or integrated with platforms like Home Assistant or Node-RED.
In this guide, I’ll show you how to set it up using Docker for a streamlined, privacy-focused smart home. Docker provides an efficient way to run Zigbee2MQTT as a standalone service, offering a lightweight, modular setup – no Home Assistant required.

Table of Contents
Key IoT Concepts in this Tutorial
Here are the key concepts related to the Internet of Things (IoT) and smart homes that you’ll be working with:
Zigbee is a wireless communication protocol used in smart home devices. It relies on a Zigbee coordinator to communicate with devices like lights, sensors, and switches within a local mesh network. This network allows devices to relay signals to extend coverage and reliability.
MQTT (Message Queuing Telemetry Transport) is a lightweight messaging protocol for low-bandwidth and high-latency environments. It uses an MQTT broker to manage communication between devices using a publish/subscribe (pub/sub) model, where devices can either send or receive messages based on specific topics.
Zigbee2MQTT is a bridge application that connects Zigbee devices to an MQTT broker. It translates Zigbee signals into MQTT messages, and vice versa. Zigbee2MQTT supports a wide range of devices from different manufacturers.
What You’ll Need
A Zigbee coordinator connected to your network or device. I have an SLZB-06 ($65 USD) connected to my network.
A device capable of running Docker, such as a Raspberry Pi or Linux server. I flashed a Raspberry Pi 4 - Model B.
How to Prepare Your Environment
SSH into your Pi using the following command in your terminal window, where
piis the username of your Raspberry Pi OS and<RaspberryPi_IP>is the IP address of your Raspberry Pi on your local network.ssh pi@<RaspberryPi_IP>Install Docker by inputting the following command at the SSH prompt.
curl -sSL https://get.docker.com | shGive permissions to the current logged in user. You may then need to close the SSH connection, and re-connect, if the permissions hasn’t taken effect.
sudo usermod -aG docker $USER
How to Set Up the Zigbee2MQTT Configuration
Create a new project directory, and also a
/datadirectory to store configuration files and data persistently.mkdir -p ~/zigbee2mqtt/dataCreate the configuration file.
touch ~/zigbee2mqtt/data/configuration.yamlOpen file with your preferred text editor, like using
nanoas shown below.nano ~/zigbee2mqtt/data/configuration.yamlPaste the following YAML code into the configuration file from the text editor interface.
 homeassistant: false
 permit_join: false
 mqtt:
   base_topic: zigbee2mqtt
   server: 'mqtt://mqtt:1883'
 serial:
   port: 'tcp://<IP_OF_ZIGBEE_COORDINATOR>:<PORT>'
 frontend:
   port: 8080
Update the following details within the
configuration.yamlfile, and save the changes.<MQTT_BROKER_IP>: Your MQTT broker's IP or hostname.port: This value depends on how your Zigbee coordinator is connected:If your Zigbee coordinator is connected to the network, you can configure the
portusing TCP/IP as shown in the example above, for exampletcp://192.168.1.xxx:6638where the SLZB-06 is located at192.168.1.xxxon the local network and6638is the default port for that Zigbee coordinator.If the Zigbee coordinator is connected to your device, you can find the serial port (such as
/dev/ttyUSB0) by runningls /dev/tty*before and after plugging in the adapter to your device.
How to Set up Zigbee2MQTT and MQTT Broker in Docker
In the root of your project directory, create a
docker-compose.yamlfile to set up the Zigbee2MQTT container and Eclipse Mosquitto broker container to handle communication between Zigbee2MQTT and other services.services: zigbee2mqtt: container_name: zigbee2mqtt image: koenkk/zigbee2mqtt restart: unless-stopped volumes: - ./data:/app/data - /run/udev:/run/udev:ro ports: # Frontend port - 8080:8080 environment: - TZ=American/Los_Angeles mqtt: image: eclipse-mosquitto:2.0 restart: unless-stopped volumes: - "./mosquitto:/mosquitto" ports: - "1883:1883" - "9001:9001" command: "mosquitto -c /mosquitto-no-auth.conf"Update the
TZenvironment variable if you are located in a different time zone, and save any changes.
Launch the Containers
Run the containers.
docker compose up -dTest the setup by checking the logs to confirm Zigbee2MQTT is running without errors. And look for lines indicating successful connection to the MQTT broker and Zigbee network initialization.
docker compose logs
Pair Your Zigbee devices
Once Zigbee2MQTT is running smoothly, you can access the frontend at
http://<your-device-IP>:8080from a web browser to pair and manage your Zigbee devices.Enable pairing by clicking Permit Join (all), and then pair your devices by putting them in pairing mode, for example holding down a reset button.
Finish pairing all the Zigbee devices that you wish to use in an automation. In the screenshot below, I have paired an Aqara button and Third Reality smart plug.
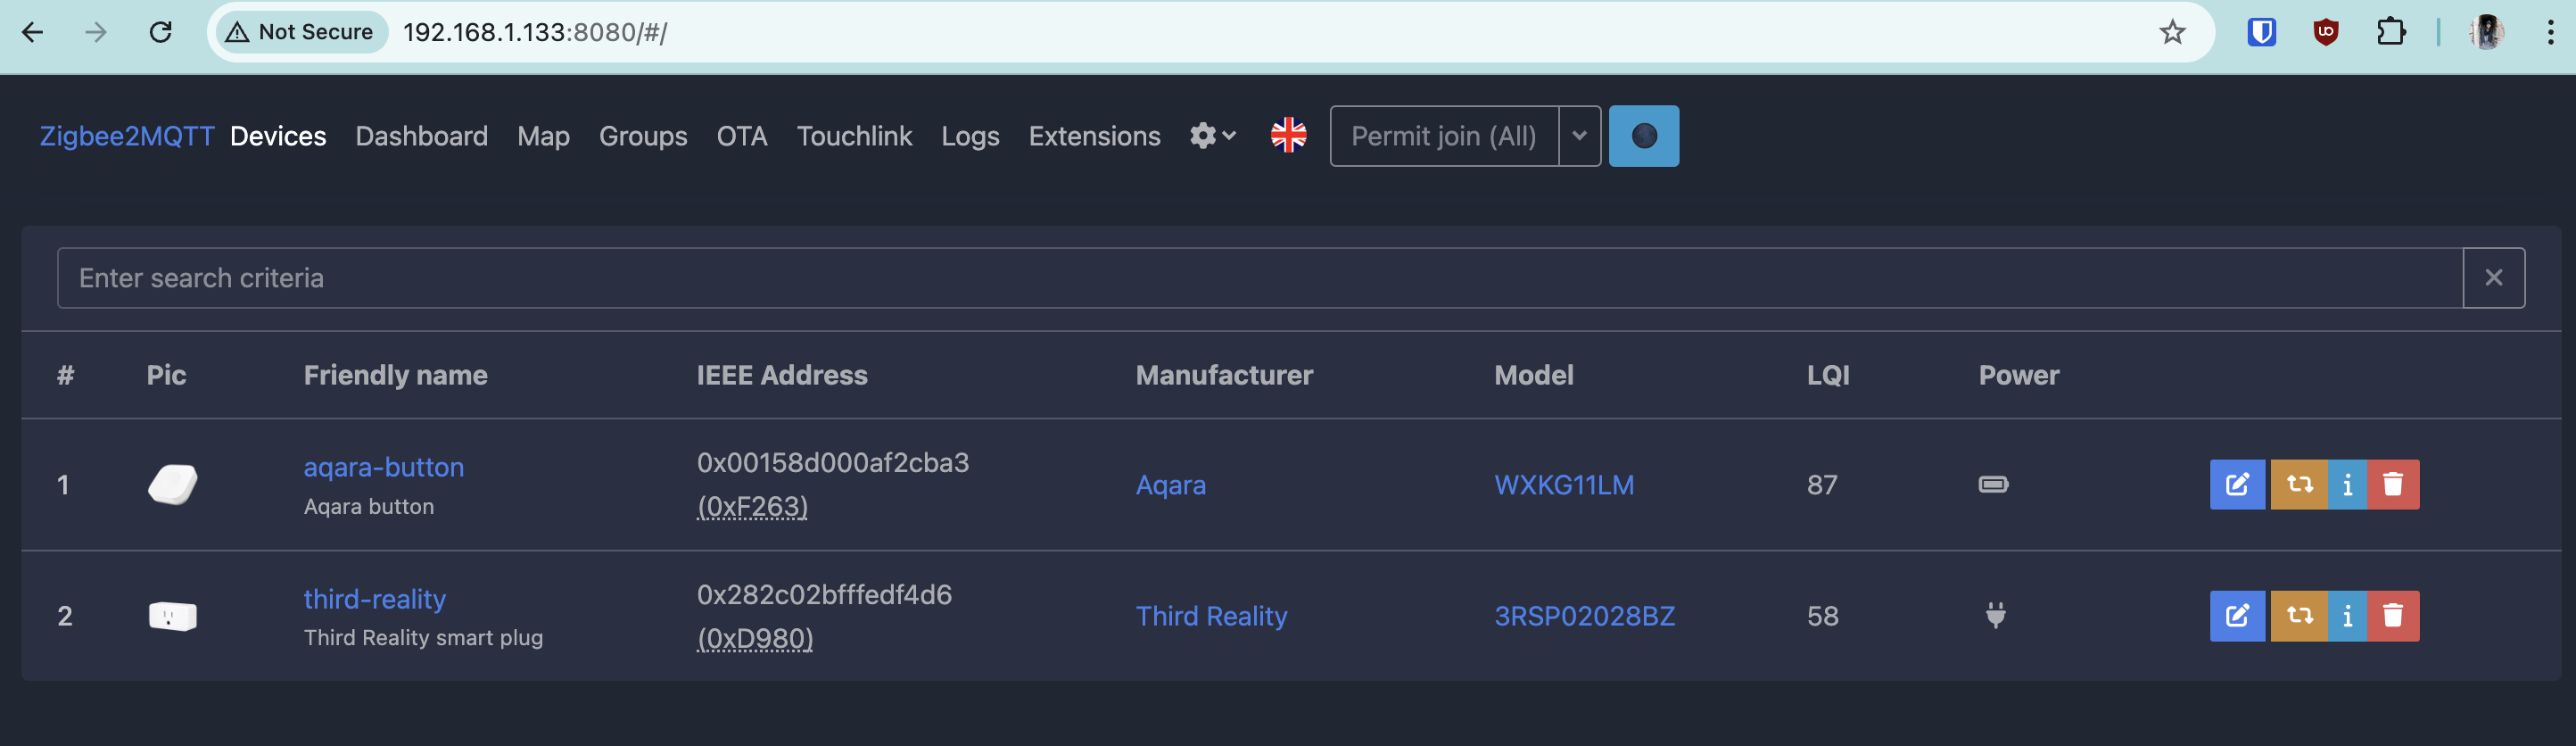
Give your devices a friendly name by using the pencil icon. Make sure to choose a unique name to avoid messaging conflicts in the following steps. For example, if you have 2 smart plugs, you can name them
smart-plug-bedroomandsmart-plug-office.
MQTT brokers follow a pub/sub messaging pattern which involves the following:
Subscribing to MQTT topics like
zigbee2mqtt/aqara-buttonto monitor device states like listening for button presses.Publishing to MQTT topics like
zigbee2mqtt/third-reality/setto send commands to devices like a smart plug to turn on a light.
A topic such as zigbee2mqtt/third-reality/set is broken down into 3 parts:
zigbee2mqttrefers to the base topic (default for Zigbee2MQTT iszigbee2mqtt).third-realityrefers to a specific device or group using the friendly name shown in the Zigbee2MQTT frontend.setallows you to control the device or group using a JSON message such as{"state": "TOGGLE"}.
Input the following command to see the MQTT messages being published to Zigbee2MQTT.
docker logs -f zigbee2mqttComplete an action on a Zigbee device, for example pushing a button, and make a note of which topics you want to utilize in your automation for the next steps. For example, in the screenshot of the logs below, there is an MQTT topic published called
zigbee2mqtt/Aqarawhen the Aqara button is pressed.

How to Create an Automation Script
To set up an automation, you can use an external system like Home Assistant or Node-RED, or use Zigbee2MQTT’s external converters to respond to MQTT messages from the broker.
You won’t be doing that. Instead, let’s write a JavaScript script to handle this automation, to keep the functionality modular and independent.
From the command line prompt of your terminal window, install the NodeSource setup script on your Raspberry Pi.
curl -fsSL https://deb.nodesource.com/setup_18.x | sudo -E bash -Install Node.js to use as the runtime for your script.
sudo apt install -y nodejsVerify the installation went smoothly by showing the installed version.
node -vInstall MQTT.js, the MQTT client library for Node.js.
npm install mqttCreate a file called
automation.jsto contain the automation script. In this example, you can run the script on the Raspberry Pi. However, the file can be placed anywhere and doesn’t even need to run on the same device as the MQTT broker. As long as the program can connect to the MQTT broker over the local network, it will function correctly.touch automation.jsOpen the file with your preferred text editor, like Nano shown here.
nano automation.jsPaste the following code into the file.
 const mqtt = require('mqtt');

 // MQTT broker connection details
 const MQTT_BROKER = 'mqtt://localhost'; // Replace with your broker's address
 const BUTTON_TOPIC = 'zigbee2mqtt/aqara-button'; // Replace with your button's topic
 const PLUG_TOPIC = 'zigbee2mqtt/third-reality'; // Replace with your plug's topic

 // Connect to the MQTT broker
 const client = mqtt.connect(MQTT_BROKER);

 // Handle connection events
 client.on('connect', () => {
     console.log('Connected to MQTT broker');
     // Subscribe to the button's topic
     client.subscribe(BUTTON_TOPIC, (err) => {
         if (!err) {
             console.log(`Subscribed to topic: ${BUTTON_TOPIC}`);
         } else {
             console.error(`Failed to subscribe to topic: ${BUTTON_TOPIC}`, err);
         }
     });
 });

 // Handle incoming messages
 client.on('message', (topic, message) => {
     if (topic === BUTTON_TOPIC) {
         try {
             const payload = JSON.parse(message.toString());
             console.log('Received message:', payload);
             const desiredAction = payload.action;

             // Check for possible actions
             if (desiredAction === 'single') {
                 // Send a message to the plug's topic to toggle the switch
                 client.publish(`${PLUG_TOPIC}/set`, JSON.stringify({"state": "TOGGLE"}));
                 console.log('Toggling the switch')
             } else if (desiredAction === 'double') {
                 // Send a message to the plug's topic to turn off the switch
                 client.publish(`${PLUG_TOPIC}/set`, JSON.stringify({ state: 'OFF' }));
                 console.log('Turning off the switch')
             }
         } catch (err) {
             console.error('Failed to parse message:', err.message);
         }

     }
 });

 // Handle errors
 client.on('error', (err) => {
     console.error('MQTT error:', err);
 });
This script connects to the MQTT broker and subscribes to the button’s topic (
zigbee2mqtt/aqara-button). When a message is received, it examines the payload. If the action is a single click (single), the script sends a toggle command ({state: "TOGGLE"}) to the plug’s topic (zigbee2mqtt/third-reality/set), toggling the plug’s state. Adoubleaction turns the plug off.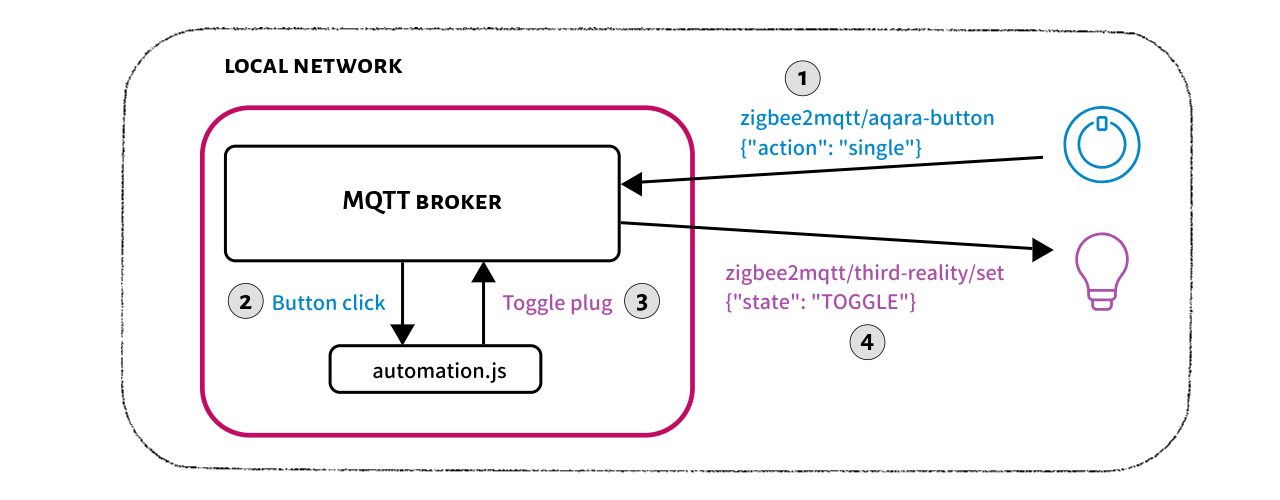
Update the MQTT broker connection and topic details at the top of the script as needed to accommodate your own Zigbee devices, and save your changes.
Run the script from the terminal prompt.
node automation.jsTest the setup by pressing the button. The script should log the button action and send a command to toggle on the smart plug. Check the MQTT broker logs if the light doesn’t turn on.
Optional*:* Once the script is working as expected, there are a few more optional steps to make sure the script restarts during reboots. Install a process manager like PM2 from the command line prompt of the Raspberry Pi.
sudo npm install -g pm2Start the script again.
pm2 start automation.jsYour app should now be daemonized, running in the background, and kept alive forever. Generate and configure a startup script to keep PM2 and your processes alive at every server restart.
pm2 startupCopy and paste the command exactly as shown in the terminal output, and run the suggested command.
Save the process list so PM2 can restore it after a system reboot.
pm2 save
What’s Next?
Now that you’ve created a custom automation, there are more ways to grow your home automation setup.
Explore more Zigbee devices: Zigbee2MQTT supports a wide range of devices from various manufacturers.
Add custom behaviors: Use Zigbee2MQTT’s external converters to define unique functionality for both supported and unsupported devices.
Scale your setup: This flexible, lightweight setup is good for beginners and power users alike, who don’t want to get locked into proprietary smart home platforms or cloud services.
If you found this tutorial helpful, don’t forget to check out my recommended Home Automation hardware and how-to videos on YouTube for more inspiration!
You can watch the video version of this article here: