
By Kelly Burke
In some situations, your web app needs to show an informational message to tell users whether an event was successful or not. For example, a “Success” message after a user clicks a button and successfully completes some action.
In this tutorial, I’ll show you how to create a simple component for informational, in-app messages with React and Material-UI. We’ll call it a Notifier component.
Here are the main sections of this tutorial:
- Getting started
- Notifier component
- Import Notifier component to Index page
- Testing
If you find this article useful, consider starring our Github repo and checking out our book where we cover this and many other topics in detail.
Getting started
For this tutorial, I’ve created a simple web app for you to follow. We’ll use code located in the tutorials/4-start folder of our builderbook repo.
If you don’t have time to run the app locally, I deployed this example app here.
To run the app locally:
- Clone the builderbook repo to your local machine with:
git clone git@github.com:builderbook/builderbook.git
- Inside the
4-startfolder, runyarnornpm installto install all packages listed inpackage.json. - Run
yarn devto start the app.
Index page
On your browser, go to http://localhost:3000. This is our Index page, which has the / route. Next.js provides automatic routing for pages located in a /pages folder. The name of each page file becomes that page’s route.
Our Index page is a simple page component that renders a form, an input, and a button (more explanation below).
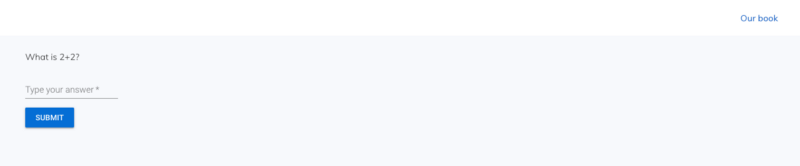
Here’s the code for our Index page at pages/index.js:
A few notes:
- We could have defined this page as a stateless functional component, since it has no state, lifecycle hooks, or refs (read more about when to use stateless functional components versus React ES6 classes). You’ll see this Eslint warning:
Component should be written as a pure function. However, the finalIndexpage that we write in this tutorial will have ref. Hence, we wrote this initialIndexpage as a child of ES6 class using extends. - We imported Head from Next.js in order to customize the
<Head> element of the page. Inside, we added apage<title> and description for proper indexing by search engine bots (good for SEO).The text inside displays on your browser tab:</li> </ul> <p><img src="https://cdn-media-1.freecodecamp.org/images/1*QtsMfsiewcSAb5AOE8LvsA.png" alt="Image" class=""></p> <ul> <li>We used Material-UI’s <a target='_blank' rel='noopener' href="https://material-ui-next.com/api/text-field/#textfield">TextField</a> and <a target='_blank' rel='noopener' href="https://material-ui-next.com/demos/buttons/#buttons">Button</a> components, which render into <code><inp</code>ut><code>; and &l</code>t;button> HTML elements, respectively.</li> <li>We wrapped our page with a <code>withLayout</code> higher-order component. Our app uses Next.js, and <code>withLayout</code> ensures that server-side rendering works properly for Material-UI inside our React-Next app. <code>withLayout</code> also adds our <code>Header</code> component (located at <code>components/Header.js</code>) to each page that <code>withLayout</code> wraps. Server-side rendering is not necessary for Material-UI or React, but it is a main feature of Next.js. We discussed <a target='_blank' rel='noopener' href="https://hackernoon.com/server-side-vs-client-side-rendering-in-react-apps-443efd6f2e87">server-side vs. client-side rendering</a> in React apps in another tutorial.</li> </ul> <p>We are done describing our initial <code>Index</code> page. Now let’s discuss the <code>Notifier</code> component that we will later import into the <code>Index</code> page to show informational messages to our web app users.</p> <h3 id="heading-notifier-component">Notifier component</h3> <p>Let’s start by defining the <code>Notifier</code> component. We define <code>Notifier</code> as a <code>React.Component</code> instead of a stateless function, because <code>Notifier</code> will have state, one lifecycle method, and a few event handling functions.</p> <p>For our informational messages, we will use Material-UI’s <a target='_blank' rel='noopener' href="https://material-ui-next.com/demos/snackbars/#snackbars">Snackbar</a>. Check out <a target='_blank' rel='noopener' href="https://material-ui-next.com/demos/snackbars/#snackbars">examples</a> of using Snackbar on the official Material-UI site.</p> <p>Here’s a high-level outline of our <code>Notifier</code> component:</p> <p>Create a <code>Notifier.js</code> file inside the <code>/components</code> folder of <code>4-start</code>. Add the above high-level outline to this file. Below, we will replace the numbered comments with code.</p> <ol> <li>We will use the <code>open</code> and <code>message</code> props of Material-UI’s Snackbar for the state of our <code>Notifier</code>. Check the <a target='_blank' rel='noopener' href="https://material-ui-next.com/api/snackbar/#props">full list of props</a> for Snackbar.</li> </ol> <p>Initially, our <code>Notifier</code> should be in a closed state with an empty string as a message. We define the <code>Notifier</code>'s initial state as:</p> <ol start="2"> <li>Now let’s write a function that updates the state of the Notifier component. The function will change the value of the <code>open</code> prop to <code>true</code> and set the value of the <code>message</code> prop to a non-empty string. Let’s call this function <code>openSnackbar()</code>.</li> </ol> <p>Before we can execute <code>openSnackbar()</code>, our <code>Notifier</code> component needs to be mounted in the DOM. Thus, we put the <code>openSnackbar()</code> function into a <code>componentDidMount</code> lifecycle method that executes right after the <code>Notifier</code> component mounts in the DOM.</p> <p>In order to access the <code>openSnackbar()</code> function <strong>anywhere</strong> in our app, we have to set its value to another function that is available outside of the <code>Notifier</code> component. Hence, we write <code>let openSnackbarFn</code> above <code>class Notifier extends React.Component</code>.</p> <p>Putting these pieces together:</p> <p>Now let’s define the <code>openSnackbar()</code> function. This function will update the <code>open</code> and <code>message</code> properties of our <code>Notifier</code>’s state. Once the state is updated, the <code>Notifier</code> component will get re-rendered to show a message (<code>open:true</code> displays the Snackbar, and <code>message:message</code> sets the message).</p> <p>Inside <code>this.setState</code>, we could have written <code>message</code> as <code>message:message</code>. Instead, we used ES6 <a target='_blank' rel='noopener' href="https://eslint.org/docs/rules/object-shorthand">shorthand syntax</a> (enforced by Eslint) to make the code more concise.</p> <ol start="3"> <li><p>When a user clicks outside of the Snackbar area, the Snackbar should close. The Snackbar prop <code>onClose</code> is responsible for this behavior. Let’s write a function called <code>handleSnackbarClose()</code> that sets <code>open</code> to <code>false</code> and <code>message</code> to an empty string.</p> </li> <li><p>Finally, let’s write code for our <code>Notifier</code> component to render the Snackbar component with all necessary props.</p> </li> </ol> <p>In addition to the <code>message</code>, <code>onClose</code>, and <code>open</code> props described above, we’ll add the following props to our Snackbar component:</p> <ul> <li><code>anchorOrigin</code>: specifies the Snackbar location</li> <li><code>autoHideDuration</code>: specifies the Snackbar duration in milliseconds</li> <li><code>SnackbarContentProps</code>: binds the Snackbar to an element inside the DOM that contains <code>message</code>; in our case, the element has the id <code>snackbar-message-id</code>, and the Snackbar will display text from this element.</li> </ul> <p>Here is the <code>render()</code> method of our <code>Notifier</code> component:</p> <p>In the <code><sp</code>an> element, we could have wr<code>itten message={this.state.me</code>ssage}, but instead we <code>wrote dangerouslySetInnerHTML={{ __html: this.state.mess</code>age }} . This allows us to add HTML code to the Snack<code>bar’s m</code>essage prop. For instance, you may want to show a hyperlink to u<a target='_blank' rel='noopener' href="https://reactjs.org/docs/dom-elements.html#dangerouslysetinnerhtml">sers. Rea</a>d more about using dangerouslySetInnerHTML in React.</p> <p>After putting the code from steps 1–4 together, here’s our final <code>Notifier</code> component:</p> <p>Important note: notice how we exported our <code>openSnackbar()</code> function in addition to <code>Notifier</code> component. We will import <strong>both</strong> <code>openSnackbar()</code> and <code>Notifier</code> into our <code>Index</code> page.</p> <h3 id="heading-import-notifier-component-to-index-page">Import Notifier component to Index page</h3> <p>Let’s go back to our <code>Index</code> page, where we will import our <code>Notifier</code> component and <code>openSnackbar()</code> function.</p> <p>Without triggering the <code>openSnackbar()</code> function, our <code>Notifier</code> component will always stay in its initial closed state with an empty string as a message. We need to execute <code>openSnackbar()</code> after a user submits the form by clicking the button on our <code>Index</code> page. Let’s define a <code>showNotifier()</code> function that does exactly that.</p> <h4 id="heading-shownotifier-function">showNotifier Function</h4> <p>We will call <code>showNotifier()</code> inside the <code><fo</code>rm> element. We’ll <code>make showNoti</code>fier() execute when a user enters a number on the form and clicks the “Submit” button.</p> <p>Here’s the current <code><fo</code>rm> o<code>n our</code> Index page:</p> <p>Let’s make two modifications:</p> <ol> <li><p>To call <code>showNotifier()</code> when the form is submitted, we use JavaScript’s <a target='_blank' rel='noopener' href="https://www.w3schools.com/jsref/event_onsubmit.asp">onsubmit Event</a>:</p> </li> <li><p>A user will enter a number inside <code>TextField</code>. In order for our <code>showNotifier()</code> function to access the value of <code>TextField</code>, we add React’s <a target='_blank' rel='noopener' href="https://reactjs.org/docs/refs-and-the-dom.html#adding-a-ref-to-a-dom-element">ref attribute</a> to <code>TextField</code>.</p> </li> </ol> <p>There are two ways to get the value of <code>TextField</code>: with <code>this.state</code> and with <code>ref</code>. We chose <code>ref</code>, since <code>this.state</code> is more concise. Here’s an <a target='_blank' rel='noopener' href="https://stackoverflow.com/questions/36683770/react-how-to-get-the-value-of-an-input-field?utm_medium=organic&utm_source=google_rich_qa&utm_campaign=google_rich_qa">explanation</a> of writing with <code>this.state</code>, and here’s <a target='_blank' rel='noopener' href="https://reactjs.org/docs/refs-and-the-dom.html#callback-refs">more info</a> about using <code>ref</code> in React.</p> <p>Now let’s define the <code>showNotifier()</code> function. Here’s the high-level outline for <code>showNotifier()</code>:</p> <p>Below, we’ll write code for each of the three comments above.</p> <ol> <li>We define <code>answer</code> as:</li> </ol> <p>This line of code says that IF <code>answerInput</code> exists (meaning the <code><inp</code>ut> element is added to the DOM), <code>THEN</code> answer equals the val<code>ue of answe</code>rInput, which is accessed <code>with answerInput</code>.value.</p> <p>IF <code>answerInput</code> does not exist, THEN the entire condition in parentheses is false and <code>answer</code> equals <code>null</code>.</p> <ol start="2"> <li><p>If a user does not enter an answer on our form but clicks the “Submit” button, we will show this message: <code>Empty field. Enter a number.</code></p> </li> <li><p>If a user enters 4 and clicks the “Submit” button, then our <code>openSnackbar()</code> function will run and show this message: <code>Correct answer!</code>. Otherwise, it will show <code>Incorrect answer.</code></p> </li> </ol> <p>We use <code>parseInt(answer, 10)</code> to parse <code>answer</code>, which is a string, and return an integer. The parameter <code>10</code> specifies that the integer is in decimal format.</p> <p>Let’s put together the code from steps 1–3 above for our <code>showNotifier</code> function. We’ll place the code right under the line <code>class Index extends React.Component</code>:</p> <p>You’ll notice that we added a line <code>event.preventDefault();</code>. This will prevent our <code><fo</code>rm> element from its default behavi<a target='_blank' rel='noopener' href="https://developer.mozilla.org/en-US/docs/Learn/HTML/Forms/Sending_and_retrieving_form_data">or of sending form data to a</a> server.</p> <p>Now we have all the code for our final <code>Index</code> page:</p> <h3 id="heading-testing">Testing</h3> <p>Let’s test that our <code>Notifier</code> works as expected. Run the app locally with <code>yarn dev</code> and navigate to <a target='_blank' rel='noopener' href="http://localhost:3000">http://localhost:3000</a>. If you aren’t running the app, go to the one I deployed: <a target='_blank' rel='noopener' href="https://notifier.builderbook.org">https://notifier.builderbook.org</a>.</p> <p>First, click “Submit” without adding anything in the text field.</p> <p><img src="https://cdn-media-1.freecodecamp.org/images/1*tFZ2EbE513_ACJqNMPiHYw.png" alt="Image" class=""></p> <p>Next, add the number 4 and click “Submit”.</p> <p><img src="https://cdn-media-1.freecodecamp.org/images/1*ov1Nt7TI_VcHWOgn-zb9WQ.png" alt="Image" class=""></p> <p>Now add any other number and click “Submit”.</p> <p><img src="https://cdn-media-1.freecodecamp.org/images/1*61lDH0rzRRsReG4X36GV8A.png" alt="Image" class=""></p> <p>Remember that we wrote code to close the Snackbar when a user clicks away from it (we wrote a <code>handleSnackbarClose()</code> function and passed it to the <code>onClose</code> prop of the Snackbar). After seeing the Snackbar, click anywhere besides the Snackbar itself on your screen. The Snackbar should close immediately.</p> <p>A nice feature of Material-UI is mobile optimization. We don’t have to write extra code for our informational message to look good on mobile devices. See for yourself by going to Chrome’s DevTools and changing the view from desktop to mobile. Our message appears across the top of the screen:</p> <p><img src="https://cdn-media-1.freecodecamp.org/images/1*3t4ur9VU3LOw2ytbKHrvAQ.png" alt="Image" class=""></p> <p>Woohoo! You’ve successfully added an informational, in-app message to a React web app! Your final code should match the code in the <a target='_blank' rel='noopener' href="https://github.com/builderbook/builderbook/tree/master/tutorials/4-end">tutorials/4-end</a> folder of our <a target='_blank' rel='noopener' href="https://github.com/builderbook/builderbook">builderbook repo</a>.</p> <h4 id="heading-customize-notifier-component">Customize Notifier component</h4> <p>Now that you have a working <code>Notifier</code> component, let’s see how we can modify the UX by changing props of Material-UI’s SnackBar component. Here’s the <a target='_blank' rel='noopener' href="https://material-ui-next.com/api/snackbar/#props">full list</a> of props you can use.</p> <p>First, let’s change the duration of the Snackbar. Insider your <code>Notifier</code> component, find the <code>autoHideDuration</code> prop. Change its value from <code>3000</code> to <code>1000</code> and compare. You’ll see that at <code>1000</code>, the Snackbar closes more quickly.</p> <p>Second, let’s change the position of the Snackbar. Find the <code>anchorOrigin</code> prop and change its values from <code>top</code> and <code>right</code> to <code>bottom</code> and <code>left</code>, respectively. Check where the Snackbar appears now:</p> <p><img src="https://cdn-media-1.freecodecamp.org/images/1*9ANw1zxyhHSQBOECUR_G2Q.png" alt="Image" class=""></p> <p>Finally, let’s make the Snackbar <code>message</code> include a hyperlink. Recall that we added <code>dangerouslySetInnerHTML={{ __html: this.state.message }}</code> to our <code>message</code> prop in the Snackbar so that we can write HTML inside of it.</p> <p>Change the code for our <code>Correct answer!</code> and <code>Incorrect answer.</code> messages like this:</p> <p>Now users will see the messages below. Notice the dark blue hyperlinks for text inside the <code><</code>;a> tags.</p> <p><img src="https://cdn-media-1.freecodecamp.org/images/1*fGzjKrwd2noPg34wQUOTCw.png" alt="Image" class=""></p> <p><img src="https://cdn-media-1.freecodecamp.org/images/1*lYm3vmPuDAx4klVt33BwWw.png" alt="Image" class=""></p> <p>If you’re learning how to build web apps with JavaScript, check out our <a target='_blank' rel='noopener' href="https://github.com/builderbook/builderbook">Github repo</a> and our <a target='_blank' rel='noopener' href="https://builderbook.org/book">book</a>, where we cover this and many other topics in detail.</p> <p>To get email updates about our tutorials, subscribe <a target='_blank' rel='noopener' href="https://builderbook.org/tutorials">here</a>.</p>