By Arnel Enero
New, much easier syntax and semantics for good old Redux
The words “simple” and “Redux” rarely appear together in the same sentence. And yet, much of the React community has come to embrace Redux as one of the best solutions for implementing application state.
Now there is a way to use Redux even if you don’t write a single line of Redux boilerplate code. You don’t even need to know or learn Redux. As long as you are convinced that Redux is the top choice for your app’s state requirements, you will want to read this.
In this article we will cover these topics:
- Managing simple app state changes
- Working with async operations (e.g. data fetches)
- Code splitting and lazy-loaded app state
The Reactor Library
I originally wrote the Reactor Library to minimize the boilerplate needed in my personal projects that use React. One of its features is the super simple app state management that I will share with you here.
I have since decided to make the library available to everyone who may be looking to simplify their React/Redux code. Feel free to use it; it’s yours as much as mine.
To install:
npm install @reactorlib/core
The 3 Key Things
To write our application state management using Reactor Library, there are 3 key things we need to know about:
- Store: This is the single place where the entire state of our application is kept.
- Entities: These are pieces of the app state, each representing a specific area of concern or functionality.
- Actions: These are functions that our components can invoke to trigger some change in the app state. These also reside in the store.
Step 1: Creating Entities
When we define an entity, we think about how the entity would react to certain actions. We refer to this as its reactions. Each reaction comprises state changes that occur within the entity (remember, each entity is just a portion of our app state).
Reactor Library provides a function called createEntity that we will use to define our entities. It accepts two arguments, the entity’s reactions, as well as its initial state:
createEntity(reactions: Object, initialState: any)
Let’s get the easier part out of the way first. The initialState should basically define the data structure of our entity by assigning a default value to it.
The reactions argument is a mapping of action names against corresponding reactions. Note that the mapping is not meant to define the actual action functions.
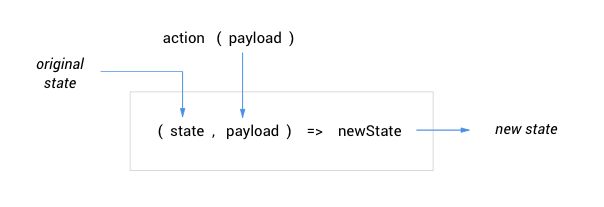
In its simplest form, a reaction looks like this:
action: (state, payload) => newState
where action corresponds to the name of an action, while payload(optional) is any single argument that the entity expects you to pass to the action. All this really means is, when action(payload) is invoked, the entity applies certain logic to change its state from state to newState.

Here is a simple example of entity definition:
const initialState = { value: 0 };
const counter = createEntity( { increment: (state, by) => ( { ...state, value: state.value + by } ), reset: state => ({ ...state, value: 0 }) }, initialState);
IMPORTANT: In defining an entity’s reactions, keep in mind that the React golden rule of not mutating the component state also applies to the application state. So if your entity’s state is of object or array type, always make sure to return a fresh object or array.
Easy peasy so far, right? Let’s go on…
Step 2: Setting Up the Store
I said ‘the store’ because there can only be one store throughout our entire application. To make this store available to all our components, we would need to inject this into a top-level component, typically <App>.
Reactor Library includes the withStore HOC that creates the store, puts entities into it, and designates its target component as the provider/owner of the store.
withStore(entities: Object) (Component)
Here the entities argument is a mapping of entity names against the actual entity objects created using createEntity(). This mapping is important because we access entities from the store using the names assigned here.
Let’s take the counter entity from our previous example, and create our store then place the entity in it:
import counter from './store/counter';
const _App = () => ( <Router> <Shell /> </Router>);
const App = withStore({ counter })(_App);
As simple as that, really. Our store is now all set.
Step 3: Importing Props from Store
Now the last remaining step is to make the application state accessible to our components. There are 2 simple rules:
- Components are able to read the application state by importing entities from the store.
- They can also change the app state, by importing actions from the store.
We use Reactor Library’s getPropsFromStore HOC to do either or both, and inject them to our component as props.
getPropsFromStore( entities?: Array<string>, actions?: Array<string>) (Component)
Here, entities is a list of entity names, and actions is a list of action names.
Imported entities are injected as state props. This means that whenever any of these entities change, the component will re-render.
Imported actions are injected as function props that we can directly invoke inside our component.
You may be wondering, where do we define these action functions? Well, we don’t. The store creates these for us, based on all the action names we mapped to the reactions when creating our entities with createEntity.
Continuing our previous examples, we import the counter entity from the store as follows:
const _ClickCount = ({ counter, increment, reset }) => ( <> You have clicked {counter.value} times. <button onClick={() => increment(1)}>Click Me</button> <button onClick={reset}>Reset Counter</button> </>);
const ClickCount = getPropsFromStore( ['counter'], ['increment', 'reset'])(_ClickCount);
That’s it! In 3 easy steps, we have connected our component to the app state.
Working with Async Actions
An async action is essentially one that requires some sort of non-blocking, asynchronous operation such as fetching data, timer, computation-intensive task, or anything else that is unable to immediately complete its execution.
With the simple form of reaction, the calculation of new state is done immediately. But when dealing with async actions, the entity needs to perform an async operation, and wait for it to finish before it can calculate the state change. For this we need a different form of reaction, which is aptly called an async reaction.
Defining Async Reactions
Reactor Library’s createEntity enables us to easily define async reactions, declaratively, in the following form:
action: [ (state, payload) => newState, async (payload, next) => { const result = await doSomethingAsync(); next(result); }, (state, result) => newState]
This is an array consisting of the 3 steps of our async reaction:
- The startup step where any preparatory state change can be made, e.g. setting a ‘loading’ or ‘wait’ flag.
- The async step where the entity performs the async operation. It waits until the async operation completes, before calling the next step.
- The completion step where the final state change is made, normally based on the result of the preceding async step.
This diagram illustrates how data flows throughout the 3 steps of the async reaction:
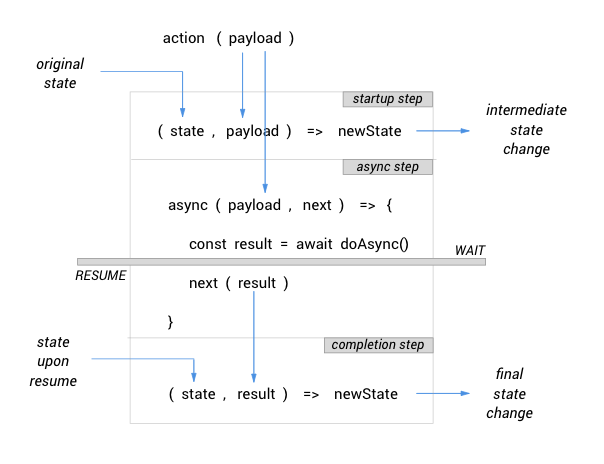
The first step (startup) is actually optional, as there are times when you don’t really need a preparatory state change.
Example Usage
Here is an example of a complete entity with both simple and async reactions. You can always go back to the illustration above if the flow of data and state changes still seem somewhat unclear.
const initialState = { auth: null, waiting: false };
const session = createEntity( { login: [ state => ({ ...state, waiting: true }), async ({ username, password }, next) => { const response = await login(username, password); next(response); }, (state, { auth }) => ({ ...state, auth, waiting: false }), ], logout: state => ({ ...state, auth: null }), }, initialState);
Once you get used to this 3-step format, you will be able to create entities quickly because you would only need to focus on the state-change logic and data flow, and not worry about any complex boilerplate code to write.
That’s it! Isn’t that way too easy?
Lazy Loading the App State
If you do code splitting, you will want to code-split your application state as well. A lazy-loaded module can have its own feature store containing feature-specific entities.
As there can only be a single store in the app, Reactor Library provides a simple way to dynamically merge lazy-loaded feature stores into the main store. This is using the withFeatureStore HOC, which has the following signature:
withFeatureStore(entities: Object) (Component)
As you might notice, this has exactly the same format as the withStore HOC that we discussed earlier. It specifies entities that are lazy-loaded together with your feature modules, to let Reactor Library know that these entities are to be dynamically merged into the store once the feature modules are loaded.
Example Usage
Let’s take, for example, a lazy-loaded timer feature that has a TimerPage component as its entry point, and a timer entity to manage its state.
import timer from './store/timer';
const _TimerPage = () => ( <Countdown />);
const TimerPage = withFeatureStore({ timer })(_TimerPage);
That’s it! Again, quick and easy.
Further Information
To learn more about the Reactor Library that we used in this article, you can find its official documentation at https://github.com/arnelenero/reactorlib.
Thanks for reading.