
By Rahat Khanna
“Hey, what’s up?” is not a phrase we need to ask someone these days. These days knowing what someone is up to has become so easy, because we keep seeing updated statuses for all our friends on WhatsApp, Snapchat, Facebook and so on.
In this article, we will learn how we can update a user’s status in a realtime component along with a list of all members who are online.
We will be using Node.js as the application server, Vanilla JavaScript in the front-end, and Pusher for realtime communication between our server and front-end.
We will build an app, which will be like your friends list or a common chat room, where you can see who’s online and what’s their latest status update in realtime. We will learn about Pusher’s presence channel and how to know about the online members on this channel.

We will be building the following components during this blog post:
Node.js Server using Express.js Framework:
- /register API — In order to register/login a new user to our channel and server by creating their session and saving their info
- /isLoggedIn API — To check if a user is already logged in or not in case of refreshing the browser
- /usersystem/auth API — Auth validation done by Pusher after registering it with our app and on subscribing to a presence or private channel
- /logout API — To logout the user and remove the session
Front-End App using JavaScript:
- Register/Login Form — To register/login a new user by filling in their username and initial status
- Members List — To see everyone who is online and their updated statuses
- Update Status — To click on the existing status and update it on blur of the status text edit control
Find here the link to the Github Repository for reference.
Introduction to Pusher
Pusher is a platform which abstracts the complexities of implementing a realtime system on our own using WebSockets or Long Polling. We can instantly add realtime features to our existing web applications using Pusher, as it supports a wide variety of software development kits (SDKs).
Integration kits are available for a variety of front-end libraries like Backbone, React, Angular, and jQuery — and also back-end platforms/languages like .NET, Java, Python, Ruby, PHP, and GO.
Signing up with Pusher
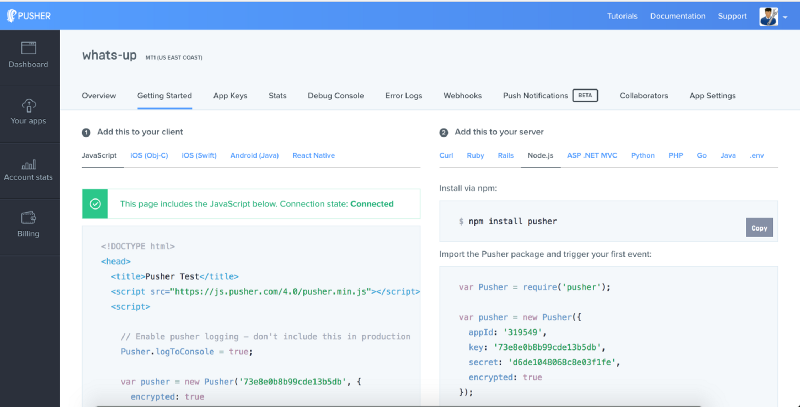
You can create a free account in Pusher here. After you signup and login for the first time, you will be asked to create a new app as seen in the image below. You will have to fill in some information about your project, and also provide the front-end library or back-end language you will be building your app with.

For this particular article, we will be selecting JavaScript for the front-end and Node.js for the back-end as seen in the image above.
This will just show you a set of starter sample codes for these selections, but you can use any integration kit later on with this app.
Node.js Server
Node.js should be installed in the system as a prerequisite to this project. Now let’s begin building the Node.js server and all the required APIs using Express. Initialize a new node project by the following command:
npm init
Installing Dependencies
We will be installing the required dependencies like Express, express-session, Pusher, body-parser, cookie-parser by the following command:
Foundation Server
We will now create the basic foundation for the Node.js Server and also enable sessions in it using express-session module.
In the above code, we have created a basic Express server, and using the method .use we have enabled cookie-parser, body-parser, and a static file serving from **public** folder. We have also enabled sessions using express-session module. This will enable us to save user information in the appropriate request session for the user.
Adding Pusher
Pusher has an open source npm module for Node.js integrations, which we will be using. It provides a set of utility methods to integrate with Pusher APIs using a unique appId, key and a secret. We will first install the Pusher npm module using the following command:
npm install pusher --save
Now, we can use require to get the Pusher module and to create a new instance passing an options object with important keys to initialize our integration. For this article, I have chosen random keys — you will have to obtain them for your app from the Pusher dashboard.
You will have to replace the appId, key and a secret with values specific to your own app. After this, we will write code for a new API which will be used to create a new comment.
Register/Login API
Now, we will develop the first API route of our application through which a new user can register/login and make themselves available on our app.
In the above code, we have exposed a POST API call on the route /register which would expect username and status parameters to be passed in the request body. We will be saving this user info in the request session.
User System Auth API
In order to enable any client subscribing to Pusher **Private** and **Presence** channels, we need to implement an auth API which would authenticate the user request by calling **Pusher.authenticate** method at the server side. Add the following code in the server in order to fulfill this condition:
We need to provide the specific route in the initialization of the Pusher client side library, which we will see later. The Pusher client library will automatically call this route and pass in the channel_name and socket_id properties. We will simultaneously get the user information from the user session object and pass it as presenceData to the Pusher.authenticate method call.
IsLoggedIn and Logout API
If the user refreshes the browser, the client side app should detect if the user is already registered or not. We will implement an isLoggedIn API route for this. Also, we need a logout route to enable any user to logout from the app.
Front-End App using Vanilla JavaScript
We will now be developing the front-end app to register a new user with an initial status and see the members who are online and their statuses. We will also build the feature for the logged-in user to update their users and all other users will see the updated status in realtime.
Step 1: Create a folder named public and create an index.html file
We have already written code in our server.js to serve static content from public folder, so we will write all our front-end code in this folder.
Please create a new folder public and also create an empty index.html file for now.
Step 2: Add Boilerplate Code to our index.html
We will be adding some basic boilerplate code to set up the base structure for our web app like Header, and Sections where the registration form and the members list can be placed.
In the above boilerplate code, we have referenced our main JavaScript file app.js and the Pusher client side JavaScript library. We also have a script tag where we will place the template for a member row in the member list. Also, we have two empty div tags with ids **me** and **membersList** to contain the logged in member name and info, as well as the list of all other members with their status.
Step 3: Style.css
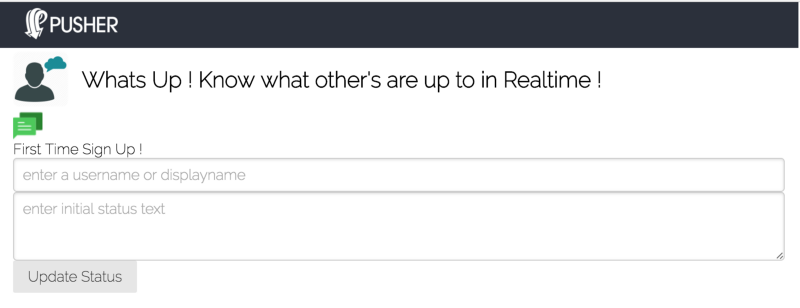
Important to note that we will be showing the signup form for the first time and the MembersList and Logout button will be hidden by default initially. Please create a new file called **style.css** and add the following CSS to it:
Please try to open the URL http://localhost:9000 in your browser and the application will load with the basic register or login form with username and status. The output will look like the screenshot below:
Step 4: Add app.js basic code
Now we will add our JavaScript code to have basic utility elements inside a self-invoking function to create a private scope for our app variables. We do not want to pollute JavaScript’s global scope.
In the above code, we have referenced all the important variables we will be requiring. We will also initialize the Pusher library using new Pusher and passing the API key as the first argument. The second argument contains an optional config object in which we will add the key authEndpoint with the custom node API route /usersystem/auth and also add the key **encrypted** setting it to value true.
We will create a couple of generic functions to show or hide an element passing its unique id. We have also added a common method named **ajax** to make AJAX requests using XMLHttp object in Vanilla JavaScript.
At the load of the page we make an AJAX request to check if the user is logged in or not. If the user is logged in, we will directly use the Pusher instance to subscribe the user to a presence channel named presence-whatsup-members . You can have this as the unique chat room or app location where you want to report/track the online members.
We have also written a method above to addNewMember using an AJAX request to the register API route we have built in Node.js. We will be passing the name and initial status entered into the form.
We also have a method to update the user view state based on the logged-in status. This method does nothing but update the visibility of the members list, logout button, and signup form. We have used a bindChannelEvents method when the user is logged in, which we will be implementing later in the blog post.
Please add the following CSS in **style.css** file to display the me element appropriately with the username and the status of the logged-in user.
Step 5: Add code to render the members list and bindChannelEvents
Now, after subscribing to the channel, we need to bind certain events so that we can know whenever a new member is added to the channel or removed from it. We will also bind to a custom event to know whenever someone updates their status.
Add the following code to the **app.js** file:
In the above bindChannelEvents method, we use the channel.bind method to bind event handlers for 3 internal events —**usher:subscription_succeeded**, **pusher:member_added**, **pusher:member_removed** and 1 custom event —**client-status-update**.
Now we will add the JavaScript code to render the list of members. It is important to know that the object which I returned from the .subscribe method has a property called members , which can be used to know the information about the logged-in user referred by the key me and other members by key members. Add the following code to **app.js** file:
We have added the event handler for new member add/remove event to re-render the members list so that it remains updated with the online members only. In order to show the members list, we need to add the following style into our file **style.css**:
Now we will write the code to trigger a client event on our channel to notify all users about the status change of the logged in user. Add the following code to your **app.js** file:
IMPORTANT: When we run this code in our browsers, update the status, and blur out of the status control, we will get an error in the JavaScript console for the Pusher library. To fix this, go to the console at Pusher.com website, go to settings, and enable sending events from clients directly.
We can only send events from clients directly for Presence or Private channels. Link to the official documentation — https://Pusher.com/docs/client_api_guide/client_events#trigger-events
Conclusion
We have built an application which will display all the online members for a particular presence channel and their status. If any of the online user updates their status, every user will be notified about the updated status.
This component or code can be used for developing a social networking section in most of the web apps these days. It is an important use case where the user needs to know about other available participants. For example: an online classroom app can see the other participants and the status can correspond to any question any participant wants to ask the presenter.

We have just used Node.js and Vanilla JavaScript to implement the above functionality. You can use the JavaScript for front-end code with any popular framework like React or Angular. The back-end can also be Java or Ruby. Please refer to the Pusher docs for more information on this.
This blog post was originally published on Pusher’s blog.