

This post will show you how to build the Feature Toggle mechanism in your Next.JS application.
We are going to use Next.JS, React, and TypeScript. We will deploy our application to Vercel to demonstrate the real-life example.
You can find the code and video in the summary at the end.
What You'll Learn in This Article
In this article, we are going to deep dive into several topics such as:
- What are feature toggles?
- How to use React's Context API
- What are environment variables, and how do we use them in our applications?
- How to build custom hooks in React.
What Are Feature Toggles?
Feature toggles (aka Feature Flags) are a technique that allows you to change the state of your application without modifying its code.
At the beginning, it might sound a bit confusing but let's consider the following scenario: Every December, many companies change their logo to add a bit of holiday spirit. Perhaps they want to add a Santa Claus hat into their logos or some sort of snowman.
Have you ever wondered if they change their website every year just to update the logo? No, in the most of cases, they only do it once, and just connected it into their feature toggle. So they can enable the special logo whenever they need it.
Here's another example: imagine a development team that follows continuous integration (CI). They use this mechanism to commit unfinished code, and then merge it onto the main branch. The unfinished code is disabled on the production environment so users cannot see incomplete features.
Keep in mind that this is only a good idea for mature development teams that have experienced developers on board along with automated checks for their CI pipelines (like automated tests, static code analysis, compilation / bundling, and so on).
Before We Start
This tutorial requires some Node and React fundamentals. You should also know how to use Git and GitHub before you follow the instructions in this article.
I skipped the part about bootstrapping the example application since I showed a very similar process in one of my previous posts. If you don't know how to do that, that's fine – just check out the below tutorials on freeCodeCamp (they're free!) before you start to follow the instructions in this article:
- Git and Github for Beginners.
- Learn Node.js - Full Tutorial for Beginners.
- Learn React - Full Course for Beginners.
- How to Build a Fully Functional Serverless App in Under Two Hours (optional).
I created two GitHub repositories for this post. The first one contains the scaffolder of the application, so you can follow all steps of the tutorial on your own. The second one is the finished application which you can deploy to Vercel without writing any code if you would like just to see the end result.
We'll build the example application using Next.JS, React, and Typescript. The main purpose of the application is to display two financial charts.
The first one represents the GDP of the United States, and the second one shows Treasury Constant Maturity over the last 10 years.
The second one is unfinished. Our goal is to hide it behind the feature toggle, so we can enable it whenever we need it.
The final application should look like this:
You can find it here.
Let's Get Started!
We need to clone the scaffolder repository from GitHub, and we can do that by typing the following command in the terminal:
$ git clone git@github.com:mateuszsokola/next-feature-toggle-scaffolder.git
Now we need install the required dependencies and start the server.
$ cd next-feature-toggle-scaffolder
$ npm install
$ npm run dev

# COMMAND OUTPUT:
> next-feature-toggle-example@0.1.0 dev /Users/msokola/code/next-feature-toggle-scaffolder
> next dev

ready - started server on 0.0.0.0:3000, url: http://localhost:3000
info  - Using webpack 5. Reason: no next.config.js https://nextjs.org/docs/messages/webpack5
event - compiled successfully
event - build page: /
wait  - compiling...
event - compiled successfully
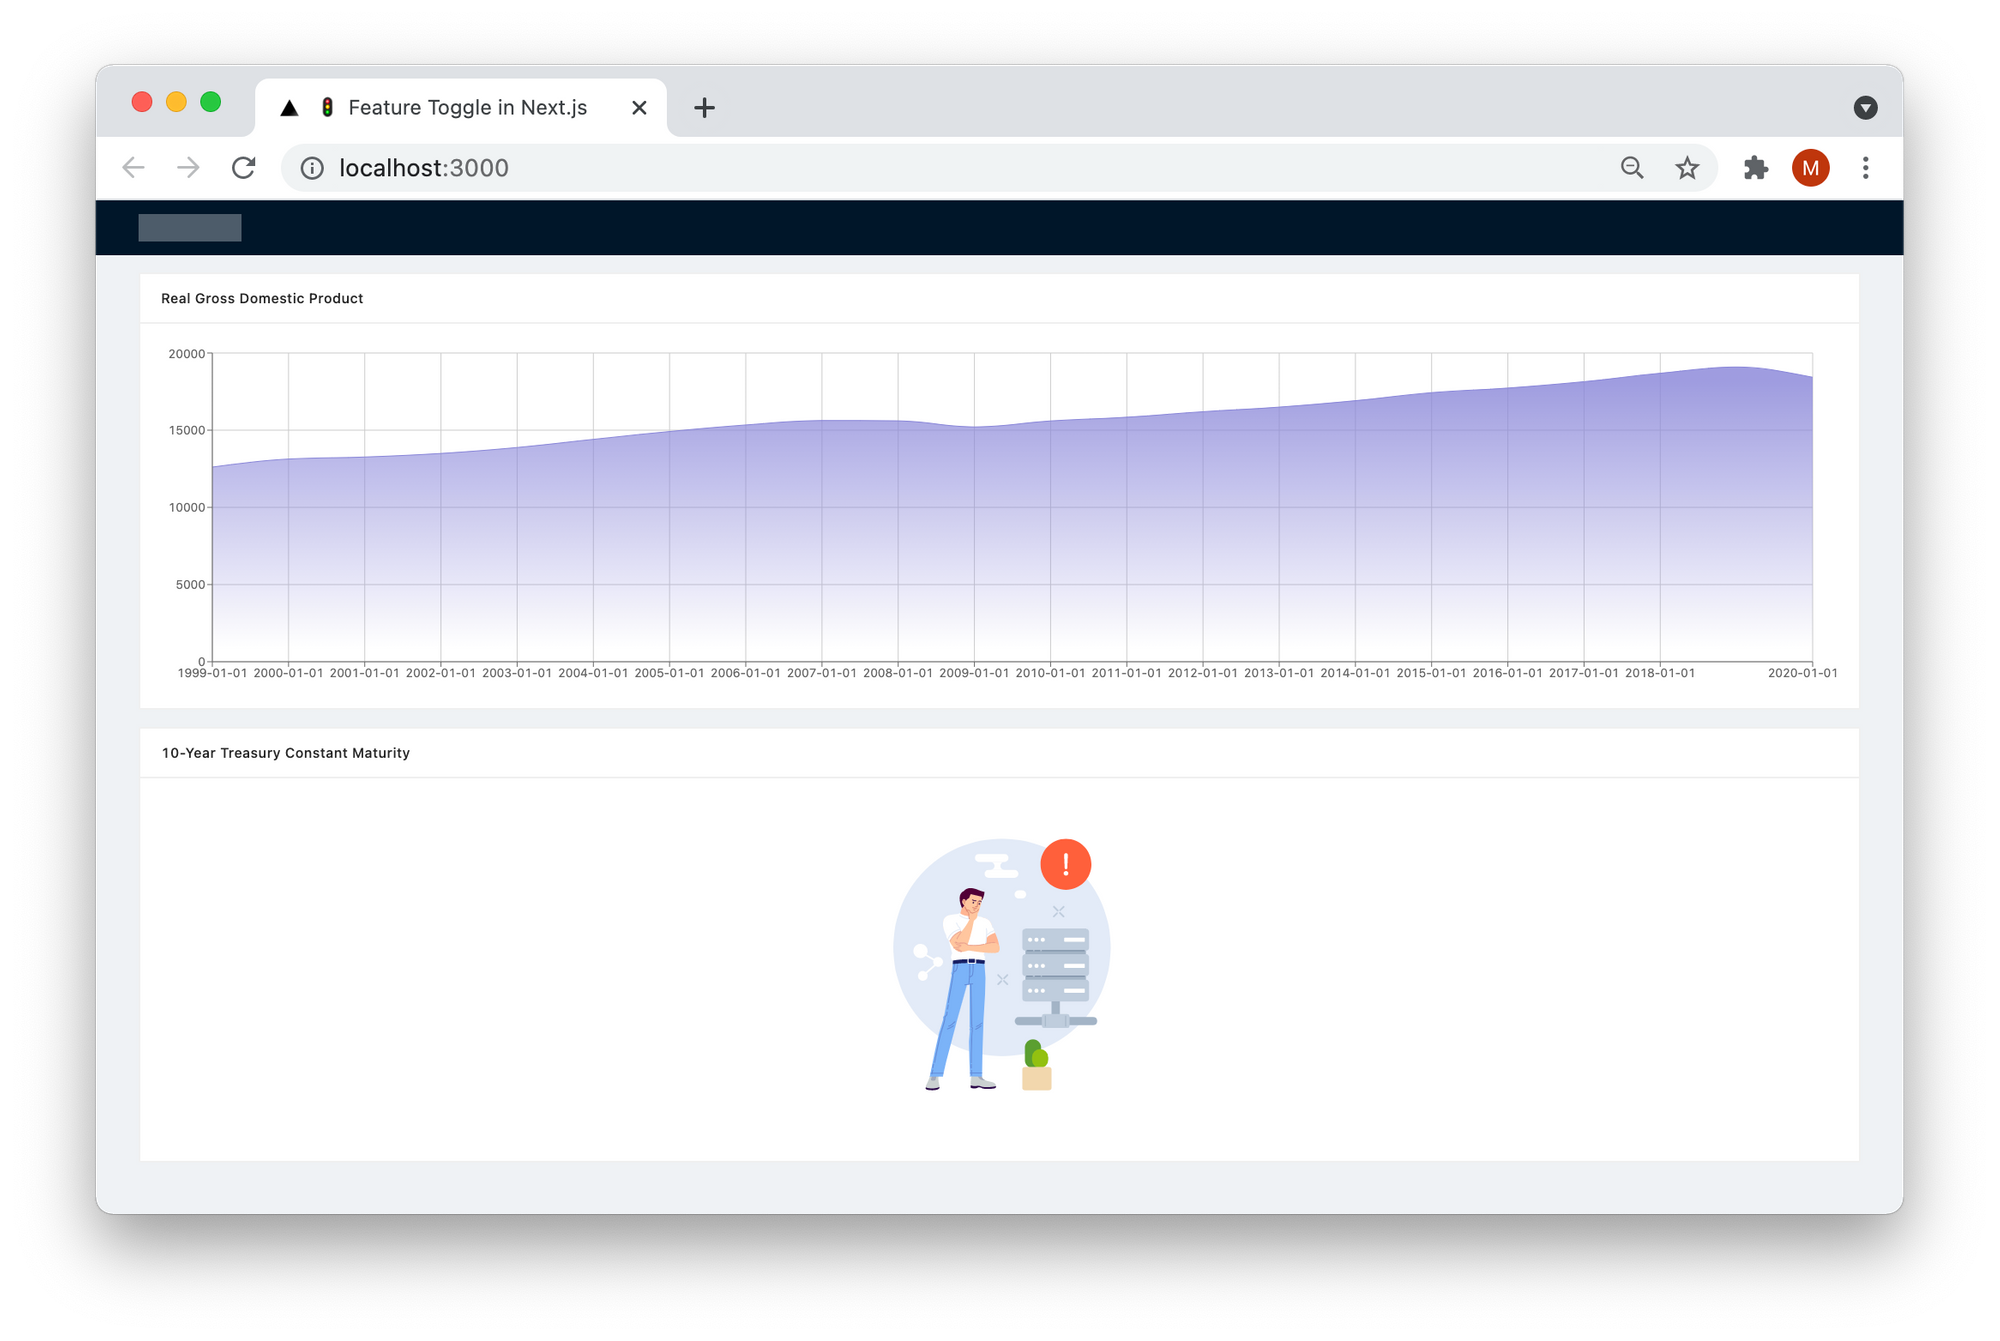
Now you can open http://localhost:3000/ in your browser and see the following website:
If you're wondering how to build a Next.JS app from scratch, you can learn how to do it from the my other tutorial here.
Now, how can we implement the Feature Toggle mechanism here? React's Context API seems to be the easiest and most appropriate way.
What is the React Context API?
The React Context API offers a neat and tidy way of passing data through multiple levels of components without doing it manually. Let's see the following example:
<Page enabledFeatures={features} />
<PageLayout enabledFeatures={features} />
<NavigationBar enabledFeatures={features} />
<Link href="https://freecodecamp.org/news/">
  <Avatar enabledFeatures={features} />
</Link>
If you don't want to use Context, you will need to pass the data as properties to every component. This is error-prone and cumbersome. If you decide to use the context, you can inject data directly into the component that actually needs it.
Now we can create a context for our feature toggle. We need to create a directory called context/, and a new file inside this directory. We can call it FeatureToggleContext.ts.
mkdir context
cd context
touch FeatureToggleContext.ts
Creating context in React is fairly easy. You need to import React in your file and call the React.createContext method with the default context value. See the example below:
// file: context/FeatureToggleContext.ts
import React from "react";

export const FeatureToggleContext = React.createContext({
    // TypeScript will have hard time to determine its type,
    // if we don't cast this array to an array of strings.
    // Likely, we will end up with an array of never or any.
    enabledFeatures: [] as string[],
})
Have in mind that the default value is only used when the component isn't wrapped into the context provider. It is just a fallback, and it shouldn't be used without the provider.
The Context Provider Component
Context comes with a Provider component that allows consuming components to listen to context changes. The Provider component takes a value prop that you pass to components that are the children of this provider.
In simple words, if we want to take advantage of the context we will need to make the Provider a parent of our all components. I decided to wrap the Provider into a standalone component so we don't clutter up other parts of the application.
Let's create a new file in the components/ directory called FeatureToggle.tsx:
cd components
touch FeatureToggle.tsx
Now we can create a component that accepts two properties: children and enabledFeatures.
The children is the main component of the application. If you created a React app using create-react-app you might have noticed that the main component is called App. Next.JS calls it MyApp, and you can find it in the file pages/_app.tsx.
The enabledFeatures is the array of enabled features. We will use it later.
# file: compontents/FeatureToggle.tsx

import React from "react";
import { FeatureToggleContext } from "../context/FeatureToggleContext";

type Props = {
    children: any;
    enabledFeatures: string[];
}

export const FeatureToggle = ({ children, enabledFeatures }: Props) => {
    return (
        <FeatureToggleContext.Provider value={{ enabledFeatures }}>
            {children}
        </FeatureToggleContext.Provider>
    )
}
The wrapped component is ready. Now we need to hook it into the main component. Let's open the file pages/_app.tsx.
We have only one toggleable feature – treasury_chart. We need to add it to the list of enabled features. At the moment, we'll soft code this list, and pass it down directly to the provider to confirm we have access to the context. Later on, we are going to create a proper API for the feature toggle.
We need to modify the file to look like this:
import { FeatureToggle } from "../components/FeatureToggle";
import "../styles/globals.css";

function MyApp({ Component, pageProps }) {
  const enabledFeatures = ["treasury_chart"];

  return (
    <FeatureToggle enabledFeatures={enabledFeatures}>
      <Component {...pageProps} />
    </FeatureToggle>
  );
}

export default MyApp;
Technically, the list of enabled features is available in the whole application now. But we have no interface to consume its value. Taking advantage of React hooks is the best way to expose it.
How to Create Custom Hooks in React
We created this mechanism based on the React Context API, and the most React way to consume React Context is by using hooks. So we will need to create a hook that offers easy access to the right data in the context.
Let's create a new directory called hooks/, and a new file called useFeatureToggle.ts.
mkdir hooks
touch useFeatureToggle.ts
Let's think about the hook for a minute. We want to check the status of a given feature. If the feature is enabled we are going to render it, otherwise we won't. So the hook should return a helper that checks if requested feature is on the list of enabled features, right? Let's code it.
# file: hooks/useFeatureToggle.ts

import React, { useContext } from "react";
import { FeatureToggleContext } from "../context/FeatureToggleContext";

export const useFeatureToggle = () => {
    // we need to read values defined in the FeatureToggleContext.
    // In this case, we'll take only the array of enabled features.
    const { enabledFeatures } = useContext(FeatureToggleContext);

    const isEnabled = (featureName: string) => {
        return enabledFeatures.includes(featureName);
    }

    // For consistency, We return an array of helpers,
    // so we follow the pattern defined by the useState hook.
    // It makes the code open for extensions,
    // so no need to refactor the app when a new helper is added here.
    return [
        isEnabled,
    ];
}
The hook is ready. We can open the main page, and connect the Treasury chart into the Feature Toggle.
Let's open pages/index.tsx.
We are going to use our custom hook to get an access to the isEnabled helper, and use it to check if the feature is enabled.
const [isEnabled] = useFeatureToggle();

// ...

return (
    /* ... */
    {isEnabled("treasury_chart") && (<TreasuryChart />)}
    /* ... */
);
The complete implementation looks like this:
# file: pages/index.tsx

import React from "react";
import Head from "next/head";
import { Layout } from "antd";

import { GdpChart, TreasuryChart } from "../components/Charts";
import { useFeatureToggle } from "../hooks/useFeatureToggle";

const { Header, Content } = Layout;

export default function Home() {
  const [isEnabled] = useFeatureToggle();
  return (
    <Layout className="layout">
      <Head>
        <title>🚦 Feature Toggle in Next.js</title>
      </Head>
      <Header>
        <div className="logo" />
      </Header>
      <Content className="content">
        <GdpChart />
        {isEnabled("treasury_chart") && (<TreasuryChart />)}
      </Content>
    </Layout>
  );
}
Now, you can try out the application in your browser. Keep in mind that you will still see the second chart.
You can fool around with the feature name given to the isEnabled helper. For example you can make a typo, and the chart should disappear afterwards.
Unfortunately, this solution doesn't give us flexibility to toggle features without modifying the codebase. Every time we want to change the status of the feature, we will need to modify the list of enabled features. How can we fix that?
The easiest way to make it toggleable without changing the code would be to implement an API that reads statuses of features from environment variables, and returns an array of active features.
How to Use Environment Variables in Node
An environment variable is a variable whose value is set outside the application, usually by functionality built into the operating system. This is Node.JS, in our case.
Let's create a .env file in our project.
touch .env
Now, we can open this file and add a new variable. We can call it FEATURE_TREASURY_CHART. We need to set its value to false.
# file: .env
FEATURE_TREASURY_CHART=false
If we use .env variables we'll need to use some server features of Next.JS, and define a new API. This means we will need to write more code.
So we need to create a new file in the pages/api/ directory. Let's call it features.ts.
The API will return an array of enabled features.
// file: pages/api/features.ts

export default (req, res) => {
    res.status(200).json([
        // Your environment variables are available within the `process.env` object.
        // IMPORTANT! All environment variable values are strings.
        // So we cannot compare them with booleans, numbers and so on.
        process.env.FEATURE_TREASURY_CHART === "true" ? "treasury_chart" : "",
    ])
}
Now, you can try to open http://localhost:3000/api/features in your browser, and you should receive the following output:
[""]
The treasury_chart wasn't added to the list of enabled features, because it is disabled. You can change the FEATURE_TREASURY_CHART variable to true, and restart you server to try it out.
How to Use the Features API
We are good to connect the React part of the application to our brand new API. Before we do so, we'll need to install axios.
Axios will help us to make HTTP requests in more convenient way than fetch. It supports error handling and types out of the box. We don't need to implement it on our own, so we can get straight to business. You might need to kill your server by hitting Control + C. Twice.
$ npm install --save axios
Let's create a new directory called services/, and a new file called FeatureToggle.ts.
Now we need to use a standard asynchronous function to make a GET request to our API.
// File: services/FeatureToggle.ts

import axios from "axios";

export const fetchFeatures = async () => {
    try {
        const { data } = await axios.get<string[]>("/api/features");

        return data;
    }
    catch(e) {
        console.log("Something went wrong");
    }

    return [] as string[];
}
OK. The feature API request is ready. We can actually trigger this function at the main component.
Open the file pages/_app.tsx.
We need to make an API request like every other in React using the useEffect and useState hooks. We need to add the following snippet to the MyApp component:
  const [enabledFeatures, setFeatures] = useState<string[]>([]);

  const processFeatures = async () => {
    const features = await fetchFeatures();

    setFeatures(features);
  }

  useEffect(() => {
    processFeatures();
  }, []);
The complete solution is here:
// file: pages/_app.tsx

import { useEffect, useState } from "react";
import { FeatureToggle } from "../components/FeatureToggleProvider";
import { fetchFeatures } from "../services/FeatureToggle";
import "../styles/globals.css";

function MyApp({ Component, pageProps }) {
  const [enabledFeatures, setFeatures] = useState<string[]>([]);

  const processFeatures = async () => {
    const features = await fetchFeatures();

    setFeatures(features);
  }

  useEffect(() => {
    processFeatures();
  }, []); // eslint-disable-line react-hooks/exhaustive-deps

  return (
    <FeatureToggle enabledFeatures={enabledFeatures}>
      <Component {...pageProps} />
    </FeatureToggle>
  )
}

export default MyApp;
Hurray! We are done with coding. The final step is to deploy our app.
How to Publish the App on Vercel
We will deploy the application to Vercel, because they offer free hosting for apps and they let us set custom environment variables ,which is critical for us.
As usual, I am going to skip the process of creating a new account. You can create one with one click using your GitHub or Google account.
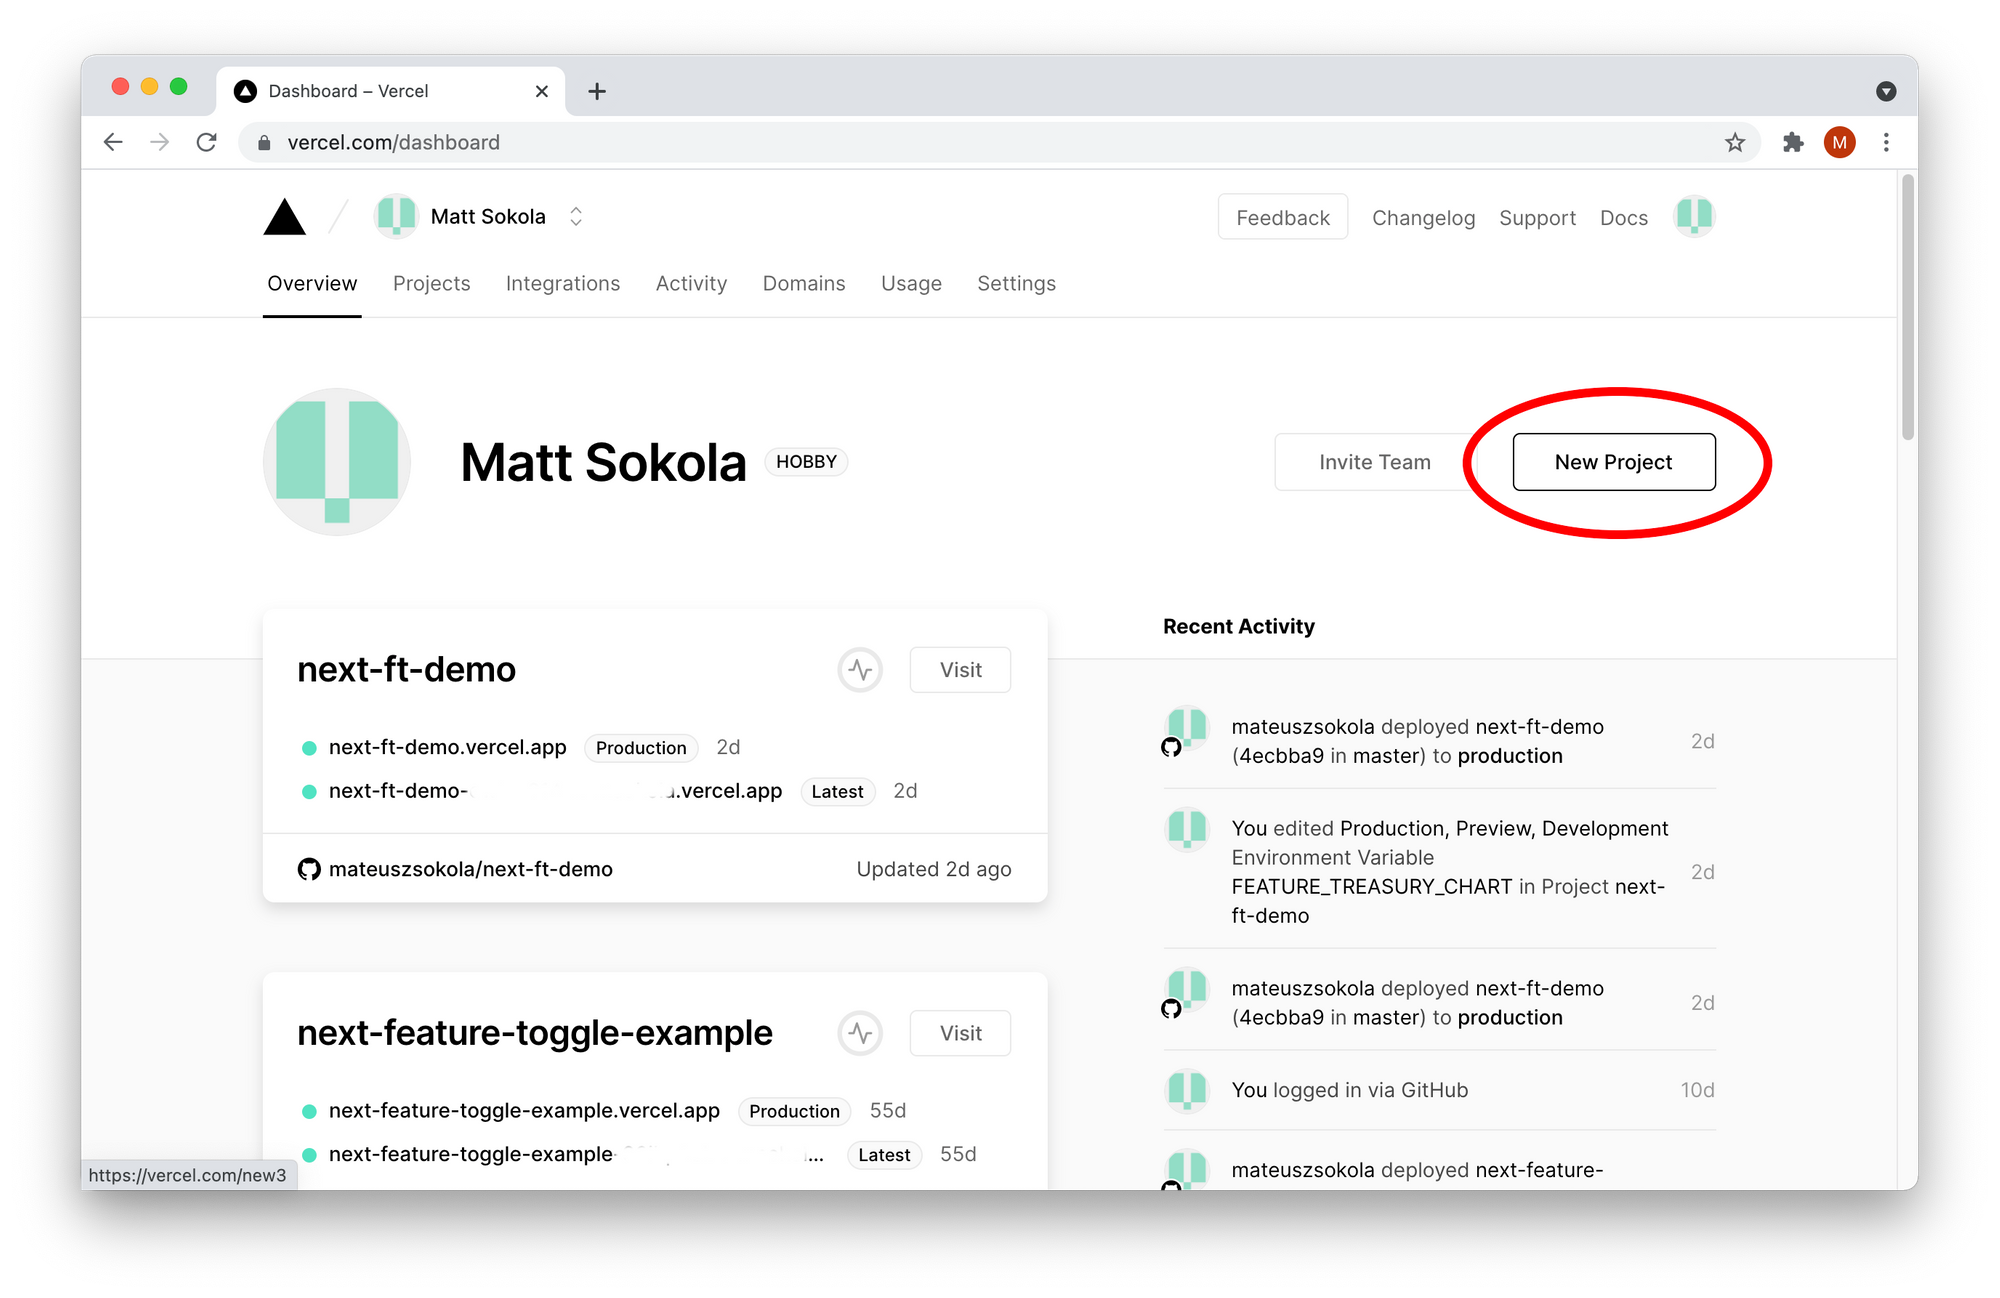
Once you've signed up, you should see this screen. Click on the "New Project" button:
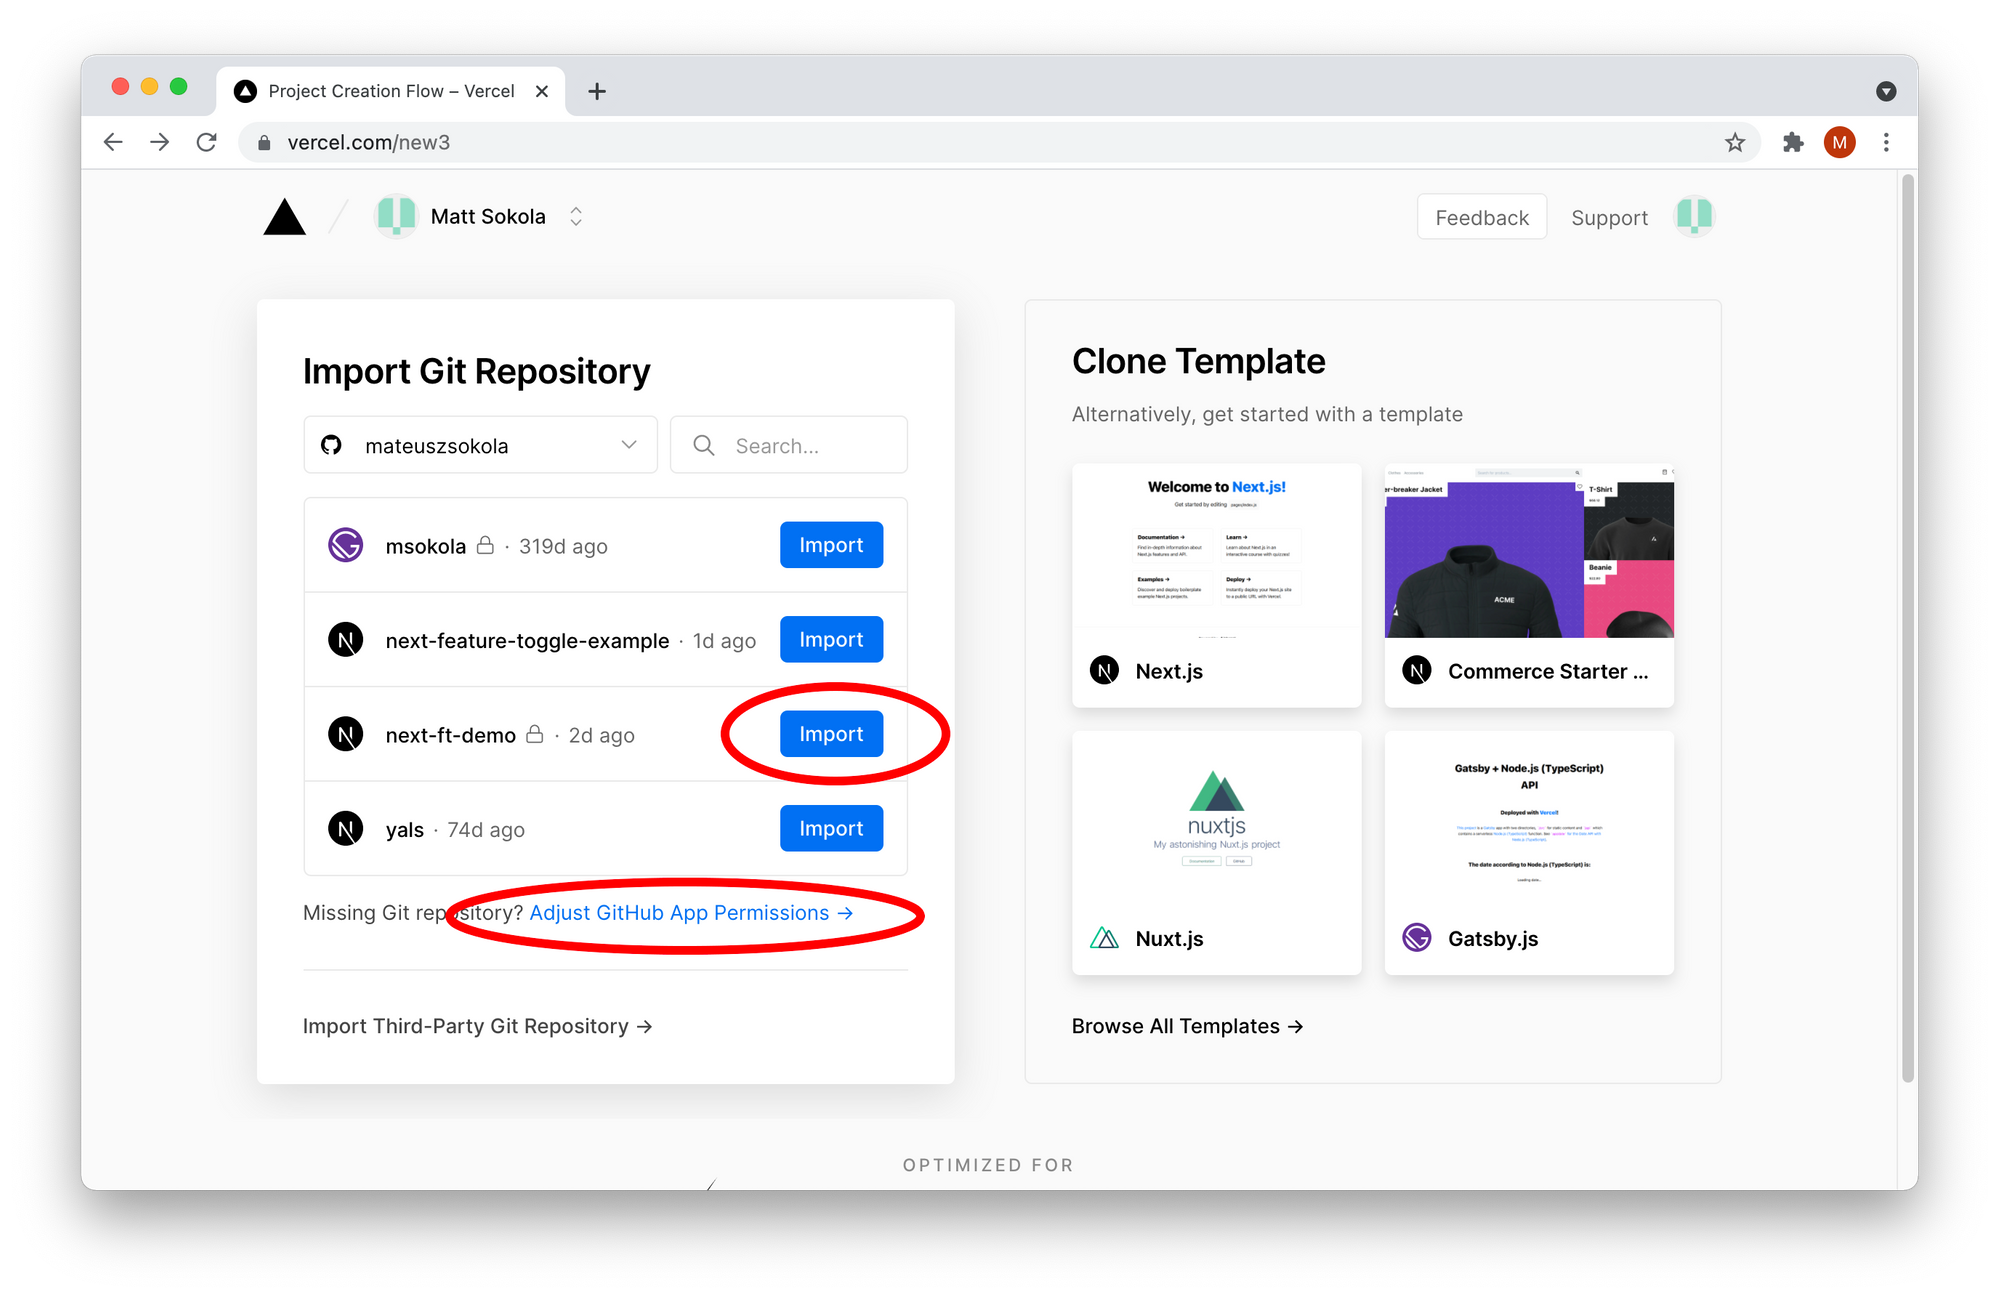
Now you need to select the GitHub repository you want to import. In my case, it is "next-ft-demo", but you might've called it something else. If you don't see your repository, you need to click on "Adjust GitHub App Permission" (the link below marked with the red ellipse):
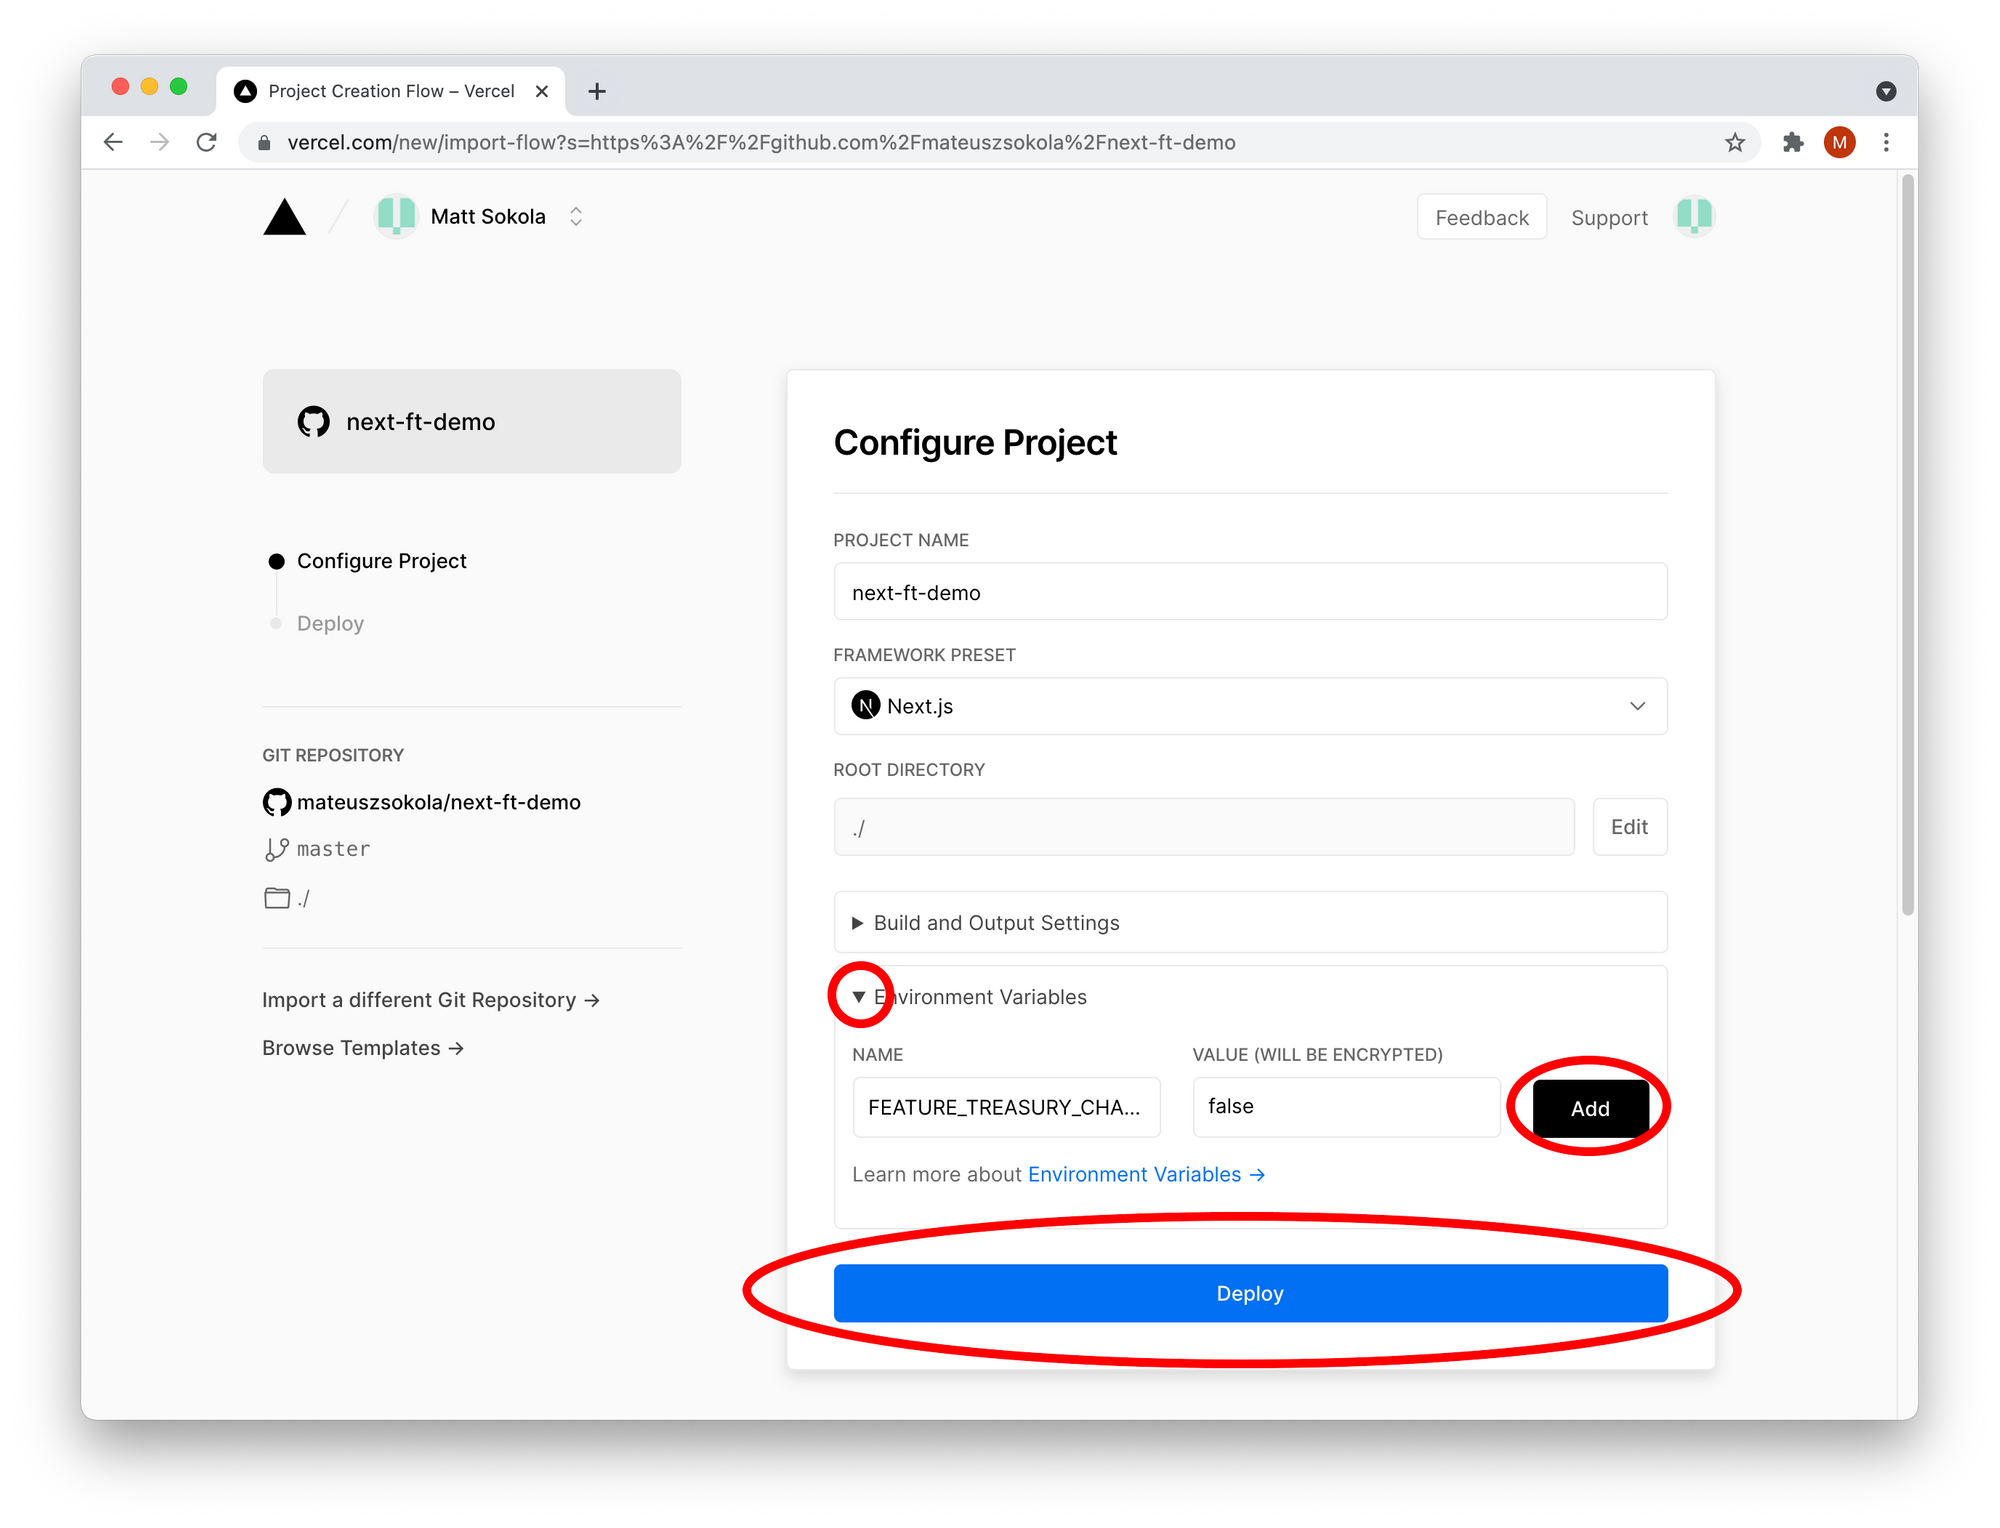
We need to configure the project. Let's open "Environment Variables", add a new variable called FEATURE_TREASURY_CHART, and set its value to false. Then click on the "Add" button, and hit "Deploy":
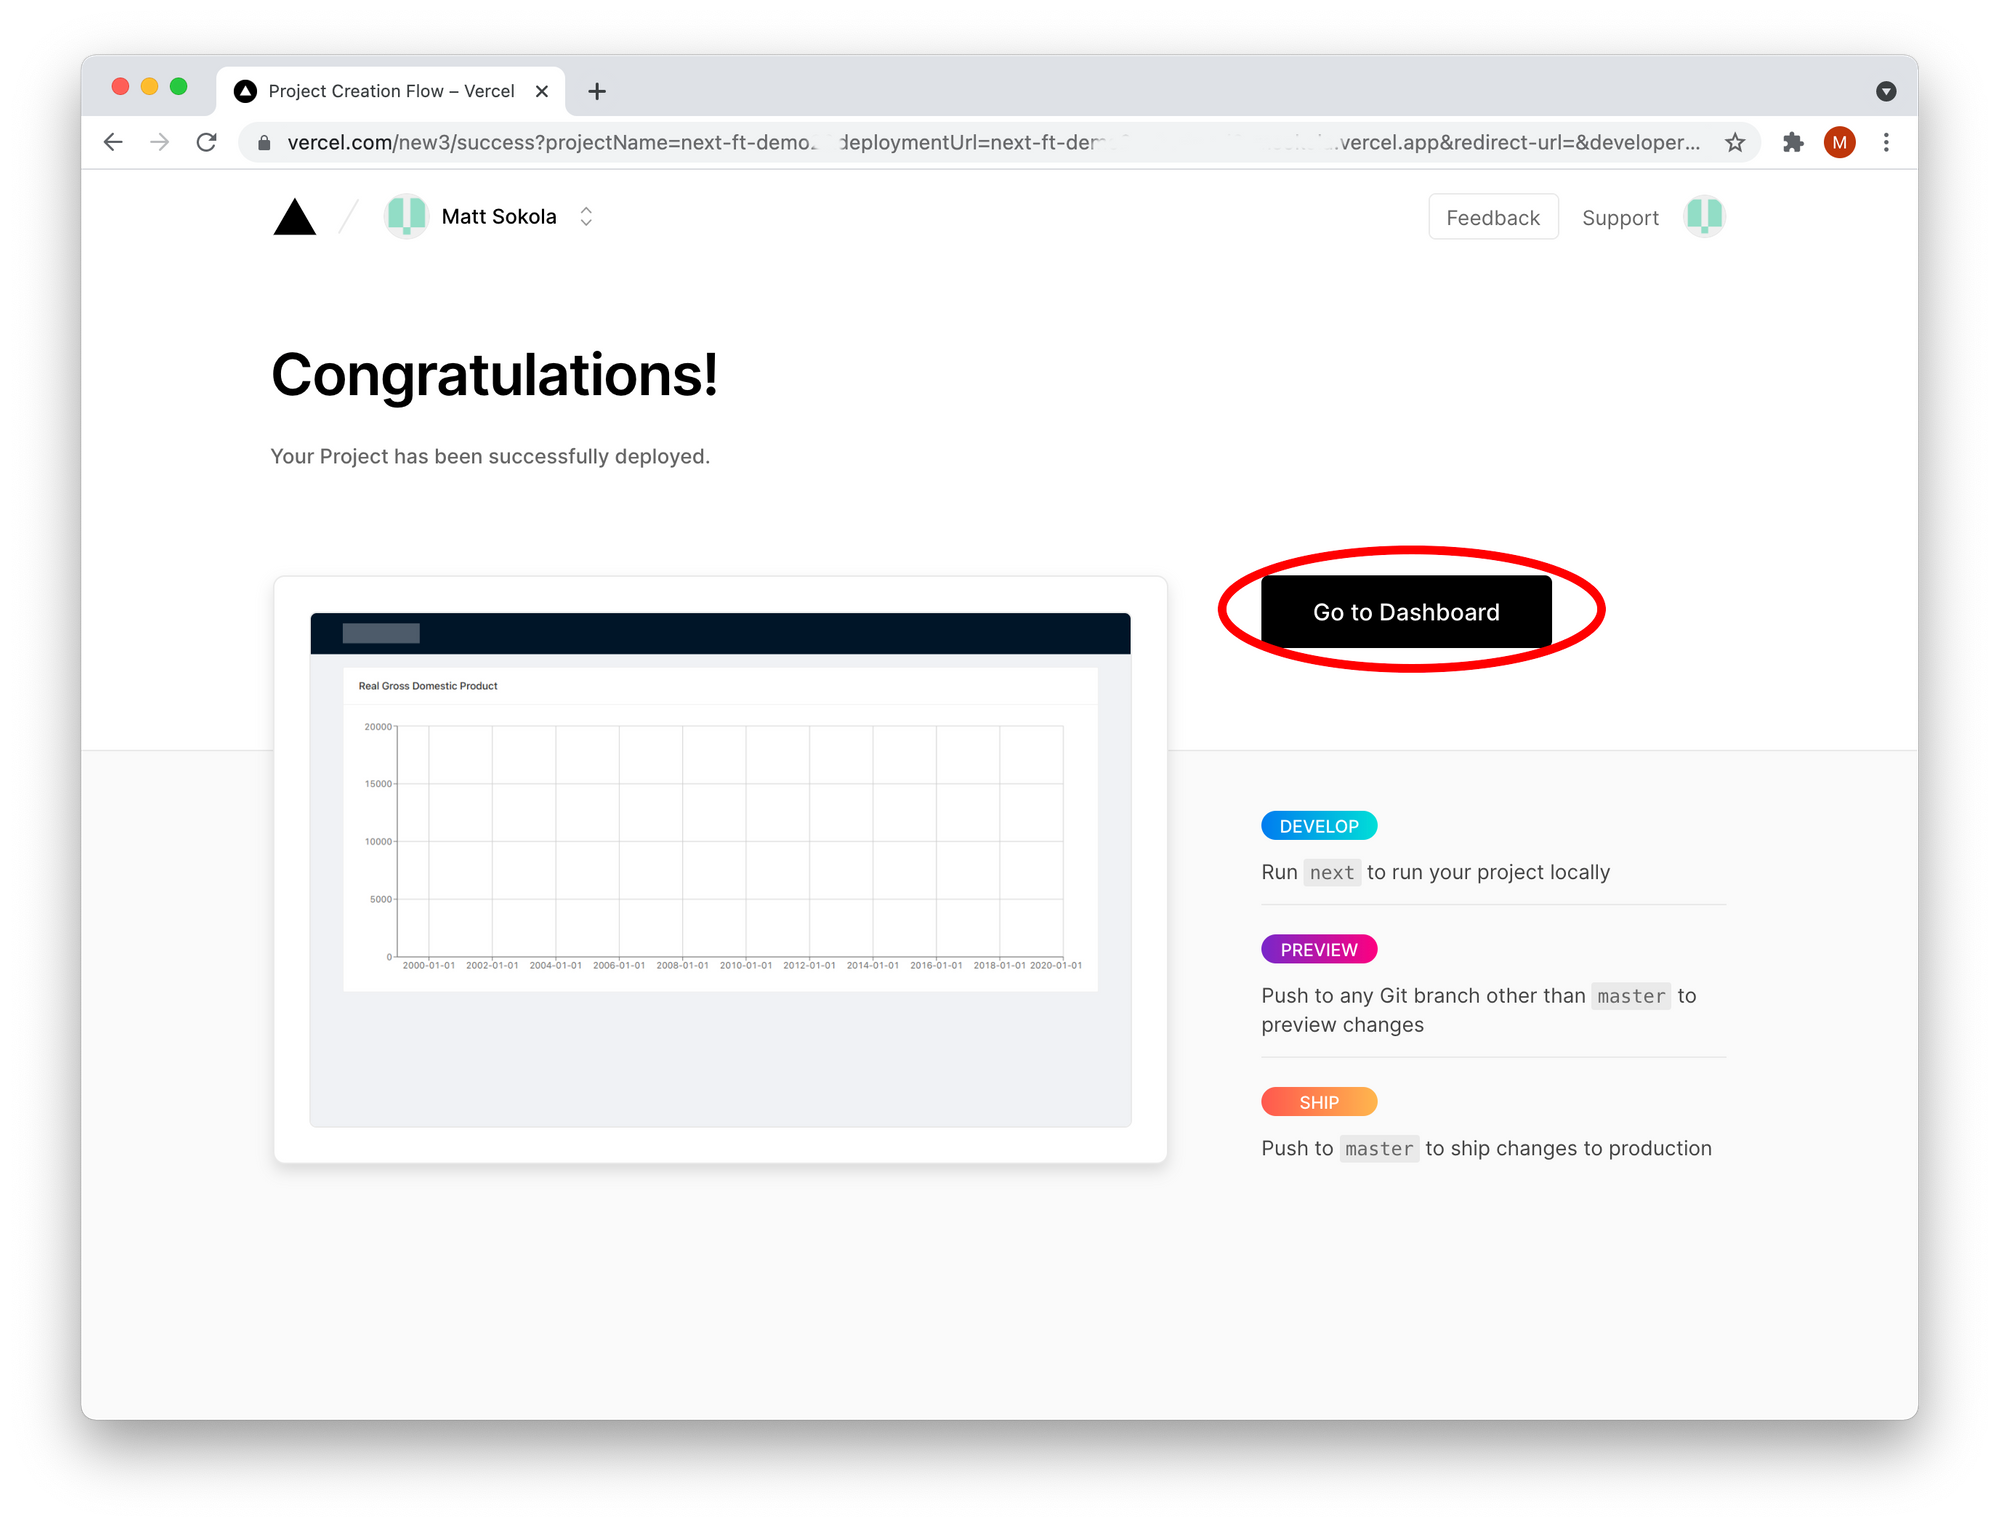
The application is being deployed now. You should see the following screen once done. Just click on the "Go To Dashboard" button:
You can open your application by clicking the "Visit" button:
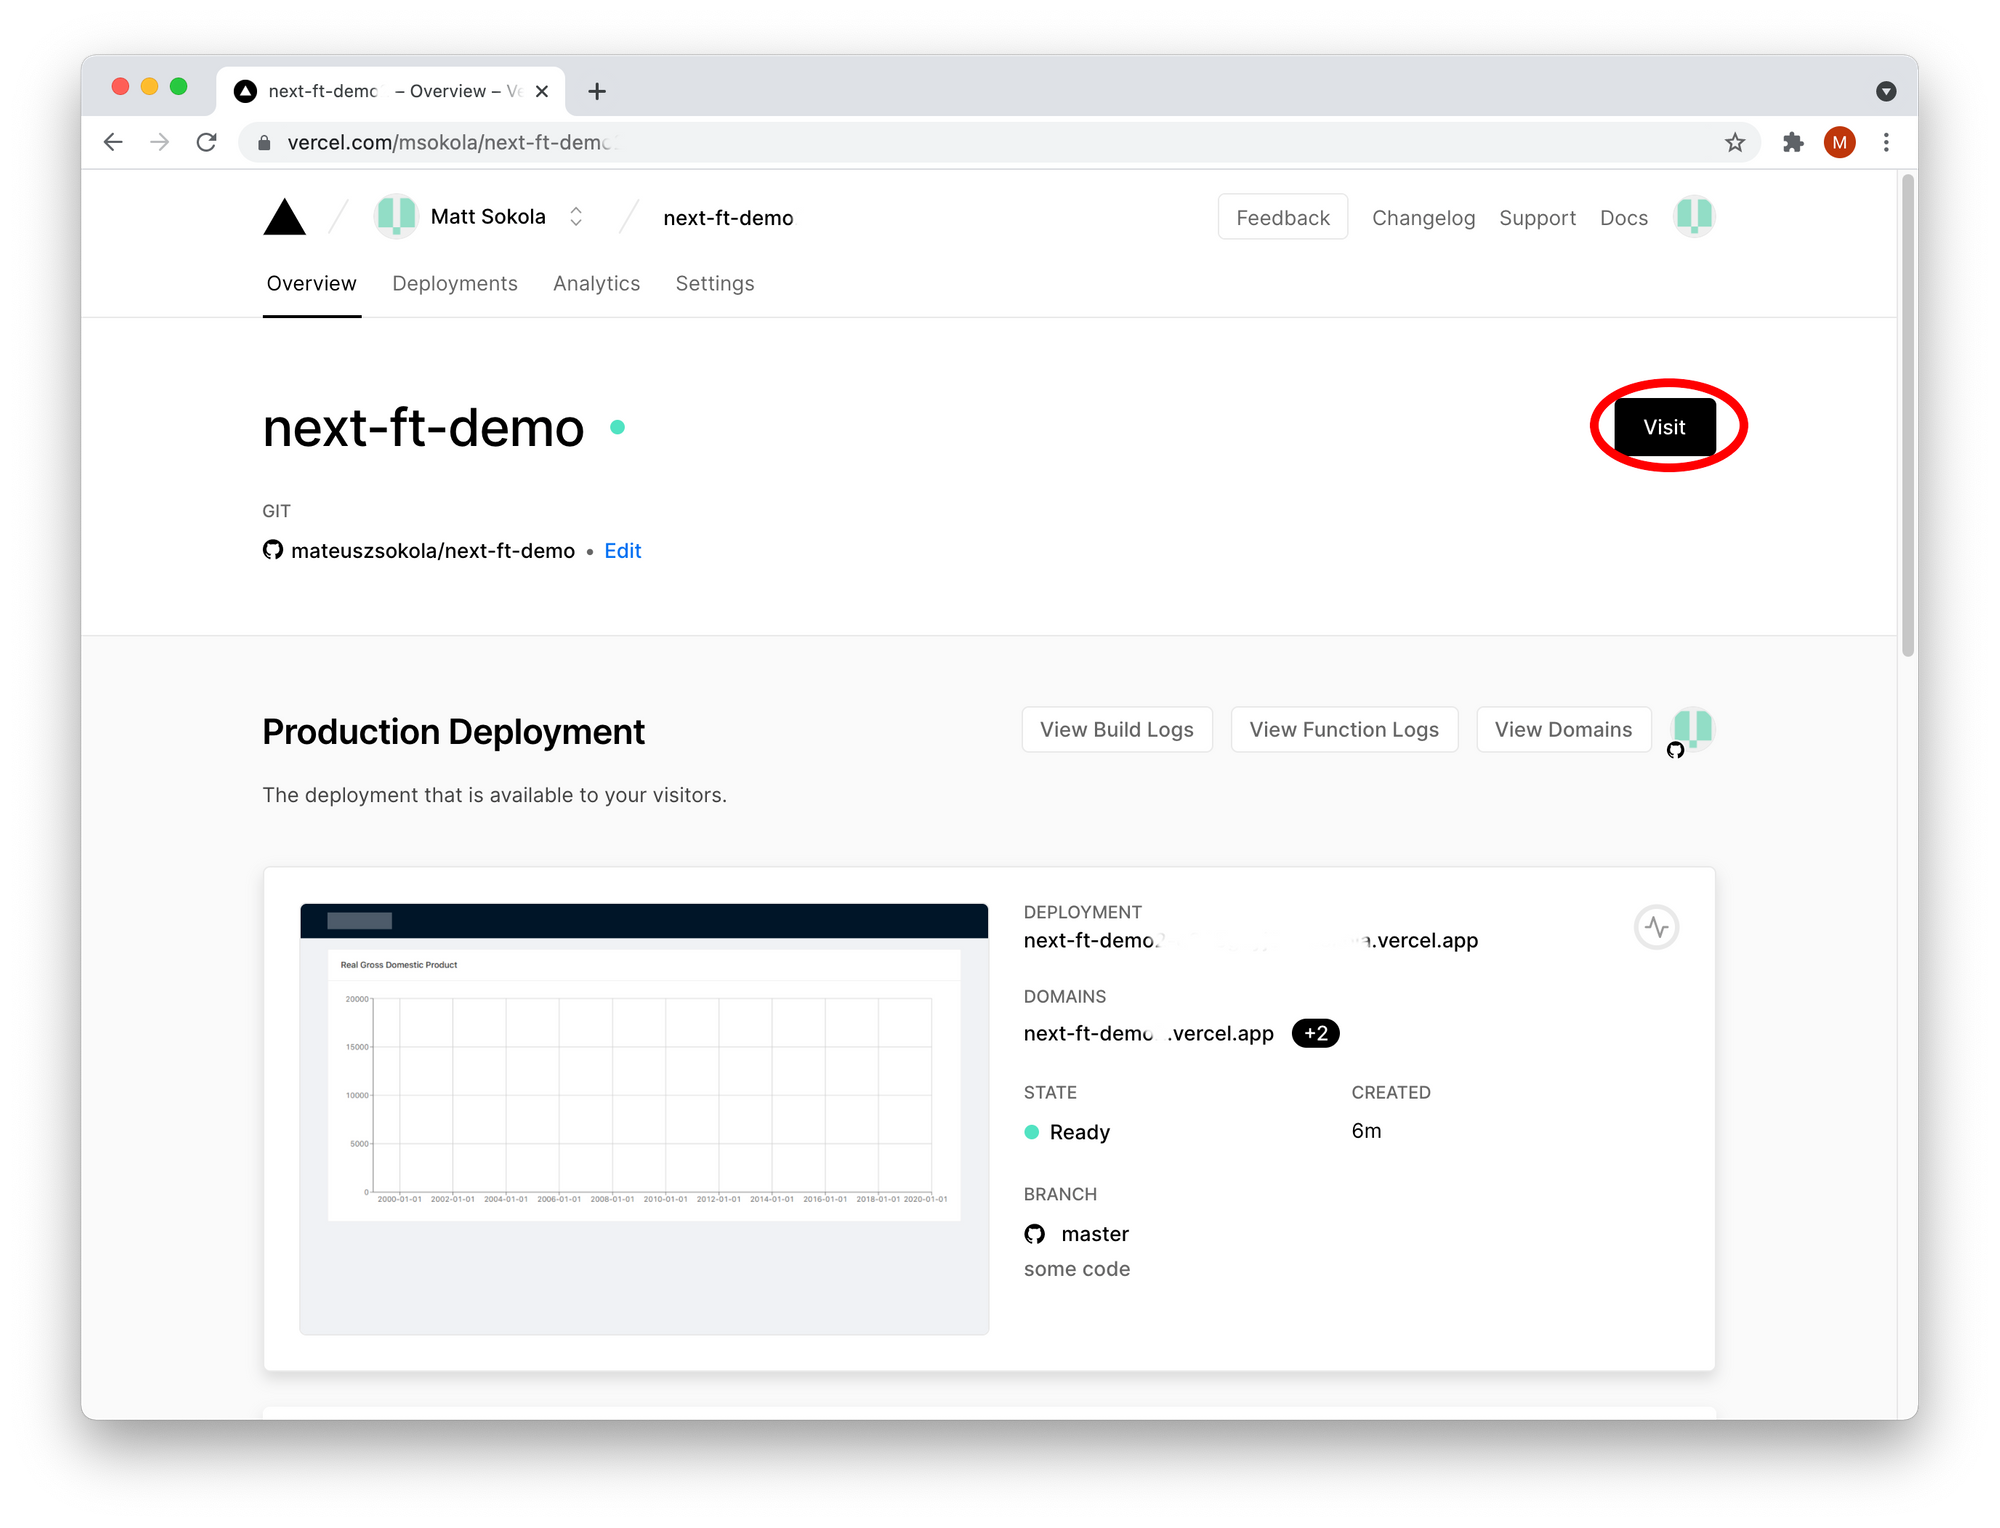
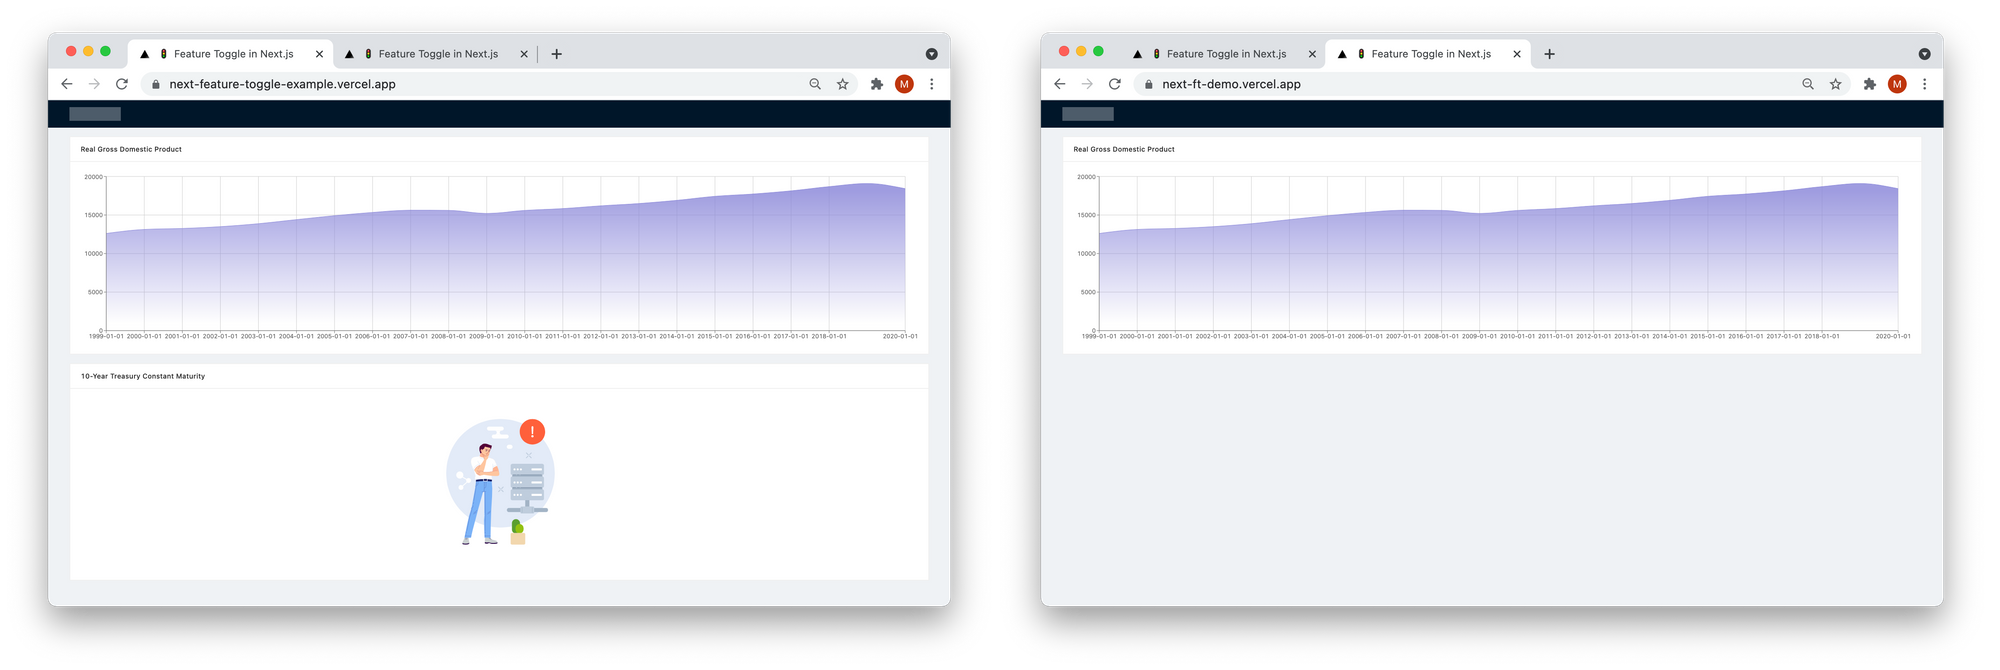
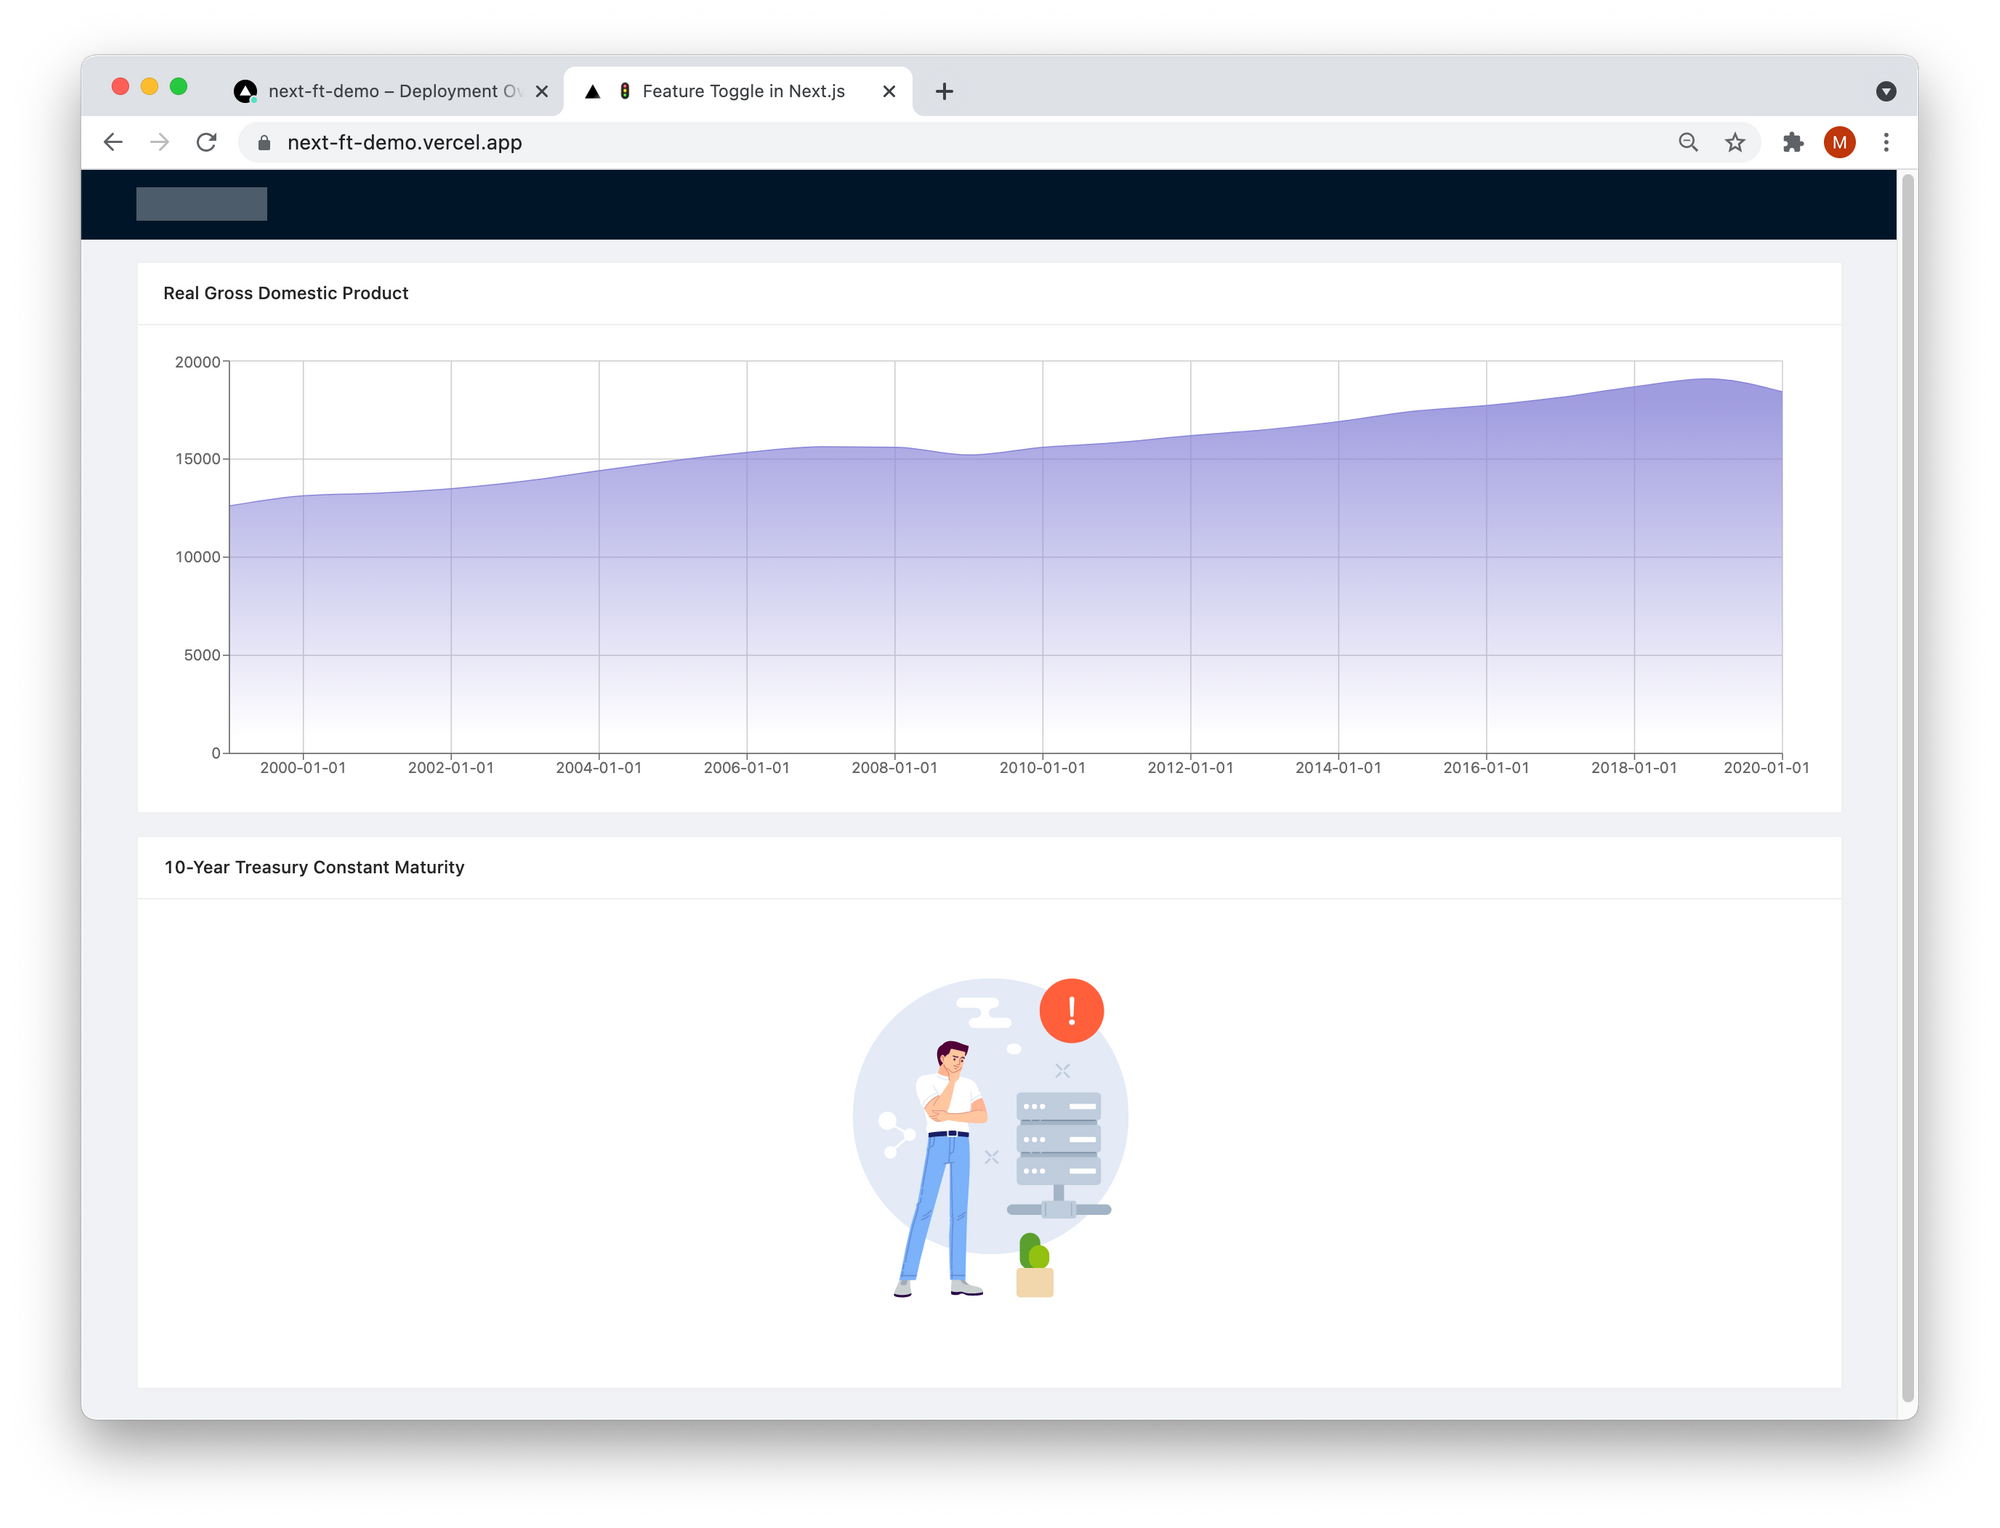
The application displays only one chart:

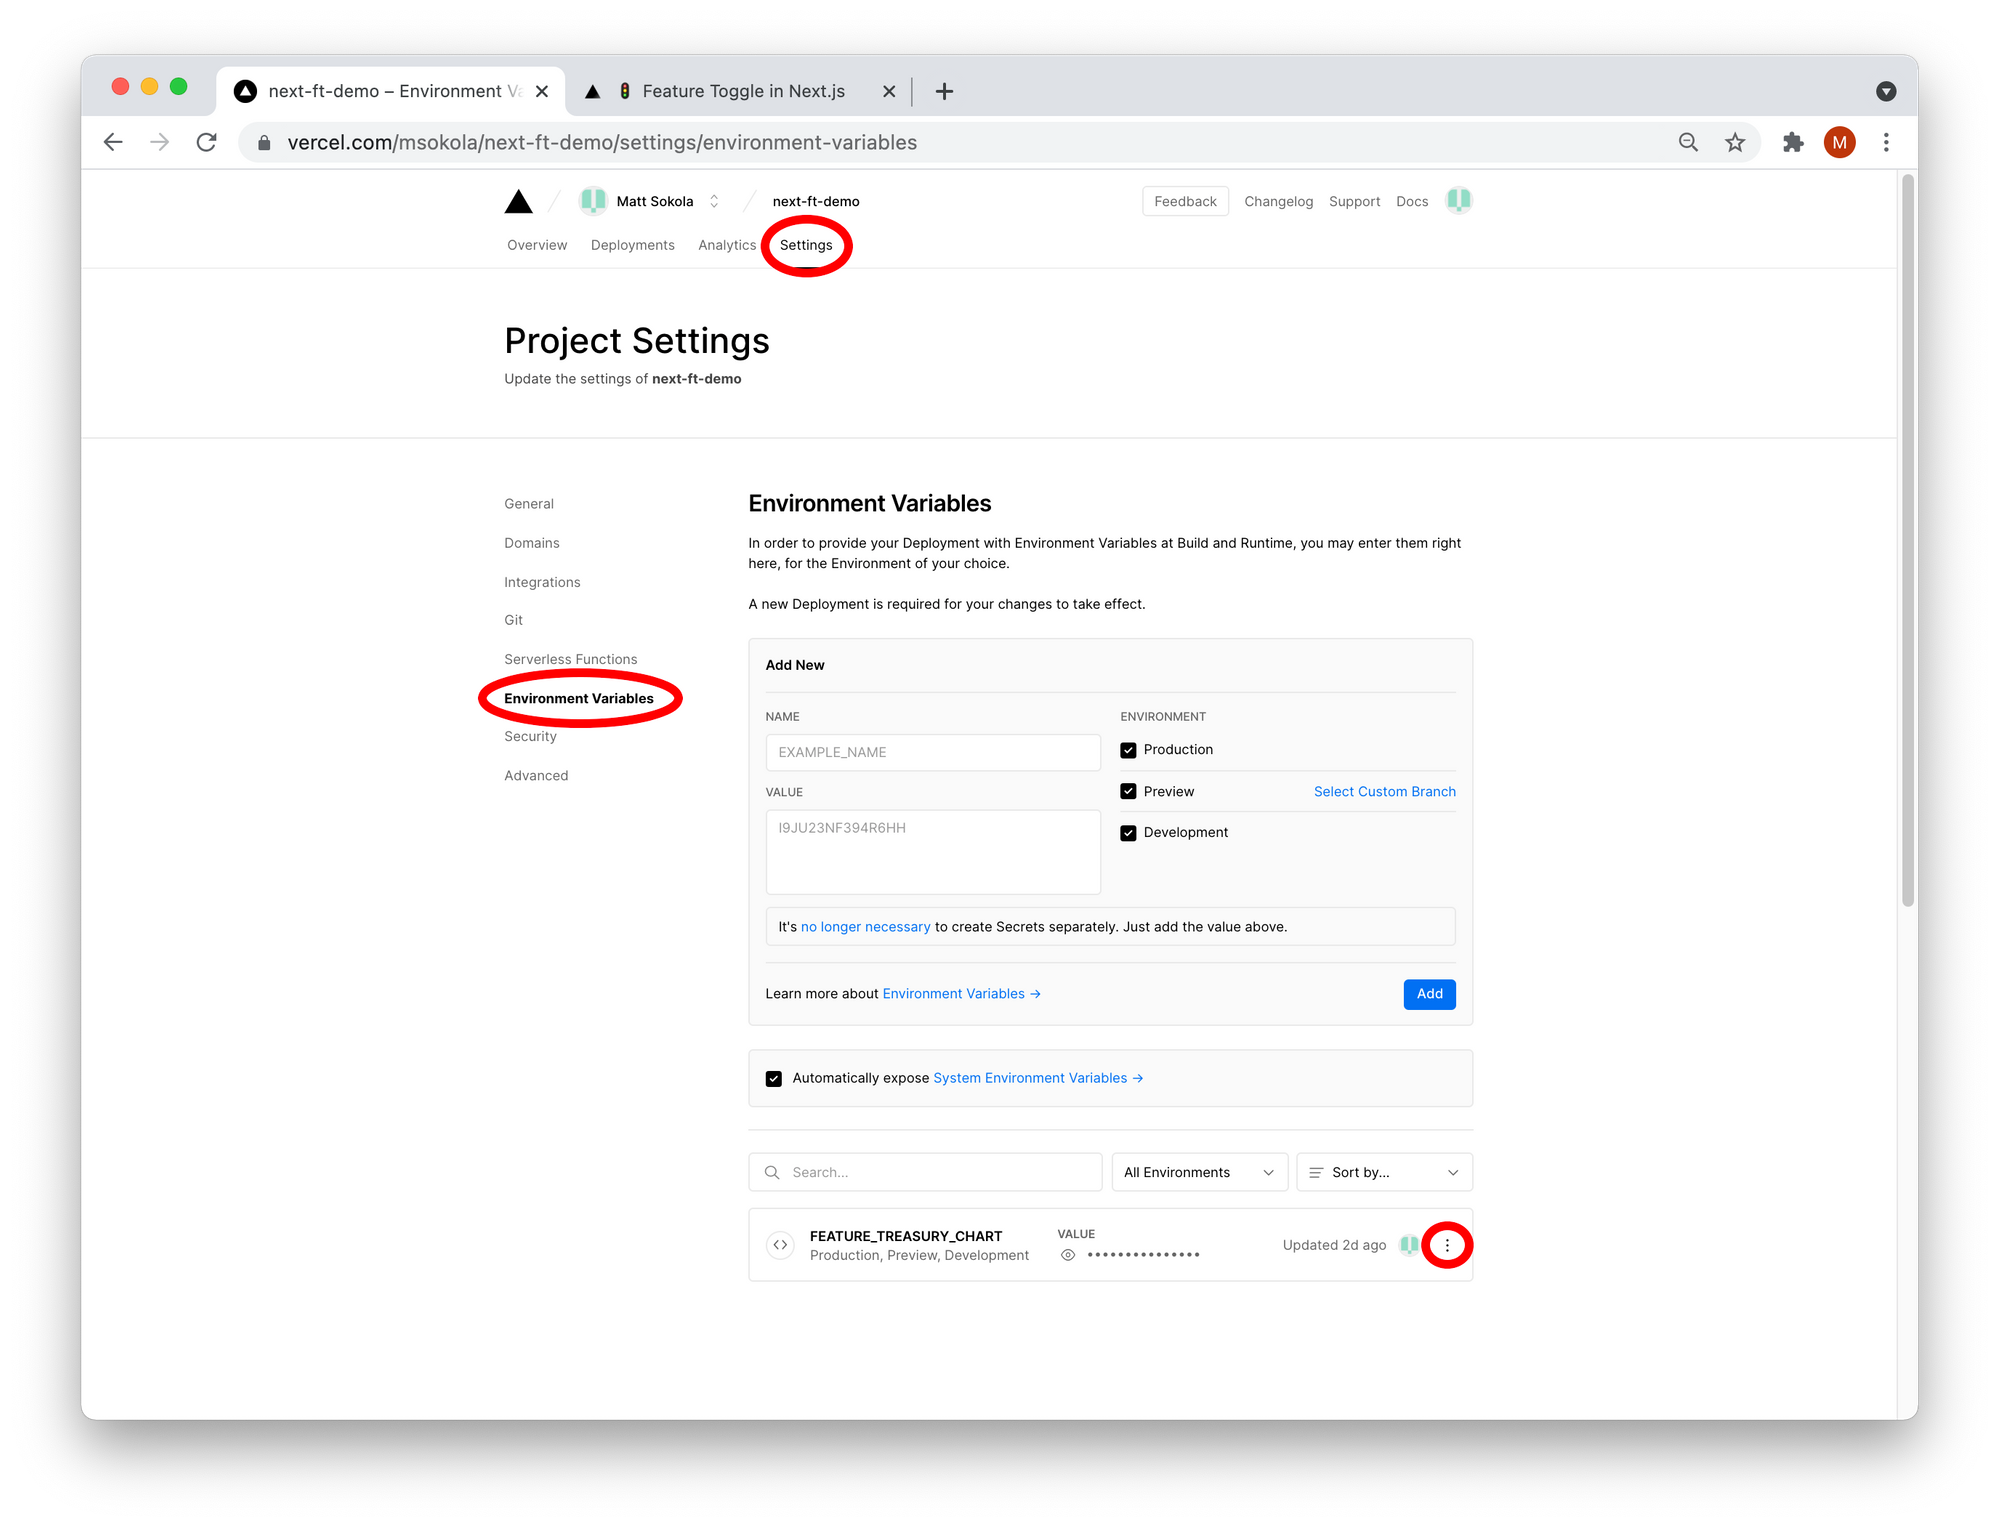
If you want to enable the Treasury chart you need select the "Settings" tab, choose the "Environment variables" section, and set the FEATURE_TREASURY_CHART variable to true:
Now we need to redeploy the application to load new variables.

Once the deployment is completed you will see the Treasury chart on your website:
Summary
This is a simple implementation of Feature Toggles. You'll probably need to adjust it to fit your needs. But I think it's a good starting point that you can build upon.
If you have an idea about how to improve my solution or you want to show us yet another way of doing it, please share it on the freeCodeCamp forum or in the comment section of the YouTube video below (I reply to every comment).
If you find the video useful it would mean the world to me if you smash the like button and subscribe.
You can find all the code on GitHub:
If you have any questions you can DM me on Twitter: @msokola
I hope you liked it and have a great day :)