

If you have started working on ReactJS recently then you might be wondering how to manage state in React so that your application can scale.
To solve this state management issue, many companies and people have developed various solutions. Facebook, who developed ReactJS, came up with a solution called Flux.
You may have heard about Redux if you have worked on front end technology such as AngularJS or EmberJS. ReactJS also has a library for implementing Redux.
But before learning Redux I would advise you to go through Flux and understand it. After that give Redux a try. I say this because Redux is a more advanced version of Flux. If the concepts of Flux are clear then you can learn redux and integrate it into your application.
What is flux?
Flux uses a unidirectional data flow pattern to solve state management complexity. Remember it is not a framework – rather it's more of a pattern that targets to solve the state management issue.
Are you wondering what's wrong with the existing MVC framework? Imagine your client's application scales up. You have interaction between many models and views. How would it look?
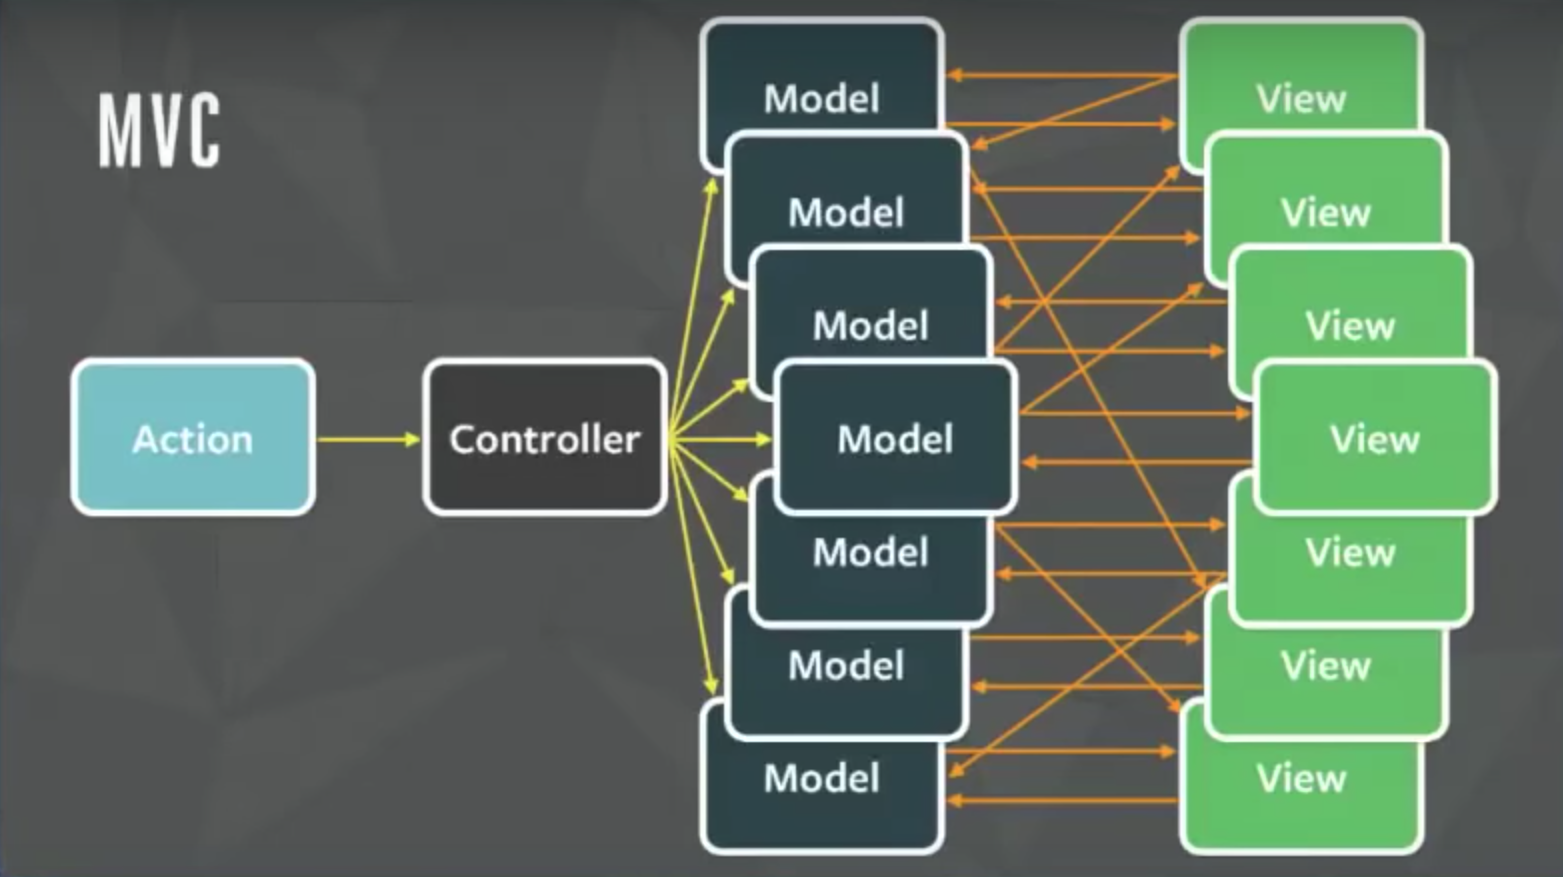
Credit: Image from Facebook F8 Flux Event
The relationship between components gets complicated. It becomes hard to scale the application. Facebook faced the same issue. To solve this issue they architected a Single directional data flow.
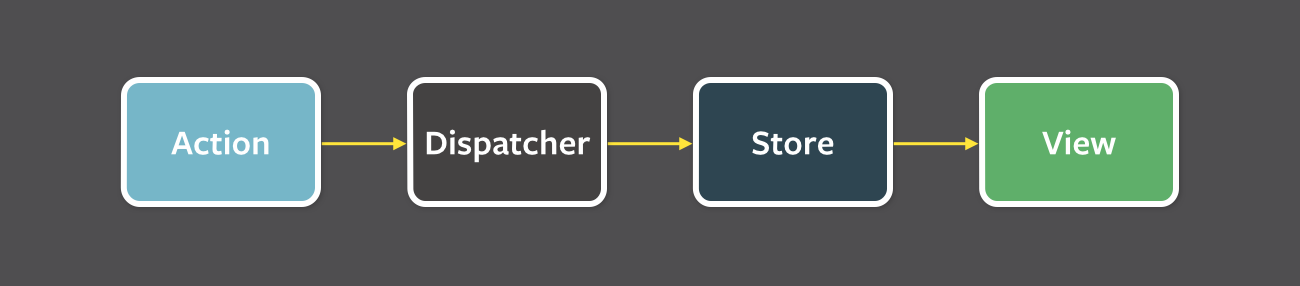
Credit: Image from Facebook's Flux Doc
As you can see from the image above, there are a lot of components used in Flux. Let's go through all the components one by one.
View: this component renders the UI. Whenever any user interaction occurs on it (like an event) then it fires off the action. Also when the Store informs the View that some change has occurred, it re-renders itself. For example, if a user clicks the Add button.
Action: this handles all the events. These events are passed by the view component. This layer is generally used to make API calls. Once the action is done it is dispatched using the Dispatcher. The action can be something like add a post, delete a post, or any other user interaction.
The common structure of the payload for dispatching an event is as follows:
{
    actionType: "",
    data: {
        title: "Understanding Flux step by step",
        author: "Sharvin"
    }
}
The actionType key is compulsory and it is used by the dispatcher to pass updates to the related store. It is also a known practice to use constants to hold the value name for actionType key so no typos occur. Data holds the event information that we want to dispatch from Action to Store. The name for this key can be anything.
Dispatcher: this is the central hub and singleton registry. It dispatches the payload from Actions to Store. Also makes sure that there are no cascading effects when an action is dispatched to the store. It ensures that no other action happens before the data layer has completed processing and storing operations.
Consider this component has a traffic controller in the system. It is a centralized list of callbacks. It invokes the callback and broadcasts the payload it received from the action.
Due to this component, the data flow is predictable. Every action updates the specific store with the callback that is registered with the dispatcher.
Store: this holds the app state and is a data layer of this pattern. Do not consider it as a model from MVC. An application can have one or many app stores. Stores get updated because they have a callback that is registered using the dispatcher.
Node's event emitter is used to update the store and broadcast the update to view. The view never directly updates the application state. It is updated because of the changes to the store.
This is only part of Flux that can update the data. Interfaces implemented in the store are as follows:
The EventEmitter is extended to inform the view that store data has been updated.
Listeners like addChangeListener and removeChangeListener are added.
emitChange is used to emit the change.
Consider the above diagram with more stores and views. Still, the pattern and the flow of data will be the same. This is because this is a single direction and predictable data flow, unlike MVC or Two-way binding. This improves the data consistency and it's easier to find the bug.

Flux Data Flow
Well, Flux brings the following key benefits to the table with the help of unidirectional data flow:
The code becomes quite clear and easy to understand.
Easily testable using Unit Test.
Scalable apps can be built.
Predictable data flow.
Note: The only drawback with the Flux is that there is some boilerplate that we need to write. Besides the boilerplate, there is little code we need to write when adding components to the existing application.
Application Template
To learn how to implement flux in ReactJS, we will build a Posts page. Here we will display all the posts. The application template is available at this commit. We will use this as the template for integrating Flux on top of it.
To clone the code from this commit, use the following command:
git clone https://github.com/Sharvin26/DummyBlog.git
git checkout 0d56987b2d461b794e7841302c9337eda1ad0725
We will require a react-router-dom and bootstrap module. To install these packages, use the following command:
npm install react-router-dom@5.0.0 bootstrap@4.3.1
Once done you'll see the following application:
DummyBlog
To understand Flux in detail we will only implement the GET posts page. Once that is done you'll realize the process is the same for POST, EDIT and DELETE.
Here you'll see the following directory structure:
+-- README.md
+-- package-lock.json
+-- package.json
+-- node_modules
+-- .gitignore
+-- public
|   +-- index.html
+-- src
|   +-- +-- components
|   +-- +-- +-- common
|   +-- +-- +-- +-- NavBar.js
|   +-- +-- +-- PostLists.js
|    +-- +-- pages
|   +-- +-- +-- Home.js
|   +-- +-- +-- NotFound.js
|   +-- +-- +-- Posts.js
|   +-- index.js
|   +-- App.js
|   +-- db.json
Note: We have added here a
db.jsonfile. This is a dummy data file. Since we don't want to build APIs and instead focus on Flux, we will retrieve the data from this file.
Our Application's base component is index.js. Here we have rendered the App.js inside the index.html under public directory using the render and getElementById methods. The App.js is used for configuring the routes.
We are also adding NavBar component at the top of the other so it will be available for all the components.
Inside the pages directory we have 3 files => Home.js, Posts.js, and NotFound.js. Home.js is simply used to display the Home component. When a user routes to a URL which doesn't exist, then NotFound.js renders.
The Posts.js is the parent component and it is used to get the data from the db.json file. It passes this data to the PostLists.js under the components directory. This component is a dumb component and it only handles the UI. It gets the data as props from its parent component (Posts.js) and displays it in the form of cards.
Now that we are clear about how our blog app is working we will start with integrating Flux on top of it.
Integrating Flux
Install Flux using the following command:
npm install flux@3.1.3
To integrate Flux in our application we will divide this section into 4 subsections:
Dispatcher
Actions
Stores
View
Note: The complete code is available at this repository.
Dispatcher
First, create two new folders named actions and stores under the src directory. After that create a file named appDispatcher.js under the same src directory.
Note: From now all the files which are related to Flux will have Camel casing as they are not ReactJS components.
Go to the appDispatcher.js and copy-paste the following code:
import { Dispatcher } from "flux";
const dispatcher = new Dispatcher();
export default dispatcher;
Here we are importing the Dispatcher from the flux library that we installed, creating a new object and exporting it so that our actions module can use it.
Actions
Now go to the actions directory and create two files named actionTypes.js and postActions.js. In the actionTypes.js we will define the constants that we require in postActions.js and store module.
The reason behind defining constants is that we don't want to make typos. You don't have to define constants but it is generally considered a good practice.
// actionTypes.js

export default {
    GET_POSTS: "GET_POSTS",
};
Now inside the postActions.js, we will retrieve the data from db.json and use the dispatcher object to dispatch it.
//postActions.js

import dispatcher from "../appDispatcher";
import actionTypes from "./actionTypes";
import data from "../db.json";

export function getPosts() {
    dispatcher.dispatch({
        actionTypes: actionTypes.GET_POSTS,
        posts: data["posts"],
    });
}
Here in the above code, we have imported the dispatcher object, actionTypes constant, and data. We are using a dispatcher object's dispatch method to send the data to the store. The data in our case will be sent in the following format:
{
    actionTypes: "GET_POSTS",
    posts: [
        {
            "id": 1,
            "title": "Hello World",
            "author": "Sharvin Shah",
            "body": "Example of blog application"
        },
        {
            "id": 2,
            "title": "Hello Again",
            "author": "John Doe",
            "body": "Testing another component"
        }
    ]
}
Stores
Now we need to build the store which will act as a data layer for storing the posts. It will have an event listener to inform the view that something has changed, and will register using dispatcher with the actions to get the data.
Go to the store directory and create a new file called postStore.js. Now first, we will import EventEmitter from the Events package. It is available in the NodeJS by default. We will also import the dispatcher object and actionTypes constant file here.
import { EventEmitter } from "events";
import dispatcher from "../appDispatcher";
import actionTypes from "../actions/actionTypes";
We will declare the constant of the change event and a variable to hold the posts whenever the dispatcher passes it.
const CHANGE_EVENT = "change";
let _posts = [];
Now we will write a class that extends the EventEmitter as its base class. We will declare the following methods in this class:
addChangeListener: It uses the NodeJS EventEmitter.on. It adds a change listener that accepts the callback function.
removeChangeListener: It uses the NodeJS EventEmitter.removeListener*.* Whenever we don't want to listen for a specific event we use the following method.
emitChange: It uses the NodeJS EventEmitter.emit*.* Whenever any change occurs, it emits that change.
This class will also have a method called getPosts which returns the variable _posts that we have declared above the class.
Below the variable declaration add the following code:
class PostStore extends EventEmitter {
    addChangeListener(callback) {
        this.on(CHANGE_EVENT, callback);
    }

    removeChangeListener(callback) {
        this.removeListener(CHANGE_EVENT, callback);
    }

    emitChange() {
        this.emit(CHANGE_EVENT);
    }

    getPosts() {
        return _posts;
    }
}
Now create the store object of our PostStore class. We will export this object so that we can use it in the view.
const store = new PostStore();
After that, we will use the dispatcher's register method to receive the payload from our Actions component.
To register for the specific event, we need to use the actionTypes value and determine which action has occurred and process the data accordingly. Add the following code below the object declaration:
dispatcher.register((action) => {
    switch (action.actionTypes) {
        case actionTypes.GET_POSTS:
            _posts = action.posts;
            store.emitChange();
            break;
        default:
    }
});
We will export the object from this module so others can use it.
export default store;
View
Now we will update our view to send the event to postActions whenever our Posts page is loaded and receive the payload from the postStore. Go to Posts.js under the pages directory. You'll find the following code inside the useEffect method:
useEffect(() => {
    setposts(data["posts"]);
}, []);
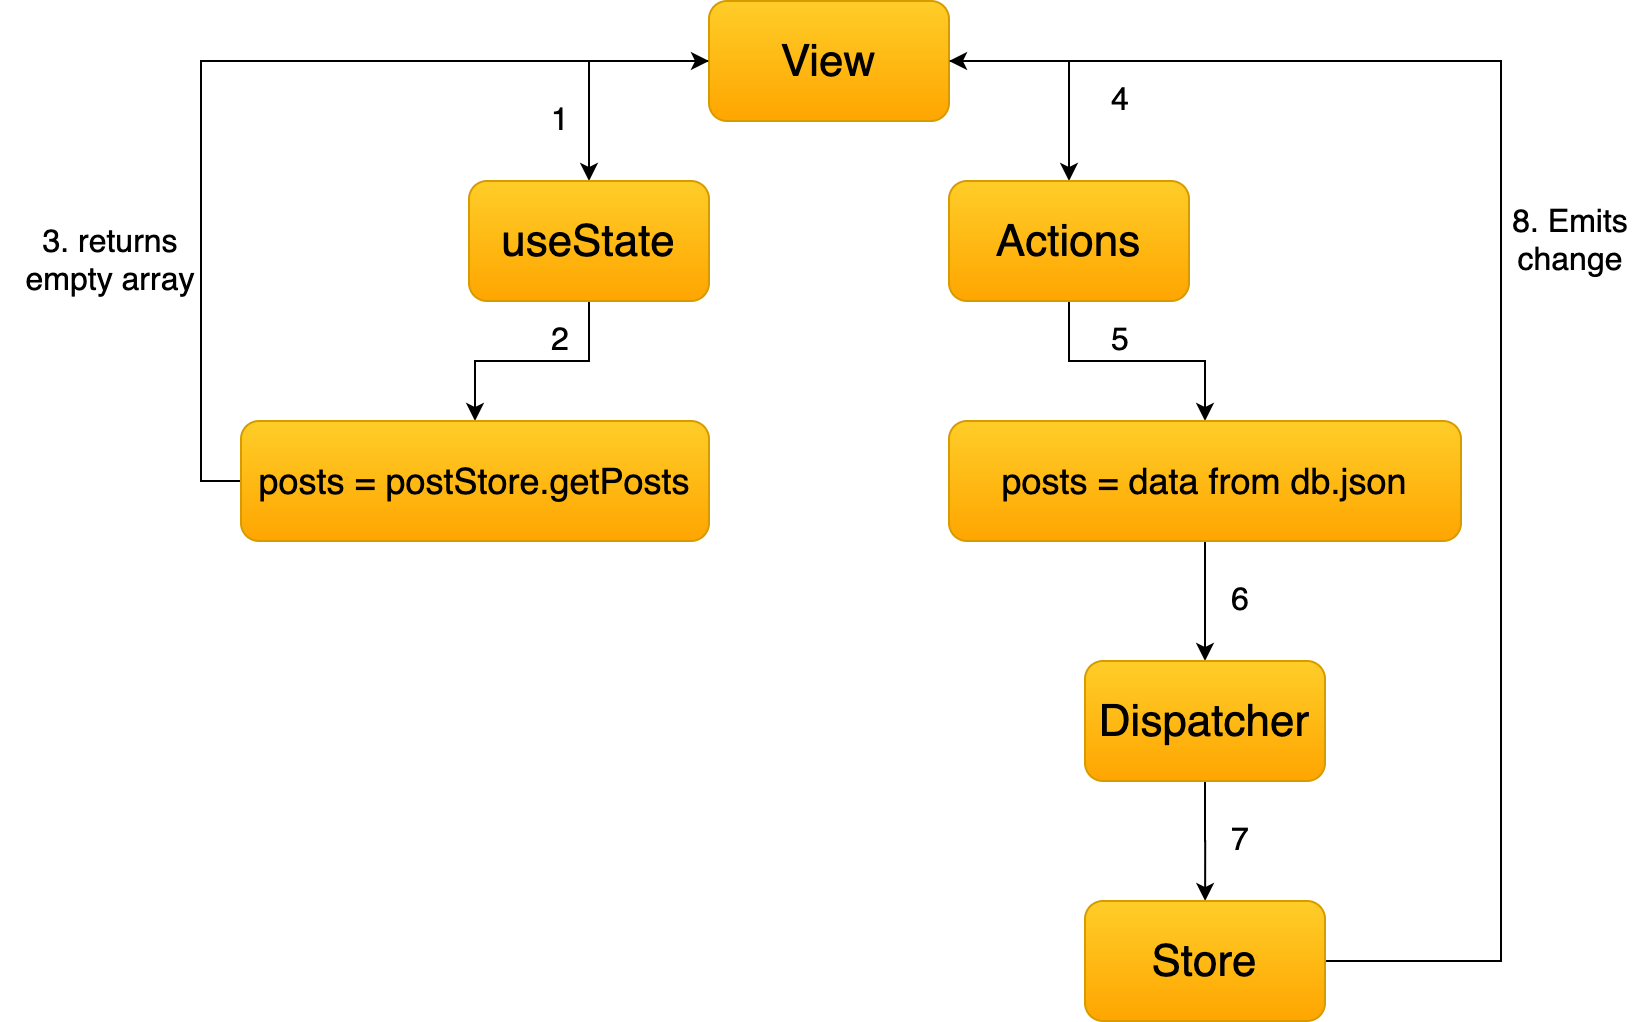
We will change how our useEffect reads and updates the data. First, we will use the addChangeListener method from the postStore class and we will pass an onChange callback to it. We will set the posts state value to have a return value of the getPosts method from the postStore.js file.
At the start, the store will return an empty array as there is no data available. So we will call a _getPosts_ method from the postActions.js. This method will read the data and pass it to the store. Then the store will emit the change and addChangeListener will listen to the change and update the value of the posts in its onChange callback.
If this seems confusing don't worry – check out the flow chart below which makes it easier to understand.
Remove the old code and update the following code inside Posts.js:
import React, { useState, useEffect } from "react";
import PostLists from "../components/PostLists";
import postStore from "../stores/postStore";
import { getPosts } from "../actions/postActions";

function PostPage() {
    const [posts, setPosts] = useState(postStore.getPosts());

    useEffect(() => {
        postStore.addChangeListener(onChange);
        if (postStore.getPosts().length === 0) getPosts();
        return () => postStore.removeChangeListener(onChange);
    }, []);

    function onChange() {
        setPosts(postStore.getPosts());
    }

    return (
        <div>
            <PostLists posts={posts} />
        </div>
    );
}

export default PostPage;
Here you'll find that we have also removed the import and also we are using setPosts inside our callback instead of useEffect method. The return () => postStore.removeChangeListener(onChange); is used to remove the listener once the user leaves that page.
With this go to the Blog Page and you'll find that our blog app is working. The only difference is that now instead of reading the data in the useEffect method we are reading it in actions, storing it in the store, and sending it to the components that require it.
When using the actual API you'll find that the application loads the data from the API one time and stores it in the store. When we revisit the same page you'll observe that no API call is required again. You can monitor it under the source tab in Chrome Developer console.
And we're done!! I hope this tutorial has made the idea of Flux clearer and you'll be able to use it in your projects.