
Webmention is a simple protocol developed by the IndieWeb Community that you can use to request notifications when your URLs are mentioned on the web.
When you post on your own site and syndicate elsewhere (POSSE), Webmention lets you enable rich interactions on your syndicated posts. This article will walk you through the simplest way to turn your social media interactions into Webmentions and display them on your Gatsby.js site.
This tutorial will implement Webmentions on an already existing site, so you should have at least some basic knowledge of React and Gatsby.
Getting Started
To help you better understand how Webmentions work, check out the image below:
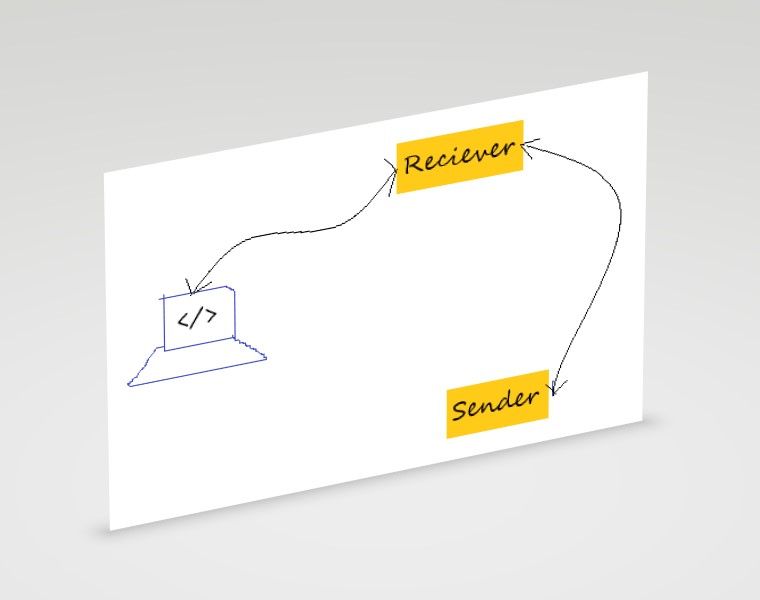
Different stages of Webmention process
Let's break down this these three stages and learn how to implement them.
How to Send Webmentions
A Webmention Sender is an implementation that send's Webmentions. Bridgy is a good example of a sender.
Bridgy is an open source tool that pulls your social media interactions from popular social sites and blog engines like Twitter, Facebook, Instagram, and Medium and magically turns them into Webmentions.

Bridgy turning social interactions to Webmentions
To use Bridgy, your domain needs to support the indieAuth Login process.
In your layout.js component (or from whatever component you are managing your <head> with React Helmet), add the following code to link to your social profiles:
import { Helmet } from "react-helmet"
// other imports

export default function Layout({ children}) {

  return (
    <div className="wrapper">
      <Helmet>

        <link rel="me" href="https://twitter.com/sprucekhalifa" />
        <link rel="me" href="https://github.com/iamspruce" />

      </Helmet>
...
    </div>
  )
}
On each of the social services you just linked to, make sure your profile has a link leading back to your homepage like you can see below:

Adding a link back to you homepage on Twitter
That's it! You are done with the IndieAuth login Process. Now head over to Bridgy and sign in with Twitter (if you used Twitter for your IndieAuth process).
From now on Bridgy will periodically analyze your tweets (I promise it doesn't do anything with your data). For each tweet that has a link to your site, it will get all the replies, likes, retweets, and so on and send them as Webmentions.
How to Receive Webmentions
A Webmention receiver is an implementation that receives Webmentions to one or more target URLs.
This implementation can be a script executed on your server, but in the case of GatsbyJs which has no server we'll rely on a third party tool called webmention.io created by Aaron Parecki.
This Tool receives your Webmentions and stores and organizes them. It also provides an API that you can use to easily grab your Webmentions and display them on your site.
To use webmention.io make sure you followed the IndieAuth Login process in the "How to Send Webmentions" section. Then go to webmention.io and sign in with your domain name.
Once you have signed up, add the following to the <head> of your site (and just replace username with the username you got when you logged in):
import { Helmet } from "react-helmet"
// other imports

export default function Layout({ children}) {

  return (
    <div className="wrapper">
      <Helmet>
        ...
        <link rel="webmention" href="https://webmention.io/username/webmention" />
        <link rel="pingback" href="https://webmention.io/username/xmlrpc" />

      </Helmet>
...
    </div>
  )
}
When you start getting Webmentions from your target URLs, you should see them in your dashboard like this:
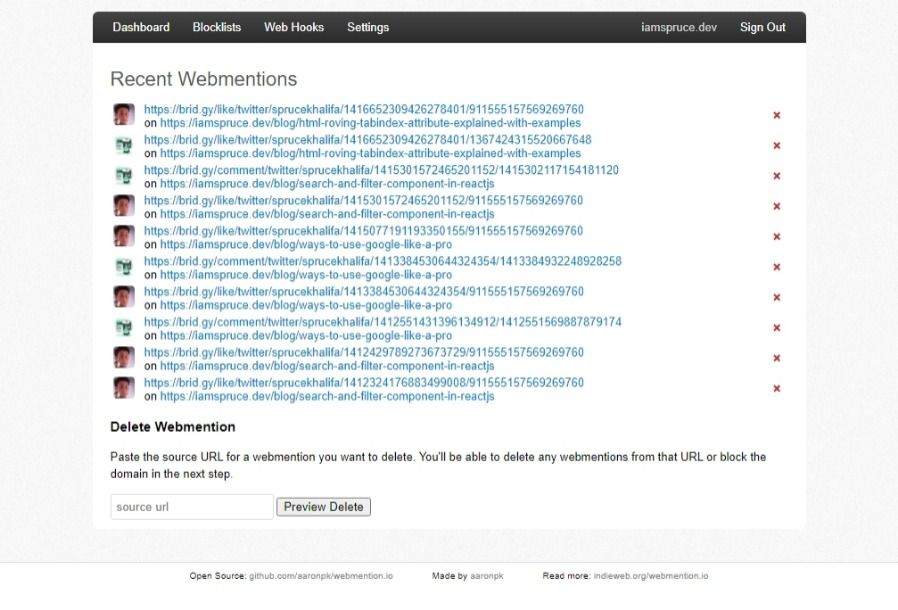
webmention.io dashboard
You can easily monitor your Webmentions in your dashboard.
How to Pull Webmentions Data to Your Website
This is the fun part where you'll pull your Webmentions data from the Webmention.io API. To do this, I created a Gatsby plugin called [gatsby-source-webmentions](https://www.npmjs.com/package/gatsby-source-webmentions)
NOTE: there's another plugin called [gatsby-plugin-webmentions](https://github.com/ChristopherBiscardi/gatsby-plugin-webmention) which pulls in Webmentions data from webmention.io API and makes them available in Graphql.
Spruce, if there's already a Gatsby plugin why create another one?
I created this plugin for two reasons:
First because I can, and why not.
Second, for image optimization – this plugin lets you use the gatsby-image plugin to optimize the images returned by the API.
How to Install the Plugin
To install the plugin, open your system terminal or the VS Code integrated terminal and run the following:
npm install gatsby-source-webmentions
Next you'll need to add the plugin to your gatsby-config.js plugins array:
   {
      resolve: "gatsby-source-webmentions",
      options: {
        DOMAIN: "example.com", // without https and any slashes
        TOKEN: process.env.WEBMENTIONS_TOKEN, // token from webmention.io
        perPage: 100, // optional
      },
The plugin takes a few options:
DOMAIN: the domain name you used to sign in to webmention.io
TOKEN: the token you got from your webmention.io dashboard
perPage: the number of Webmentions you want to fetch per page (this is completely optional)
To avoid pushing your secret token to GitHub add it as an environmental variable.
How to Display Webmentions on the Client Side
If you're dynamically creating your pages with the createPage Node API there's a high chance that you passed the slug variable to all your site pages. If you are unsure or you named it something else just check your site gatsby-node.js file.
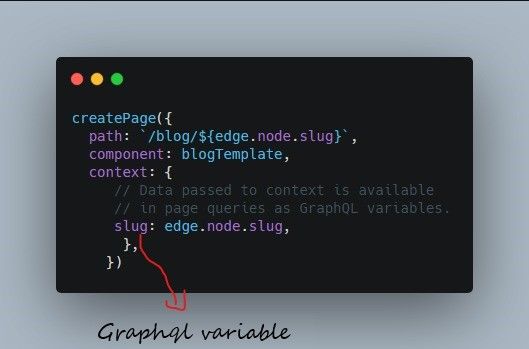
Using Create pages to generate a slug for site pages
In your src/templates/blog.js or wherever your page templates are, you'll query Webmentions only if the wm_slug matches the page slug.
import React from "react"
import { graphql } from "gatsby"
import Layout from "../components/Layout"
import Comment from "./Comment"


export const query = graphql`
  query($slug: String!) {
    allWebmention(filter: { wm_slug: { eq: $slug } }) {
        totalCount
        edges {
          node {
            id
            published
            publishedFormated: published(formatString: "MMM Do, YYYY")
            author {
                name
                photo
                url
            }
            url
            wm_id
            content {
              html
            }
          }
        }
      }
    }
`

export default function BlogPost({ data, location }) {
...
  const mentions = data.allWebmention

  return (
    <>
      <Layout>
      ...
      // display mentions in a react component
      </Layout>
    </>
  )
}
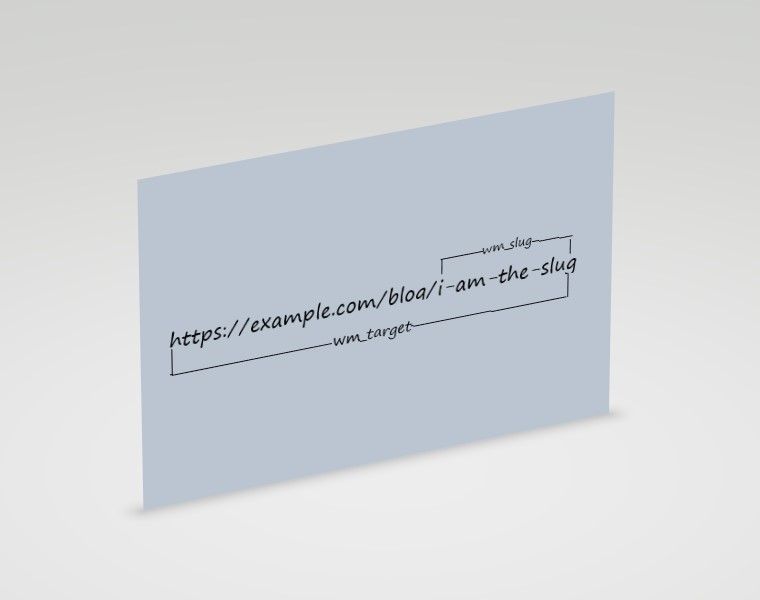
wm_slug is a node I created to grab the slug from the wm_target.
Now you can map over all the Webmentions for that target slug and display them in a React Component:
import React from "react"
import { graphql } from "gatsby"
import Layout from "../components/Layout"
import Comment from "./Comment"


export const query = graphql`
  query($slug: String!) {
    allWebmention(filter: { wm_slug: { eq: $slug } }) {
    // graphql queries
      }
    }
`

export default function BlogPost({ data }) {
...
  const mentions = data.allWebmention

  return (
    <>
      <Layout>
      ...
          <ol className="webmentions__list">
      {mentions.edges.map(edge => (
        <Comment
          key={edge.node.wm_id}
          imageUrl={edge.node.author.photo}
          authorUrl={edge.node.author.url}
          authorName={edge.node.author.name}
          dtPublished={edge.node.published}
          dtPublishedFormated={edge.node.publishedFormated}
          content={edge.node.content && edge.node.content.html}
          url={edge.node.url}
        />
      ))}
      </ol>
      </Layout>
    </>
  )
}
How to Group the Webmentions by Type
Although this is completely optional, it is a good idea to group your Webmentions by type:
"in_reply_to"– for replies"like_of"– for likes"retweet_of"– for retweets, etc.
...

export const query = graphql`
  query($slug: String!) {
    allWebmention(filter: { wm_slug: { eq: $slug } }) {
      likes: group(field: like_of) {
        totalCount
        edges {
          node {
             // node queries
          }
        }
      }

      replies: group(field: in_reply_to) {
        totalCount
        edges {
          node {
            // node queries
        }
      }
    }
}
...
How to Optimize the Webmentions Author Images
I mentioned earlier that the gatsby-source-plugin allows us to optimize the images returned from the Webmentions query.
To be able to optimize the images you must have [gatsby-plugin-image](https://www.gatsbyjs.com/plugins/gatsby-plugin-image/), gatsby-plugin-sharp, gatsby-transformer-sharp and gatsby-source-filesystem installed:
export const query = graphql`
  query($slug: String!) {
    allWebmention(filter: { wm_slug: { eq: $slug } }) {
      likes: group(field: like_of) {
        totalCount
        edges {
          node {
            // other node queries
            author {
                photoSharp {
                  childImageSharp {
                    gatsbyImageData(
                      width: 38
                      placeholder: BLURRED
                      formats: [AUTO, WEBP, AVIF]
                )
              }
             }
            }
          }
        }
      }
    }
`
For other optimizations and image processing, refer to the gatsby-plugin-image reference guide.
How to Add Custom Pagination
You can paginate your Webmentions with one of the many Gatsby pagination plugins. But all I wanted was a simple "Load More" button, and thankfully smarter people like Eric Howey have already thought about this.
The code below is from the article Load more button and infinite scroll in Gatsby (although I made a few adjustments to it):
import React, { useState, useEffect } from "react"
import { graphql } from "gatsby"
import Button from "./Button"
import Comment from "./Comment"

export const query = graphql`
  query($slug: String!) {
    allWebmention(filter: { wm_slug: { eq: $slug } }) {
        totalCount
        edges {
          node {
          // node queries
         }
        }
       }
      }

export default function BlogPost({ data }) {
...
  const replies = data.allWebmention

  const [state, setState] = useState({
    list: [...replies.slice(0, 5)],
    Load_more: false,
    has_more: replies.length > 5,
  })
  const handleState = () => {
    state.Load_more = true
  }
  //handle loading more mentions
  useEffect(() => {
    if (state.Load_more && state.has_more) {
      const currentLength = state.list.length
      const is_more = currentLength < replies.length
      const new_list = is_more
        ? replies.slice(currentLength, currentLength + 5)
        : []
      setState.list = [...state.list, ...new_list]
      setState.Load_more = false
    }
  }, [state.Load_more, state.has_more, replies, state.list])

  useEffect(() => {
    const is_more = state.list.length < replies.length
    setState.has_more = is_more

  }, [state.list,replies.length])
  return (
    <div className="webmentions-wrapper">
      {replies.length > 0 ? (
        <>
    <h4>Comments <span className="webmentions-counter">{replies[0].totalCount}</span> </h4>
    <ol className="webmentions__list">
      {state.list.edges.map(edge => (
        <Comment
          key={edge.node.wm_id}
          imageUrl={edge.node.authorImg}
          authorUrl={edge.node.authorUrl}
          authorName={edge.node.authorName}
          dtPublished={edge.node.published}
          dtPublishedFormated={edge.node.publishedFormated}
          content={edge.node.content && edge.node.content.html}
          url={edge.node.url}
        />
      ))}
      </ol>
      <div className="webmentions-load text-center">
      {state.has_more ? (
          <Button
            event={handleState}
            name="Load More"
            label="Load More Webmentions"
            btnSize="small"
            btnType="primary"
          />
      ) : (
        <p>No More Mentions...</p>
      )}
    </div>
        </>
      ) : (
        <p>No Webmentions found</p>
      )}
    </div>
  )
}
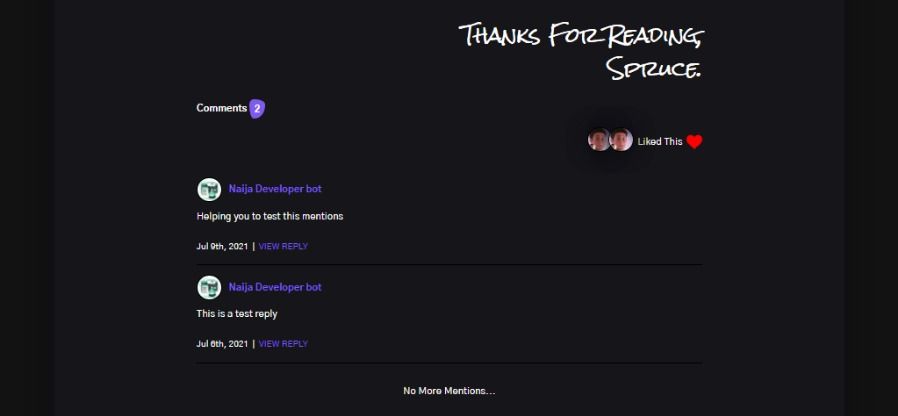
Continuous Deployment with Webmentions
As you might have noticed, your Webmentions data are pulled at build time. This means that users won't see new Webmentions unless your site has been built.
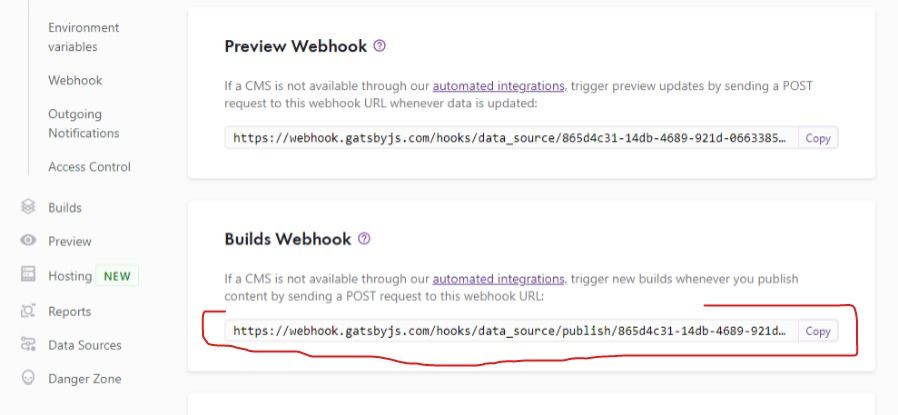
I host my site in Gatsby Cloud and to avoid crawling out of bed at midnight to build my site. It provides us with a WEBHOOK that can trigger a build for your site even while you are sleeping.
If you are using Gatsby cloud, go to your dashboard and copy the Webhook:
Webhooks from Gatsby Cloud dashboard
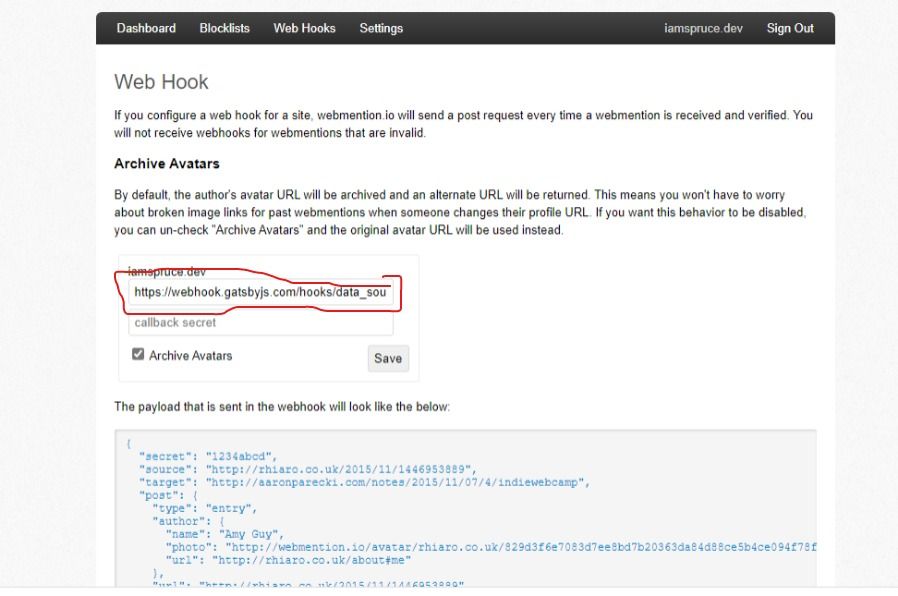
Once you have copied the Webhook, head over to your webmention.io dashboard, click on Web hooks, and paste the copied Webhook into the form:
webmention.io web hooks
That's it – you are done. Now any time you get a new Webmention the Web hook will build your site automatically.
Wrapping Up
In this tutorial we learned how to implement Webmentions on your Gatsby site. If you have any questions or you found this tutorial useful, please feel free to connect with me on Twitter @sprucekhalifa. Thank you.
Happy Coding!