
By Rajind Ruparathna
Error MDNs stating an error in the lines of “Signature verification failed” or “Decryption failed” are common for users who are just getting started with AS2 in any AS2 service. We have seen many such instances in our SaaS B2B AS2 messaging platform the AdroitLogic AS2Gateway. With these kinds of errors, sometimes, it is important for the support team and also the user to be able to try the decryption or signature verification manually to get more insight.
In this blog post, we will look at what the digital signature in AS2 protocol is, how to verify the signature of an AS2 message, and some tips on figuring out the cause for certain signature verification failures.
Signature in AS2 Protocol
AS2 signature is essentially a digital signature which provides authentication, data integrity and non-repudiation to the AS2 communication.
- Authentication — Ensures that the receiver is transacting with the sender that he/she was meant to transact with (and not an impostor)
- Data Integrity — Determines whether the file or data the receiver got was altered along the way
- Non-Repudiation — Prevents the sender from denying that the messages they sent originated from them
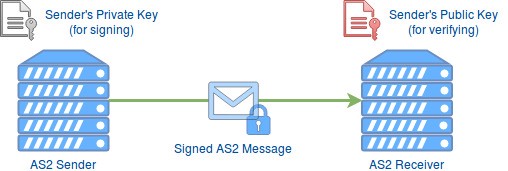
As shown in the above figure, the sender’s private key is used when generating the signature, and thus for verification the sender’s public key is used.
Let’s Get to Work!
For demonstration purposes, we will be using an incoming AS2 message to the AS2Gateway. Since we are only focusing on signature verification in this blog post, the incoming AS2 message will not be encrypted or compressed. If you want to try this out with encryption, please take a look at my previous article on decrypting AS2 message with OpenSSL.
Downloading RAW Message and Transport Headers
Once we have received an AS2 message, we can see the received message in the inbox view in AS2Gateway as shown below.
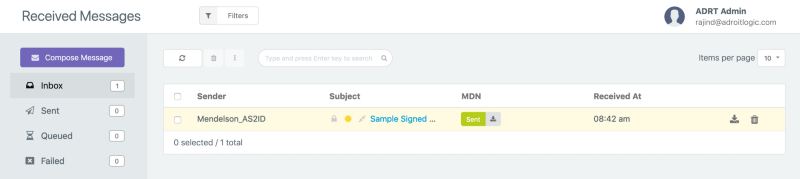
Then we can click on the message subject (in this case it is “Sample Signed Message”) to go to the detailed view of the received message as shown below.
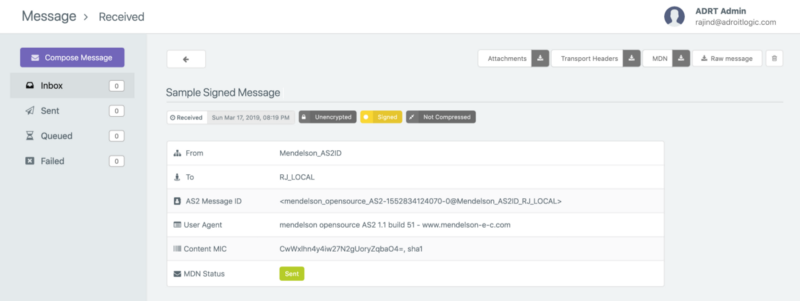
Now you can click on the “Raw Message” button and the “Download Transport Headers” button to download the unprocessed AS2 message payload and transport headers we received from the partner respectively. The raw message will be download to a file with name message.raw and the transport headers will be downloaded to a file with name headers.raw.
Getting the Sender’s Public Key
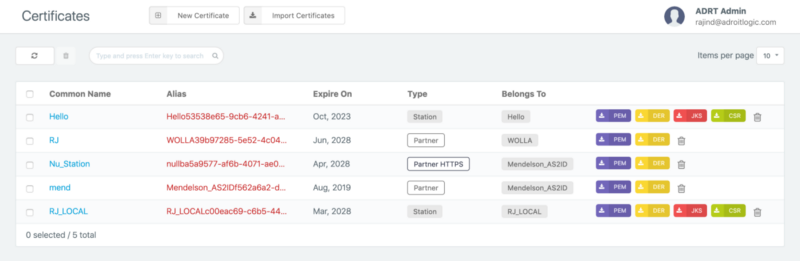
Now that we have the raw message and transport headers, what we need next is the sender’s public key. We can directly download it by clicking the PEM (purple) button from the certificates view (shown below) in the AS2Gateway.
Before we proceed with the next steps, let’s make sure we have everything we need in place.
- Raw message (message.raw)
- Transport headers (headers.raw)
- Sender’s public key (cert.pem)
Analyzing the HTTP Transport Headers
Let’s first take a look at the transport headers before we proceed.
As you can see, there are a bunch of headers. Let us focus only on a couple of important ones in the context of verifying the signature of the AS2 message.
- The content-type header suggests that we have a multi-part signed payload in the outer most layer and further it tells us that the multi-part boundary is denoted by the string “ — -=_Part_1_1702144111.1552838995900” for this AS2 message.
- We also have the mime-version to be 1.0
If you are interested in knowing more in-depth details, the best place to start would be the AS2 RFC 4130.
Analyzing the Raw Message
Now, let us look at the raw message (message.raw). As per the content type transport header, we already know that the payload is a multi-part signed one. We can see it below. There you see two parts (separated by the multi-part boundary string as stated in the content-type transport header). One with the original payload (we see the payload in plain text since we did not encrypt or compress the payload for this demonstration). The other with the signature (application/pkcs7-signature).
Adding Required Headers
Do you remember that we talked about a few important transport headers when we are looking at the transport headers? Now is the time to use them. We need to add those headers to our message.raw file so that the final output would be as follows. (Let’s take the new file as message_with_headers.raw) Note that the white space between the HTTP transport headers and the multi-part signed payload is intentional.
Verifying the Signature…
It’s time to run the decryption command. Here we use the ‘smime’ tool by OpenSSL.
openssl smime -verify -noverify -in message_with_headers.raw -signer cert.pem -out verified_payload.txt
Once you run the command you should get a message saying “Verification successful”. The verified payload would be in the file verified_payload.txt. Note that in this case, we will get the payload mime part as the output which would look something as follows.
Just for completion, let me add a note on an error I got while trying this. For me, the cause for this error was a mismatch in the multi-part boundary string in the content-type header with actual multi-part boundary string. Note that there are two preceding ‘-‘s when the multi-part boundary is used in a multi-part SMIME payload.
Error reading S/MIME message 4719224428:error:0DFFF0D2:asn1 encoding routines:CRYPTO_internal:no multipart body failure:/BuildRoot/Library/Caches/com.apple.xbs/Sources/libressl/libressl-22.240.1/libressl-2.6/crypto/asn1/asn_mime.c:464:
Further note that we have used the parameter ‘-noverify’ in the signature verification command. This is because the certificates we have used in this demo are self-signed certificates. If the ‘noverify’ param is not used, OpenSSL will try to verify the certificate first and will fail giving an error similar to following.
Verification failure 4567594604:error:21FFF075:PKCS7 routines:func(4095):certificate verify error:/BuildRoot/Library/Caches/com.apple.xbs/Sources/libressl/libressl-22.240.1/libressl-2.6/crypto/pkcs7/pk7_smime.c:340:Verify error:self signed certificate
Cool. Signature verification is done and dusted. Even though we’ve looked at doing the signature verification entirely using command line tools in this article, this can be done using a few lines on Java code as well. I hope to cover it in a future article.
Bonus Pack
Before signing off, I would like to share some bonus details which would help you identify the cause for certain signature verification failure scenarios. The first one is on how to find out the signature algorithm used.
Finding out the Signature Algorithm Used
In order to find the signature algorithm used, we can use the asn1parse tool by OpenSSL. First, we need to separate out the signature part without the mime headers to a separate file as follows. Let’s call this file signature.raw
Now, we can run the following command to get the asn1parse output.
openssl asn1parse -i -in signature.raw
The output would be as follows. If you can see below, the outer most part has type pkcs7-signedData, and after four or five lines we see sha1 which is the signature algorithm used.
More Details from the asn1parse Output
There are a few more details we can see and understand from the asn1parse output. Optionally when signing, the signing certificates are attached to the signature itself. That is what you see starting from the pkcs7-data section. The “INTEGER : 438EFDF3” is the signing cert serial number. You can also see the validation period of the certificate as shown below.
258:d=7 hl=2 l= 13 prim: UTCTIME :051201134315Z
273:d=7 hl=2 l= 13 prim: UTCTIME :190810134315Z
Sending agents MUST encode signing time through the year 2049 as UTCTime. Signing times in 2050 or later MUST be encoded as GeneralizedTime. Agents MUST interpret the year field (YY) as follows: if YY is greater than or equal to 50, the year is interpreted as 19YY; if YY is less than 50, the year is interpreted as 20YY.
Regarding UTCTime from RFC 2311 — https://tools.ietf.org/html/rfc2311
In this case, the period which the certificate is valid is from UTC 2005/12/01 13:43:15 to 2019/08/10 13:43:15.
We also have the signing time at signingTime attribute as 190317161000Z which is UTC 2019/03/17 16:10:00. Note that during signature validation, in addition to the content hash matching, another check will be made to see if the signature was when the certificate was current. Basically, at the time of the signing, the certificate should be valid.
With some more knowledge in ASN.1 structure, we should be able to gain a lot more information from this. It’s time for me to sign off. Cheers! ?
Call To Action
- Clap. Appreciate and let others find this article.
- Comment. Share your views on this article.
- Follow me. Rajind Ruparathna to receive updates on articles like this.
- Keep in touch. LinkedIn, Twitter
Originally published at notebookbft.wordpress.com on March 19, 2019.