

In this step-by-step tutorial, you'll learn how to easily start with Unit Tests in React. You'll learn how to write tests for Redux states as well as fundamental Redux slice tests using the React Testing Library and Jest.
🔐 Here's What We'll Cover
- You'll see how easy it is to set up your first unit tests in React.
- You'll improve your general React knowledge.
- You'll get the hang of why Test Driven Development (TDD) is helpful for your coding workflow.
📝 Prerequisites
- You should be familiar with the basic React workflow structure (including functional components and hooks).
- You should have a basic knowledge of Redux (I'm using Redux Toolkit for this guide).
- You don't need any prior knowledge about testing.
- I'm using the
npminstallation approach, not theyarnone.
🎯 The Objective
While learning advanced concepts of React, you'll probably stumble across the topic of testing. Being able to work with automatic tests is also quite handy for any upcoming frontend developers.
However, as I myself was learning React, I had a hard time finding information about how to implement tests for libraries like Redux (even though it's a library I work with all the time).
Beyond that, I found that doing any component testing in React is basically unfeasible when you don't know how to work with the Redux library.
So I took some time to read the Redux documentation and went back and forth with it a bit. Then I decided to write a practical starter guide for unit testing in React, including Redux, to share what I learned.
Since I would like to take a modern approach, I'm also going to use the Redux Toolkit. We'll cover the Redux implementation in this guide.
What we'll cover:
To start off, I will provide some general information about tests before I directly go into creating the first general unit tests.
Next I'll give a quick overview of how to implement some Redux Toolkit logic.
Then we will work on some unit tests within an application which uses Redux Toolkit. For this step we will adjust our previously created tests to the new Redux environment.
This is a step-by-step guide. If you are new to tests, I recommend following this guide in order from top to bottom.
I have also created a public GitHub repository for this guide with some commentary. You can use that if you want to look something up without scrolling through this guide in its full length again.
Table of Contents
- What Different Kinds of Tests Are There?
- How to Set Up Your React Testing Environment
- Check Out Your Created React Application
- How to Create Your First Unit Test
- How to Create a Failing Test on Purpose
- How to Create Some Additional Tests
- How to Perform Testing with the React Redux Toolkit
- Outlook for Advanced Testing
📋 What Different Kinds of Tests Are There?
This quick guide won't provide you with detailed theoretical knowledge about all the different kinds of testing out there. At this point, you should just understand that there are generally three kinds of tests:
- Unit Tests
- Integration Tests
- End-To-End Tests
To put it in simple words: You can see these three types of tests as generally increasing in their complexity.
While unit tests cover single functions and components, integration tests typically focus on multiple functions and their connections to each other. End-to-end tests are even more complex and give insights about multiple function and component structures.
There are other test concepts, but these three are the most important ones for web developers, for example.
Again, this is really put in simple words. But in this case it's sufficient to know that unit tests are basically the least complex tests out of these three.
It's also quite easy to work with unit tests as soon as you have a basic understanding of how testing in general works.
I would also like to quickly emphasize that there are mainly two ways of testing your application.
- Manual Testing
- Automatic Testing
Manual Testing is pretty much what you probably already do for all of your application which you create. When manually testing your application, you basically start your React application with npm run start and actually click on buttons to check if the corresponding function works.
Automatic Tests, on the other hand, are pretty much functions you create which automatically check your application to see if the respective steps work that you defined within these tests. This automatic kind of testing is extremely important for larger projects.
With this automatic approach, it's also way easier to scale your tests. In the end, you have a lot of tests which automatically test your whole application in a relatively short amount of time. These test can help you spot any potential errors which might have occurred during development. This would take much more time if you were to go back constantly to manually test your application.
Being able to work with automatic tests is also typically a big plus for your résumé as a frontend developer.
🔧 How to Set Up Your React Testing Environment
In order to get a practical start, we are going to directly dive into our React application.
You will see that the setup of a testing environment is relatively easy in React – or, to be more precise, React does it all for you during the regular install setup.
Therefore, I'm creating a React application with the following line:
npx create-react-app <name of your application>
After this step, we need everything that should be added for using Redux in our React application:
- React Redux:
npm install react-redux(provides some mandatory hooks, for example) - React Redux Toolkit:
npm install @reduxjs/toolkit(provides logic for creating a store or slices, for example)
It's worth mentioning that there also is the Redux core (npm install redux). But this is already part of the React Redux Toolkit installation, so we don't have to install it here too.
If you wanted to use React without the React Redux Toolkit, then you would have to separately reach out to the Redux core installation.
You can also create a new React application from scratch with npx create-react-app my-app --template redux which includes the React Redux Toolkit, the React core, React Redux, as well as a template from the React Redux Toolkit.
Choose this approach if you don't have any existing React applications, since it's probably more convenient.
Under the hood, you now have an application that uses the React Testing library combined with Jest (a testing framework). Together, they have pretty much everything that you will need for testing your React application.
You don't have to install anything else for this purpose. These tools come out of the box with a standard React installation.
🔎 Check Out Your Created React Application
As you go into your newly created React application, you will find the folder and file structure you are likely familiar with. Besides others, there is the App.js file, which is created like this:
import logo from './logo.svg';
import './App.css';

function App() {
  return (
    <div className="App">
      <header className="App-header">
        <img src={logo} className="App-logo" alt="logo" />
        <p>
          Edit <code>src/App.js</code> and save to reload.
        </p>
        <a
          className="App-link"
          href="https://reactjs.org"
          target="_blank"
          rel="noopener noreferrer"
        >
          Learn React
        </a>
      </header>
    </div>
  );
}

export default App;
Within the src folder, you also have the file App.test.js. This file is actually a first test that came out of the box with React installation. This file is structured like this:
import { render, screen } from '@testing-library/react';
import App from './App';

test('renders learn react link', () => {
  render(<App />);
  const linkElement = screen.getByText(/learn react/i);
  expect(linkElement).toBeInTheDocument();
});
Even without fully understanding what render or screen is, for example, we can see that something is going on with our App component in there. In fact, this is a unit test that is focusing on a specific part of the App component.
While this first template for a test is a handy representation of what a test looks like, I would like to create a test file from scratch.
Generally speaking, tests are separated into different test suites. These test suites are typically a group of tests that focus on the same component, for example. Tests within the same test suite basically have the same superordinate topic.
To check this, try to enter npm run test in your terminal when you are within your React application.
It could say something like "There are no new tests or changes since the last commit" – in this case, just enter a in the terminal to run all tests regardless.
In the end, you should be able to see this within the terminal:
 Result of
 npm run test
At the top, you can see that the App.test.js file passed. Basically, all tests within this file were successful.
Below that, you can see renders learn react link: This is the description for this particular test, which we can define individually. We will get back to this later.
Further down, we can finally see the test suites and tests. As you can see, we have one test suite and one test. To be more precise, we have one test suite that includes this one test.
Later on, you will recognize that we will use like 1-3 test suites while there will be around 5+ tests, for example. Again, test suites basically provide a structure that groups single tests together.
The stuff with the snapshots is not important for your specific case.
Snapshots are an advanced concept for testing. So a reference snapshot (like an image that was taken) is being compared with the version after some actions took place. This can help to check whether the UI stays the same after some actions or if some changes happened all of a sudden.
I won't focus on testing with snapshots in this article. This is a topic that you might want to look up after understanding some unit testing basics.
🔨 How to Create Your First Unit Test
Now that we've looked at a unit test, lets dive into the first test which we'll build from scratch on our own.
For that, I would like to create a new folder called __tests__. This is common when you are working with tests or checking out other applications.
I'm also dragging the already-available App.test.js file into this folder. This doesn't change anything about the result.
Our folder structure now looks like this:
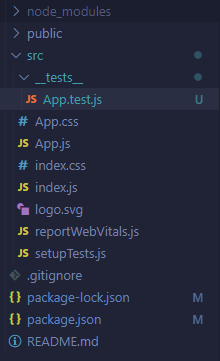 general folder structure with
 __tests__
Within __tests__, we create the file myFirstTesting.test.js. We need this file structure of <test name>.test.js. You can also create a test file with <test name>.spec.js – both approaches will work the same.
Our first step is to import the App.js component: import App from "../App";.
To create our first test, we have to make use of the test() function. You could also use it(). Both will achieve the same result.
The first parameter of this function has to be a string, which describes what we are going to test (remember the stuff with "renders learn react link" within the test file we viewed?). This is going to help you have a more precise overview after running all the tests.
In this case, I will use the description "renders logo in App component". The second parameter is another function for which we are using an anonymous arrow function. Our myFirstTesting.test.js file now looks like this:
import App from "../App";

test("renders logo in App component", () => {

})
Even though there is not much going on, let's try entering npm run test again. We will find the following result in our terminal:

Therefore, we now have two test files, resulting in two test suites and two tests.
Now we would actually like to test something. Since we added the description "renders logo in App component", we are going to test exactly that.
In order to do that, we need the render() function, which we'll use whenever we actually want to render a component from our application.
In order to add the render() function, we have to import it from the React Testing library, which is already part of our React application without any other installations.
While we're at this step of importing, let's also import screen (also part of the React Testing library). It provides access to different functions that will look through the current screen after something gets rendered and find specific elements, for example.
After adding these two imports, our myFirstTesting.test.js file now looks like this:
import App from "../App";
import { render, screen } from "@testing-library/react";

test("renders logo in App component", () => {

})
Now that we have all that, let's actually start working on our test.
First of all, we need to render our component. Remember that tests are self-contained and don't know that we have an App.js with the corresponding content in our React application. We have to individually tell the specific test that a component exists by rendering it with render() at the top of the test. This is going to look like this: render(<App />);.
Now that we have rendered the App.js component in this test, we should try to check if a specific content part can be found by the test. This way, we can actually test if App.js was rendered like it was supposed to be.
Assuming something went wrong, we would not be able to find the React logo, for example, which is currently part of the App.js component.
So we will try to find this logo, which is an img element. To do this, we can make use of the getByAltText() function that finds an element by its specific alt attribute, which is commonly utilized for images. We have access to this function with screen that we imported earlier.
We now have this expression: screen.getByAltText("logo"). So the test looks at the screen where we rendered the App.js component beforehand, and then gets an element, which has an alt attribute of "logo". We will connect all this to a variable.
Our test file now looks like this:
import App from "../App";
import { render, screen } from "@testing-library/react";

test("renders logo in App component", () => {
  render(<App />);
  const image = screen.getByAltText("logo");
})
There are a bunch of different functions like getByAltText() that you can use to look for elements with a specific text content, a specific role like a button, or even with a test id that you can add to the actual element.
You also have the opportunity to look for multiple elements. Besides that, you don't have to use a string as parameter. A regular expression with /logo/i is also feasible, for example. We will use different ways to find elements throughout this starter guide.
For the last step, we have to utilize expect(), which we use to see what behavior we can expect. In this case, we expect that our image variable is part of the component and therefore exists.
For this approach, our file would look like this:
import App from "../App";
import { render, screen } from "@testing-library/react";

test("renders logo in App component", () => {
  render(<App />);
  const image = screen.getByAltText("logo");
  expect(image).toBeInTheDocument();
})
❗ How to Create a Failing Test on Purpose
If we now run our tests with npm run test, everything will pass. Now, let's try to reverse this logic so that we actually create a failing test. This way, we can check if this test actually has some impact or not.
To do this, we can go into our App.js file and change the alt attribute for the logo image. If you change it to alt="loo", the test will fail and it'll give you some information.
In our case, though, I would like to change something on the test itself to make it fail and show you another expression that is handy to know. Instead of expect(image).toBeInTheDocument(); we can also type expect(image).not.toBeInTheDocument();. So here we added a not. This basically reversed the logic, and now the test expects that no such image element exists.
If we now try to run the test, we will find the following error message in our terminal:
 The error message we get
You can see that the test expected that there was no such element as image. However, it found something and therefore answered with an error message.
You don't have to make all your tests purposely fail to check if they work or not. I just wanted to show you what an actual failing test would look like.
✏️ How to Create Some Additional Tests
Now we have finished with our first test and have some basic knowledge about what to expect when working with unit tests. Next, we will check out some other test examples.
In order to create a more realistic scenario, I will add one additional component, which we'll insert into the App.js component.
For this step, first we create a folder called components in our src folder. This is not a must, but it is common to structure your files like that.
Within the components folder, we create List.js. Our folder structure now looks like this:
 current folder structure
Now, let's try to follow more of a test driven development (TDD) workflow, which is quite modern. I'm not necessarily sayint that this is always recommended. But a TDD approach is considered best practice by more and more people nowadays.
Of course, in this tutorial we'lre "only" talking about unit tests and not integration or end-to-end tests, but the general TDD workflow is similar for all three test categories.
So using this test driven development approach, we basically add tests and work on our application simultaneously.
To be more precise, we even create tests for single components and function parts before you even implement this tested logic in your application.
So there is a lot of going back and forth instead of creating all the tests at once at the end.
How to Start the Setup for List.js
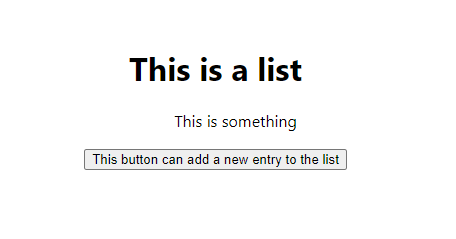
In our example, we have added the List.js component. Within this component, I would like to add a list with a button. When a user clicks on the button, it adds something to the list (an object with multiple keys and values).
In order to have some sort of frame, I will first add some div elements and similar stuff to our List.js component before we dive into the actual logic.
The List.js component now looks like this:
const List = () => {
  return (
    <div
      style={{ marginLeft: "auto", marginTop: "500px", marginBottom: "500px" }}
    >
      <h1>This is a list</h1>
      <ul style={{ listStyleType: "none" }}>
        <li>This is the first list entry</li>
      </ul>
      <button>This button can add a new entry to the list</button>
    </div>
  );
};

export default List;
I also added the List.js component as a child to App.js (below all the other stuff in App.js) so it will be visible without changing anything else.
The result looks like this:
 How it looks
This won't win you any style competitions but it's sufficient for our case.
Setup for the test for List.js
Since we want to test while we are working on our component, I will now jump directly to the testing part even if nothing really happened in our List.js component in terms of click functions, for example.
We could create a new test file, but I would like to show you a new function we can use for our test suites specifically. This function is called describe() and can be handy for further structuring our tests.
To use describe(), we jump to myFirstTesting.test.js within __tests__. Right now, this file basically serves as one test suite for the test we specifically created for the App.js component. But I would like to have two test suites within this test file: one for the App.js tests and one for the List.js tests.
For this step, I'm using the describe() function, which basically works like the test() function in terms of parameters.
The first parameter will be a string, describing the respective test suite. The second parameter is a function, which then includes our test() functions with their stuff.
It will look like this in our case:
import App from "../App";
import { render, screen } from "@testing-library/react";

describe("App.js component", () => {
  test("renders logo in App component", () => {
    render(<App />);
    const image = screen.getByAltText("logo");
    expect(image).toBeInTheDocument();
  });
});

describe("List.js component", () => {
  test("example", () => {});
});
Before we jump into this new test, I would actually like to add something for the App.js testing. Since we have this describe() block, we could just add a new test() function – and this is what I'm going to do.
See the following newly added test described with "renders List.js component in App.js":
import App from "../App";
import { render, screen } from "@testing-library/react";

describe("App.js component", () => {
  test("renders logo in App component", () => {
    render(<App />);
    const image = screen.getByAltText("logo");
    expect(image).toBeInTheDocument();
  });

   test("renders List.js component in App.js", () => {
    render(<App />);
    const textInListJS = screen.getByText(/This is a list/i);
    expect(textInListJS).toBeInTheDocument();
  });
});

describe("List.js component", () => {
  test("example", () => {});
});
So I'm rendering the App.js component and looking for text via a regular expression, which is part of the List.js component. This test can basically be understood as a render test for List.js. If List.js had not been able to be rendered within App.js, this test would not pass.
If you are confused that this works without separately using render() on the List.js component, remember that List.js is part of App.js and everything inside App.js will be rendered under typical conditions. If you tried to look for a text phrase that doesn't exist in List.js, this new test would fail. Right now, in our case, it passes.
I would also like to emphasize that you can have multiple expect() functions within the same test. Therefore, we also could have structured this new test like this:
import App from "../App";
import { render, screen } from "@testing-library/react";

describe("App.js component", () => {
  test("renders logo in App component", () => {
    render(<App />);
    const image = screen.getByAltText("logo");
    const textInListJS = screen.getByText(/This is a list/i);

    expect(image).toBeInTheDocument();
    expect(textInListJS).toBeInTheDocument();
  });
});

describe("List.js component", () => {
  test("example", () => {});
});
This would also work perfectly fine in our case. And this can be handy in situations where you test for some small elements which are directly connected to each other and have the same requirements to be rendered.
But keep in mind that in our case, we should have adjusted the description for this test. That's because "renders logo in App component" is not correct anymore if we are testing more than that in this test. So let's head back to the structure with two separate tests for now. But have in mind that you are able to work like this.
Back to the test for List.js
Now I would like to work with the second describe() block that we created a few moments ago, where we want to work with tests specifically for the List.js component.
Since we are aiming for a test-driven development approach, we should think about what we are going to build, write a test, and then implement that logic in our component.
We want to create a simple list in our List.js component. So there will be an array, which we will go through with map().
For this approach, we will utilize the useState() hook so we have a state that can dynamically adjust (the array of list items). Our first test will be to check if the length of this array in its initial state is equal to 1.
To find the items within this state, we will make use of the getAllByTestId() method, which allows us to search for specific elements we marked with a data-testid in the frontend.
The test with the description "renders initial state of listData state" that I created is now included:
import App from "../App";
import { render, screen } from "@testing-library/react";

describe("App.js component", () => {
  test("renders logo in App component", () => {
    render(<App />);
    const image = screen.getByAltText("logo");
    const textInListJS = screen.getByText(/This is a list/i);

    expect(image).toBeInTheDocument();
    expect(textInListJS).toBeInTheDocument();
  });
});

describe("List.js component", () => {
   test("renders initial state of listData state", () => {
    render(<List />);
    const list = screen.getAllByTestId("list-item");
    expect(list.length).toEqual(1);
  });
});
Right now this test will fail, of course, because we haven't added any of this logic to the component yet.
So I adjusted the List.js component. It now looks like this:
import { useState } from "react";

const List = () => {
  const initialState = [
    {
      id: `${new Date().getSeconds()}`,
      description: "This is something",
      significance: 7,
    },
  ];
  const [listData, setListData] = useState(initialState);

  return (
    <div
      style={{ marginLeft: "auto", marginTop: "500px", marginBottom: "500px" }}
    >
      <h1>This is a list</h1>
      <ul style={{ listStyleType: "none" }}>
        {listData.map((listItem) => {
          return (
            <li key={listItem.id} data-testid="list-item">
              {listItem.description}
            </li>
          );
        })}
      </ul>
      <button>This button can add a new entry to the list</button>
    </div>
  );
};

export default List;
Newly added was the listData state array via a useState() hook as well as an initialState, which I initialized with one object at the very top. I also made use of the map() function to go through this listData to create a list.
For each <li> element, I'm adding a key and a data-testid. This data-testid is the id we need for our test to find the respective elements.
On our actual application, we can see the listItem.description for this initial state:
So by manually testing (actually looking at our application in the browser), we can see that this should work. If we now run our tests, we will also see that the test we created passed.
How to add an object to the state
Now let's test something more exciting: the logic to add a new object to this listData state. Again, we will start by working on our test first before actually implementing the required logic within the React component.
With this newly added test described by "adds a new data entry to listData after button click", our test file now looks like this:
import App from "../App";
import List from "../components/List";
import { render, screen } from "@testing-library/react";

import userEvent from "@testing-library/user-event";

describe("App.js component", () => {
  test("renders logo in App component", () => {
    render(<App />);
    const image = screen.getByAltText("logo");
    expect(image).toBeInTheDocument();
  });

  test("renders List.js component in App.js", () => {
    render(<App />);
    const textInListJS = screen.getByText(/This is a list/i);
    expect(textInListJS).toBeInTheDocument();
  });
});

describe("List.js component", () => {
  test("renders initial state of listData state", () => {
    render(<List />);
    const list = screen.getAllByTestId("list-item");
    expect(list.length).toEqual(1);
  });

  test("adds a new data entry to listData after button click", () => {
    render(<List />);
    let listItems = screen.getAllByTestId("list-item");
    const button = screen.getByRole("button", {
      name: /This button can add a new entry to the list/i,
    });

    expect(list.length).toEqual(1);
    userEvent.click(button);
    list = screen.getAllByTestId("list-item");
    expect(list.length).toEqual(2);
  });
});
At the bottom, you can see this test. Therefore, we are first rendering the List.js component before looking for all available list items we assigned a test id to. You will see exactly where we put the test id in a few moments.
We also have to look for the button that we want to test to see if clicking on it adds something to the list. We do this with getByRole() which expects a role like "button" or "table" as a first parameter, for example (there are a bunch of different roles you can target). The second parameter is optional and is an object that can receive a value for the name key.
name is pretty much the text content we have specifically for the button in this case. This optional second parameter is handy when you have multiple elements of type "button" in your component and want to get a specific button out of these.
After getting the listItems as well as the button, we start off with a first expect() to basically test the initial state. In this initial state, we expect to have only one list item.
Then, with the help of userEvent, we are going to click on the button. You could also use fireEvent for this situation (userEvent is still pretty new compared to the fireEvent approach). Both will work, and both are helpful for any action where you want to interact with specific elements. In this case, I want to simulate clicking on a button.
Tests generally follow a "arrange -> act -> assert" pattern that you can follow to structure them. Within the "arrange" part, you initialize and get all required elements. With the "act" part, you would simulate a mouse click (as in our case), for example. With "assert," you are checking if it all behaves like you expected it to.
In another case, you could simulate changing the value of an input field with fireEvent.change(inputField, { target: { value: someValueVariable } }), for example. Maybe you want to focus an input field or even drag an element - such actions can be simulated via fireEvent and userEvent.
After the button click, it again looked for all listItems since the current value of this variable would still be 1 from the previous initialization. As soon as this step is completed, it uses another expect() function to check if the length of the listItems array is now equal to 2 and not 1.
Now that we have our test logic, let's jump back to the List.js component and implement the corresponding logic:
import { useState } from "react";

const List = () => {
  const initialState = [
    {
      id: `${new Date().getSeconds()}`,
      description: "This is something",
      significance: 7,
    },
  ];
  const [listData, setListData] = useState(initialState);

  return (
    <div
      style={{ marginLeft: "auto", marginTop: "500px", marginBottom: "500px" }}
    >
      <h1>This is a list</h1>
      <ul style={{ listStyleType: "none" }}>
        {listData.map((listItem) => {
          return (
            <li key={listItem.id} data-testid="list-item">
              {listItem.description}
            </li>
          );
        })}
      </ul>
      <button
        onClick={() =>
          setListData([
            ...listData,
            { id: 999, description: "999", significance: 100 },
          ])
        }
      >
        This button can add a new entry to the list
      </button>
    </div>
  );
};

export default List;
The only part that changed is the button at the bottom of this file. So I added a function that gets invoked when clicking on this button. The function then adjusts the current state of listData which is responsible for rendering our list. I copied the current state with a spread operator and then added another hard-coded object as the new entry for this list.
Of course, there are more creative ways to fill in the values for the id, description, and significance keys.
I would also like to emphasize that you have the opportunity to create a separate function outside of the return() and access this function like this: onClick={separateFunctionToAddObjectToState} on the same button element. This would also work without having to render something additional within the test.
If we now run our test, we will see that it passes. If you try to still expect a length of 1 after clicking on the button, the test will fail like this:
 error alert for length of 1
So it actually does what it is supposed to do.
🔧 Setup for Redux
After working with local states via the useState() hook, I would like to work on the same files and adjust them for Redux (or the Redux Toolkit, to be precise).
I'm not going to dive deep into what Redux actually is and what every term like action, store, or reducer means in detail – since this would be worthy of a whole new guide. If you want that, you can read this guide to Redux basics.
Instead, I will give just a quick rundown and show which files I'm adding and editing. Then I'll talk about how to handle the render() method, including the Redux store provider, which can cause a lot of frustration when testing if you don't know about it.
Overall folder structure:
 current overall folder structure with the React Redux Toolkit
You can see that I added an app (for the store) as well as a features (for the slice) folder.
Updated index.js file:
import React from "react";
import ReactDOM from "react-dom/client";
import "./index.css";
import App from "./App";
import reportWebVitals from "./reportWebVitals";
import { Provider } from "react-redux";
import store from "./app/store";

const root = ReactDOM.createRoot(document.getElementById("root"));
root.render(
  <React.StrictMode>
    <Provider store={store}>
      <App />
    </Provider>
  </React.StrictMode>
);
You can see that I added a provider and wrapped it around the application so we have access to the store from anywhere.
Created store.js file:
import { configureStore } from "@reduxjs/toolkit";
import { ListSlice } from "../features/ListSlice";

const store = configureStore({
  reducer: {
    listReducers: listSlice.reducer,
  },
});

export default store;
In this file, we have created the required store for the Redux implementation.
Created ListSlice.js file in features folder:
import { createSlice } from "@reduxjs/toolkit";

export const initialState = {
  value: [
    {
      id: `${new Date().getSeconds()}`,
      description: "This is something",
      significance: 7,
    },
  ],
};

export const ListSlice = createSlice({
  name: "listReducers",
  initialState,
  reducers: {},
});

export const { } = ListSlice.actions;
export default ListSlice.reducer;
Here we have created the slice that we added to the store. Notice that I haven't added any reducer yet. This slice just contains the current corresponding state.
Updated List.js file in components folder:
import { useSelector, useDispatch } from "react-redux";

const List = () => {
  const listState = useSelector((state) => state.listReducers.value);
  const dispatch = useDispatch(); // not used right now

  return (
    <div
      style={{ marginLeft: "auto", marginTop: "500px", marginBottom: "500px" }}
    >
      <h1>This is a list</h1>
      <ul style={{ listStyleType: "none" }}>
        {listState.map((listItem) => {
          return (
            <li key={listItem.id} data-testid="list-item">
              {listItem.description}
            </li>
          );
        })}
      </ul>
      <button>This button can add a new entry to the list</button>
    </div>
  );
};

export default List;
On the frontend, we swapped the local state (using the useState hook) with the Redux state (using the useSelctor hook). You'll also see that I adjusted the button. There is no click function anymore (we will get back to that later on).
🔎 How to Perform Testing with the React Redux Toolkit
Now that we have updated and created all the necessary files for the React Redux Toolkit logic, I would like to run a quick test of all the tests we previously created.
The result is that all tests have failed:

Keep in mind that I adjusted the button in List.js, for example, so the corresponding test was expected to fail. However, not all tests should have failed.
The test environments are working in their own world. They don't know if you wrap a provider somewhere in index.js and enable Redux logic. So the tests are still trying to make the rendering work without Redux. But our application now depends on Redux to manage our main state.
This means that we have to adjust the render() function so that this function is actually aligned with the Redux logic.
A method to make this work is to introduce a helper function, which we will store in a new folder called utils. The file will be called utils-for-tests.jsx. The content will look like this:
import React from "react";
import { render } from "@testing-library/react";
import { configureStore } from "@reduxjs/toolkit";
import { Provider } from "react-redux";
// As a basic setup, import your same slice reducers
import { ListSlice } from "../features/ListSlice";

export function renderWithProviders(
  ui,
  {
    preloadedState = {},
    // Automatically create a store instance if no store was passed in
    store = configureStore({
      reducer: { listReducers: ListSlice.reducer },
      preloadedState,
    }),
    ...renderOptions
  } = {}
) {
  function Wrapper({ children }) {
    return <Provider store={store}>{children}</Provider>;
  }

  // Return an object with the store and all of RTL's query functions
  return { store, ...render(ui, { wrapper: Wrapper, ...renderOptions }) };
}
This code information can be found in the Redux documentation. You can almost copy and paste it all for your application.
But you have to adjust the slices that are used in there. Since in our application there is only the ListSlice we don't have much to add. Just import that and update the content of the configureStore() function, like we managed it in our store.js file.
This step is necessary to basically mock the entire Redux logic and put it together into one new render() function.
With that, we can import this new function into our test files (App.test.js and myFirstTesting.test.js) and then replace all render() functions with renderWithProviders(). The App.test.js file, for example, now looks like this:
import { screen } from "@testing-library/react";
import App from "../App";
import { renderWithProviders } from "../utils/utils-for-tests";

test("renders learn react link", () => {
  renderWithProviders(<App />);
  const linkElement = screen.getByText(/learn react/i);
  expect(linkElement).toBeInTheDocument();
});
There is not much more to do! If we now run our tests again (and comment out this one test, which is going to fail regardless because the button logic is not active anymore), it will work again.
Slice testing
Another exciting part about testing with Redux is testing the slices. If you created your application with the React Redux Toolkit template, then you will be provided with some corresponding tests.
For our case, I also want to implement a new test file where we will specifically test ListSlice.js and its corresponding Redux logic.
For this slice, we have to import the slice and the corresponding reducers we want to test. To start, I will import the slice and test if it gets initialized with the initialState.
This is actually not the TDD approach since we already manually tested this part. Netherless, I would like to implement an automatic test as well:
import ListSlice, { initialState } from "../features/ListSlice";

describe("tests for ListSlice", () => {
  test("initialize slice with initialValue", () => {
    const listSliceInit = ListSlice(initialState, { type: "unknown" });
    expect(listSliceInit).toBe(initialState);
  });
});
Notice that I'm using .spec instead of .test. This doesn't matter. You can choose either. In this case, I'm going with .spec to remind you that this is also a viable option.
Also remember that we exported the initialState within our slice (see above). So we are able to import it here.
Other than that, we are already familiar with the describe() environment, which includes one test(). Within this test, I'm initializing a variable listSliceInit, which will hold the value we are receiving after the slice operation took place.
For this operation, we use ListSlice as a function and include the initial state as the first argument (in this case initialState). The second argument will be a reducer in most cases.
But in this case, we don't need to enter a reducer. Instead, we are using an object with type: "unknown". This is basically telling the function that we don't want to perform any additional operations.
Therefore, listSliceInit should now include our state value, which includes an array with one entry. The corresponding test will pass.
To force a failure, I'm entering expect(listSliceInit).toBe({ value: [] }); instead of the previous expect() function. So instead of our initialState we are expecting it to have an empty array. Now our test environment will tell us the following:
 failing test
So it actually tells us what exactly it expected – in this case, it expected the initialState.
Next, I would like to test a reducer. However, we haven't added one yet. So I will adjust ListSlice in the ListSlice.js file like this:
export const ListSlice = createSlice({
  name: "listReducers",
  initialState,
  reducers: {
    testAddReducer: (state, action) => {
      state.value.push(action.payload);
    },
  },
});
Thus, I added testAddReducer(), which is responsible for pushing one additional element to the current state value, which it receives via an input from the dispatch (through action.payload).
If we now jump back to the listSlice.spec.js file, I'm adding another unit test:
import ListSlice, { initialState, testAddReducer } from "../features/ListSlice";

describe("tests for ListSlice", () => {
  test("initialize slice with initialValue", () => {
    const listSliceInit = ListSlice(initialState, { type: "unknown" });
    expect(listSliceInit).toBe(initialState);
  });

  test("testAddReducer", () => {
    const testData = {
      id: `${new Date().getSeconds()}`,
      description: "This is for the test section",
      significance: 5,
    };

    const afterReducerOperation = ListSlice(
      initialState,
      testAddReducer(testData)
    );

    expect(afterReducerOperation).toStrictEqual({
      value: [initialState.value.at(0), testData],
    });
  });
});
I added the test for testAddReducer. You can see that I imported the reducer as well.
Firstly, I'm initializing a new variable, testData, which contains the data I would like to push to the current state.
After that, we follow the same structure as before with afterReducerOperation. But instead of this type: "unknown" stuff, we add the reducer as the second argument. This receives the testData as a parameter – basically like you would see it in a dispatch.
Then, we expect this afterReducerOperation variable to be strictly equal to the value of an array, which has two entries: initialState.value.at(0) (the first entry of our initialState) and testData. And this test will pass like we actually expected it.
If we are trying to enter some other entries or change the current ones, you would be able to see this test failing:
 forced error: I added a third entry to the array
How to make the button click function work again
Remember the button click within the List.js component (for adding something to the listData state) that wasn't working anymore after we changed to the Redux setup? Let's quickly update that to make that logic work within a Redux environment for the sake of completeness. Since we have the required reducer now, this will be an easy step.
To make the test work again, which added a new element to the state, we have to adjust it a little on the frontend to implement the Redux logic. (Previously we used the useState hook for a local state.)
For this step, we are making use of the dispatch() function in order to reach out to the testAddReducer:
import { useSelector, useDispatch } from "react-redux";
import { testAddReducer } from "../features/ListSlice";

const List = () => {
  const listState = useSelector((state) => state.listReducers.value);
  const dispatch = useDispatch();

  return (
    <div
      style={{ marginLeft: "auto", marginTop: "500px", marginBottom: "500px" }}
    >
      <h1>This is a list</h1>
      <ul style={{ listStyleType: "none" }}>
        {listState.map((listItem) => {
          return (
            <li key={listItem.id} data-testid="list-item">
              {listItem.description}
            </li>
          );
        })}
      </ul>
      <button
        onClick={() =>
          dispatch(
            testAddReducer({
              id: `${new Date().getSeconds()}1`,
              description: "This is added",
              significance: 5,
            })
          )
        }
      >
        This button can add a new entry to the list
      </button>
    </div>
  );
};

export default List;
Besides the button logic, nothing else has changed in this file.
In the corresponding test (within myFirstTesting.test.js nothing has changed), if we now test everything – including this updated test – we will see that everything works fine:
 final test run
And that's pretty much it for fundamental slice and general Redux unit testing!
🔭 Outlook for Advanced Testing
There are different topics like thunks (or RTK Query as an alternative) which could also be tested. But I'm considering this as an advanced topic, and it would take some more time to explain these processes.
If you are not aiming to be an expert in testing at this point, the topics we discussed for unit tests in Redux in this tutorial should be sufficient for you.
Generally speaking, I would recommend diving deeper into so-called mocks, spies, and also snapshots. These will be helpful if you are working on some other more advanced tests.
The stuff with renderWithProvider() is basically based on such a mock – there, we artificially created a store with reducers and a provider to create this new render() function. So mocks are especially helpful for any third-party libraries, for example.
As I said, though, mocks, spies, and snapshots are more of an advanced topic to wrap your head around.
📣 Further Learning Opportunities
I recently started to work on my first free Udemy course. While this first free course covers the basics of the React Redux Toolkit with German audio and manually added English subtitles, I'm also planning to publish other Udemy courses completely in English in the future.
I would really appreciate it if you would check out this cost-free course in order to provide me with some feedback.