

In this article, I will walk you through an example that will show you how web workers function in JavaScript with the help of WebSockets.
I think it's helpful to work with a practical use case because it is much simpler to understand the concepts when you can relate them to real life.
So in this guide, you will be learning what web workers are in JavaScript, you'll get a brief introduction to WebSockets, and you'll see how you can manage sockets in the proper way.
This article is quite application/hands-on oriented, so I would suggest trying the example out as you go along to get a much better understanding.
Let’s dive in.
Table of contents
- Prerequisites
- What are web workers in JavaScript?
- Brief introduction to web sockets
- Use case description
- Project structure
- Client and Server architecture
- Worker System
- Communication between the UI and the socket via web worker
- Summary
Prerequisites
Before you start reading this article, you should have a basic understanding of the following topics:
- Class Diagrams: We are going to use them to showcase our example. Here are a couple resources you can use to learn more about them:
- Context Diagram and Container Diagrams
- React
- Web sockets
- Difference between scope and context
- Global objects
What are web workers in JavaScript?
A web worker is a piece of browser functionality. It is the real OS threads that can be spawned in the background of your current page so that it can perform complex and resource-intensive tasks.
Imagine that you have some large data to fetch from the server, or some complex rendering needs to be done on the UI. If you do this directly on your webpage then the page might get jankier and will impact the UI.
To mitigate this, you can simply create a thread – that is a web worker – and let the web worker take care of the complex stuff.
You can communicate with the web worker in a pretty simple manner which can be used to transfer data to and fro from the worker to the UI.
Common examples of web workers would be:
- Dashboard pages that display real-time data such as stock prices, real-time active users, and so on
- Fetching huge files from the server
- Autosave functionality
You can create a web worker using the following syntax:
const worker = new Worker("<worker_file>.js");
Worker is an API interface that lets you create a thread in the background. We need to pass a parameter, that is a <worker_file>.js file. This specifies the worker file the API needs to execute.
NOTE: A thread is created once a Worker call is initiated. This thread only communicates with its creator, that is the file which created this thread.
A worker can be shared or used by multiple consumers/scripts. These are called shared workers. The syntax of the shared worker is very similar to that of the above mentioned workers.
const worker = new SharedWorker("<worker_file>.js");
You can read more about SharedWorkers in this guide.
History of web workers
Web workers execute in a different context, that is they do not execute in a global scope such as window context. Web workers have their own dedicated worker context which is called DedicatedWorkerGlobalScope.
There are some cases where you can't use web workers, though. For example, you can't use them to manipulate the DOM or the properties of the window object. This is because the worker does not have the access to the window object.
Web workers can also spawn new web workers. Web workers communicate with their creator using certain methods like postMessage, onmessage, and onerror. We will look into these methods closely in the later sections of this article.
Brief Introduction to Web Sockets
A web socket is a type of communication that happens between two parties/entities using a WebSocket protocol. It actually provides a way to communicate between the two connected entities in a persistent manner.
You can create a simple web socket like below:
const socket = new WebSocket("ws://example.com");
Over here we have created a simple socket connection. You'll notice that we have passed a parameter to the WebSocket constructor. This parameter is a URL at which the connection should be established.
You can read more about web sockets by referring to the Websockets link in the prerequisites.
Use Case Description
NOTE: Context, Container, and Class diagrams drawn in this blog post don't accurately follow the exact conventions of these diagrams. They're approximated here so that you can understand the basic concepts.
Before we start, I would suggest reading up on c4models, container diagrams, and context diagrams. You can find resources about them in the prerequisites section.
In this article, we are going to consider the following use case: data transfer using web workers via socket protocol.
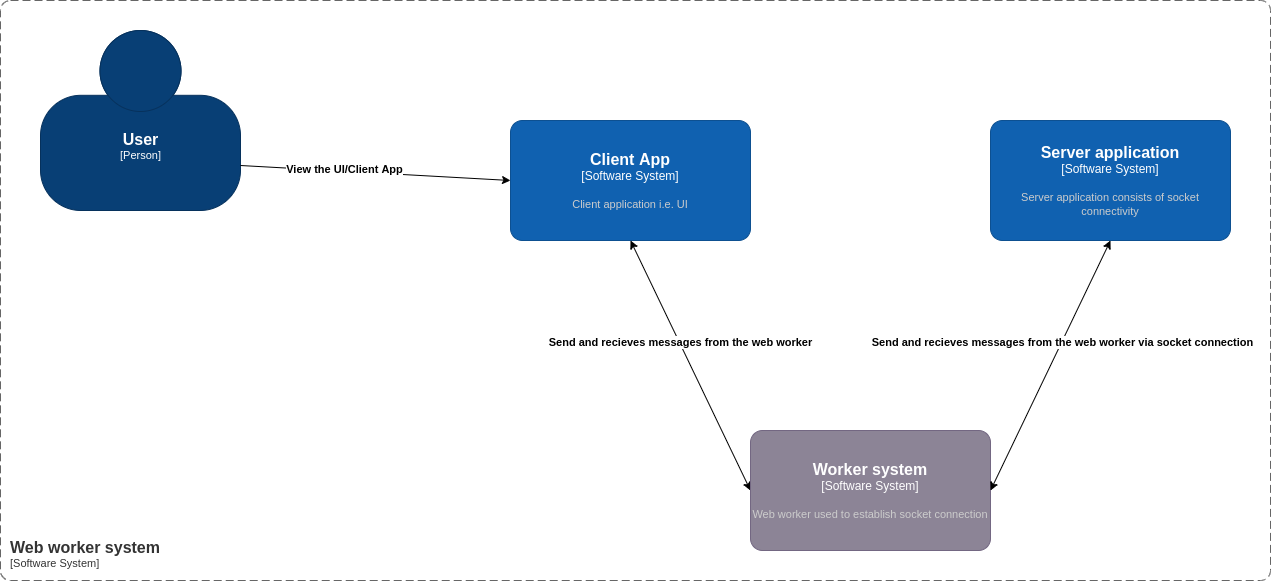
We are going to build a web application which will plot the data on a line chart every 1.5 seconds. The web application will receive the data from the socket connection via web workers. Below is the context diagram of our use case:
 Container Diagram
As you can see from the above diagram, there are 4 main components to our use case:
- Person: A user who is going to use our application
- Software system: Client App – This is the UI of our application. It consists of DOM elements and a web worker.
- Software system: Worker system – This is a worker file that resides in the client app. It is responsible for creating a worker thread and establishing the socket connection.
- Software system: Server application – This is a simple JavaScript file which can be executed by
nodeto create a socket server. It consists of code which helps to read messages from the socket connection.
Now that we understand the use case, let's dive deep into each of these modules and see how the whole application works.
Project Structure
Please follow this link to get the full code for the project that I developed for this article.
Our project is divided into two folders. First is the server folder which consists of server code. The second is the client folder, which consists of the client UI, that is a React application and the web worker code.
Following is the directory structure:
├── client
│   ├── package.json
│   ├── package-lock.json
│   ├── public
│   │   ├── favicon.ico
│   │   ├── index.html
│   │   ├── logo192.png
│   │   ├── logo512.png
│   │   ├── manifest.json
│   │   └── robots.txt
│   ├── README.md
│   ├── src
│   │   ├── App.css
│   │   ├── App.jsx
│   │   ├── components
│   │   │   ├── LineChartSocket.jsx
│   │   │   └── Logger.jsx
│   │   ├── index.css
│   │   ├── index.js
│   │   ├── pages
│   │   │   └── Homepage.jsx
│   │   ├── wdyr.js
│   │   └── workers
│   │       └── main.worker.js
│   └── yarn.lock
└── server
    ├── package.json
    ├── package-lock.json
    └── server.mjs
To run the application, you first need to start the socket server. Execute the following commands one at a time to start the socket server (assuming you are in the parent directory):
cd server
node server.mjs
Then start the client app by running the following commands (assuming you are in the parent directory):
cd client
yarn run start
Open http://localhost:3000 to start the web app.
Client and Server Application
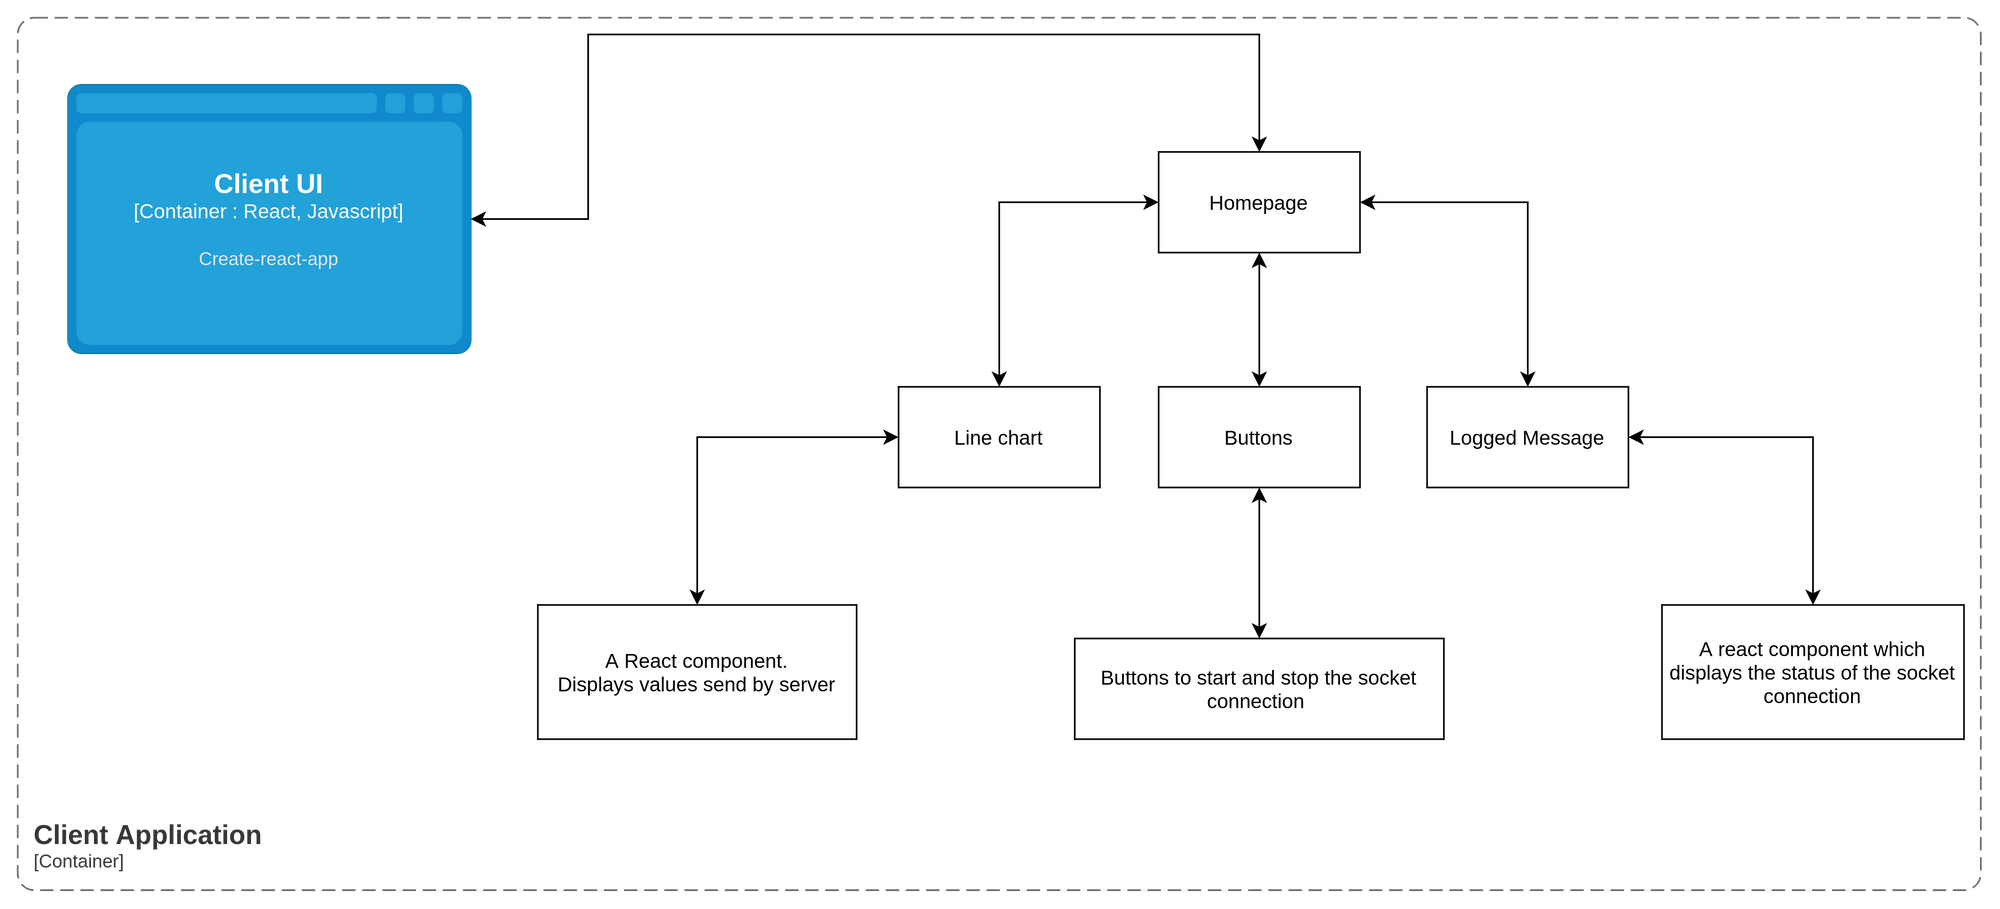
The client application is a simple React application, that is CRA app, which consists of a Homepage. This home page consists of the following elements:
- Two buttons:
start connectionandstop connectionwhich will help to start and stop the socket connection as required. - A line chart component - This component will plot the data that we receive from the socket at regular intervals.
- Logged message - This is a simple React component that will display the connection status of our web sockets.
Below is the container diagram of our client application.
 Container Diagram: Client Application
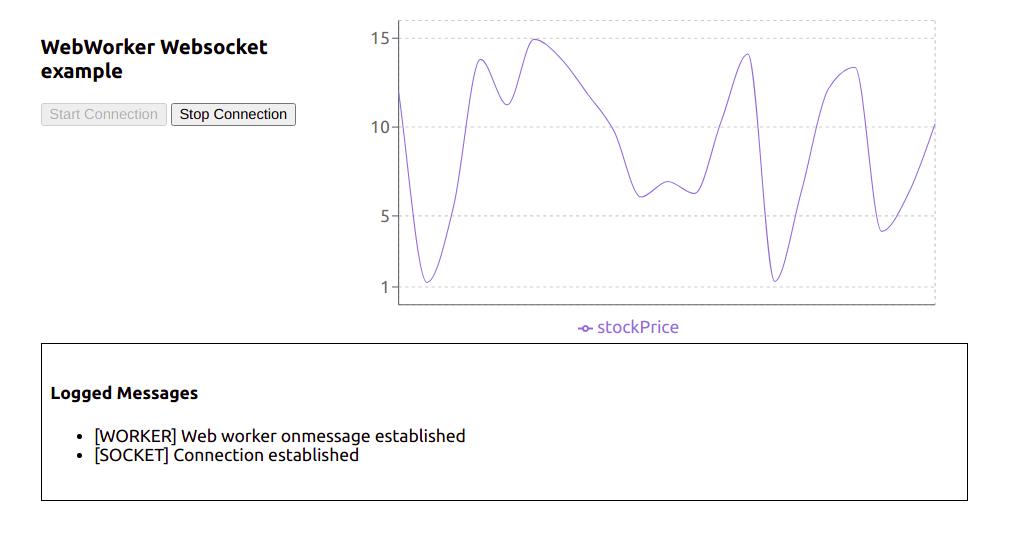
Below is how the UI will look:
 Actual UI
To check out the code for the client UI, go to the client folder. This is a regular create-react-app, except that I have removed some boilerplate code that we don't need for this project.
App.jsx is actually the starter code. If you check this out, we have called the <Homepage /> component in it.
Now let's have a look at the Homepage component.
const Homepage = () => {
const [worker, setWorker] = useState(null);
const [res, setRes] = useState([]);
const [log, setLog] = useState([]);
const [buttonState, setButtonState] = useState(false);
const hanldeStartConnection = () => {
// Send the message to the worker [postMessage]
worker.postMessage({
connectionStatus: "init",
});
};
const handleStopConnection = () => {
worker.postMessage({
connectionStatus: "stop",
});
};
//UseEffect1
useEffect(() => {
const myWorker = new Worker(
new URL("../workers/main.worker.js", import.meta.url)
); //NEW SYNTAX
setWorker(myWorker);
return () => {
myWorker.terminate();
};
}, []);
//UseEffect2
useEffect(() => {
if (worker) {
worker.onmessage = function (e) {
if (typeof e.data === "string") {
if(e.data.includes("[")){
setLog((preLogs) => [...preLogs, e.data]);
} else {
setRes((prevRes) => [...prevRes, { stockPrice: e.data }]);
}
}
if (typeof e.data === "object") {
setButtonState(e.data.disableStartButton);
}
};
}
}, [worker]);
return (
<>
<div className="stats">
<div className="control-panel">
<h3>WebWorker Websocket example</h3>
<button
id="start-connection"
onClick={hanldeStartConnection}
disabled={!worker || buttonState}
>
Start Connection
</button>
<button
id="stop-connection"
onClick={handleStopConnection}
disabled={!buttonState}
>
Stop Connection
</button>
</div>
<LineChartComponent data={res} />
</div>
<Logger logs={log}/>
</>
);
};
As you can see, it's just a regular functional component that renders two buttons – a line chart, and a custom component Logger.
Now that we know how our homepage component looks, let's dive into how the web worker thread is actually created. In the above component you can see there are two useEffect hooks used.
The first one is used for creating a new worker thread. It's a simple call to the Worker constructor with a new operator as we have seen in the previous section of this article.
But there are some difference over here: we have passed an URL object to the worker constructor rather than passing the path of the worker file in the string.
const myWorker = new Worker(new URL("../workers/main.worker.js", import.meta.url));
You can read more about this syntax here.
If you try to import this web worker like below, then our create-react-app won’t be able to load/bundle it properly so you will get an error since it has not found the worker file during bundling:
const myWorker = new Worker("../workers/main.worker.js");
Next, we also don’t want our application to run the worker thread even after the refresh, or don’t want to spawn multiple threads when we refresh the page. To mitigate this, we'll return a callback in the same useEffect. We use this callback to perform cleanups when the component unmounts. In this case, we are terminating the worker thread.
We use the useEffect2 to handle the messages received from the worker.
Web workers have a build-in property called onmessage which helps receive any messages sent by the worker thread. The onmessage is an event handler of the worker interface. It gets triggered whenever a message event is triggered. This message event is generally triggered whenever the postMessage handler is executed (we will look more into this in a later section).
So in order for us to send a message to the worker thread, we have created two handlers. The first is handleStartConnection and the second is handleStopConnection. Both of them use the postMessage method of the worker interface to send the message to the worker thread.
We will talk about the message {connectionStatus: init} in our next section.
You can read more about the internal workings of the onmessage and postMessage in the following resources:
Since we now have a basic understanding about how our client code is working, then let's move on to learn about the Worker System in our context diagram above.
Worker System
To understand the code in this section, make sure you go through the file src/workers/main.worker.js.
To help you understand what's going on here, we will divide this code into three parts:
- A
self.onmessagesection - How the socket connection is managed using the
socketManagement()function - Why we need the
socketInstancevariable at the top
How self.onmessage works
Whenever you create a web worker application, you generally write a worker file which handles all the complex scenarios that you want the worker to perform. This all happens in the main.worker.js file. This file is our worker file.
In the above section, we saw that we established a new worker thread in the useEffect. Once we created the thread, we also attached the two handlers to the respective start and stop connection buttons.
The start connection button will execute the postMessage method with message: {connectionStatus: init} . This triggers the message event, and since the message event is triggered, all the message events are captured by the onmessage property.
In our main.worker.js file, we have attached a handler to this onmessage property:
self.onmessage = function (e) {
  const workerData = e.data;
  postMessage("[WORKER] Web worker onmessage established");
  switch (workerData.connectionStatus) {
    case "init":
      socketInstance = createSocketInstance();
      socketManagement();
      break;

    case "stop":
      socketInstance.close();
      break;

    default:
      socketManagement();
  }
}
So whenever any message event is triggered in the client, it will get captured in this event handler.
The message {connectionStatus: init} that we send from the client is received in the event e. Based on the value of connectionStatus we use the switch case to handle the logic.
NOTE: We have added this switch case because we need to isolate some part of the code which we do not want to execute all the time (we will look into this in a later section).
How the socket connection is managed using the socketManagement() function
There are some reasons why I have shifted the logic of creating and managing a socket connection into a separate function. Here is the code for a better understanding of the point I am trying to make:
function socketManagement() {
  if (socketInstance) {
    socketInstance.onopen = function (e) {
      console.log("[open] Connection established");
      postMessage("[SOCKET] Connection established");
      socketInstance.send(JSON.stringify({ socketStatus: true }));
      postMessage({ disableStartButton: true });
    };

    socketInstance.onmessage = function (event) {
      console.log(`[message] Data received from server: ${event.data}`);
      postMessage( event.data);
    };

    socketInstance.onclose = function (event) {
      if (event.wasClean) {
        console.log(`[close] Connection closed cleanly, code=${event.code}`);
        postMessage(`[SOCKET] Connection closed cleanly, code=${event.code}`);
      } else {
        // e.g. server process killed or network down
        // event.code is usually 1006 in this case
        console.log('[close] Connection died');
        postMessage('[SOCKET] Connection died');
      }
      postMessage({ disableStartButton: false });
    };

    socketInstance.onerror = function (error) {
      console.log(`[error] ${error.message}`);
      postMessage(`[SOCKET] ${error.message}`);
      socketInstance.close();
    };
  }
}
This is a function that will help you manage your socket connection:
- For receiving the message from the socket server we have the
onmessageproperty which is assigned an event handler. - Whenever a socket connection is opened, you can perform certain operations. To do that we have the
onopenproperty which is assigned to an event handler. - And if any error occurs or when we are closing the connection then, we use
onerrorandoncloseproperties of the socket.
For creating a socket connection there is a separate function altogether:
function createSocketInstance() {
  let socket = new WebSocket("ws://localhost:8080");

  return socket;
}
Now all of these functions are called in a switch case like below in the main.worker.js file:
self.onmessage = function (e) {
  const workerData = e.data;
  postMessage("[WORKER] Web worker onmessage established");
  switch (workerData.connectionStatus) {
    case "init":
      socketInstance = createSocketInstance();
      socketManagement();
      break;

    case "stop":
      socketInstance.close();
      break;

    default:
      socketManagement();
  }
}
So based on what message the client UI sends to the worker the appropriate function will be executed. It is pretty self-explanatory on what message which particular function should be triggered, based on the above code.
Now consider a scenario where we placed all the code inside self.onmessage.
self.onmessage = function(e){
    console.log("Worker object present ", e);
    postMessage({isLoading: true, data: null});

    let socket = new WebSocket("ws://localhost:8080");

        socket.onopen = function(e) {
          console.log("[open] Connection established");
          console.log("Sending to server");
          socket.send("My name is John");
        };

        socket.onmessage = function(event) {
          console.log(`[message] Data received from server: ${event.data}`);
        };

        socket.onclose = function(event) {
          if (event.wasClean) {
            console.log(`[close] Connection closed cleanly, code=${event.code} reason=${event.reason}`);
          } else {
            // e.g. server process killed or network down
            // event.code is usually 1006 in this case
            console.log('[close] Connection died');
          }
        };

            socket.onerror = function(error) {
              console.log(`[error] ${error.message}`);
            };
}
This would cause the following problems:
- On every
postMessagecall made by the client UI, there would have been a new socket instance. - It would have been difficult to close the socket connection.
Because of these reasons, all the socket management code is written in a function socketManagement and catered using a switch case.
Why we need the socketInstance variable at the top
We do need a socketInstance variable at the top because this will store the socket instance which was previously created. It is a safe practice since no one can access this variable externally as main.worker.js is a separate module altogether.
Communication between the UI and the socket via web worker
Now that we understand which part of the code is responsible for which section, we will take a look at how we establish a socket connection via webworkers. We'll also see how we respond via socket server to display a line chart on the UI.
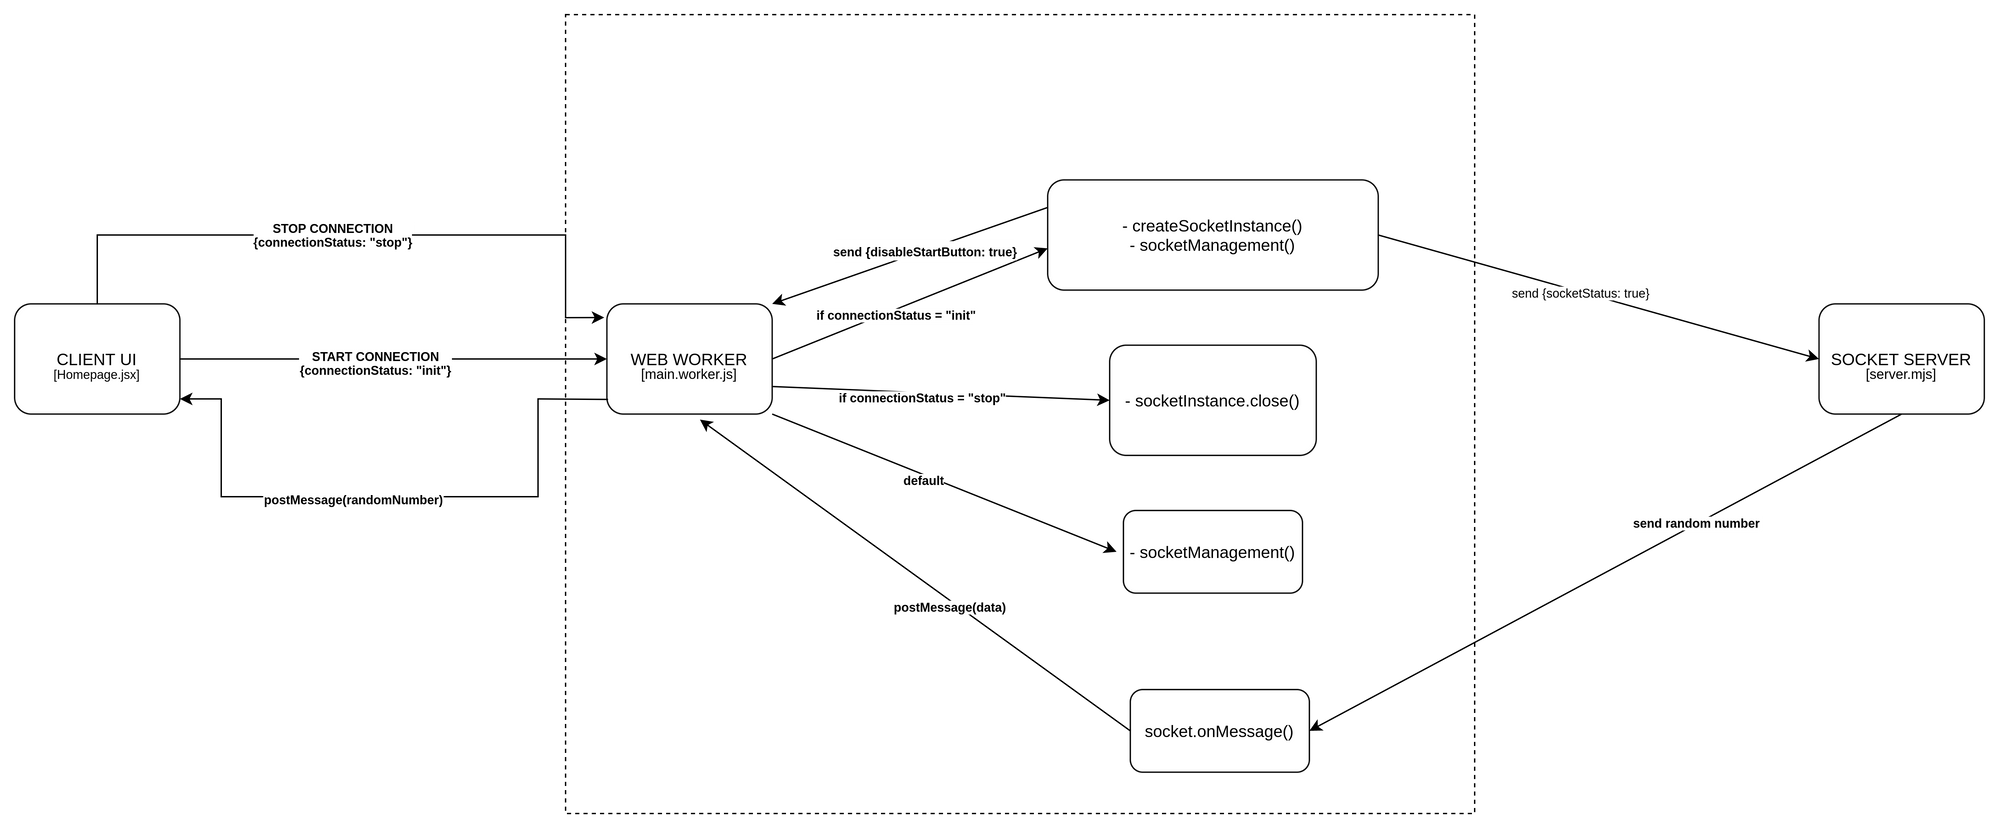 End-to-end flow of the application
NOTE: Some calls are purposefully not shown in the diagram since it will make the diagram cluttered. Make sure you refer to the code as well while referring to this diagram.
Now let's first understand what happens when you click on the start connection button on the UI:
- One thing to notice over here is that our web worker thread is created once the component is mounted, and is removed/terminated when the component is unmounted.
- Once the
start connectionbutton is clicked, apostMessagecall is made with{connectionStatus: init} - The web worker’s
onmessageevent handler which is listening to all the message events comes to know that it has received connectionStatus as init. It matches the case, that is in the switch case ofmain.worker.js. It then calls thecreateSocketInstance()which returns a new socket connection at the URL:ws://localhost:8080 - After this a
socketManagement()function is called which checks if the socket is created and then executes a couple of operations. - In this flow, since the socket connection is just established therefore, socketInstance’s
onpenevent handler is executed. - This will send a
{socketStatus: true}message to the socket server. This will also send a message back to the client UI viapostMessage({ disableStartButton: true})which tells the client UI to disable the start button. - Whenever the socket connection is established, then the server socket’s
on('connection', ()=>{})is invoked. So in step 3, this function is invoked at the server end. - Socket’s
on('message', () => {})is invoked whenever a message is sent to the socket. So at step 6, this function is invoked at the server end. This will check if thesocketStatusis true, and then it will start sending a random integer every 1.5 seconds to the client UI via web workers.
Now that we understood how the connection is established, let's move on to understand how the socket server sends the data to the client UI:
- As discussed above, socket server received the message to send the data, that is a random number every 1.5 second.
- This data is recieved on the web worker’s end using the
onmessagehandler. - This handler then calls the
postMessagefunction and sends this data to the UI. - After receiving the data it appends it to an array as a
stockPriceobject. - This acts as a data source for our line chart component and gets updated every 1.5 seconds.
Now that we understand how the connection is established, let's move on to understand how the socket server sends the data to the client UI:
- As discussed above, socket server recieved the message to send the data, that is a random number, every 1.5 seconds.
- This data is recieved on the web worker’s end using the socket's
onmessagehandler. - This handler then calls the
postMessagefunction of the web worker and sends this data to the UI. - After receiving the data via
useEffect2it appends it to an array as astockPriceobject. - This acts as a data source for our line chart component and gets updated every 1.5 seconds.
NOTE: We are using recharts for plotting the line chart. You can find more information about it at the official docs.
Here is how our application will look in action:
 Working Example
Summary
So this was a quick introduction to what web workers are and how you can use them to solve complex problems and create better UIs. You can use web workers in your projects to handle complex UI scenarios.
If you want to optimize your workers, read up on the below libraries:
Thank you for reading!