
By Jean-Paul Delimat
Before you can launch a new service, you need infrastructure. You want reliability, scalability, and many other -ilities. But you don’t want to break the bank.
I’ve gone through the process of launching several new services over the past few years. Each time, I’ve explored the field of options.
The goal of this article is to help you focus on the value that your solution provides to your users, while minimizing the time and money spent geeking out on infrastructure.
We’ll use turn-key hosting services for everything, and the goal is for the bill to be under $200/month.
Note that I have no affiliation — nor hold any stake — in any of the products or services I recommend in this article. I just like what they do.
Let’s get started. Here’s what do you’ll need:
- A high availability API
- A web application (unless your service is purely an API, or is only consumed in a mobile application, chatbot, etc.)
- File storage
- Two environments: one for testing and demoing, and one for production
- Tools to monitor your production platform
- The ability to dynamically scale your production servers
Production VS Staging
You’ll need two environments: a production one, which your customers will actually use, and a “staging” one, which your team will use for testing and potentially demoing beta features to customers.
Staging should require minimal setup to run your applications. You shouldn’t need to worry about load testing for this.
Your production environment will have all its services load-balanced, with at least two instances of everything for reliability’s sake. In a moment we’ll get to some basic — yet comprehensive — tools that can help you achieve 24/7 monitoring.
Back End Hosting
I recommend you host your back-end API on Heroku. It works with most languages. You can view the full list of supported languages here. Note that although ASP.NET is not yet officially supported, there are open source build packs that make this possible.
While some developers may argue that raw AWS EC2 instances are cheaper than Heroku dynos, this is only true when you look at the server’s cost. Since Heroku is much faster to set up and integrates more easily with extra services, you’ll save hours of developer work, should more than make up for the price difference.
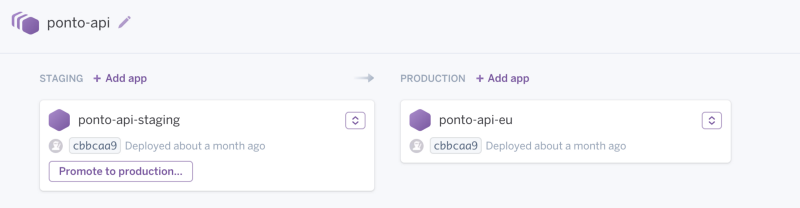
Let’s start by creating a Heroku pipeline for your API with two steps: staging and production. You’ll deploy by pushing your code to the staging application. Then, once you’ve tested it, you’ll “promote” a version of staging to production. This process will help prevent faulty deployments from reaching your production servers — and ultimately your customers.
Your pipeline will look as below (read more details here):
I recommend you start with:
- 1 hobby dyno at $7/month for staging
- 2 standard-1X dynos for production at $25/month each
Cost: $57/month
Database Hosting
If you’re using PostgreSQL, just use Heroku’s service for this. It will be more consistent network-wise, and you’ll get one line of billing instead of two.
For the more generic case, use Compose. The lowest resource plans are more than OK for the early stage. Scale the resources “slider style” upon need.
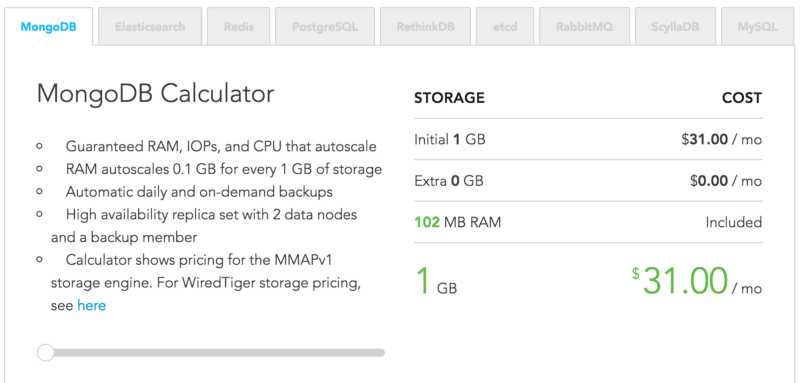
Compose covers the must have: node failover, daily backups, SSL encryption, and a basic monitoring panel.
You could run the staging and production databases on one “deployment” in Compose. But to keep your production data isolated and safe from corruption from untested code, you should use two separate databases.
For the costs, we take the MongoDB as benchmark for $31/month per deployment (PostgreSQL would be $27/month).
Cost: $62/month
A quick note on using mlab for MongoDB hosting: We started out with mlab, too. We had a fancy dedicated replica set of 2 nodes with 1.7 GB of RAM and 40 GB SSD. All for the price of $260/month ($180 for the cluster itself and $80 just to turn on SSL).
The service was good — especially their monitoring component, telemetry.
But after a few months run and a few thousand users, all graphs still showed less than 10% consumption. The cluster was overkill, and would be for some time. So we moved to Compose and scaled gradually there to reduce costs.
Front End Hosting
I recommend using Netlify. It’s quite straight-forward:
- connect with your BitBucket/GitHub/GitLab account
- select the repository and branch to deploy
- set your build command, and the build folder you want to serve
Pushing to the right Git branch will trigger your build on Netlify’s servers, then automatically deploy it to their CDN. You can read more about how all this works here.
There are two more steps:
- point your DNS to your Netlify URL using a CNAME record
- enable SSL on the Netlify panel. It will provision and auto-deploy a Let’s Encrypt TLS certificate within minutes.
Then create projects as follows:
- one for the staging app on a non-master git branch
- one for the production app for your master git branch
Use the free plan for the staging platform and the $9/month plan for the production platform. You will quickly scale to the $49/month plan to bring in your team. But this is not needed at start. When you reach millions of users worldwide you can upgrade again to use the Geo-IP CDN.
Cost: $9/month
File Hosting
For file hosting, I recommend AWS S3 (Simple Storage Service). Create two buckets — one for staging and one for production.
The content is distributed via the AWS CDN, and data can be stored and retrieved securely. There are more details here on how to set up buckets securely.
The first 5GB (now even 15GB I think) are free. Then the cost is at $0.03 per GB (at least for their EU/Ireland location). So early on, you may not even have to pay anything.
Cost: $0/month
On a side note, I recommend you send data to AWS S3 directly from your web app to lighten the load on your API. There are plenty of articles on the web for how to do this securely.
Domain and SSL
Get a domain name, which for most top-level domains will cost less than $50/year.
Then you can generate certificates for all your endpoints using Let’s Encrypt. It provides CA enabled SSL certificates — which are trusted by major browsers — for free.
Cost: $50/year
Monitoring Tools
Monitoring your production platform is key. You need to know when errors occur so you can quickly fix them. Users will not make the effort to report small problems, but their impression of your service will nevertheless be degraded.
Comprehensive monitoring requires:
- API rotating logs with proactive error line detection
- active reporting of client- and server-side exceptions and errors
- uptime monitoring
- performance metrics on your API and database, so you know when to scale
- a central place to report all the errors so you can act quickly
Slack
You can use Slack to aggregate all the error reports in a single communication hub. Slack is built for teams, but if you’re working alone on your project, these tools will be your team.
Create an account on Slack and a channel called #prod-errors. You’ll configure all your other services to report errors on Slack.
Once you install each services’ Slack app and enable its notifications for desktop and mobile, you’ll be good to go.
This is the startup version of 24/7 on-call monitoring.
Logging
I recommend Papertrail for log management. It provides:
- a simple web based console for logs from all your API dynos
- daily backup of your logs in a separate storage location
- alert configuration, to ping you when necessary
This is how it looks:
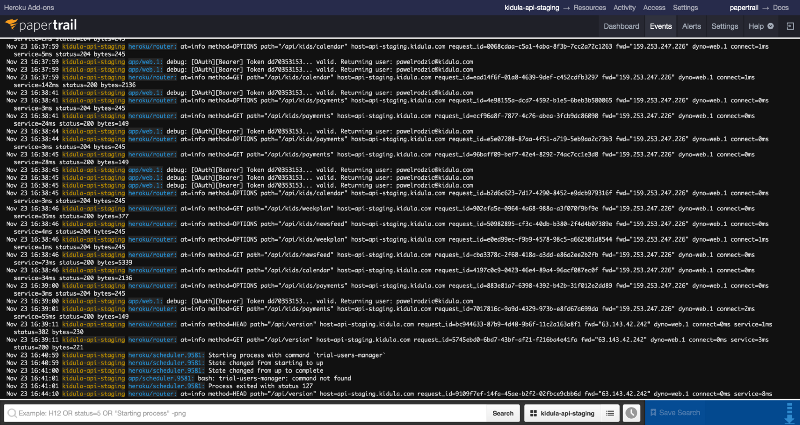
Not so sexy at first glance, but in the end the UX is close to a real server console, so it does the trick.
Add Papertrail as an add-on for your Heroku staging and production apps. Use the free plan for the staging platform. Use the $7/month “Fixa” plan for the production platform to get the 50MB/day of logs and history for 1 year.
Configure a Papertrail alert to push errors lines to your Slack #prod-errors channel.
Be careful. The logs are pushed from your dynos to add-ons via a component called logplex. If you have an algorithm that produces thousands of lines in a few milliseconds, logplex will drop them.
Cost: $7/month
Alternatives: You can plug other tools in one click on Heroku. See the full list here.
You can add and remove logging add-ons without restarting your app, so it’s pretty safe to play around. You can even test several solutions in parallel and compare them.
In my opinion other logging systems are overkill at the start. Logentries provides advanced analytics, but only on the $89/month plan. Sumologic is also a great tool, but for it’s only necessary when you have millions of users. Then it will be able to detect changes in log flows and application behavior.
Sentry
Your API, web app, and mobile applications should report errors and exceptions to Sentry. Integration is turn-key. It just involves copy-pasting a few lines into your project in any technology out there.
Setup Sentry to also push errors to your Slack #prod-errors channel.
Sentry’s free plan is OK, as it allows 5,000 events per day. So unless you have a bug in a mobile app distributed to thousands of users, it should hold. Use the first paid plan at $29/month if your team is at least two people, so all of your team members have access to the portal.
Cost: $29/month
Uptimerobot
This is a health check to know whether your service is up.
To set it up:
- configure one endpoint for your API (and add some authentication free endpoint like /version if needed)
- configure one endpoint for your web app in its index.html file
Set up Uptimerobot to push downtime alerts to your Slack #prod-errors channel.
Use the free plan (there’s only a free plan at this point).
Cost: $0/month
Librato
Heroku provides decent metrics for your API, but it’s limited to three days of history. Librato has longer history and a more comprehensive dashboard.
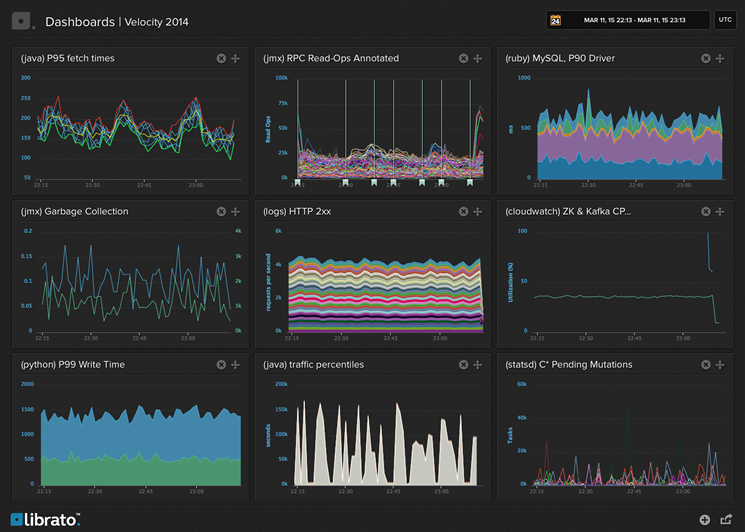
Configure Librato as an add-on for your Heroku apps:
- Use the free plan for the staging app
- Use the $19/month “Nickel” plan for the production app, so you’ll get up to four weeks depth on the graphs
The pricing of Librato with Heroku is different than on the Librato website.
This is enough to get an overview of your API performance. Scale your resources as your throughput and response time increase, to reduce the impact on your user experience.
Cost: $19/month
Time to pay the bill
Let’s sum up all the costs I’ve identified so far:
- $57/month for the backend on Heroku
- $62/month for the databases on Compose
- $9/month for the web apps on Netlify
- $50/year for the domain name (split to ~$4/month)
- $55/month for the monitoring Papertrail/Sentry/Librato
Total: $187 / month
We’ve achieved our goal of being under $200/month. We still have an extra $13/month to spare. Let’s see if we can setup our software engineering stack for this cost.
We could use:
- Bitbucket for Git repositories. It’s less trendy than GitHub, but offers free private repositories
- JIRA can serve as an agile planner and bug tracker for $10/month
- CodeShip has a free plan to automate your API build
- Google Apps only costs $4/month per account. Use one account and aliases for things like office@…, support@…, career@…. These addresses look good, but reach the very same person at the earliest stage of a startup.
I could go on and on, but we should stop here since we’ve exceed the $200 monthly budget by $1 already.
Conclusion
If you’re a developer and want to launch a SaaS startup or hobby, I hope this article has shown that the infrastructure part is not so difficult if you use the right tools.
Even if you aim to become the next big thing, you can still economize during your early stage drive to get your product out there.
Focus on the value you bring to users. Not on infrastructure.
The solutions provided in this article scale to tens of thousands of users. Set it up right at start, and you’ll be on track for supporting explosive user growth once you achieve traction. I wish you luck in reaching that point as soon as possible.
Please share this to whoever would be interested. If you like what you read, hit that ❤ button below.