

HTML vs JSX
Hypertext Markup Language (HTML) is the standard language for documents that determine the structure of a web page.
HTML is a very important language in web development. Your code is either in HTML originally or compiles to it so browsers can read it.
JSX, on the other hand, means JavaScript Syntax Extension or JavaScript XML as some like to put it.
It was created as a syntactic sugar for React.createElement(). It is an extension of JavaScript that allows developers to write HTML right within JavaScript. So when you're writing JSX, technically you're writing JavaScript and HTML together.
Also, that means JavaScript's reserved keywords must be kept intact. And that is why the “for” attribute in HTML is “HTMLFor” in JSX, since "for" is one of the commonest JavaScript reserved keywords.
In terms of support by browsers, HTML is supported by all of them. JSX, on the other hand, was never really intended to be, so you need a compiler like Babel or Webpack to transpile JSX into the JavaScript that browsers understand.
The Main Differences Between HTML and JSX
You need to return a single parent element in JSX
One of the major differences between HTML and JSX is that in JSX, you must return a single parent element, or it won't compile.
A lot of devs use <div>...</div>, but a better one that many people use is “fragment”, <>...</> which makes the code more readable.
In HTML, you are free to do whatever you want as you don’t have to return a single parent element.
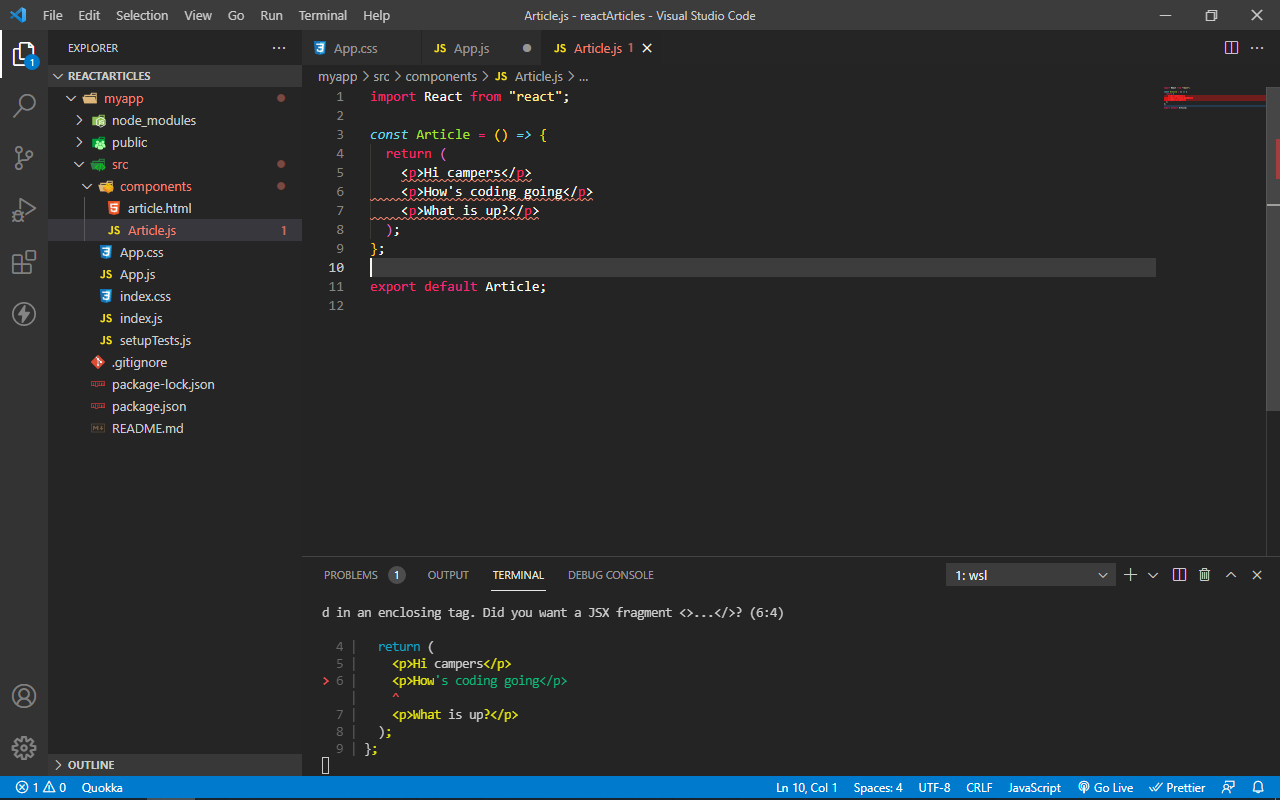 Here you can see that JSX is not compiling because there's no parent element.
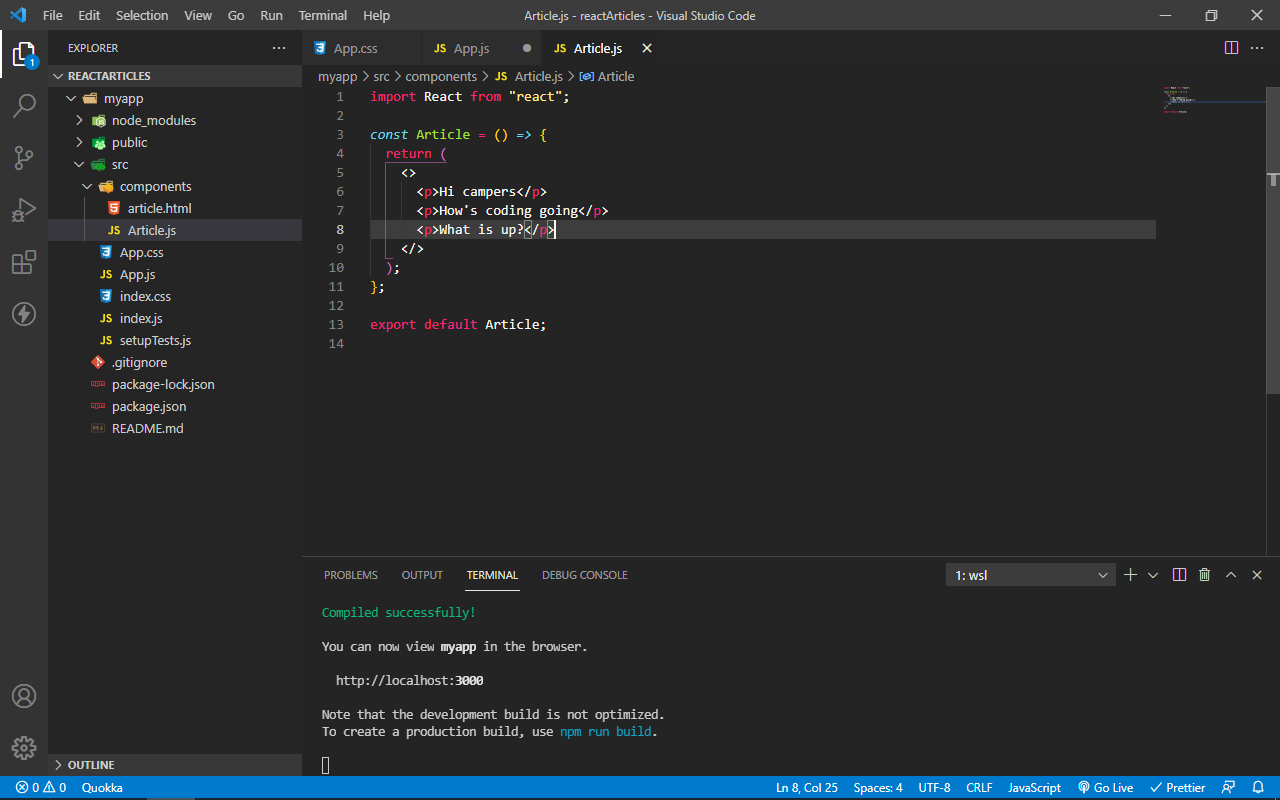 And here JSX is compiling because there is a parent element (fragment).
You can implement JS directly in JSX
In JSX, it is possible to write JavaScript directly. You can do this by putting the JavaScript in curly braces {...}. Whereas in HTML, you need a script tag or an external JavaScript file to implement JavaScript:
const Article = () => {
  return (
    <>
      <div>
        <p>Hi campers</p>
        <p>How's coding going</p>
        <p>What is up?</p>
        {new Date().toDateString()}
        <br />
        <br />
        {2 + 5} is seven in word
        <br />
      </div>
    </>
  );
};
export default Article;
All Tags Self-close in JSX
Tags can self-close in JSX. That is, it is possible to have <div></div> as <div /> and <span></span> as <span />. You don't want to do that, but its possible.
Self-closing tags in HTML can self-close without the slash before the right angle bracket, that is <br /> could work as <br>. But in JSX, you need to include the slash. This should bring something to mind – JSX heavily relies on HTML 4 syntax.
 Here you can see that JSX is not compiling because there's no forward slash before the right angle bracket of the line break tag.
 And here you can see that JSX is compiling because there is a forward slash in the line break tag.
###ClassName and HTMLFor, not class and for in JSX
To define class names and for attributes in JSX, you don't do it as class or for, since both are reserved keywords in JavaScript.
You actually create class components with the class keyword. So, to define class names in JSX, you do it as "className" and for attributes for labels you write "HTMLFor":
const Article = () => {
  return (
    <>
      <div className="container">
        <p>Hi campers</p>
        <p>How's coding going</p>
        <p>What is up?</p>
        {new Date().toDateString()}
        <br />
        <br />
        {2 + 5} is seven in word
        <br />
        <form>
          <label htmlFor="name">Name</label>
          <input type="text" />
        </form>
      </div>
    </>
  );
};

export default Article;
Write all HTML Attributes in camelCase in JSX
You need to write all HTML attributes and event references in camelCase while writing JSX. So, onclick becomes onClick, onmouseover becomes onMouseOver, and so on:
const Article = () => {
  const sayHI = () => {
    alert("Hi Campers");
  };

  return (
    <>
      <div className="container">
        <p>Hi campers</p>
        <p>How's coding going</p>
        <p>What is up?</p>
        {new Date().toDateString()}
        <br />
        <br />
        {2 + 5} is seven in word
        <br />
        <button onClick={sayHI}>ALert Hi</button>
      </div>
    </>
  );
};
export default Article;
Write Inline Styles as Objects in JSX
And lastly, to define inline styles for JSX, you write it as an object, with the properties in camelCase, the values in quotes, and then you pass it inline to the JSX.
This means you have to open up a style attribute and use curly braces instead of quotes. This is opposed to HTML where you're free to define millions of styles right inside the opening tag without writing them as objects and putting them in quotes:
const Article = () => {
  const inlineStyle = {
    color: "#2ecc71",
    fontSize: "26px",
  };
  return (
    <>
      <div className="container">
        <p style={inlineStyle}>Hi campers</p>
        <p>How's coding going</p>
        <p>What is up?</p>
        {new Date().toDateString()}
        <br />
        <br />
        {2 + 5} is seven in word
        <br />
        <button onClick={sayHI}>ALert Hi</button>
      </div>
    </>
  );
};
export default Article;
You can choose to write the object directly in the style attribute – that is, by opening up two curly braces and putting the properties and values inside.
But a cleaner way is to define the object outside of the JSX, and then pass it into the opening tag.
const Article = () => {
  return (
    <>
      <div className="container">
        <p style={{ color: "#2ecc71", fontSize: "26px" }}>Hi campers</p>
        <p>How's coding going</p>
        <p>What is up?</p>
        {new Date().toDateString()}
        <br />
        <br />
        {2 + 5} is seven in word
        <br />
      </div>
    </>
  );
};

export default Article;
Note that you should not use inline styling in plain HTML – you don't want to ruin your website's SEO.
That's it!
Thank you for reading. To connect with me, checkout my portfolio, or follow me on Twitter, where I spend most of my time tweeting and engaging in anything web development.