By Stacy Goh
I’ve been using GitHub for more than two years now. A few days ago, I was wondering why there were no push notifications for GitHub. I already receive email notifications when someone creates a pull request/issue on my repositories, but there are no notifications for stars/forks.
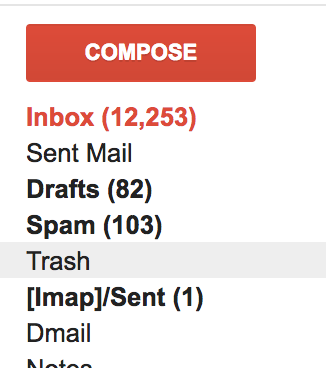
Also, email notifications keep piling on top of the 12,253 emails already in my inbox. This is just not cool >.<
Being a developer, I decided to take things into my own hands. I decided to build a Chrome extension that pushes real-time notifications whenever someone interacts with one or more of my GitHub repositories. It’s on the Google Chrome store as GitHub Notifier. You can also find out more about it here.

You’ll see one of the above notifications whenever someone does any of the following:
- Creates an issue or comments on an issue
- Creates a pull request
- Forks your repository
- Stars your repository
- Pushes code to your repository
How I built it
Initially, I thought it would be really simple to build. I thought I could get it up in one day since I had experience building Chrome apps.
But as always, the devil is in the details. Here are the tools, frameworks, and whatever else I used to get it up and running:
- GitHub Apps
- Express and NodeJS
- Firebase
- Google Cloud Messaging
- Chrome extension
GitHub Apps
To send notifications to a user in real time, we need to use a webhook to ping them whenever there is any user interaction. The payload will contain information, such as the person who interacted with your repository, the action taken (was it a star or a fork), and the name of the repository.
To do that, register for a GitHub App. It will allow you to choose what webhook events your GitHub App will detect.
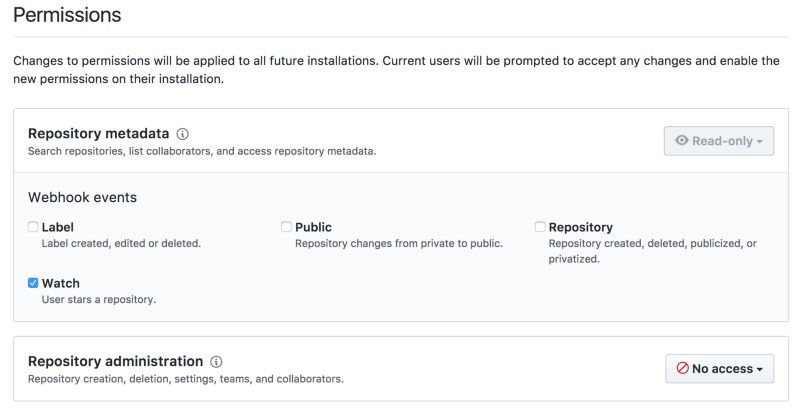
Fill in your webhook URL, which I will cover later.
Further reading: GitHub Apps
Express and NodeJS
After defining the events the webhook triggers, you need a server to receive and process the payload. Since standalone Chrome extensions cannot launch a server, we will need to create a separate project for this.
Create a POST endpoint in your Express and NodeJS project, which will handle the webhook.
app.post(‘/watch’, function(req, res, next) {
.....
});
For webhooks, I love to use [ngrok](https://ngrok.com/) — a free tool (with a cap of 30 users), which creates a publicly accessible URL to configure the webhook service.
Once you have ngrok installed, you can use it to tunnel to an application running on, say, port 3000. It is as easy as typing
ngrok http 3000
ngrok then generates a url in both http and https . You can use these to fill in your webhook url in GitHub Apps temporarily until you host them.
Further reading: ngrok
The Chrome extension
Next, create a separate project for your Chrome extension. A Chrome extension by itself is easy to build. First, create a manifest.json file that contains properties like the extension's name, description, version number, and so on.
We will also need a popup.html file, which shows a popup when someone downloads and clicks on your Chrome extension. The popup prompts users to fill in their GitHub username, as shown below:
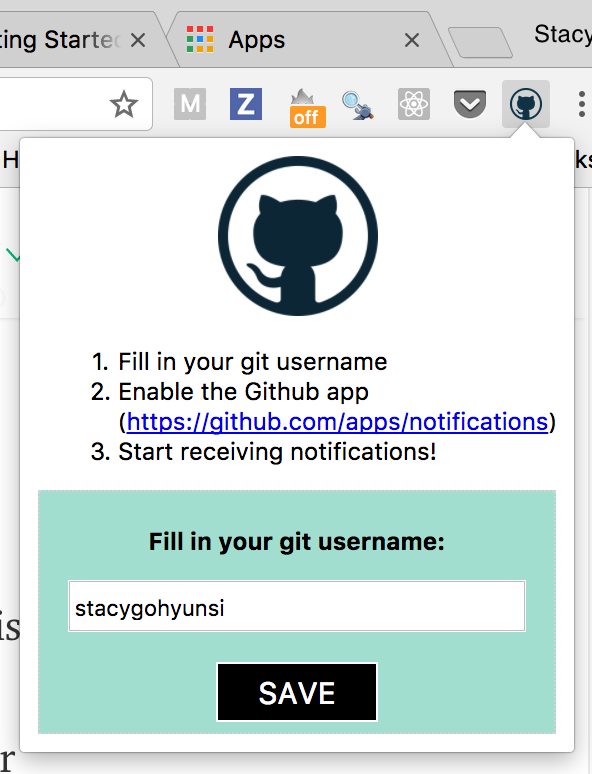
After you save your GitHub username, connect your GitHub username to a computer that will receive the notifications.
We do that with both Google Cloud Messaging and Firebase.
Further reading: Getting Started: Building a Chrome Extension
Google Cloud Messaging and Firebase
Google Cloud Messaging (GCM) is a mobile notification service that enables developers to send messages between servers and client apps.
Firebase is a real-time, cloud-hosted database developed by Google. I chose Firebase for this case because it’s easy and quick to setup.
In your Chrome extension, create a popup.js file. This will make use of both GCM and Firebase. After you save your username in the popup, use GCM to generate a registrationID to identify your browser. Think of registrationID as an ID to differentiate your computer from other users.
The registrationID and the GitHub username will be saved as an entry in Firebase.
Further reading: Firebase and Google Cloud Messaging
How does it all work?
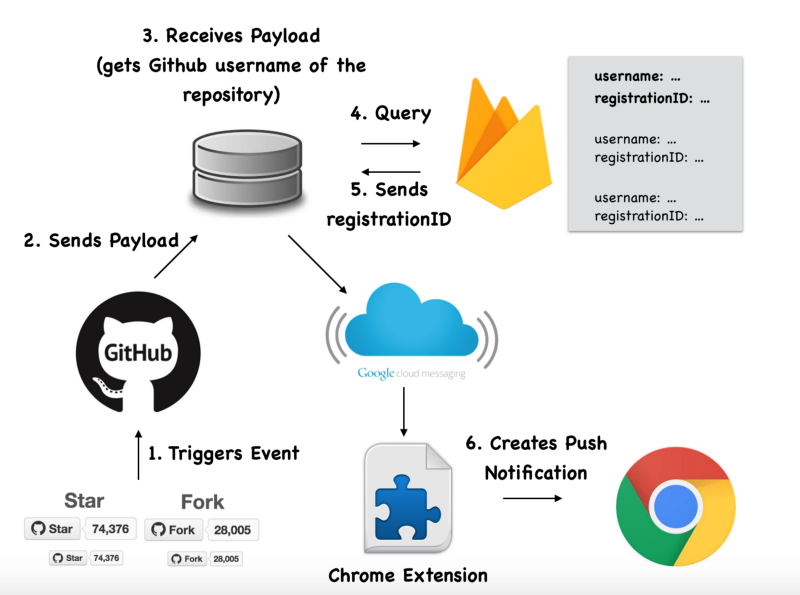
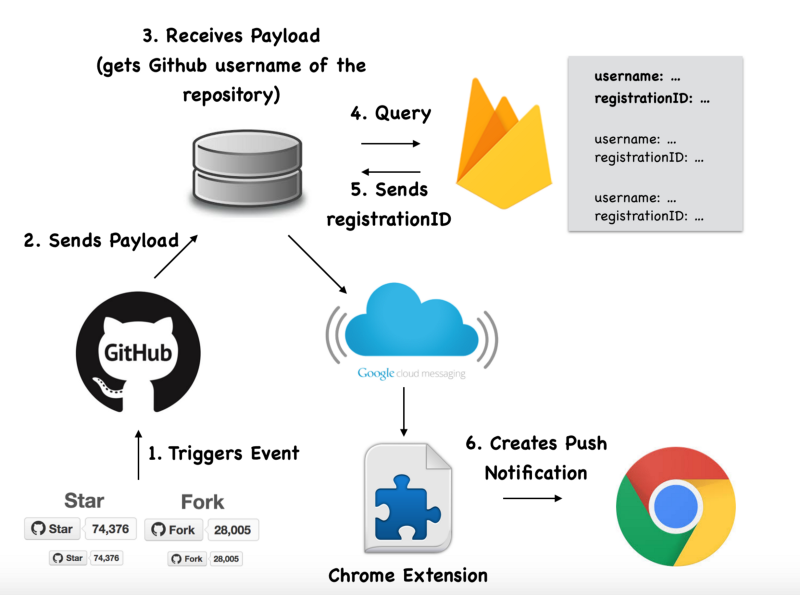
To summarize the illustration above, whenever someone interacts with the GitHub repository, the following happens:
- A payload will be sent from GitHub Apps to your Express and NodeJS server.
- The server receives the payload and extracts the GitHub username from the payload.
- Query Firebase for the associated registrationID from the GitHub username.
- Google Cloud Messaging is used to send a message from the server to the Chrome extension based on the registrationID.
- Once the Chrome extension receives the message from Google Cloud Messaging, it creates a Chrome notification and pushes it to the user.
And ta-dah! You have received a real-time Chrome notification from GitHub!
I hope I didn’t lose you there. Once again, install GitHub Notifier if you are as excited about receiving real-time GitHub push notifications as I am. Drop me a message if you need further clarification.
If you have any suggestions for improvements or know of a simpler way to build a GitHub Chrome Notifier, message me at hello@imstacy.com and let’s discuss.
Or if you enjoyed my article, follow me at github.com/stacygohyunsi or message me at imstacy.com.
