
By Karthikeya Viswanath
TL;DR
- Setup GraphQL engine — Install Hasura GraphQL engine and expose tables over a GraphQL API
- Authentication and Securing your GraphQL Server
- Migrations
In this post, we’ll use the Hasura GraphQL Engine to get instant GraphQL APIs on my existing Laravel app running locally.
For the purpose of this project, we’ll be using a sample Laravel ToDo app built using Laravel 5.1, and modifying the code to integrate HGE. (Please note though, that Laravel 5.1 has already reached End of Life in June 2018, and you should migrate to a newer version if you’re still using this.)
You can find the initial sample app here, the final repository here, and a live app for you to test out here.
This is what the our planned architecture will look like:
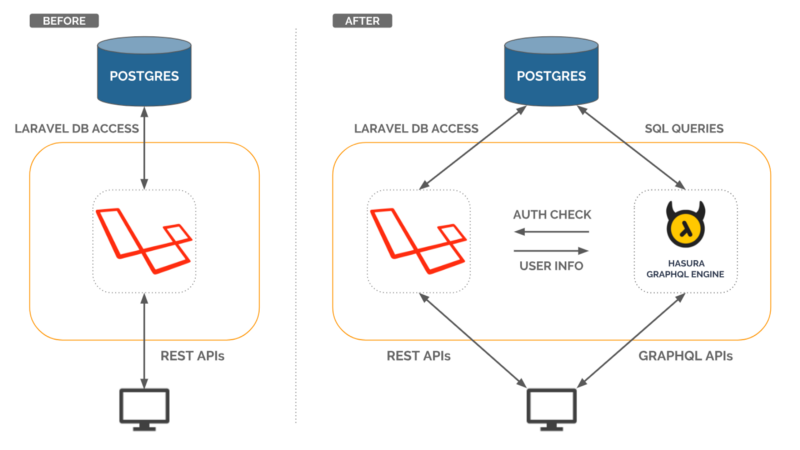 Architecture before and after integration with HGE
Setup GraphQL Engine
Hasura GraphQL engine (HGE) gives you an instant realtime GraphQL API on top of your existing Postgres. HGE works out of the box with your existing:
- Postgres database — Connects with your existing database and provides a GraphQL API to your database.
- Authentication system — Connects with your existing authentication system to secure GraphQL API.
- Migration system — Hasura GraphQL Engine doesn’t interfere with the existing Laravel migration system. Schemas can be managed separately in Laravel as long as it doesn’t alter the schema tracked by the GraphQL Engine. More info on how Hasura GraphQL engine manages your schema state here.
Also it comes with a nifty console, with GraphiQL integrated, which is useful while debugging GraphQL APIs.
Installation
Hasura GraphQL engine can be installed on Heroku using the button below
![]() Click this button to deploy the GraphQL engine to Heroku
Click this button to deploy the GraphQL engine to Heroku
or on any machine which can run Docker. Checkout the getting-started section for more info.
For the sake of this tutorial, we’ve set up a HGE instance for our Laravel app here (use the access-key helloworld , we’ll explain how it works below).
Installation using Docker
Before installing the Hasura GraphQL Engine, you’ll need a postgres connection string. You can get this from your config/database.php file, or your .env file, wherever your storage credentials are kept.
Putting the details together:
postgres://username:SECUREPASSWORD@host:port/database_name
Follow the instructions here.
Once Hasura GraphQL engine starts, visiting http://localhost:8080 opens the Hasura Console. The console provides a GraphiQL instance to easily test all your GraphQL queries, mutations, and so on.
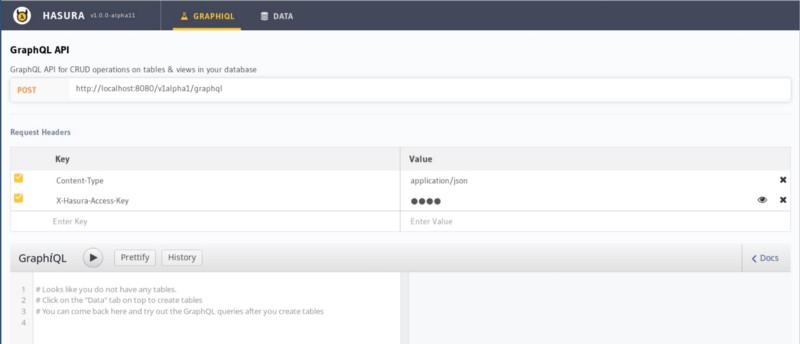 Hasura GraphQL Engine Console
Now go to the Data tab, and track all the tables to create instant GraphQL APIs!
Authentication
By default, HGE is installed in development mode. All the tables/views which are tracked by HGE can be viewed/updated without any checks. This is is not recommended for a production environment. Hasura lets you define granular access controls for every field in your GraphQL schema, that’s every table or view in your Postgres schema. These access control rules can use dynamic variables that come in with every request. Check out the docs for more information.
HGE can be secured from direct access by configuring a webhook URL which will be called to validate every request unless the request contains a valid access-key.
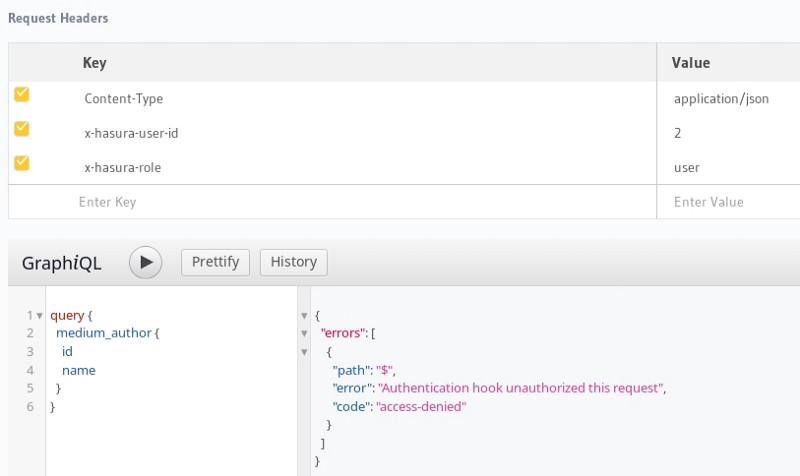
Let’s first make a simple request for users:
And running it in GraphiQL:
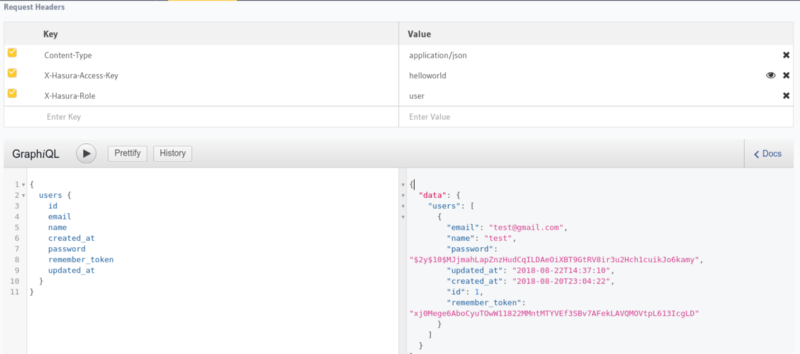
Note that x-hasura-user-id is set to “2” and x-hasura-role is set to “user”. These are the auth headers which will need to be set by the auth-hook in the production mode. (GraphQL engine started with access-key and auth-hook).
Secure GraphQL API
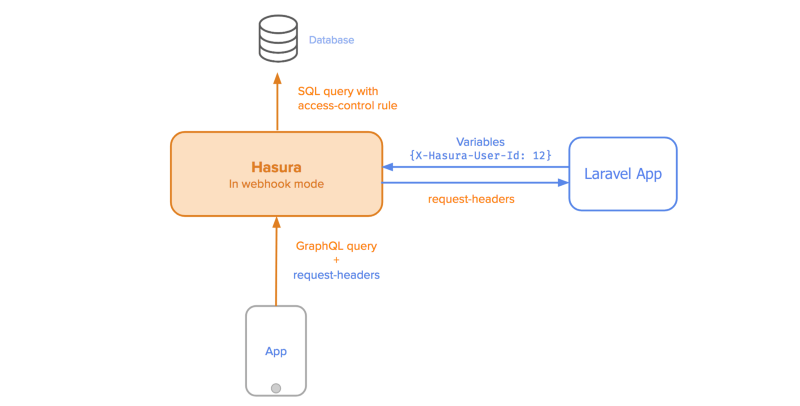 Webhook architecture
The first step is to secure HGE with anaccess-key and configure auth-hook with the a webhook, which in this case will be served by the Laravel app. This webhook will be invoked by the GraphQL engine, with the headers attached to the request. The webhook will return appropriate x-hasura-role and x-hasura-user-id , which it can obtain from authenticating the user with the Authorization header that’s passed on from the request.
Here, the auth-hook host will be your IP address on the docker bridge network if you’re using docker, or your webhook URL otherwise. You can ignore the postgres section if you’re using an external Postgres database.
To set up the access-key / auth-hook flags on your Heroku instance of HGE, follow these instructions. We’ll assume that the webhook is at /hge-webhook for now, we will be setting it up on Laravel later.
Let’s try to make the query again and see what the response is.
This is because we haven’t configured the webhook yet, or even set the correct Authorization headers.
Setting up the Laravel webhook
Let’s set up our sample app on Heroku, so that we can easily deploy it and test out our changes.
For the purposes of this tutorial, we’ve deployed a sample app with the webhook here. The corresponding HGE instance can be accessed here. (Access key: helloworld )
You can register on this sample app, and add/remove todos on the app.
Let’s add a webhook now to authenticate requests sent to our HGE instance. We’ll do this using a middleware, so let’s generate a middleware class first.
php artisan make:middleware webhookMiddleware
Let’s first add the route to our app/Http/routes.php file:
Now we’ll register our middleware by adding it to the app/Http/Kernel.php file under routeMiddleware:
Now let’s set up the actual webhook at app/Http/Middleware/webhookMiddleware.php :
This page simply uses the Authorization bearer token to start a session, and then uses Laravel’s Auth to check and get the user id. You can modify this to add your custom session/token logic, and verify authentication.
If authenticated, we return the x-hasura-role and x-hasura-user-id variables as JSON. This will authenticate the request to HGE.
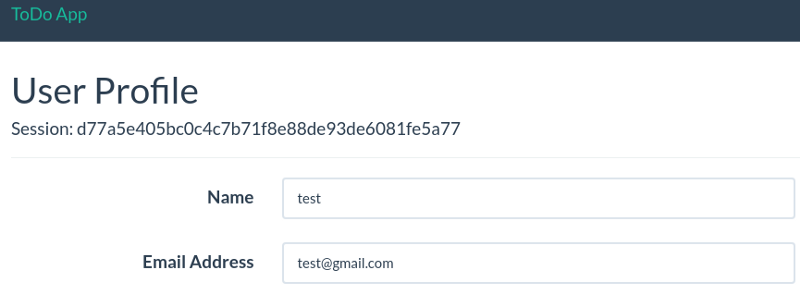
Now, we need an easy way to get the session token of a logged in user, so let’s add this to our resources/views/users/profile.blade.php :
Now, login in and head to the User Profile to see your new session token:
Let’s commit and deploy this to Heroku:
git commit -am "Add HGE webhook"
git push heroku master
Once it’s pushed, let’s head over to the HGE Console to test our new webhook!
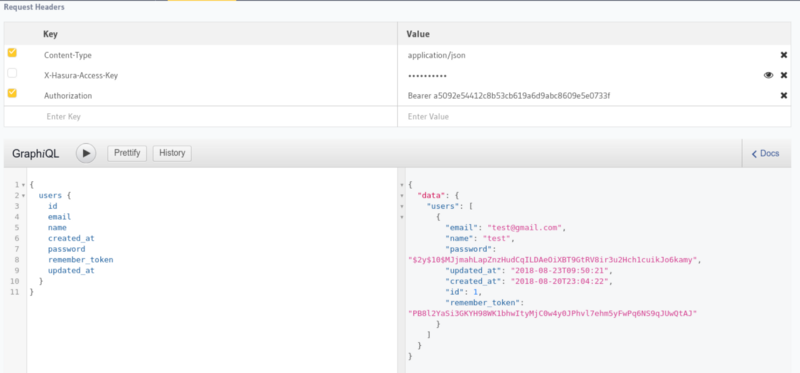 Authorization using Bearer token
The webhook returns the corresponding x-hasura-user-id and x-hasura-role, and GraphQL engine responds with appropriate results as configured in the access rules.
Migration System
HGE comes with a powerful Rails-inspired migration system, and changes made in the HGE console automatically generate schema files in your folder when run as hasura console (you can install the Hasura CLI for this).
For the purposes of this blog, though, we’ll let Laravel handle our migrations, and just export the HGE metadata so that it can track the schema and permissions separately.
You can check out the HGE docs for more detailed instructions.
Once you have everything set up as described in the above link, you can just add the folder created to your version control repository for the Laravel code.
To export metadata, run the following command in the folder created by the hasura init command in the migration instructions:
hasura metadata export
Since we’re letting Laravel handle the migrations, avoid making schema changes through the Hasura console, so that the Laravel migrations remain your source of truth on the schema.
That’s it! We now have a secure HGE endpoint working neatly with Laravel’s internal auth. Go forth and write code!
Hasura gives you instant realtime GraphQL APIs over any Postgres database without having to write any backend code.