
By Manu Arora
If you have an e-commerce application, a payment gateway lets you process payments on your website on the fly.
With all the modern payment gateway solutions available these days, there are many ways you can integrate payments and charge your users for your product or services.
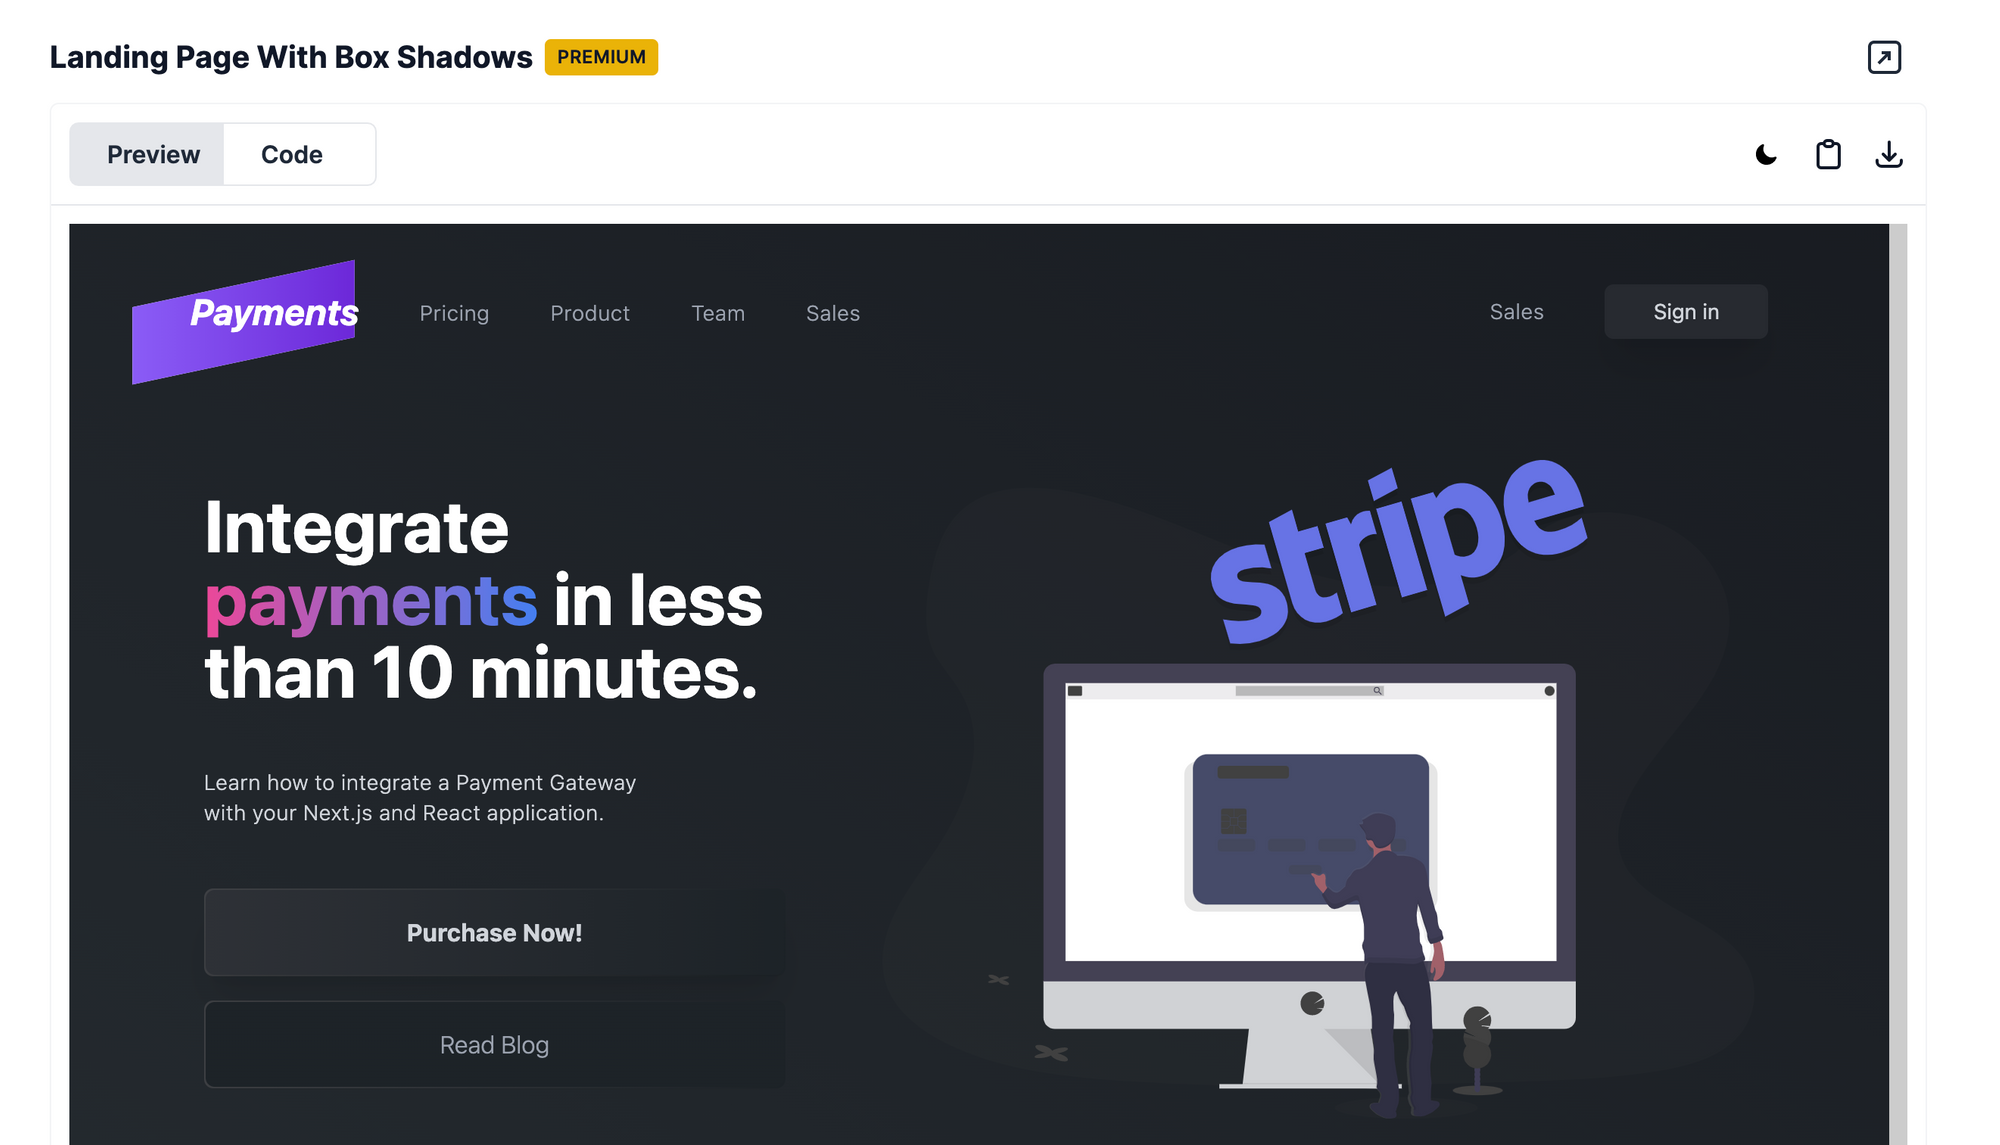
In this tutorial, we are going to build a landing page that lets the end user purchase products from a web application. The page looks like this:

Live Demo: Integrate Payments Source Code: Integrate Payments Source Code
Some of the popular payment gateways that are available are:
Today, we are going to learn how to integrate Razorpay with a Next.js (React) application and understand how the flow actually works.
Tech Stack
For our Stack, we are going to use the following technologies:
- Next.js - A framework for React that gives access to serverless functions and React architecture.
- TailwindCSS - A utility-based CSS framework for easy styling
- Razorpay - A payment gateway system that lets users access payments.
- Vercel - For hosting our Next.js application (if not already hosted)
- Tailwind Master Kit - For easily accessible Tailwind Components
Project Setup
If you already have a project, then you can directly skip to the integration part of the article. If not, let's get started by creating a Git repository and hosting our project on Vercel.
How to Set Up a Next.js Repository and Website
First, head over to Vercel and create a hobby account for yourself. (If you're going to use it for a commercial project, make sure you buy their plan. Hobby accounts are just for testing and creating playgrounds.)
Once the account is created, click on New Project

Then, select Next.js from the available options and create a Git Repository on the platform itself.

Your site will be deployed within seconds and you will get a URL for the live website.
How to Set Up TailwindCSS
Now since the website is setup, you can directly go to GitHub, clone the repository, to run it in your local environment. For that, follow these simple steps:
- Go to GitHub and find your newly created repository
- Click on the
codesection and copy the repository URL. - Open your terminal on the desktop and write
git clone <repo_name>. This will clone the repository in your local environment so that you can start working. - Once the repository is cloned/copied in your local environment, open the project in your favourite code editor (VSCode is the best in my opinion).
- In the terminal, open the location of the application and write
npm install. This will install all the related node modules. - You can start the local development server by writing
npm run dev.
Now the project is up and running in your local environment. To access your website locally, open localhost:3000 in your browser and you will be able to see the boilerplate website already there for you.
Setting up tailwind is very simple. Their documentation makes it even simpler. Check out their docs for reference and more on TailwindCSS as a framework.
To setup Tailwind on your local environment, follow the below steps:
npm install -D tailwindcss postcss autoprefixer- This will install TailwindCSS along with other important dependencies for compiling and running your Tailwind code.npx tailwindcss init -p- This will initialize atailwind.config.jsfile that is just an object which can be manipulated according to the user's needs.- In the
tailwind.config.jsfile, paste the below code which basically tells Tailwind to compile the code present in the/pagesand/componentsdirectories.
module.exports = {
  content: [
    "./pages/**/*.{js,ts,jsx,tsx}",
    "./components/**/*.{js,ts,jsx,tsx}",
  ],
  theme: {
    extend: {},
  },
  plugins: [],
}
- Open the
globals.cssfile present in the/stylesdirectory and paste the following code. These code snippets import all the Tailwind related setup code:@tailwind base; @tailwind components; @tailwind utilities; - Restart your website by quitting the terminal and writing
npm run devon the terminal. Now you're ready to harness the power of TailwindCSS.
Now that Tailwind and our website are setup, let's jump right into developing the page and integrating payments.
Landing Page Development
The landing page that we are going to use is directly taken from the Tailwind Master Kit that lets you access components built with TailwindCSS.
Let's break down the code and understand it better.
Navbar.js
import React from "react";
export const Navbar = () => {
  return (
    <div className="flex flex-row items-center  justify-between px-20 py-10">
      <div className="flex flex-row items-center">
        <h1 className="font-bold italic text-2xl text-white mr-10">Payments</h1>
        <ul className="flex flex-row space-x-10">
          <li>
            <a
              href="#"
              className="text-gray-400 text-sm tracking-wide font-light"
            >
              Pricing
            </a>
          </li>
          <li>
            <a
              href="#"
              className="text-gray-400 text-sm tracking-wide font-light"
            >
              Product
            </a>
          </li>
          <li>
            <a
              href="#"
              className="text-gray-400 text-sm tracking-wide font-light"
            >
              Team
            </a>
          </li>
          <li>
            <a
              href="#"
              className="text-gray-400 text-sm tracking-wide font-light"
            >
              Sales
            </a>
          </li>
        </ul>
      </div>
      <div className="flex flex-row space-x-10 items-center">
        <a href="#" className="text-gray-400 text-sm tracking-wide font-light">
          Sales
        </a>
        <button className="bg-[#272A30] text-gray-300 px-8 text-sm py-2 rounded-md shadow-xl drop-shadow-2xl">
          Sign in
        </button>
      </div>
    </div>
  );
};
Building the Navbar is simple. It's a Flexbox container with links and unordered list items aligned in a row.
The button, however, is interesting. It used the new TailwindCSS drop shadow class which drops a background shadow. (We can also use colored shadows in TailwindCSS 3.0+ versions - pretty cool.)
Hero.js
const Hero = ({ onClick }) => {
  return (
    <div className="relative z-10 flex flex-col md:flex-row mt-10 items-center  max-w-6xl justify-evenly mx-auto">
      <div className="md:w-1/3 mb-20 md:mb-0 mx-10">
        <h1 className=" text-white font-bold text-5xl mb-10">
          Integrate{" "}
          <span className="bg-clip-text text-transparent bg-gradient-to-r from-pink-500 to-violet-500">
            payments
          </span>{" "}
          in less than 10 minutes.
        </h1>
        <p className="text-sm text-gray-300 font-light tracking-wide w-[300px] mb-10">
          Learn how to integrate a Payment Gateway with your Next.js and React
          application.
        </p>
        <div className="bg-gradient-to-r from-[#3e4044] to-[#1D2328] p-[1px] rounded-md mb-4">
          <button
            onClick={onClick}
            className="bg-gradient-to-r from-[#2E3137] to-[#1D2328] rounded-md w-full py-4 shadow-xl drop-shadow-2xl text-gray-300 font-bold"
          >
            Purchase Now!
          </button>
        </div>
        <div className="bg-gradient-to-r from-[#3e4044] to-[#1D2328] p-[1px] rounded-md">
          <button className="bg-gradient-to-r from-[#1D2328] to-[#1D2328] rounded-md w-full py-4 shadow-sm drop-shadow-sm text-gray-400 font-light">
            Read Blog
          </button>
        </div>
      </div>
      {/* <div className="w-2/3 bg-white flex-shrink-0  relative"> */}
      <img
        className="w-full md:w-[36rem] h-full"
        alt="stripe payment from undraw"
        src="/payments.svg"
      />
      {/* </div> */}
    </div>
  );
};
The hero section contains our Purchase Now button which will initialise the payments for us (we'll look at the implementation in the next section).
The layout contains two sections: the Left section contains all the text and the Right Section contains a large image (taken from Undraw, a free and open source illustrations website).
The onClick action on the button is important since it is responsible for triggering the action that will initialise the payments. The onClick is nothing but a callback that calls the function which is passed down as a prop to the component.
That's pretty much it for the UI part. Let's jump into the payments section and understand how to setup a developer account on Razorpay and use their SDK to make payments on our website.
How to Set Up a Razorpay Account and Retrieve API Keys

For integrating payments (that is, receiving payments on our website), we need to have two things:
- A Razorpay account
- A set of API Keys that lets us access their services.
Let's create an account and retrieve the API keys.
- Head over to Razorpay and sign up for an account
- After signing up you can access the Dashboard where you will find all the necessary details that are required for integrating payments.

- For now, we will be in Test mode so that we can test our payments before we actually go live.
- In the left panel, scroll down to
Settings- There you will find the API keys section along with the configurations you can make to your payments UI.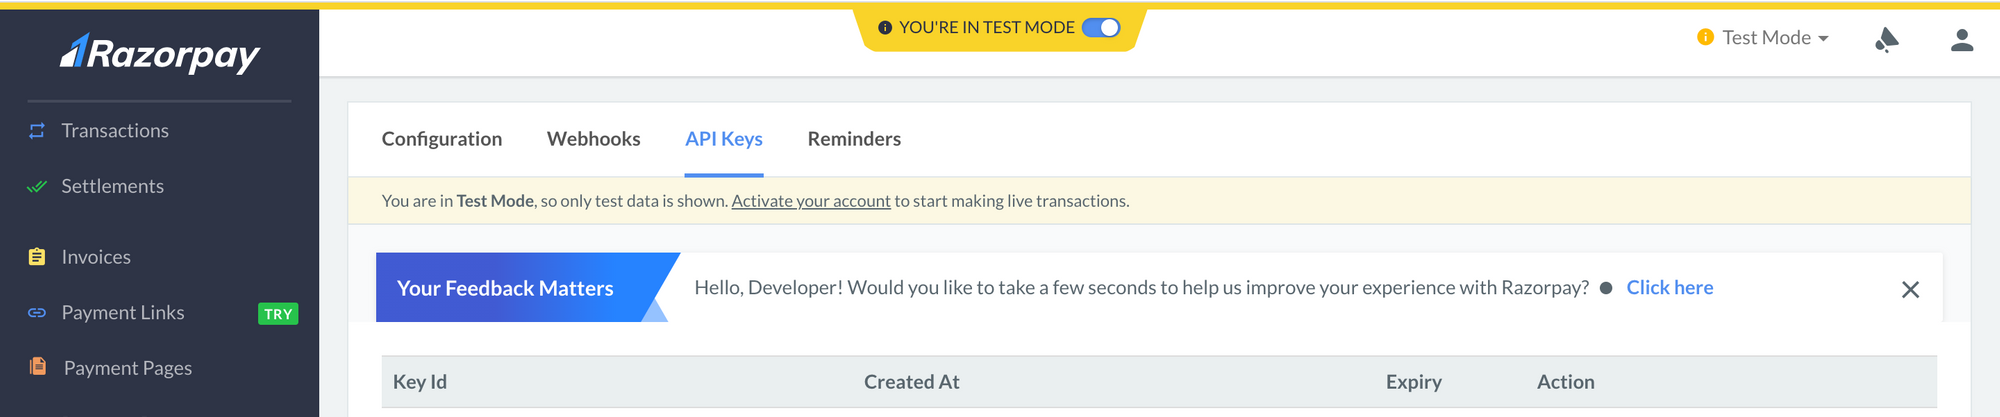
- Since you will be doing it for the first time, click on
Generate API Keysand the download will automatically start. The downloaded file containsRazorpay API KeyandRazorpay API Secret.
Now you're all set with the API keys and setting up the platform. Let's jump directly into how to actually trigger the Razorpay API and make payments.
How to Integrate Payments with Razorpay
For our payments to be integrated, we need a button click that actually initializes the Razorpay checkout module. For this, we already have a button Purchase Now the calls a function onClick that is nothing but a callback. Let's see the actual implementation and understand the code behind it.
To initialise a payment, we need to add Razorpay's checkout script into our code. In React, we can simply do it using the document.body.appendChild(script) code.
initializeRazorpay()
const initializeRazorpay = () => {
    return new Promise((resolve) => {
      const script = document.createElement("script");
      script.src = "https://checkout.razorpay.com/v1/checkout.js";

      script.onload = () => {
        resolve(true);
      };
      script.onerror = () => {
        resolve(false);
      };

      document.body.appendChild(script);
    });
  };
Now, we are using a promise to achieve this task. We do this because later on, we are going to use the initializeRazorpay() in such a way that every time Purchase Now is clicked, the payments are initialised. We simply have to await this function to create and append a script into the DOM.
Let's look at the main function which is responsible for creating and initializing payments on the page.
makePayment() function
const makePayment = async () => {
const res = await initializeRazorpay();
if (!res) {
alert("Razorpay SDK Failed to load");
return;
}
// Make API call to the serverless API
const data = await fetch("/api/razorpay", { method: "POST" }).then((t) =>
t.json()
);
console.log(data);
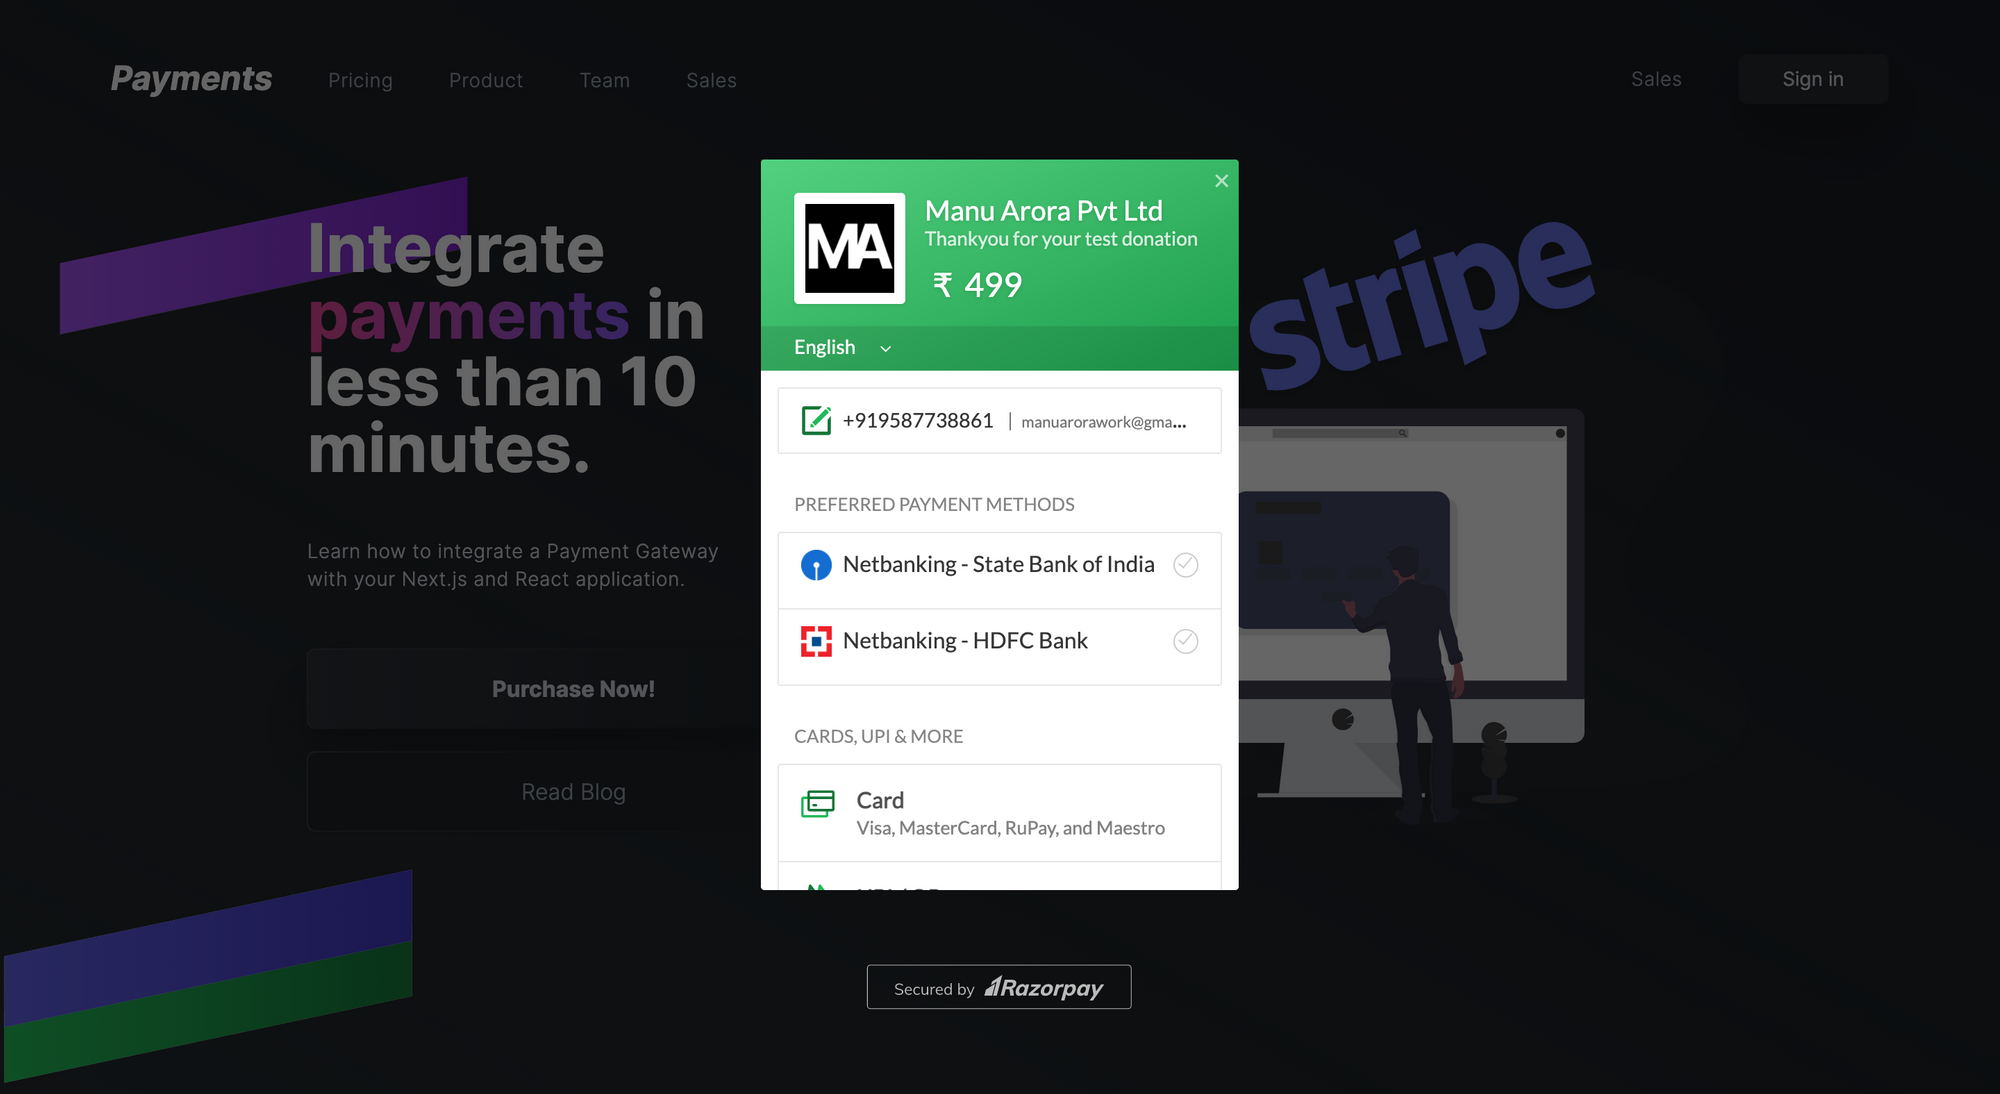
var options = {
key: process.env.RAZORPAY_KEY, // Enter the Key ID generated from the Dashboard
name: "Manu Arora Pvt Ltd",
currency: data.currency,
amount: data.amount,
order_id: data.id,
description: "Thankyou for your test donation",
image: "https://manuarora.in/logo.png",
handler: function (response) {
// Validate payment at server - using webhooks is a better idea.
alert(response.razorpay_payment_id);
alert(response.razorpay_order_id);
alert(response.razorpay_signature);
},
prefill: {
name: "Manu Arora",
email: "manuarorawork@gmail.com",
contact: "9999999999",
},
};
const paymentObject = new window.Razorpay(options);
paymentObject.open();
};
The makePayment() method is responsible for initialising and opening the Razorpay popup.
The makePayment() function does the following operations:
- Initializes the Razorpay Checkout script and appends it to the body. This was handled by the
initializeRazorpaymethod as we saw earlier. - Makes a call to the
/api/razorpay.jsserverless function. (This we will talk about in a minute). Creates an Object which has 4 important keys:
currency- The currency in which we want the transaction to happenamount- The amount in which the transaction has to happen. Note that it has to be the smallest denomination. Example if you're from the USA, then the amount will be in cents.order_id- This will be generated from the serverless API which we are going to talk about in a minute.handler- When the payments are successful, this callback function is called.
Finally, a
paymentObjectis created with theoptionspassed down as the parameters to thewindow.Razorpaymethod. This is available to us because of thecheckoutscript that we looked at before.
We looked at the above makePayment() method and saw a line of code which is:
const data = await fetch("/api/razorpay", { method: "POST" }).then((t) =>
      t.json()
    );
But what does it mean?
Next.js allows us to access serverless functions with the help of apis that are available to us in the api folder within Next.js.
The serverless APIs are nothing but Lambda Functions that act as a back-end for our JAMStack applications. Here, we can write our back-end related code easily without having to create a separate back-end.
Here, we need serverless because the order_id that we saw in the makePayments() code is unique and has to be generated at the backend. Not only this but the amount and currency also comes from the backend. This is to ensure that no one can manipulate the amount and the currency and the portal is secure for payments.
Let's have a look at the serverless API code and understand it better.
/api/razorpay.js
const Razorpay = require("razorpay");
const shortid = require("shortid");

export default async function handler(req, res) {
  if (req.method === "POST") {
    // Initialize razorpay object
    const razorpay = new Razorpay({
      key_id: process.env.RAZORPAY_KEY,
      key_secret: process.env.RAZORPAY_SECRET,
    });

    // Create an order -> generate the OrderID -> Send it to the Front-end
    const payment_capture = 1;
    const amount = 499;
    const currency = "INR";
    const options = {
      amount: (amount * 100).toString(),
      currency,
      receipt: shortid.generate(),
      payment_capture,
    };

    try {
      const response = await razorpay.orders.create(options);
      res.status(200).json({
        id: response.id,
        currency: response.currency,
        amount: response.amount,
      });
    } catch (err) {
      console.log(err);
      res.status(400).json(err);
    }
  } else {
    // Handle any other HTTP method
  }
}
This of razorpay.js as your route which leads to /api/razorpay. Every file you create in the API folder becomes a serverless route. Just like we create APIs in the back-end, we create files here in the APIs folder which becomes a route for us.
For example: let's say you create a file in the /api folder named posts.js. So the route will become /api/posts which can return anything you want depending upon the use case.
For our case, we need to make a POST request to our back-end that will create an order_id for us along with amount and currency that can be returned to the front-end for making payments.
Let's understand the flow for this API.
- First we need to install the
razorpaymodule along withshortidfor generating short unique ids. To do that, head over to your terminal and writenpm install razorpayandnpm install shortid - Now, to access a
POSTrequest, we check the request object and access the method by using the below snippet:
export default async function handler(req, res) {
  if (req.method === "POST") {
    // Initialize razorpay object
    const razorpay = new Razorpay({
      key_id: process.env.RAZORPAY_KEY,
      key_secret: process.env.RAZORPAY_SECRET,
    });

    // rest of the code...
}
Here,
request.methodchecks for the method. If the method isPOSTwe go ahead and initialize the Razorpay object.The Razorpay object takes in 2 parameters:
key_idandkey_secret. Remember when we downloaded the keys from Razorpay dashboard? Let's put them to use.Open/create the
.envfile in your folder structure's root and paste the following code:
RAZORPAY_KEY=YOUR_KEY_HERE
RAZORPAY_SECRET=YOUR_SECRET_HERE
Here, you can plug in your API key and secret and you will be good to go.
Note: Make sure you restart your development server – otherwise the changes won't be reflected.
Once the razorpay object is setup, it takes in three important options: receipt, amount and currency.
const payment_capture = 1;
    const amount = 499;
    const currency = "INR";
const options = {
      amount: (amount * 100).toString(),
      currency,
      receipt: shortid.generate(),
    };
Note that amount and currency are being declared in our back-end so that there's no way for attackers to tamper with it.
Once the options are setup, we can create orders with Razorpay's _razorpay_._orders_.create(options) method.
try {
      const response = await razorpay.orders.create(options);
      res.status(200).json({
        id: response.id,
        currency: response.currency,
        amount: response.amount,
      });
    } catch (err) {
      console.log(err);
      res.status(400).json(err);
    }
Here, we simply await the create() method provided by Razorpay. When the create method is successful, we get an id which is nothing but the order_id that we need to supply to the front-end in order to generate unique payments.
Once everything is successful, we send a 200 response with id, currency and amount fields. This is all what is required by the front-end to process payments.
How to Make Payments with Razorpay
Once everything is integrated and is in place, we can start using Razorpay's charging methods – there are various options available. With this, you can start charging for your services and products by simply accepting payments on your website.
The whole popup is customisable and can be edited directly from Razorpay's dashboard portal.
Since you're in Test mode, to start using their services in production, you need to complete their Identification process by submitting your proof documents and simply toggle between test mode and live mode.
That's all you need to do from the coding side to make the transition from test to live.
Environment Variables
To make sure that our changes are reflected in our live production website, we need to add the same environment variables that we added in the code on the Vercel platform as well.
For that:
- Head over to Vercel and open your project
- Click on
settings - Click on
environment variables. - You will get 2 input fields - Name and Value.
- First, enter
RAZORPAY_KEYand add the API key - Second, enter
RAZORPAY_SECRETand add the secret value - Redeploy the website and you will be able to make payments in the live environment as well.
Live Demo and Source Code
The entire source code for the application can be found here.
The live demo of the website is here.
Conclusion
Integrating payments is easy, thanks to Razorpay's excellent documentation that is easy to understand.
I enjoyed coding this website and integrating payments. You can also see a snippet of the code at my website: Manu Arora's Code Snippets
If you liked this blog, try implementing it in your own website so you can reach out to your end-users and make payments an easy task for yourself.
If you'd like to give any feedback, reach out to me at my Twitter handle or visit my Website
Also thanks to Tailwind Master Kit for the beautiful Landing Page UI.
Happy Coding. :)