By Trevor Phillips
Let’s scrap the ugly UIView.animate(…) code and give it an upgrade, shall we?
Here we’ll dive into a practical example using Apple’s UIViewPropertyAnimator to create smooth animations combined with user interaction.
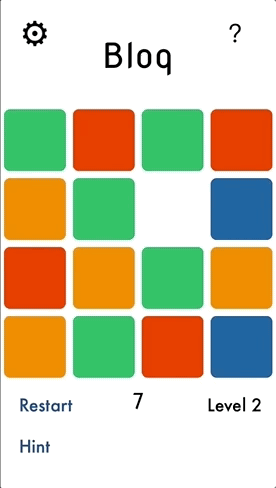
You can check out the end result of these animations in the free app Bloq, which uses the techniques described below as its foundation for gameplay.
 Animations using UIViewPropertyAnimator
Background
It’s a class introduced in iOS 10 which offers more capabilities than traditional UIView.animate(...) functions:
- Programmatically start, stop, pause, or resume the animation at any time
- Add animation blocks and completion blocks to the animator at your leisure
- Reverse the animation at any time
- “Scrub” the animation, that is, programmatically set how far along it should be right now
Getting Started
First, we’ll define a custom view controller BlockViewController which will represent each colored square within the game. Note: I am not including code for the colors, rounded corners, or other aspects which are irrelevant to this tutorial.
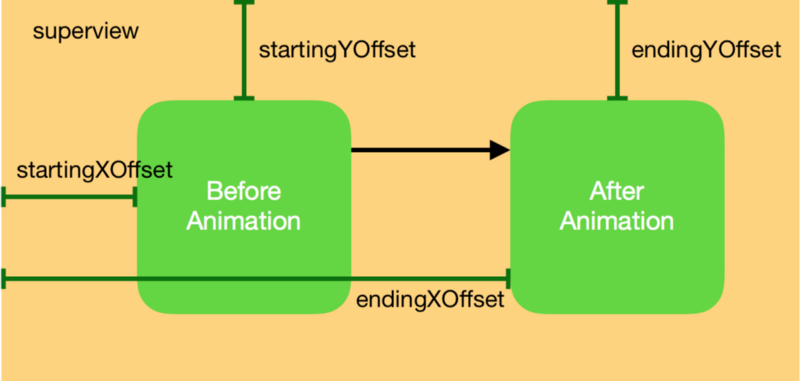
class BlockViewController: UIViewController { var startingXOffset: CGFloat = 0 var endingXOffset: CGFloat = 0 var startingYOffset: CGFloat = 0 var endingYOffset: CGFloat = 0
var topConstraint = NSLayoutConstraint() var leadingConstraint = NSLayoutConstraint()
var animationDirection: AnimationDirection = .undefined var isVerticalAnimation: Bool { return animationDirection == .up || animationDirection == .down } var transitionAnimator: UIViewPropertyAnimator? var animationProgress: CGFloat = 0}
The properties topConstraint and leftConstraint define the offset of the view controller’s view from the top and left sides of its superview (respectively).
The offset properties are used by the UIViewPropertyAnimator to determine where the animation should begin and where it should end. Since the blocks in the game can move both left/right and up/down, we define both X and Y offsets.
We also have a simple enum AnimationDirection to assist with the logic necessary for animations.
enum AnimationDirection: Int { case up, down, left, right, undefined}
Now in the view controller’s viewDidLoad() function, we can set up the constraints something like this:
topConstraint = view.topAnchor.constraint(equalTo: superview.topAnchor, constant: startingYOffset)
leadingConstraint = view.leadingAnchor.constraint(equalTo: superview.leadingAnchor, constant: startingXOffset)
topConstraint.isActive = true
leadingConstraint.isActive = true
let recognizer = UIPanGestureRecognizer()
recognizer.addTarget(self, action: #selector(viewPanned(recognizer:))) // will be defined later!
view.addGestureRecognizer(recognizer)
Helper Functions
Let’s also set up a few “helper” functions which will be useful later. The following functions will swap the offset values:
private func swapXConstraints() { let tmp = endingXOffset endingXOffset = startingXOffset startingXOffset = tmp}
private func swapYConstraints() { let tmp = endingYOffset endingYOffset = startingYOffset startingYOffset = tmp}
This one will be useful for resetting the animation:
private func nullifyAnimations() { transitionAnimator = nil animationDirection = .undefined}
And here we have a function to reverse the animator:
private func reverseAnimation() { guard let animator = transitionAnimator else { return } animator.isReversed = !animator.isReversed}
If the animation is already running and isReversed is true, then we know that the animation is running in the reversed direction. If the animation is not running and isReversed is true, the animation will run in the reversed direction when started.
Finally, this little function takes velocity represented as a CGPoint, and determines which, if any, direction the animation should go based on whether the x-component or the y-component of the velocity is greater in magnitude:
private func directionFromVelocity(_ velocity: CGPoint) -> AnimationDirection { guard velocity != .zero else { return .undefined } let isVertical = abs(velocity.y) > abs(velocity.x) var derivedDirection: AnimationDirection = .undefined if isVertical { derivedDirection = velocity.y < 0 ? .up : .down } else { derivedDirection = velocity.x < 0 ? .left : .right } return derivedDirection}
User Interaction
Let’s get to the essential stuff: the animations and user interaction!
In viewDidLoad() we attached a pan gesture recognizer to the BlockViewController's view. This gesture recognizer calls the function viewPanned(recognizer: UIPanGestureRecognizer) when its state changes.
@objcfunc viewPanned(recognizer: UIPanGestureRecognizer) { switch recognizer.state { case .began: animationProgress = transitionAnimator?.fractionComplete ?? 0 case .changed: didChangePan(recognizer: recognizer) // described below case .ended: didEndPan(recognizer: recognizer) // described below default: break }}
Remember how I mentioned the “scrubbing” ability of UIViewPropertyAnimator? The fractionComplete property allows us to get and set how far along the animator should be with its animations. This value ranges from 0.0 to 1.0.
 “Catching” the animation halfway through
The animationProgress is captured in recognizer.state = .began because we may have a situation shown above, where a pan gesture is initiated midway through the animation. In this case, we want to “catch” the animation in its current state. The animationProgress property is used to enable this “catching” behavior.
The function viewPanned(recognizer: UIPanGestureRecognizer)offloads most of its logic into two functions, described below. Our code will become a bit more complex, so for enhanced readability and syntax-highlighting, I’ll switch to Github Gists now.
The comments describe what is going on. Note that we actually begin the animation (if it doesn’t exist) when the state in viewPanned(recognizer: UIPanGestureRecognizer) is changed rather than began. This is because the velocity when state = .began is always zero. We can’t determine the animation direction until the velocity is non-zero, hence waiting until state = .changed to start the animation.
When we call transitionAnimator.continueAnimation(...) we are basically saying, “Okay animator, the user is done interacting, so go and finish up your business now!” Passing nil for the timing parameter and 0 for the duration factor will not make the animation finish instantaneously. It will still animate smoothly to the finish.
The Logic, Explained
At the end of this function, do you see the isOpposite variable and some confusing logic regarding animator.isReversed? Let’s understand what is going on here.
private func oppositeOfInitialAnimation(velocity: CGPoint) -> Bool { switch animationDirection { case .up: return velocity.y > 0 case .down: return velocity.y < 0 case .left: return velocity.x > 0 case .right: return velocity.x < 0 case .undefined: return false }}
The variable isOpposite uses the above helper function. It simply takes a velocity as input and returns true if this velocity is going opposite of the current animation direction.
Then we have an if-else statement with two scenarios:
Case 1: The pan gesture has ended in the reverse of its initial direction, but the animator has not been reversed. This means we need to reverse the animator before calling transitionAnimator.continueAnimation(...).
Case 2: The pan gesture has finished in its initial direction, but the animator has been reversed at some point. This means that again, we must reverse the animator before calling transitionAnimator.continueAnimation(...).
 Almost there!
Animation
In didChangePan(...) we called beginAnimation() if the transition animator was nil. Here is the implementation for this function:
The important things going on are:
- We notify a delegate that it should set
startingXOffset,endingXOffset,startingYOffset, andendingYOffset - We initialize the
transitionAnimatorwith an animation block which updates the view’s constraints, then calllayoutIfNeeded() - We configure the animator’s completion block (described below)
- If the animation was programmatically initiated (no pan gesture involved), we call
transitionAnimator.continueAnimation(...)to allow the animation to finish on its own - If the animation was initiated from a pan gesture, we immediately pause the animation rather than allow it to complete. This is because the animation progress will be scrubbed in
didChangePan(...)
Animation Completion
The last function to be addressed is configureAnimationCompletionBlock(), described below:
If the animator finished where it started, we reset the constraints back to how they were before the animation.
If the animator finished as expected, in a different position, we swap the constraints. This allows the view to be animated back and forth, again and again.
 Swipe back and forth after swapping constraints in completion block
Lastly we do a quick sanity check to make sure that if the position state is .end, the view has actually changed position. When developing the app I ran into some buggy behavior, but this solved the issue.
Summary
The sample BlockViewController code can be found here, but please keep in mind that it is taken out of context from a larger application. It will not work out of the box.
For more interesting projects ranging from Node.js to Raspberry Pi, please feel free to check out my website. Or download Bloq for free on the App Store.