
By Njoku Samson Ebere
The first time I tried to learn blockchain development, I felt overwhelmed.
This tutorial you're reading is what I wish I could send back in time to myself.
This will give you a strong foundation in blockchain development, and set you up for success in coding your own smart contracts.
In in addition to my explanation and code examples, I've included lots of videos you can use to supplement your learning.
Prerequisites
This tutorial assumes that you understand some foundational coding concepts. One of these that will be particularly helpful is the concept of object-oriented programming (OOP).
What is Blockchain?
The Blockchain is a network of transactions or assets called blocks where every block is connected to the others. Everyone here has equal access to the data circulating within the network.
You can see blockchain as a document that holds the details of transactions made by a group of people where everyone has a copy. Everyone must agree upon any updates before they are accepted.
Anyone who tries to mutilate their document without the others' consent is seen as fraudulent and will suffer predefined consequences.
For example, imagine that a group of friends (Njoku, Samson, and Ebere) decides to start a peer-to-peer savings account that must run for a certain period before a withdrawal is possible. The three agree that no one will be the boss, and each person will have equal access to the account to ensure trust. So they open an account.
Each time one of them deposits money, everyone gets a new account history document emailed to them. Whenever they decide to add a new member, the person becomes part of the signatories and gets a copy of the account history.
Everyone must consent before a withdrawal happens outside the proposed date. Not following these terms will incur consequences such as losing all of a person’s savings or leaving the association after paying a fine.
Blockchain is known as a decentralized technology since data and authority are shared equally among everybody in the network. It differs from centralized applications where the company owns the data, and the consumers just hope their data isn’t misused.
Examples of decentralized applications include Bitcoin and Ethereum, while centralized applications include Facebook and Google.
Blockchain technology falls under the category of Web 3 simply because it is the third phase of the internet in which users can read, write, and own data. Web 1 was the stage where users could only read data. Web 2 emerged sometime around the early 2000s and is the phase in which users can read and write data.
How Blockchain Works
In this section, I will explain what happens in a blockchain application behind the scenes.
We will begin by looking at how it works in theory and then how we can replicate it using a programming language that many devs already know – JavaScript.
Theory Behind the Blockchain
A blockchain is a connection of many blocks. So it begins with one block called the genesis block. Among other things, a block contains a hash, the previous block hash, and at least one transaction.
Every block in the blockchain keeps a record of its hash and the previous block’s hash to keep the network safe from hackers.
This implies that for a hacker to gain access and break the network, they need to generate the hashes and match them to the right block without breaking other blocks. Now that sounds really stressful and almost impossible. That is how secure blockchains are.
Next, any user on the network can perform at least one transaction. If the user has completed a set of transactions they need at a time, they can use those transactions to create a block. The block may now be added to the others.
The whole process of adding a new block is known as mining. The process secures and verifies the transactions contained in a block.
The hash of a block gets generated when mining. The process of calculating the hash is known as proof of work.
Blockchain in Practice
Let's use some JavaScript object-oriented programming to demonstrate how blockchain works. We are using the OOP method because blockchain programming uses the same pattern.
But before we start building, let's learn how to generate the hash for every block in a blockchain.
How to generate a block's hash
There are a lot of libraries for generating a block's hash. But we will use the SHA256 library for this tutorial. SHA256 is the most popular and is used by many renowned companies.
The SHA256 library takes any data given to it and returns a 64-character long string. Every string passed to the SHA256 library will always return the same 64-character long string every time.
You can check out https://emn178.github.io/online-tools/sha256.html and play around with the UI to see how it works.
Blockchains do not use just any hash generated because of security reasons. It specifies what the first few characters must look like for the hash to be accepted. This means that the hash will have to be generated several times, and a record of what changes on each iteration will be kept for reference purposes.
For example, a blockchain may specify that the only acceptable hash must contain three zeros at the beginning.
To calculate the hash, we need to add a number known as a nonce to the string being hashed. The nonce usually starts from zero and is incremented every time the hash is generated until a hash beginning with three zeros is found. Then the hash and the nonce will be stored for reference purposes.
The code below will calculate the hash for "man":
SHA256("man").toString()
However, we may run the function several times to get a string with three zeros at the beginning. Since the function will always return the same result, we need to add a number to the string and increment it until we get the hash we want.
The code we'd use for that will look like this:
let hash = "";
let nonce = 0;

while (hash.substring(0, 3) !== "000") {
  nonce++;
  hash = SHA256("man" + nonce).toString();
}

console.log(nonce);
console.log(hash);
This code will produce 000d6575d4670dae39df9944e54c27dc4837beab1db23e2de264a7c1a3f38b1a after 5707 times instead of 48b676e2b107da679512b793d5fd4cc4329f0c7c17a97cf6e0e3d1005b600b03.
This level of security measures taken to build blockchain applications makes them very reliable and acceptable.
Now that we understand how a hash is generated in blockchain, let's get back to demonstrating how blockchain works.
How Blockchain Works Using JavaScript
First, create a directory called intro_to_blockchain. Then open the directory in a terminal.
Run the following command and hit enter for all the prompts to initialize the project:
npm init
Create 2 files: blockchain.js and test.js:
touch blockchain.js test.js
We will use the blockchain.js file to write the code that emulates how blockchain works and use test.js to test the code and see the result.
In the blockchain.js, enter the following code:
class Blockchain {
    constructor () {
        this.chain = [this.createGenesisBlock()];
        this.pendingTransactions = [];
    }
}
The code above declares a class named Blockchain. The constructor function is used to initialize the chain and pendingTransactions array.
The chain array will contain every block or group of transactions added to the network. The pendingTransactions array will hold all transactions that have not been added to a block.
Remember that a blockchain starts with a genesis block. That is why the chain array is initialized with an array containing a function that creates the genesis block. You may hardcode the genesis block into the chain array, too.
We now need to build the createGenesisBlock function. Use the code below:
  createGenesisBlock() {
    return {
      index: 1,
      timestamp: Date.now(),
      transactions: [],
      nonce: 0,
      hash: "hash",
      previousBlockHash: "previousBlockHash",
    };
  }
The function will only execute once because the constructor function runs only once – at the beginning of the program.
It is also the only time a random uncalculated hash or previousBlockHash is used because it is the first block in the chain and does not carry any transactions.
The next thing to do is to make a function to get the last block. Use the code below:
  getLastBlock() {
    return this.chain[this.chain.length - 1];
  };
This code will enable us to access the details of the most recent block added. Remember that we need to keep track of the previous block's hash.
Let's now add the code to calculate the hash of a block.
generateHash(previousBlockHash, timestamp, pendingTransactions) {
    let hash = "";
    let nonce = 0;

    while (hash.substring(0, 3) !== "000") {
      nonce++;
      hash = SHA256(
        previousBlockHash +
          timestamp +
          JSON.stringify(pendingTransactions) +
          nonce
      ).toString();
    }

    return { hash, nonce };
  }
To ensure that this works, install the SHA256 library using the following command:
npm i sha256
Import it at the top of your blockchain.js file like this:
const SHA256 = require("sha256");
We will now add a function that creates our transactions and adds them to the list of pending transactions. Enter the following code:
  createNewTransaction(amount, sender, recipient) {
    const newTransaction = {
      amount,
      sender,
      recipient,
    };

    this.pendingTransactions.push(newTransaction);
  }
The time has now arrived for us to build the last function – createNewBlock. It will enable us to add the pending transactions to a block, calculate the hash, and add the block to the chain. Type the code below:
  createNewBlock() {
    const timestamp = Date.now();
    const transactions = this.pendingTransactions;
    const previousBlockHash = this.getLastBlock().hash;
    const generateHash = this.generateHash(
      previousBlockHash,
      timestamp,
      transactions
    );

    const newBlock = {
      index: this.chain.length + 1,
      timestamp,
      transactions,
      nonce: generateHash.nonce,
      hash: generateHash.hash,
      previousBlockHash,
    };

    this.pendingTransactions = [];
    this.chain.push(newBlock);

    return newBlock;
  }
The code above uses the getLastBlock function to access the previous block's hash. It calculates the hash of the current block, adds all the detail of the new block in an object, clears the pendingTransactions array, and pushes the new block into the chain.
Let's export the Blockchain class to be able to access it outside the file:
module.exports = Blockchain;
How to Test the Code
We want to test the code we have written so far and see if it works as expected. We will navigate to the test.js file and begin by importing the Blockchain class that we exported a moment ago like this:
const Blockchain = require("./blockchain");
Now that we have the class here, we can make an instance of it and name it bitcoin:
let bitcoin = new Blockchain();
You may call it whatever you see fit, but I will use bitcoin because it is popular.
Let's now see what we have in bitcoin by default. To do that, we will log it to the console like this:
console.log(bitcoin);
We will now open the project in a terminal and run the following command:
node test
It should output the following:
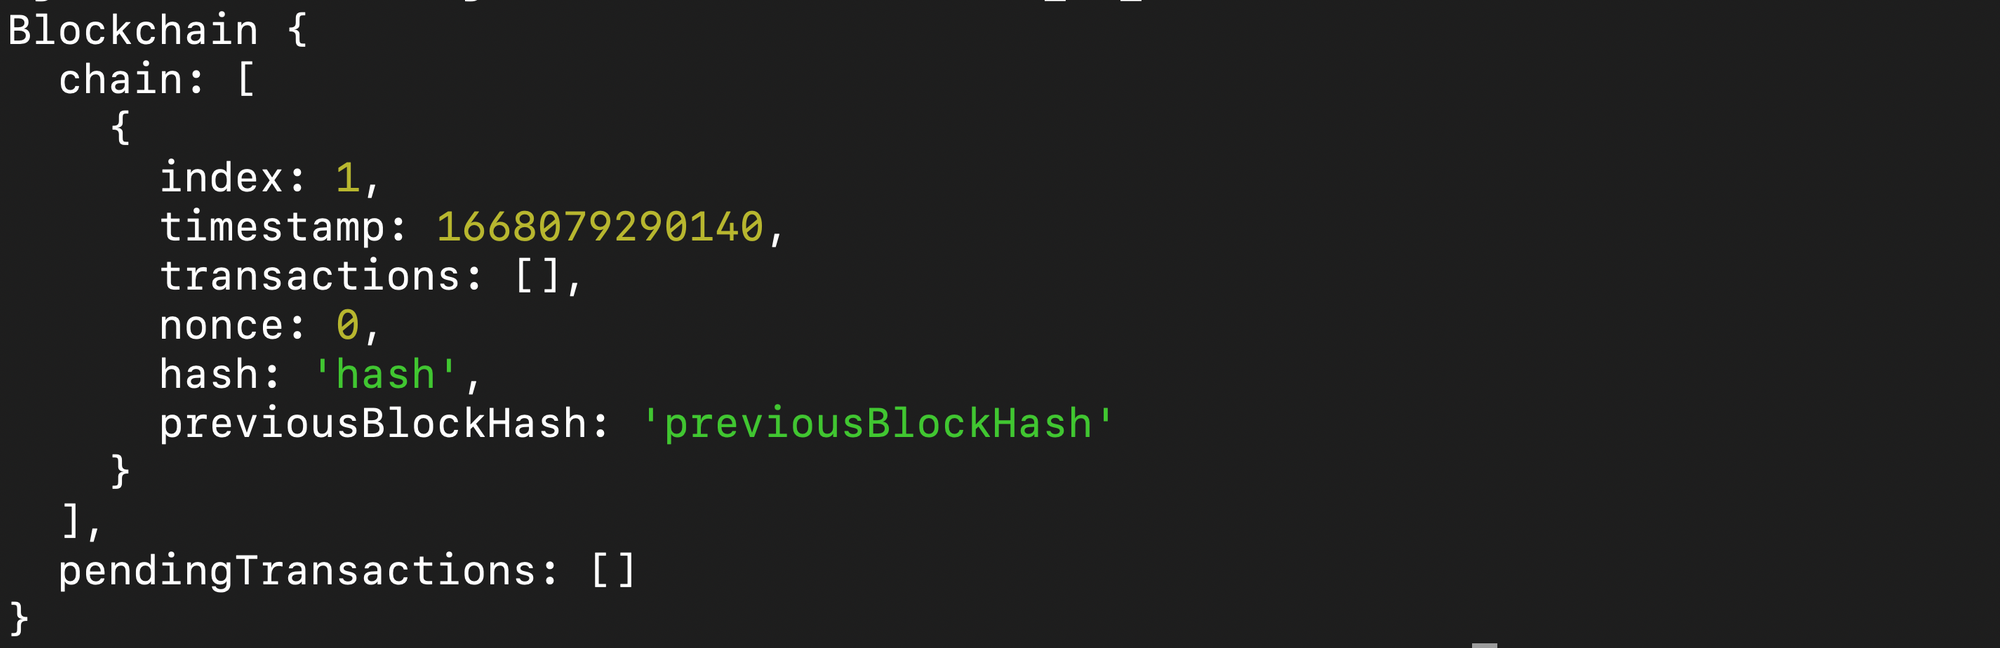 Default Output
In the output above, we have the chain array containing the genesis block and the pendingTransactions array containing nothing.
You will recall that the constructor function contains all those data and it runs once at the beginning of the program.
To add a new transaction, use the code below:
bitcoin.createNewTransaction(
  "100",
  "0xBcd4042DE499D14e55001CcbB24a551F3b954096",
  "0xa0Ee7A142d267C1f36714E4a8F75612F20a79720"
);
The first parameter is the amount, the second is the sender, and the third is the recipient just as we specified while creating the function.
If you run node test again, you should have one item in the pendingTransactions array like this:
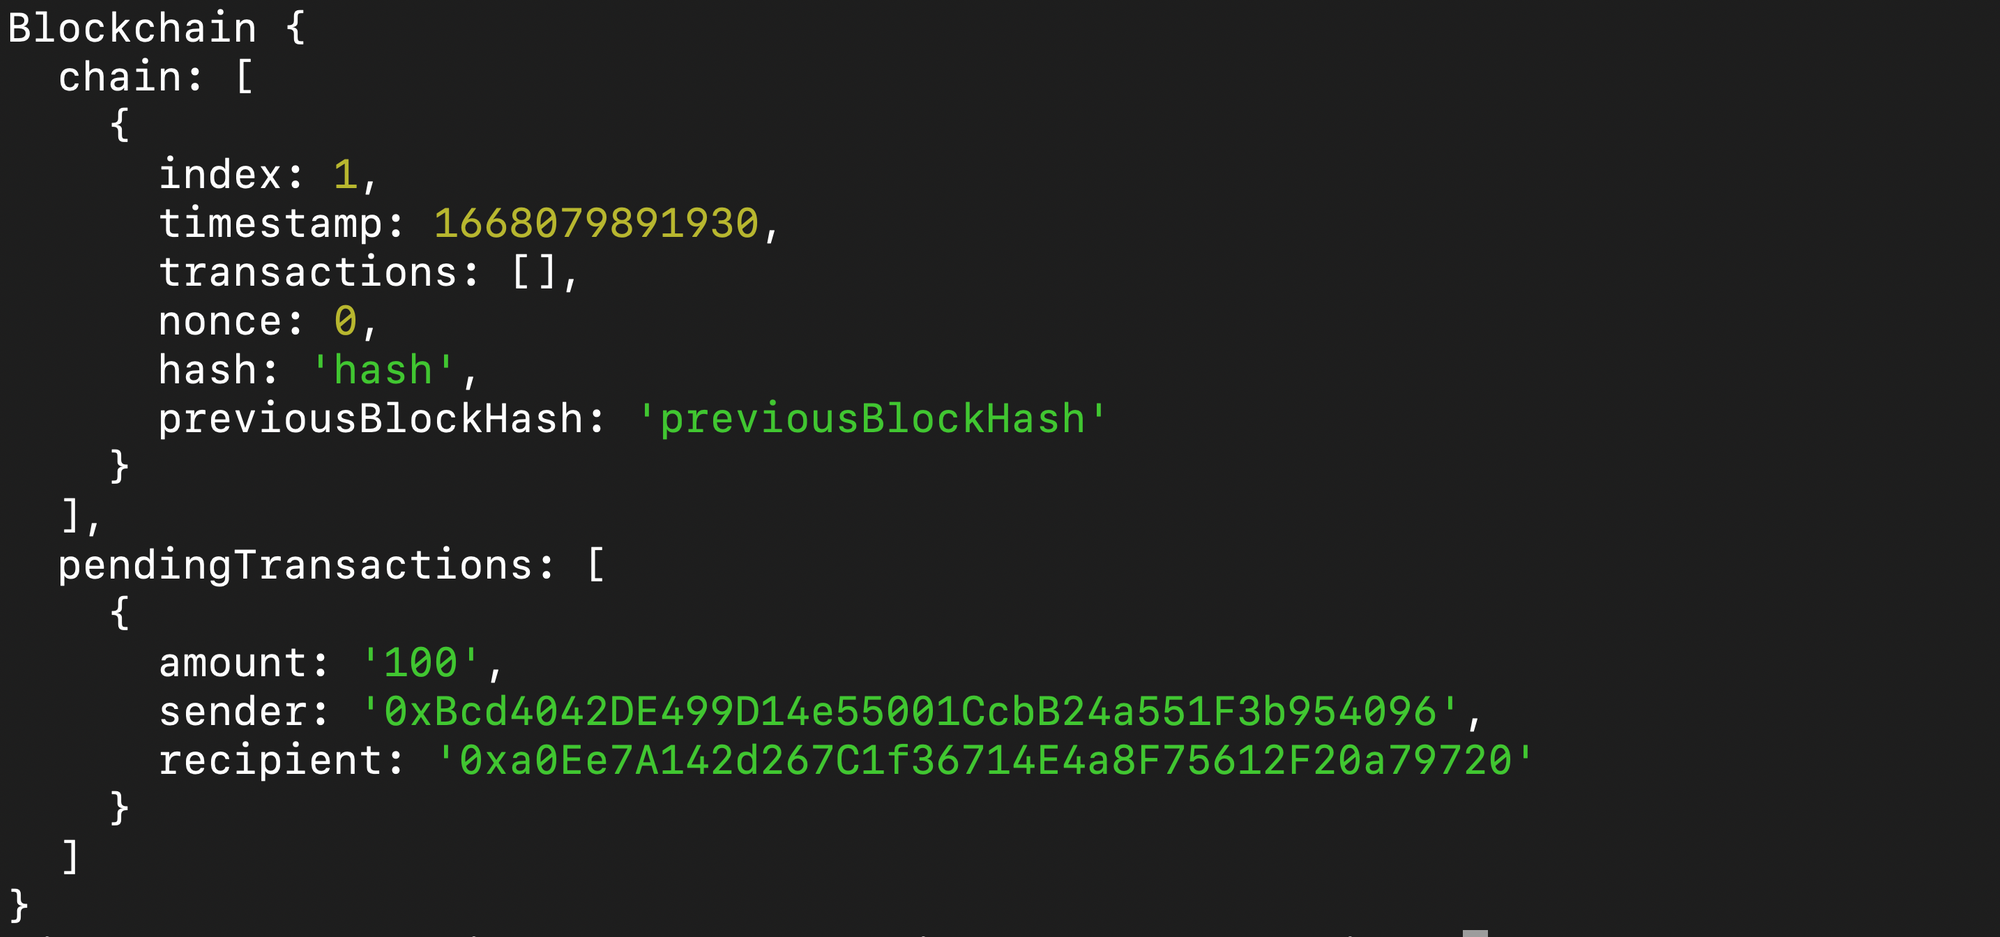 One pending transaction added
To create or mine a block, enter the following code:
bitcoin.createNewBlock();
You should get the output below this time:
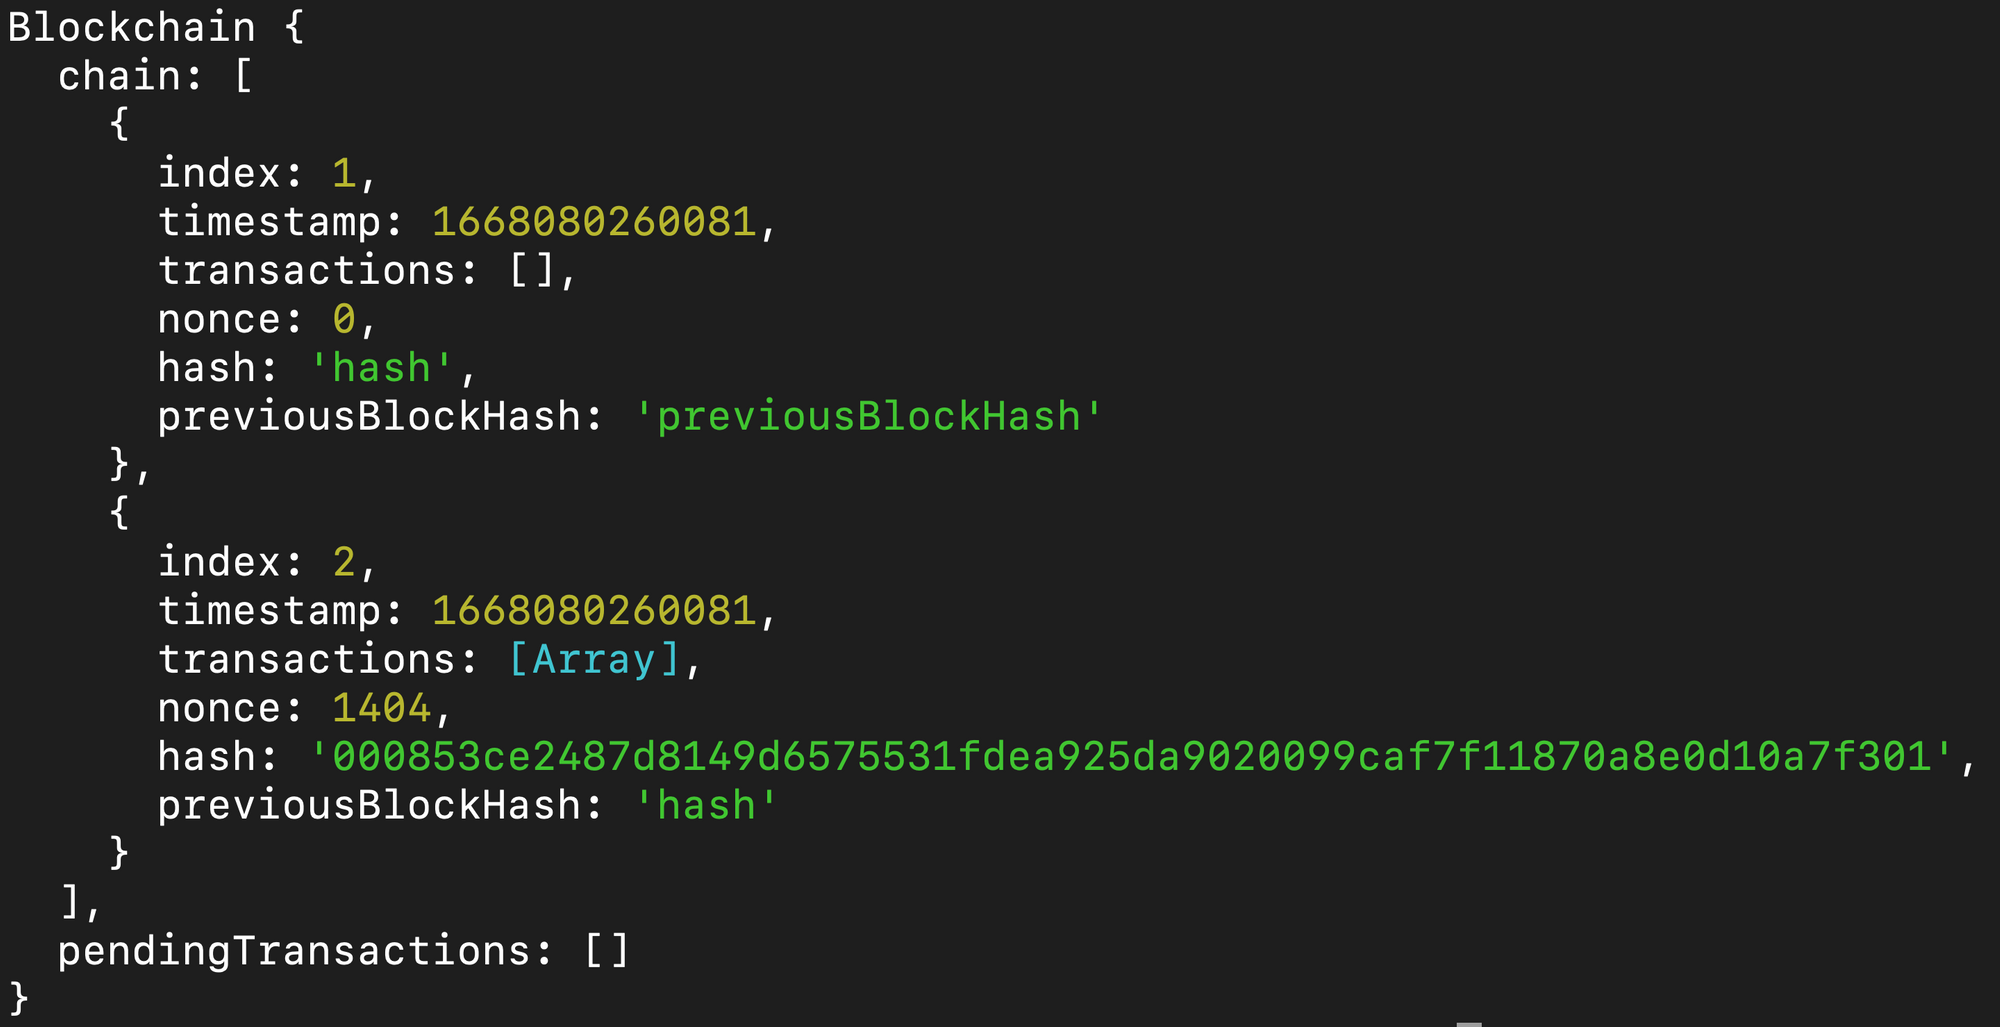
You will notice that there are now two (2) blocks in the chain and no more transactions in the pendingTransactions array.
Some things to note in the second block are the nonce and the hash. The nonce is 1404. That means it took 1404 iterations to get the correct hash for this block.
To see the transactions in the second block, we use the following code:
console.log("\n");
console.log("Second Block Transactions", bitcoin.chain[1].transactions);
Now we have the result below:
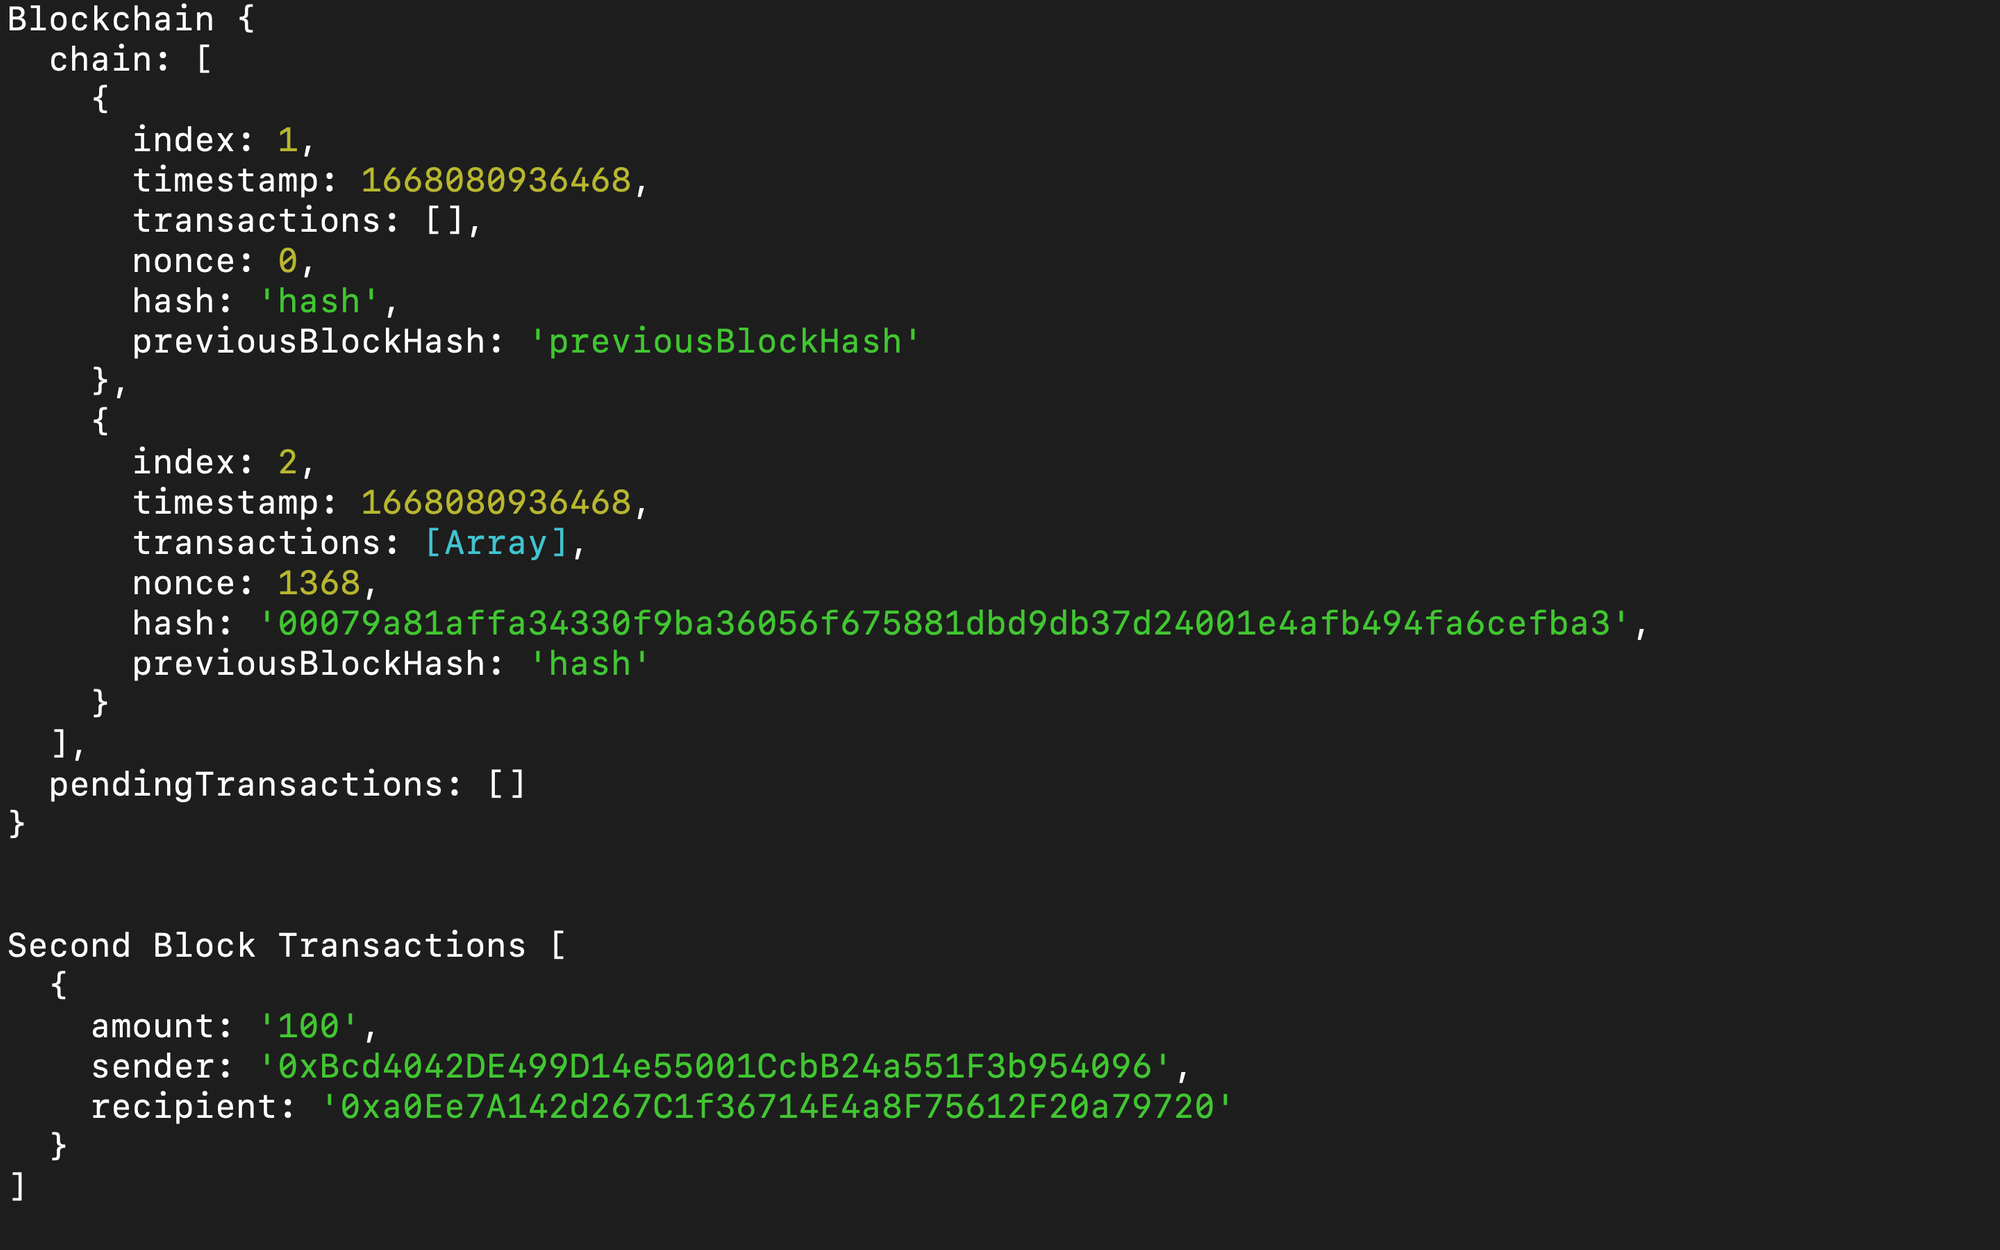
That looks good! It shows that all our functions work as intended. And that is what goes on behind the scenes of many blockchain applications.
You've just learned how blockchain works. But you shouldn’t build a blockchain application solely on this program idea. There is much more to learn to enable you to build real-world DApp. Still, what we have done so far will help you dive more into learning web3.
One of the things you need to learn is a blockchain programming language such as Solidity and other blockchain frontend libraries such as Web3js and Etherjs.
I'll now introduce you to smart contracts using Solidity.
How to Write a Smart Contract
In this section, we will cover all you need to know about smart contracts and the Solidity programming language.
What is a Smart Contract?
A smart contract is a program stored on the blockchain. It holds certain conditions that must be met before it executes.
Smart contracts take after traditional contracts. But they're different because they are run by a computer automatically when the predefined terms are met.
What is Solidity?
Solidity is the main programming language used to build most smart contracts because it is specifically designed for that purpose. It follows the OOP pattern that we demonstrated using JavaScript and borrows the typed nature of TypeScript. So while some syntax might differ from what you already know, it is not too far-fetched to grasp.
We will be learning the basics of Solidity by using it to build a smart contract that enables users to send funds to each other.
Don't worry, you will not have to set up another project. We will use the remix playground to do everything – write the code, compile, debug, and test.
Let's now head over to https://remix.ethereum.org/. You should have the following screen stare at you for a while:
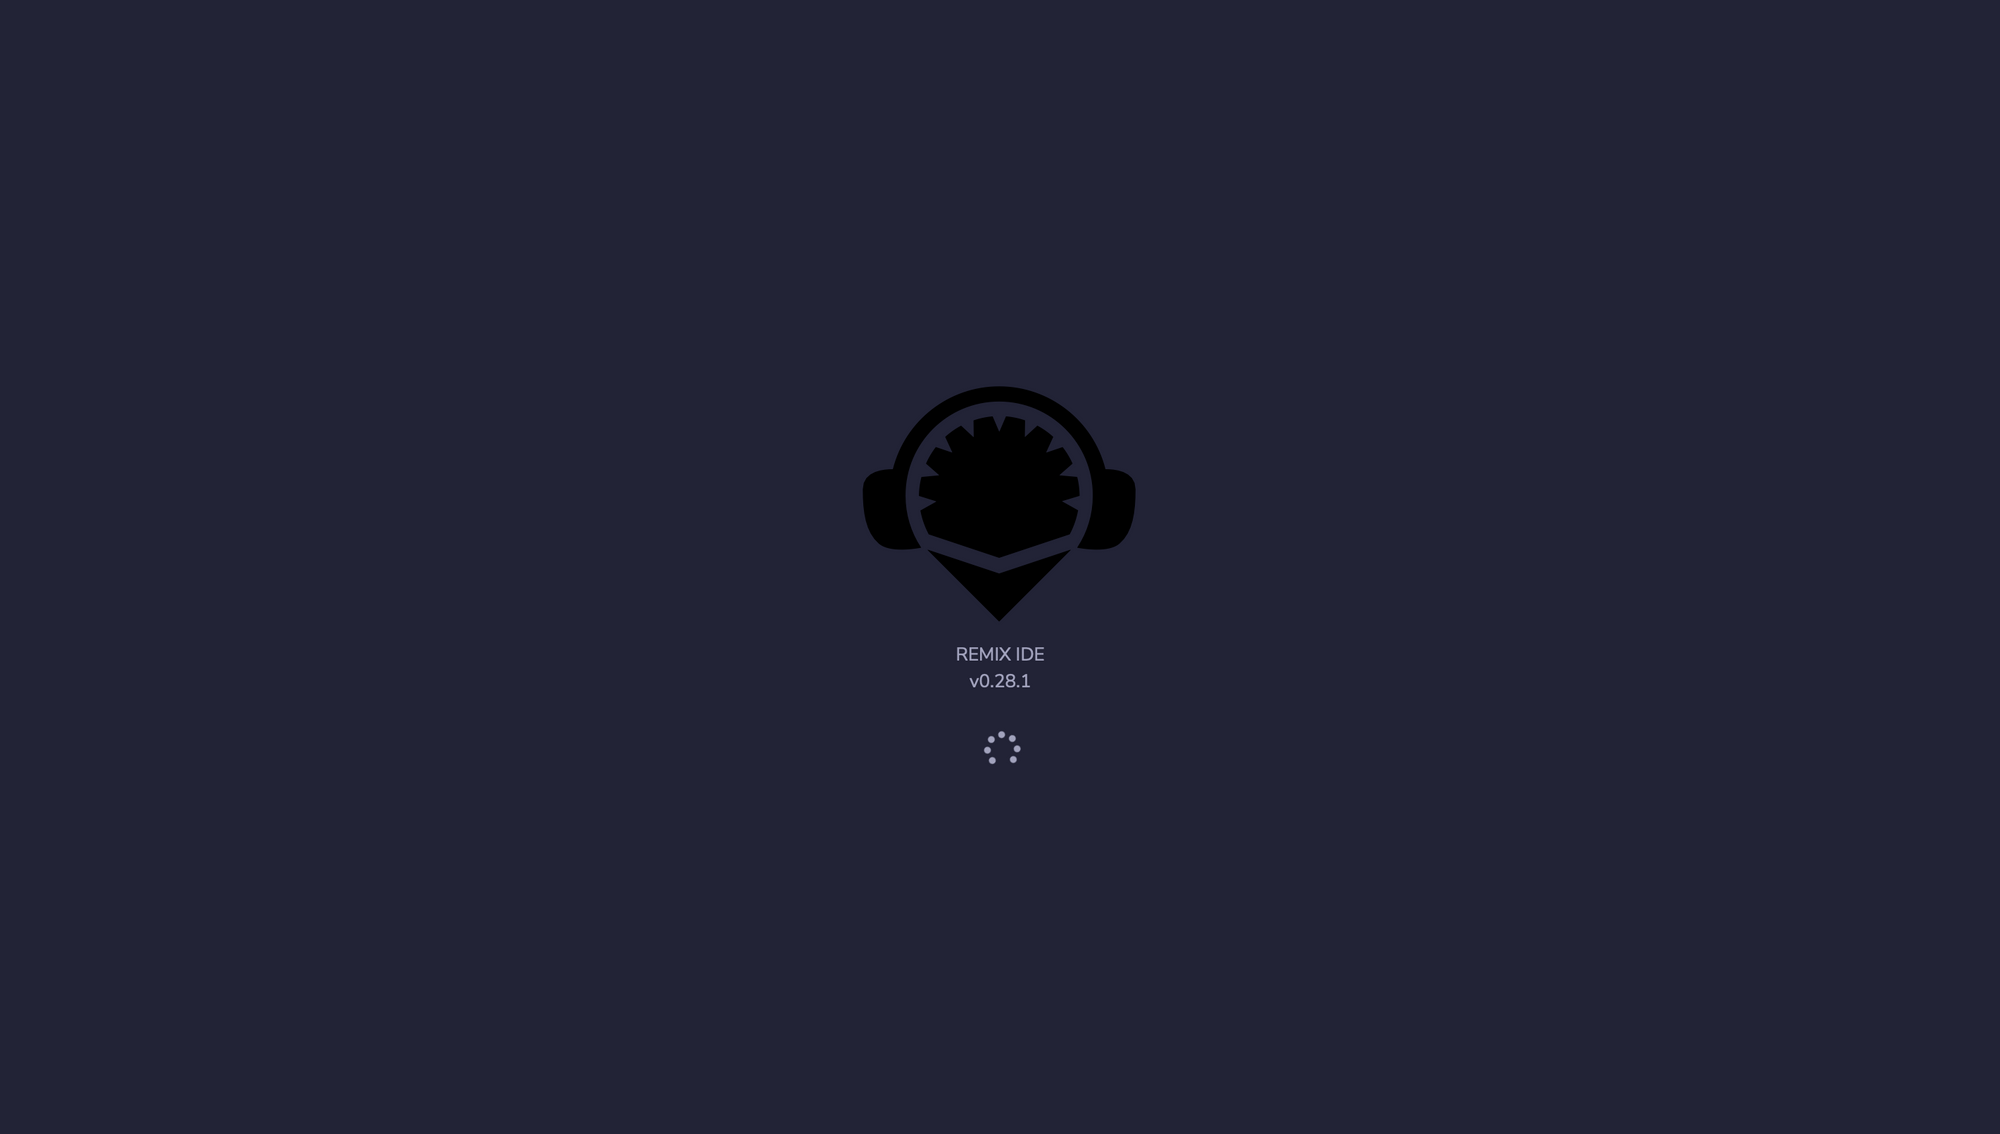 Remix welcome page
Remix is getting everything ready for you. Just be patient 😊
When it's done, you should have the following screen:

This playground provides us with all we need to write our first smart contract.
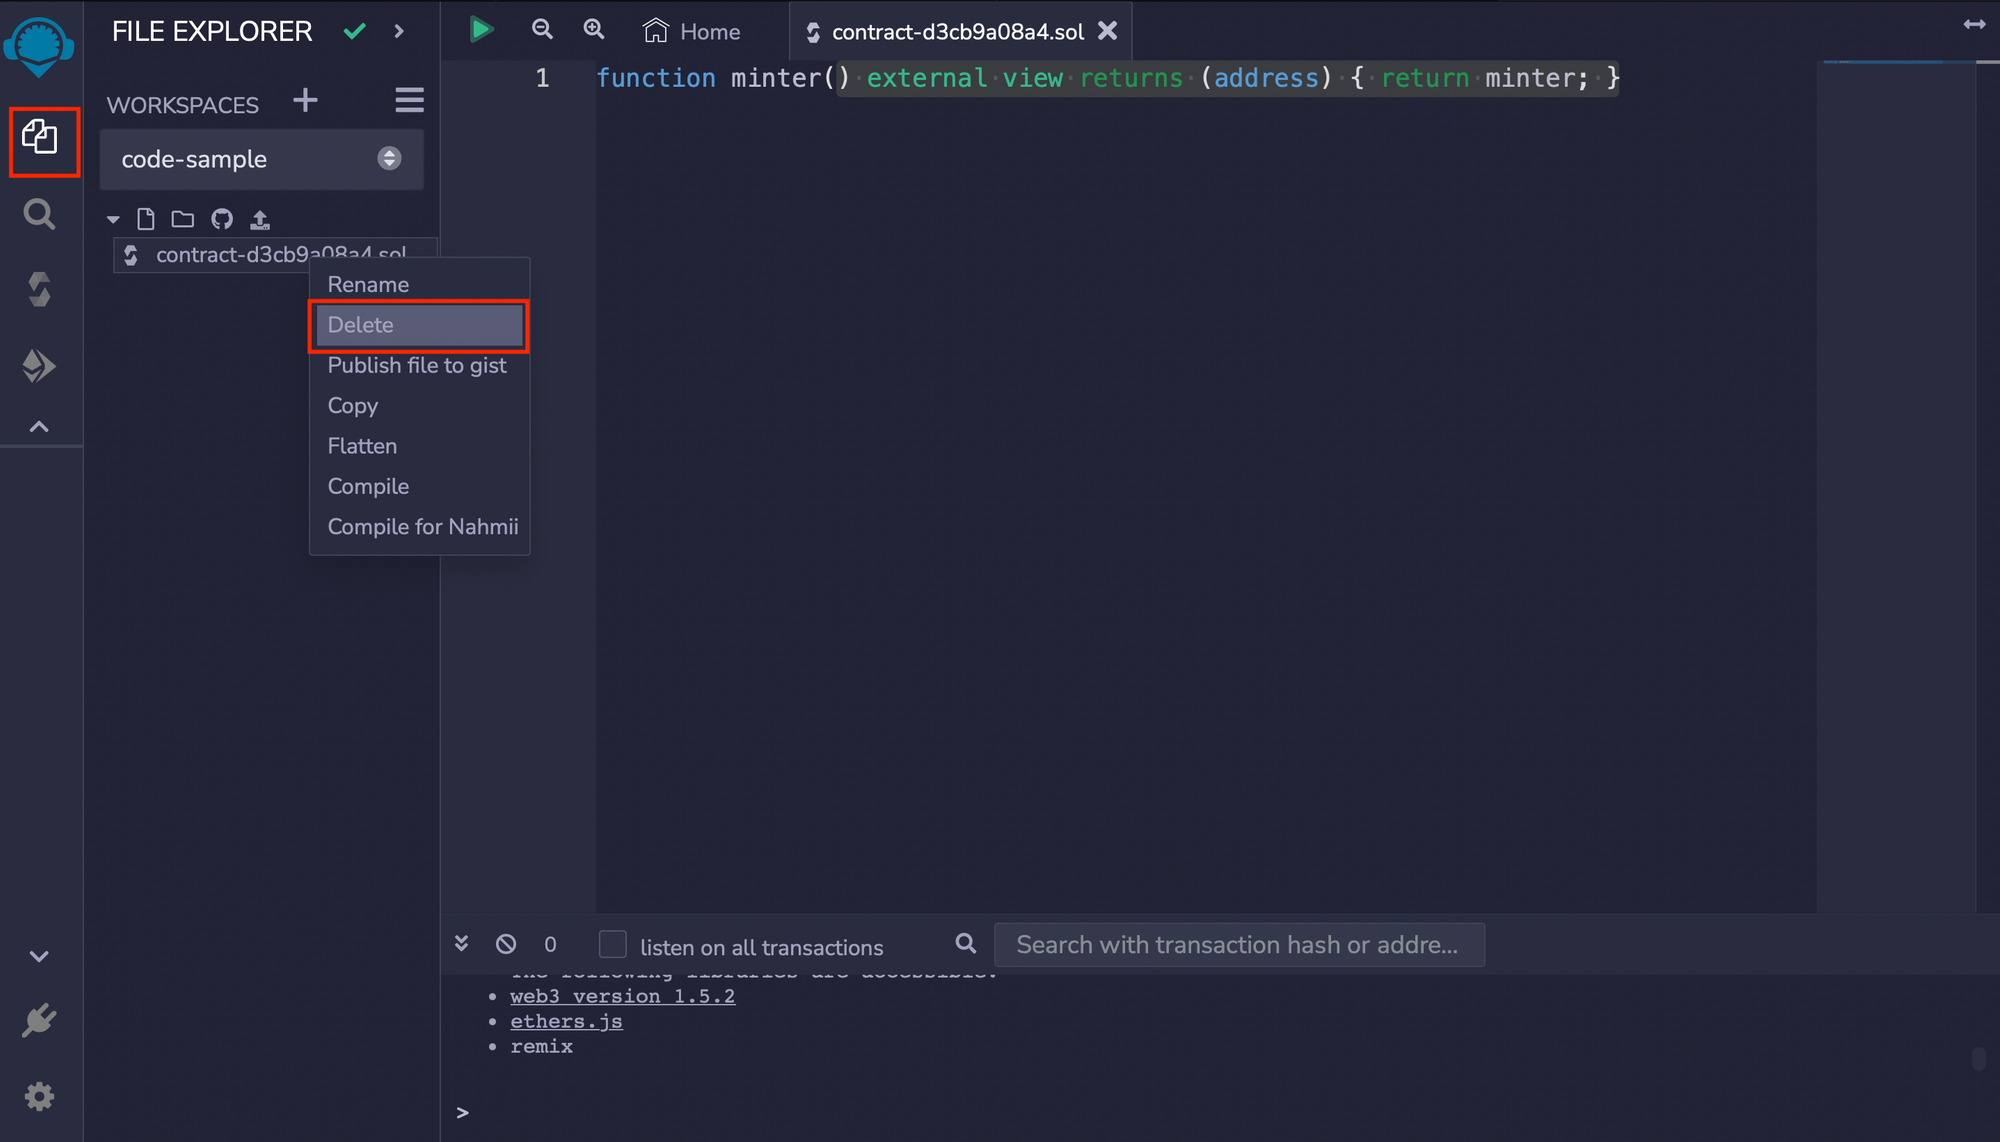
Let's start by deleting the file created for us by default. To do that, click on the first icon below the remix logo.
Right-click on the file name in the explorer section and select delete:
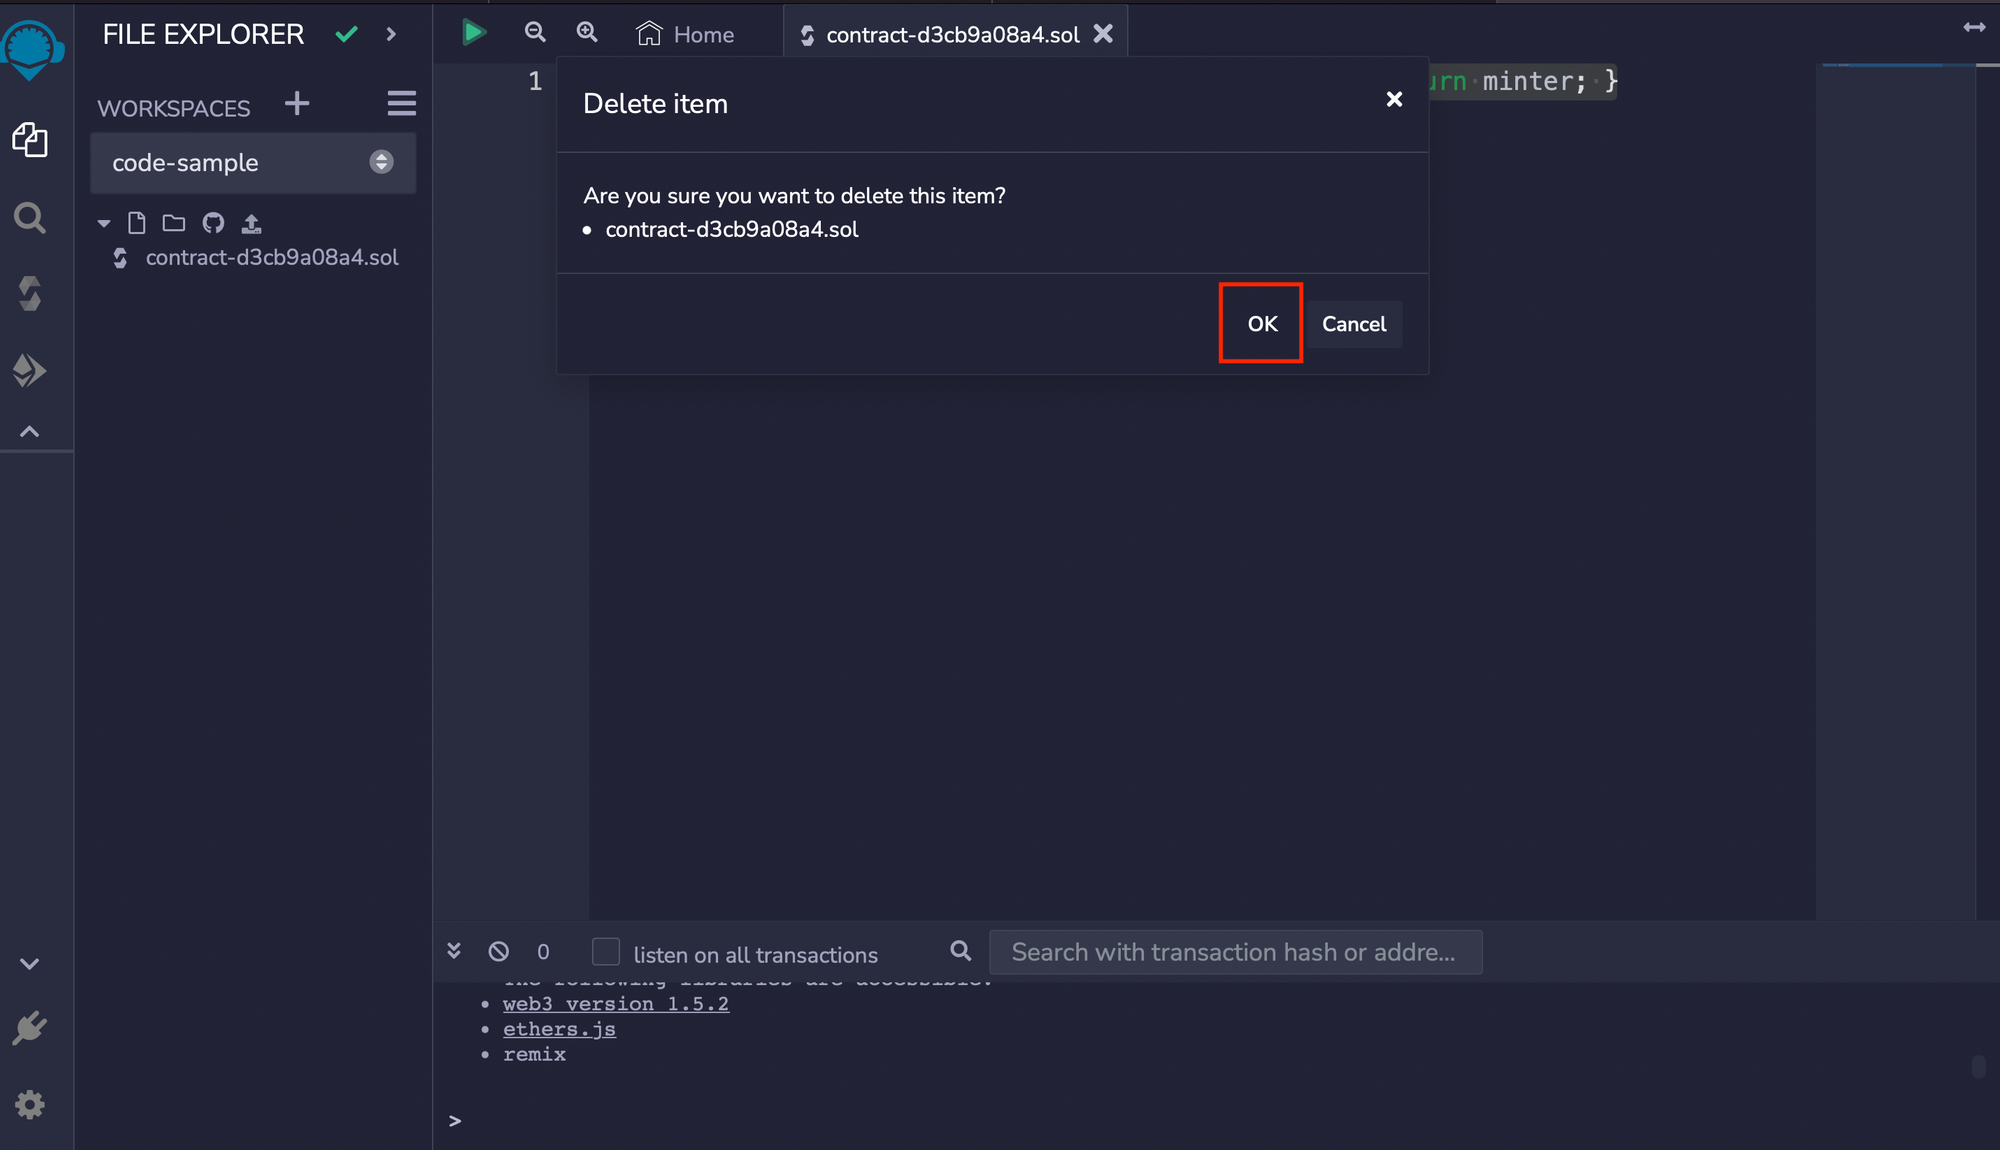
Click OK in the pop-up menu.
We will now create a new file named Blockchain.sol by clicking the document icon marked red in the image below and type the name of the file in the space provided:
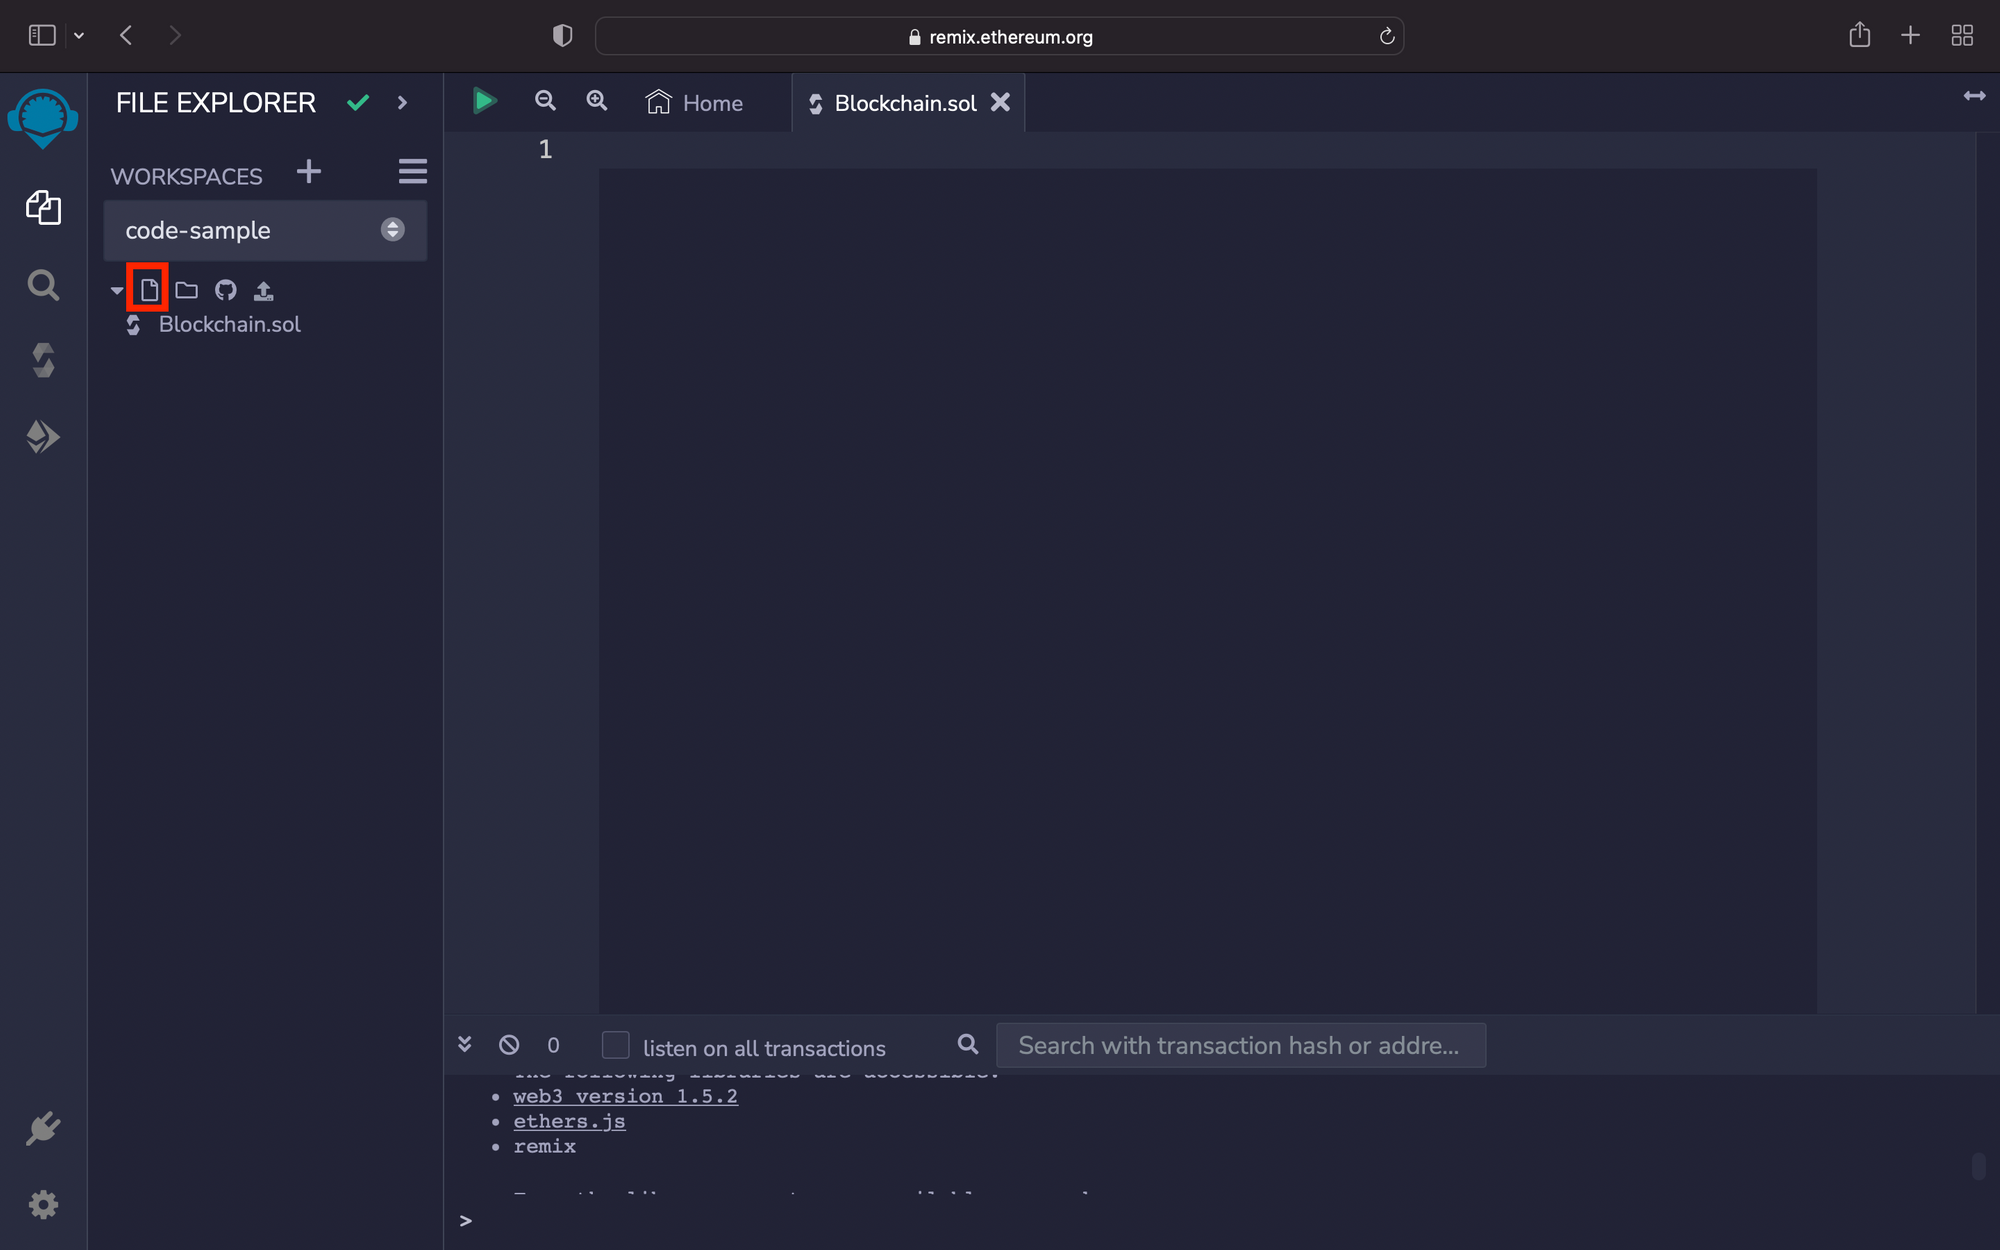
.sol is the extension used for solidity files. The blank space is where we will type our code.
Solidity code always begins with the line below:
// SPDX-License-Identifier: UNLICENSED
Without this code, you will get an error. It is just like saying that you accept the terms and conditions of writing Solidity.
The next thing to do is to state the Solidity version you want to use. I will use the following code:
pragma solidity ^0.8.7;
The caret (^) sign indicates that the program will be compatible with higher versions of solidity. We can now start the program.
The first thing to do is to define a Class named Blockchain. However, the keyword for Class in solidity is contract. So we have:
contract Blockchain {

}
Inside the contract above, we will create a data-type called BlockStruck with the code below:
struct BlockStruck {
    uint256 index;
    uint256 timestamp;
    uint256 amount;
    address sender;
    address recipient;
}
Solidity allows us to create any data-type that we see fit using the struct keyword, which is short for structure.
We define all the keys we expect a value for in the struct. Since solidity is a strongly typed language, we specified a data-type before each key. The struct is similar to Object in JavaScript.
uint indicates that a variable is an integer. Adding a number after it (such as uint256 or uint18) specifies the maximum size it should take, but uint assumes uint256 by default.
address, on the other hand, indicates that a variable is a wallet address. There is also the string data-type.
The next thing that we want to define is an event. An event is usually triggered at the end of a function's execution to send data to the frontend. You can see it like console.log. Some people also use it as a cheap way of storage.
We want to define a BlockEvent that we will trigger after adding a block to the chain. Enter the following code below the BlockStruct:
event BlockEvent(uint256 amount, address sender, address recipient);
Unlike struct, circular braces are used for an event, and their keys are separated by commas (,). Also, notice that struct does not end with a semicolon, but event does.
Now that we have defined the structure of blocks, let's use it to setup an array of blocks called chain like this:
BlockStruck[] chain;
The code above defines the chain to be an array of BlockStruct. As always, we specify the data-type before the variable name.
Next, define a variable to keep track of how many blocks are in the chain:
uint256 chainCount;
You may choose to assign it a value on the same line (uint256 chainCount = 0;) or do it in the constructor function like this:
constructor() {
    chainCount = 0;
}
We will now define three (3) functions: addBlockToChain (to add blocks to the chain), getChain (to return all the blocks added to the chain), and getChainCount (to get the number of blocks added to the chain).
addBlockToChain function
The code below begins the function:
function addBlockToChain(uint256 amount, address payable recipient) public {

}
Like the functions you already know, it begins with the function keyword followed by the name of the function, and the argument it expects in braces.
One of the arguments (recipient) has a flag called payable, indicating that the wallet address is eligible to receive funds. Next to it is the function's visibility flag (public).
Visibility defines who can call a function or variable. It can be public, private, internal, or external.
- A
publicfunction can be called by any contract. privatefunctions can only be called inside the contract where they are defined.- Only contracts that inherit
internalfunctions can call them. externalfunctions are only accessible by other contracts.
In the addBlockToChain, we start by incrementing the chainCount by one like this:
chainCount += 1;
Next, add the block of a transaction to the chain like this:
        chain.push(
            BlockStruck(
                chainCount,
                block.timestamp,
                amount,
                msg.sender,
                recipient
            )
        );
The BlockStruct takes values corresponding to the keys set when defining the struct. It is then added to the chain array using the .push method. Now we have a new block in the chain.
Finally, we trigger the BlockEvent we created a while ago:
emit BlockEvent(amount, msg.sender, recipient);
emit is the keyword used to call an event. As with the BlockStruct, the BlockEvent takes the values as they correspond to the keys set when defining the it.
The addBlockToChain function now looks like this:
    function addBlockToChain(uint256 amount, address payable recipient) public {
        chainCount += 1;

        chain.push(
            BlockStruck(
                chainCount,
                block.timestamp,
                amount,
                msg.sender,
                recipient
            )
        );

        emit BlockEvent(amount, msg.sender, recipient);
    }
getChain function
This function takes no argument but returns a BlockStruct. We will use the following code:
    function getChain() public view returns (BlockStruck[] memory) {
        return chain;
    }
The program returns the chain, an array of all blocks.
Something to note in the function above is that we used view to show that this function returns a value. We also indicated the kind of data type we expect to be returned (returns (BlockStruck[] memory)) and the storage type to be used (memory).
There are two main storage types in solidity: Storage and Memory. Storage is the default type of storage used to hold data permanently for a program while Memory is temporary and is less expensive in terms of gas.
Gas is a fee paid to execute smart contracts. Don't worry about that. We have some dummy gas that will enable us to test our program.
getChainCount function
Like the getChain, this function also takes no argument. It returns the number of blocks added to the chain so far. See the code below:
    function getChainCount() public view returns (uint256) {
        return chainCount;
    }
That completes the smart contract that we intended to create. Now the code looks like this:
// SPDX-License-Identifier: UNLICENSED
pragma solidity ^0.8.7;

contract Blockchain {
    struct BlockStruck {
        uint256 index;
        uint256 timestamp;
        uint256 amount;
        address sender;
        address recipient;
    }

    event BlockEvent(uint256 amount, address sender, address recipient);

    BlockStruck[] chain;
    uint256 chainCount;

    constructor() {
        chainCount = 0;
    }

    function addBlockToChain(uint256 amount, address payable recipient) public {
        chainCount += 1;

        chain.push(
            BlockStruck(
                chainCount,
                block.timestamp,
                amount,
                msg.sender,
                recipient
            )
        );

        emit BlockEvent(amount, msg.sender, recipient);
    }

    function getChain() public view returns (BlockStruck[] memory) {
        return chain;
    }

    function getChainCount() public view returns (uint256) {
        return chainCount;
    }
}
How to Compile the Smart Contract
We need to compile the code to check if there are errors that we need to fix. The steps below will help us do just that.
Click on the third icon on the left side menu of the remix IDE:

Ensure that the solidity version selected matches the one you specified at the beginning of the smart contract. Then click the Compile button:
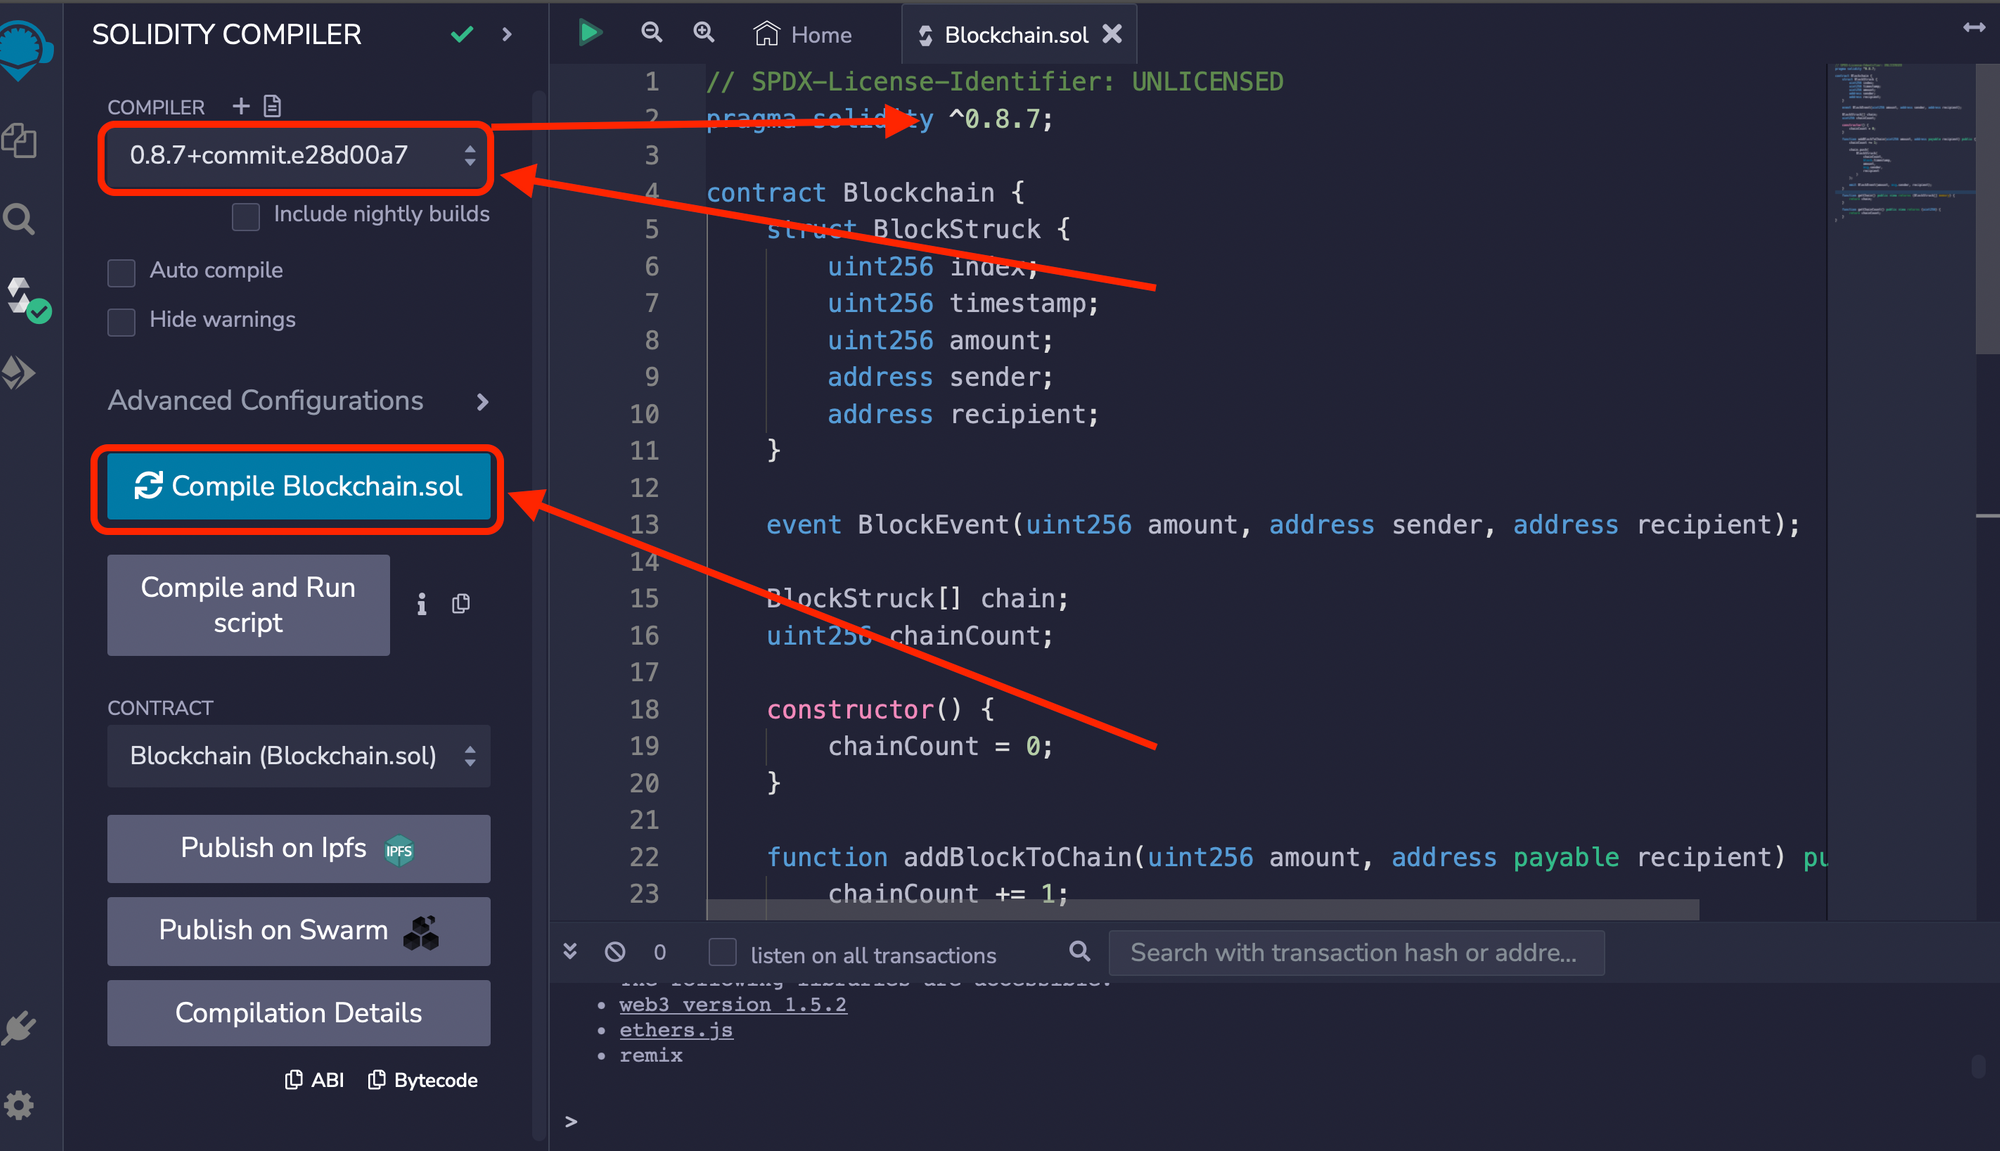
The compilation was successful since we have no errors. Beautiful 🥰.
How to Deploy the Smart Contract
Now that compilation is successful, let's deploy the contract.
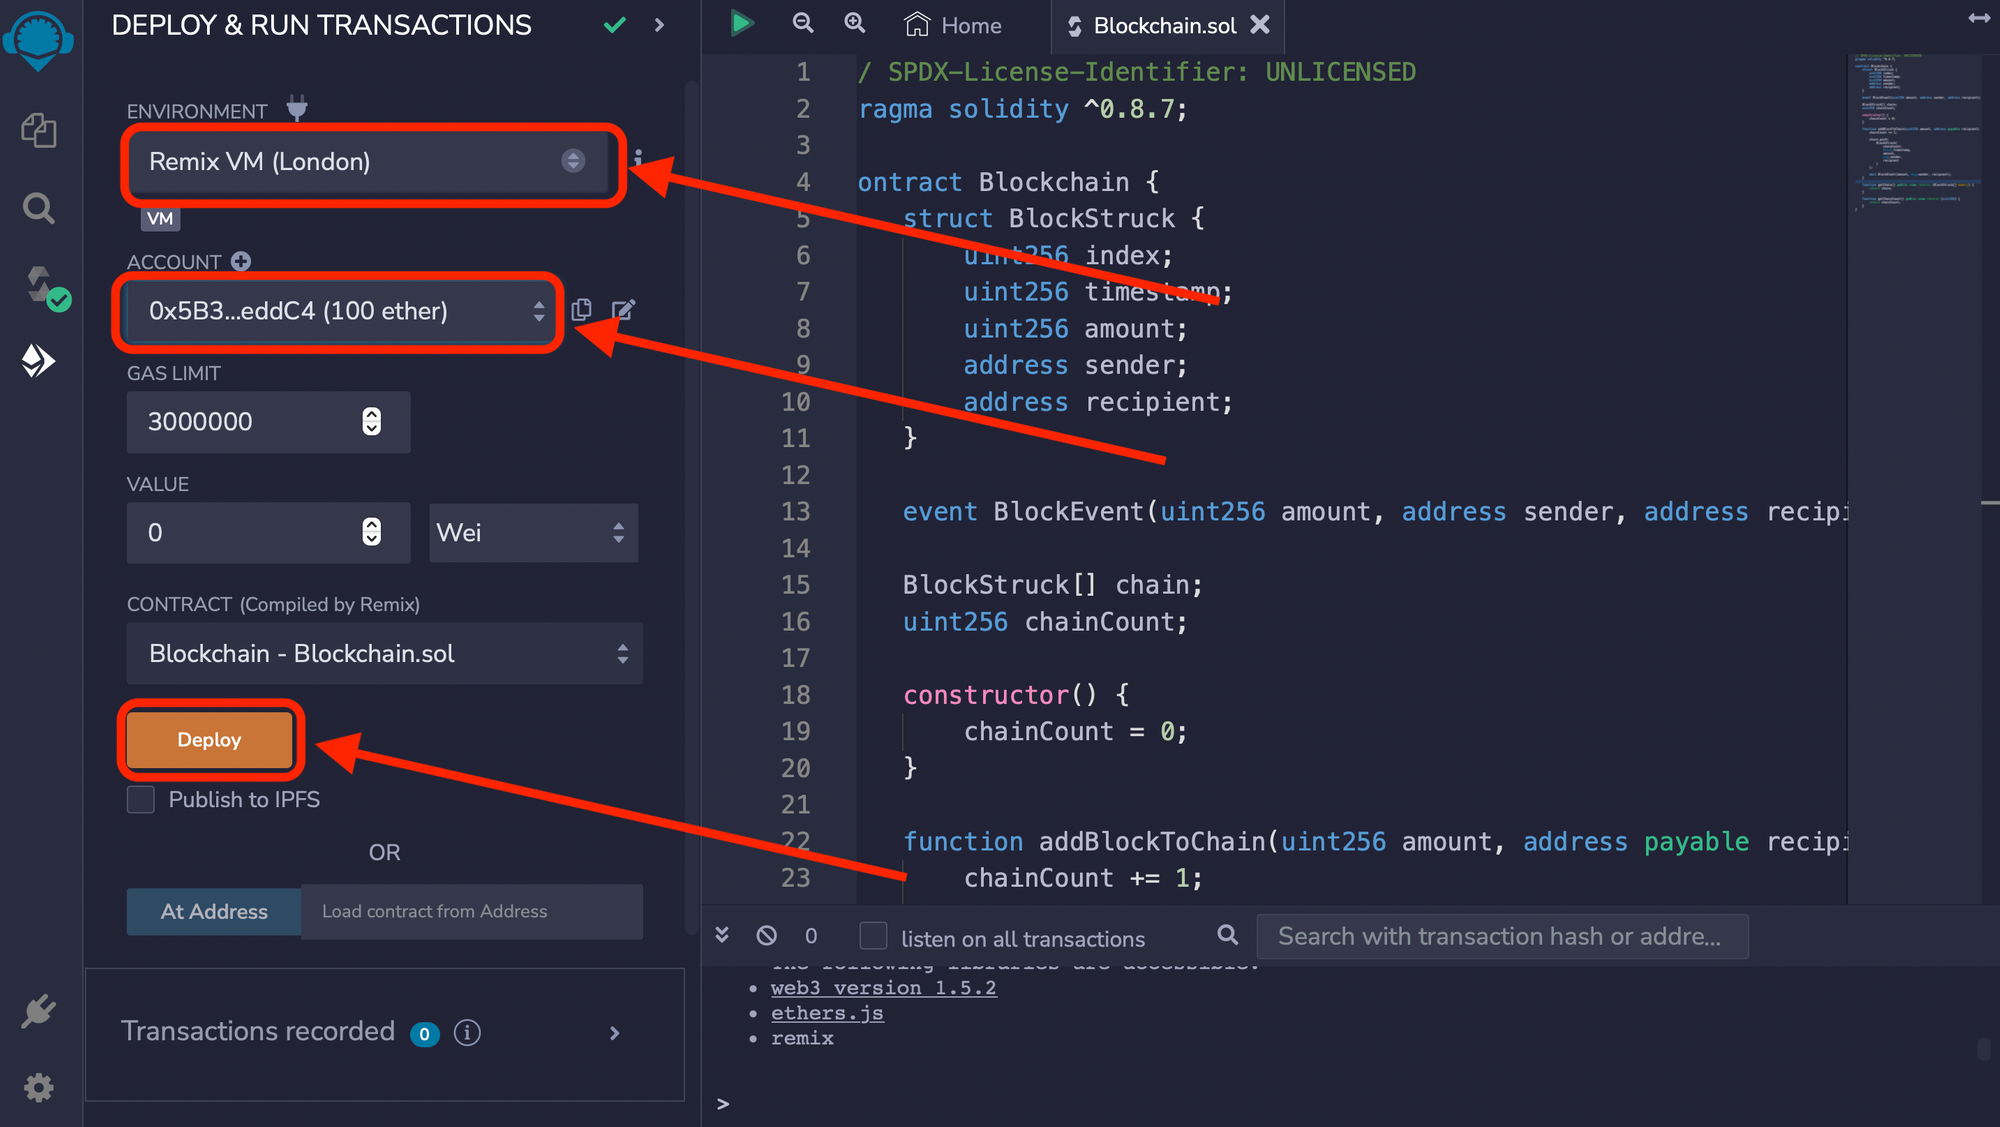
Click on the fourth icon in the side menu:
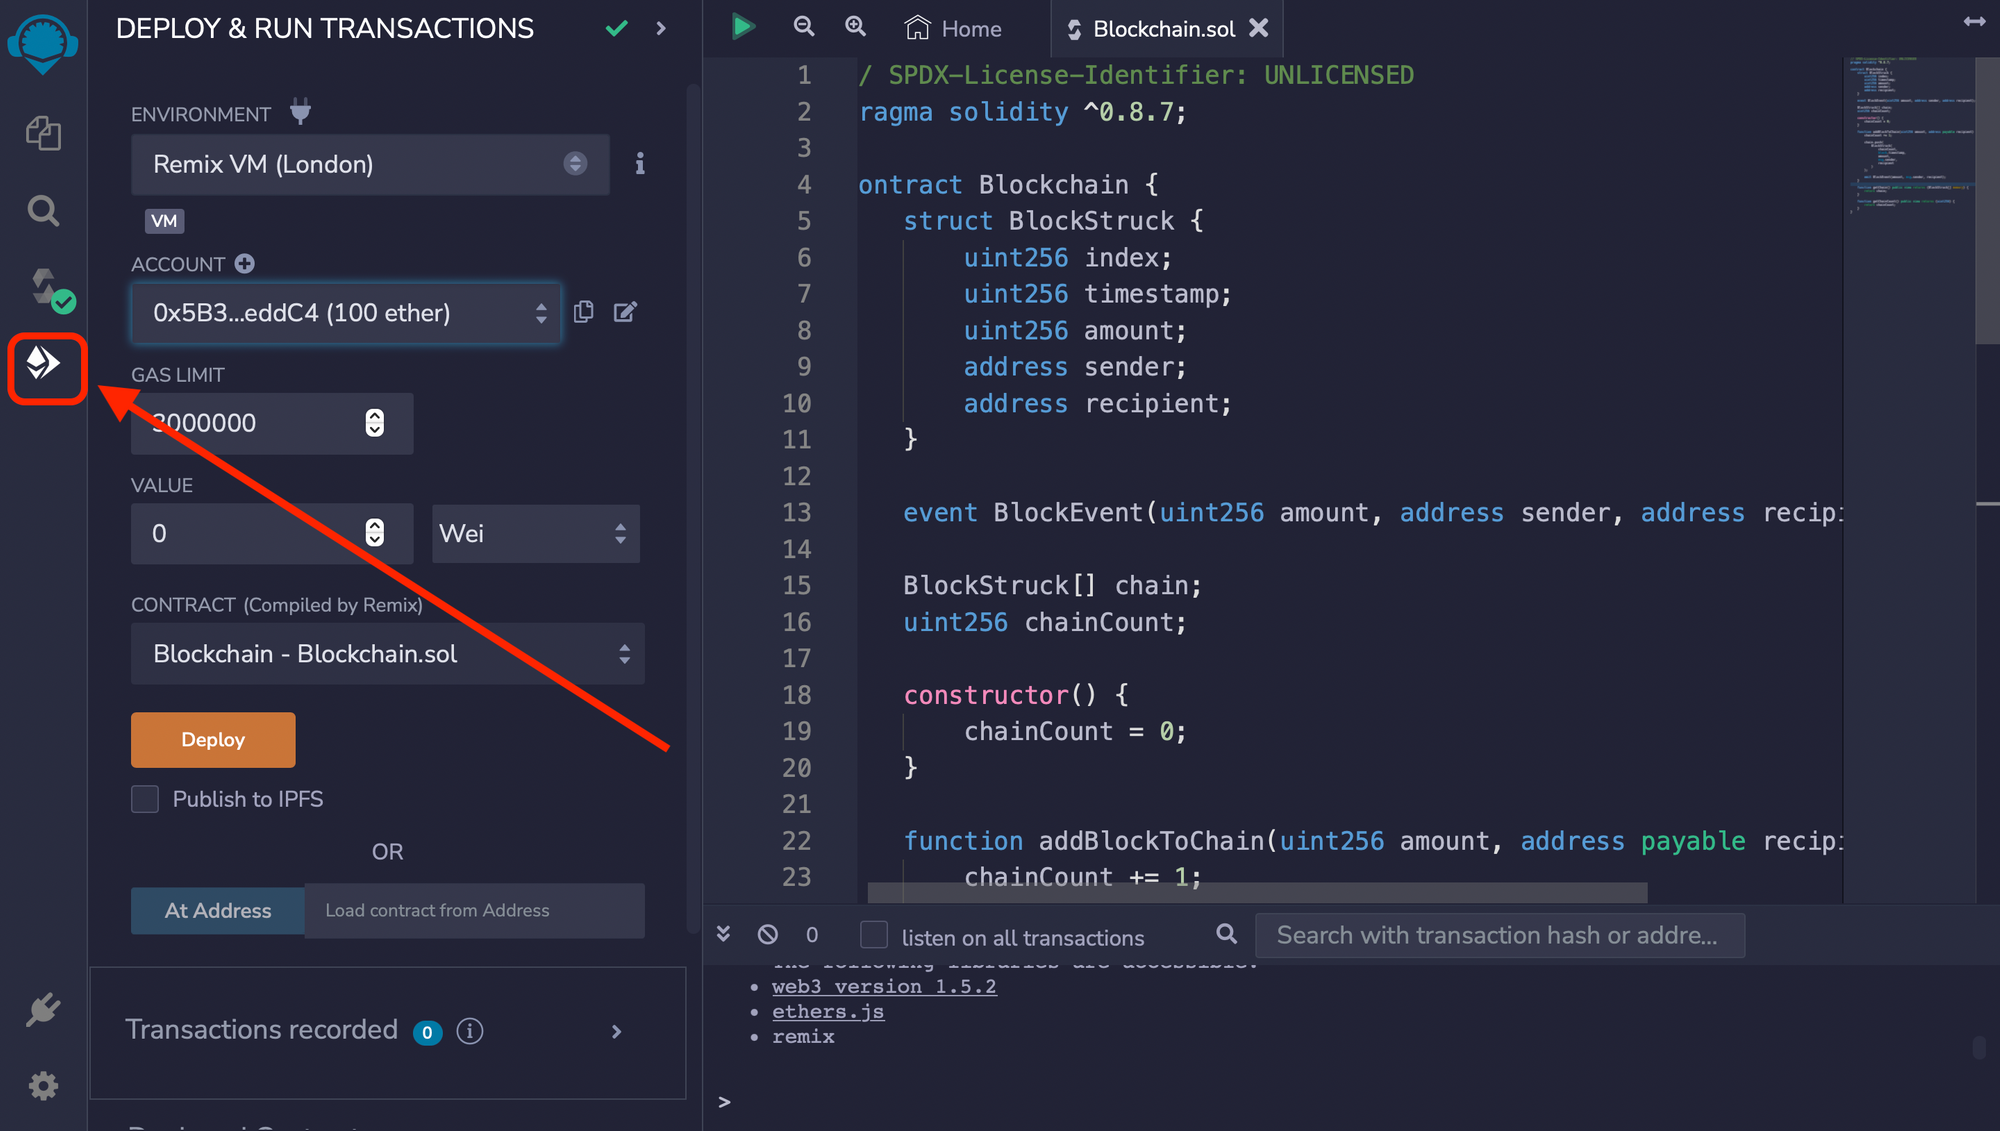
Select Remix VM (London) for the ENVIRONMENT. It has ten (10) accounts with 100 dummy ethers each that you may use for test purposes. Then click the Deploy button:
Now when you scroll to the bottom, you will find the Blockchain contract under Deployed Contracts. Click the arrow by the deployed contract name to see the functions of the contract that you can interact with.
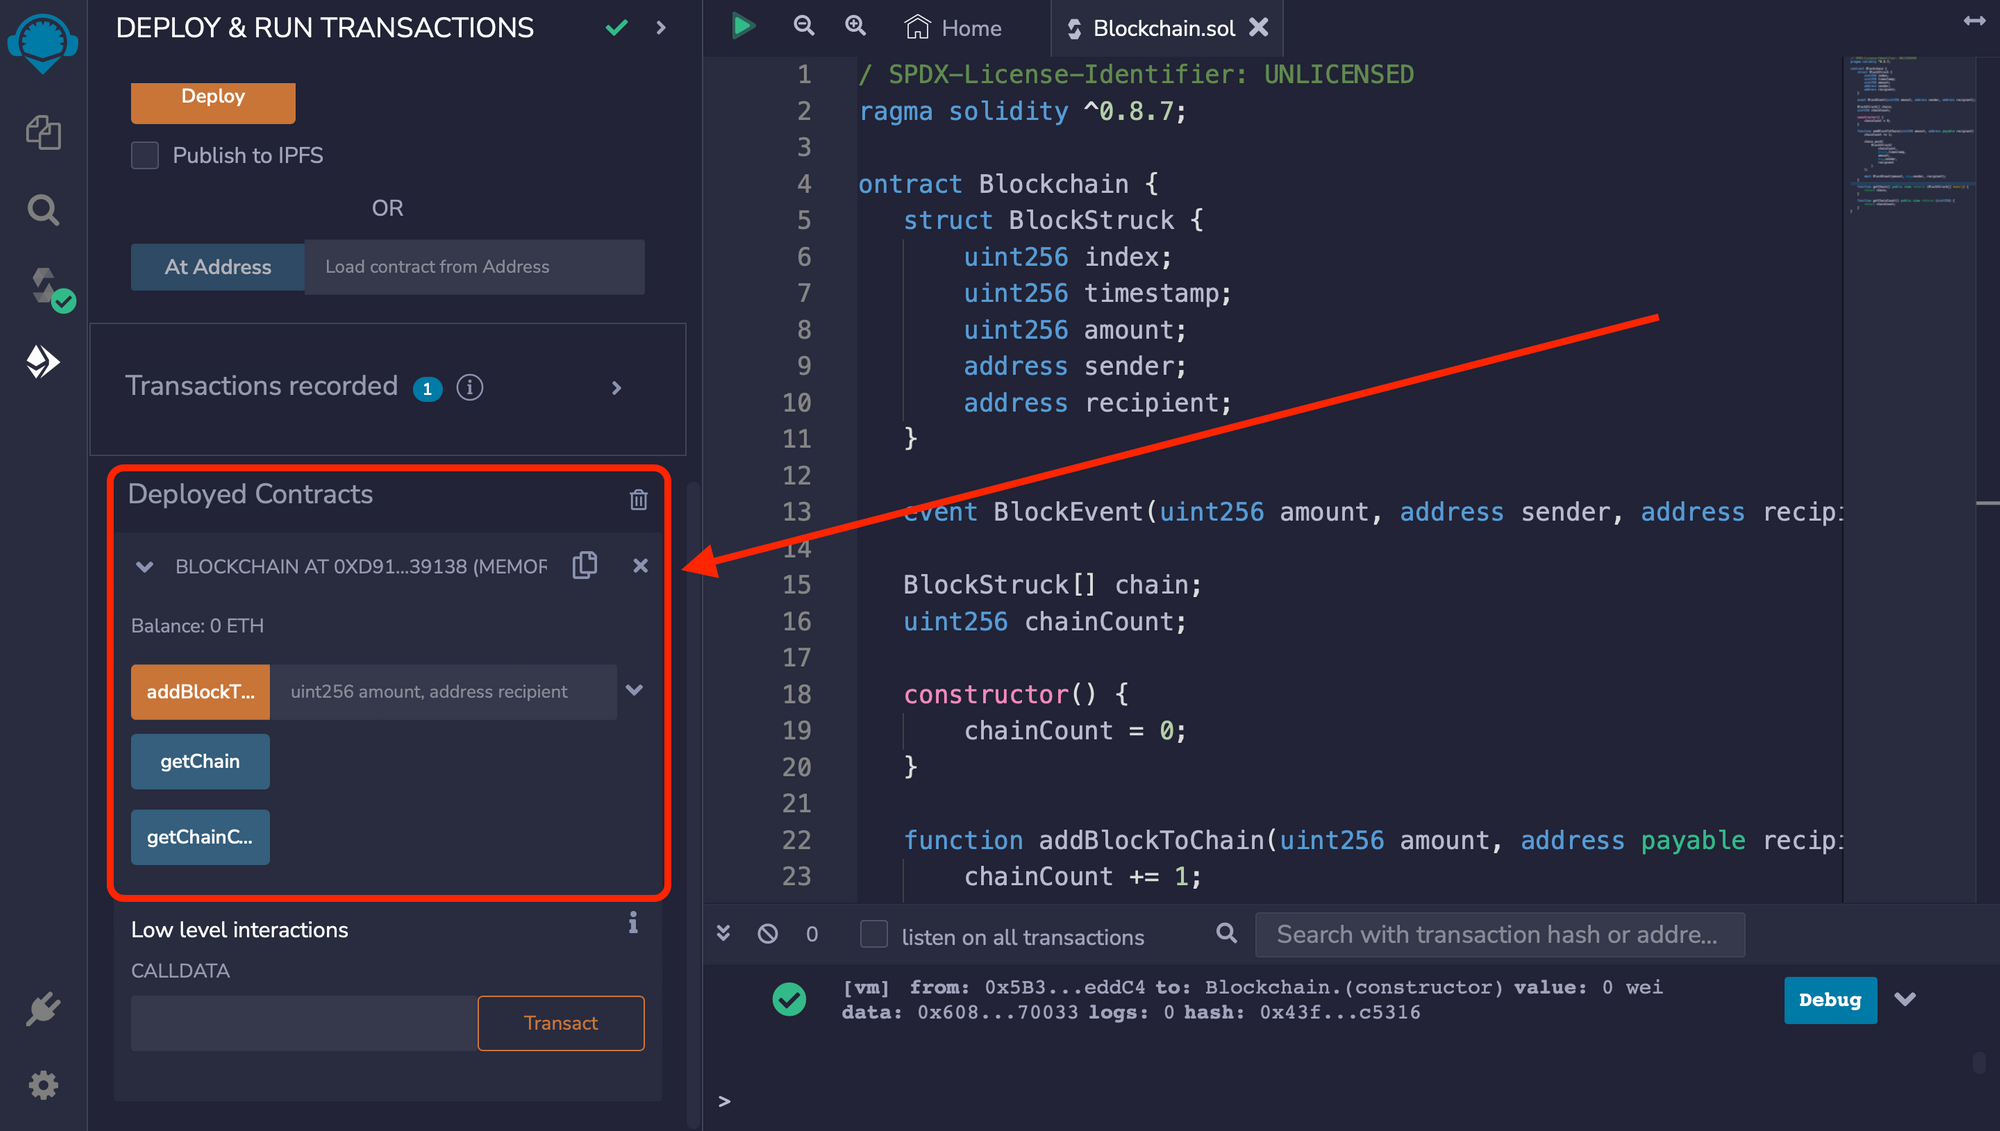
There are three (3) functions in the image above that match the three (3) functions we defined in our smart contract. Remix automatically creates a UI for you to test your contracts as soon as you deploy them
How to Test the Smart Contract
We will now test the functions we created to see how they respond.
How to test the addBlockToChain function
To test the addBlockToChain function, click the caret (^) icon by the side of the function button and input box. That drops down a form. Fill in 10 for the amount, and fill in one of the ten 10 account addresses for the recipient:
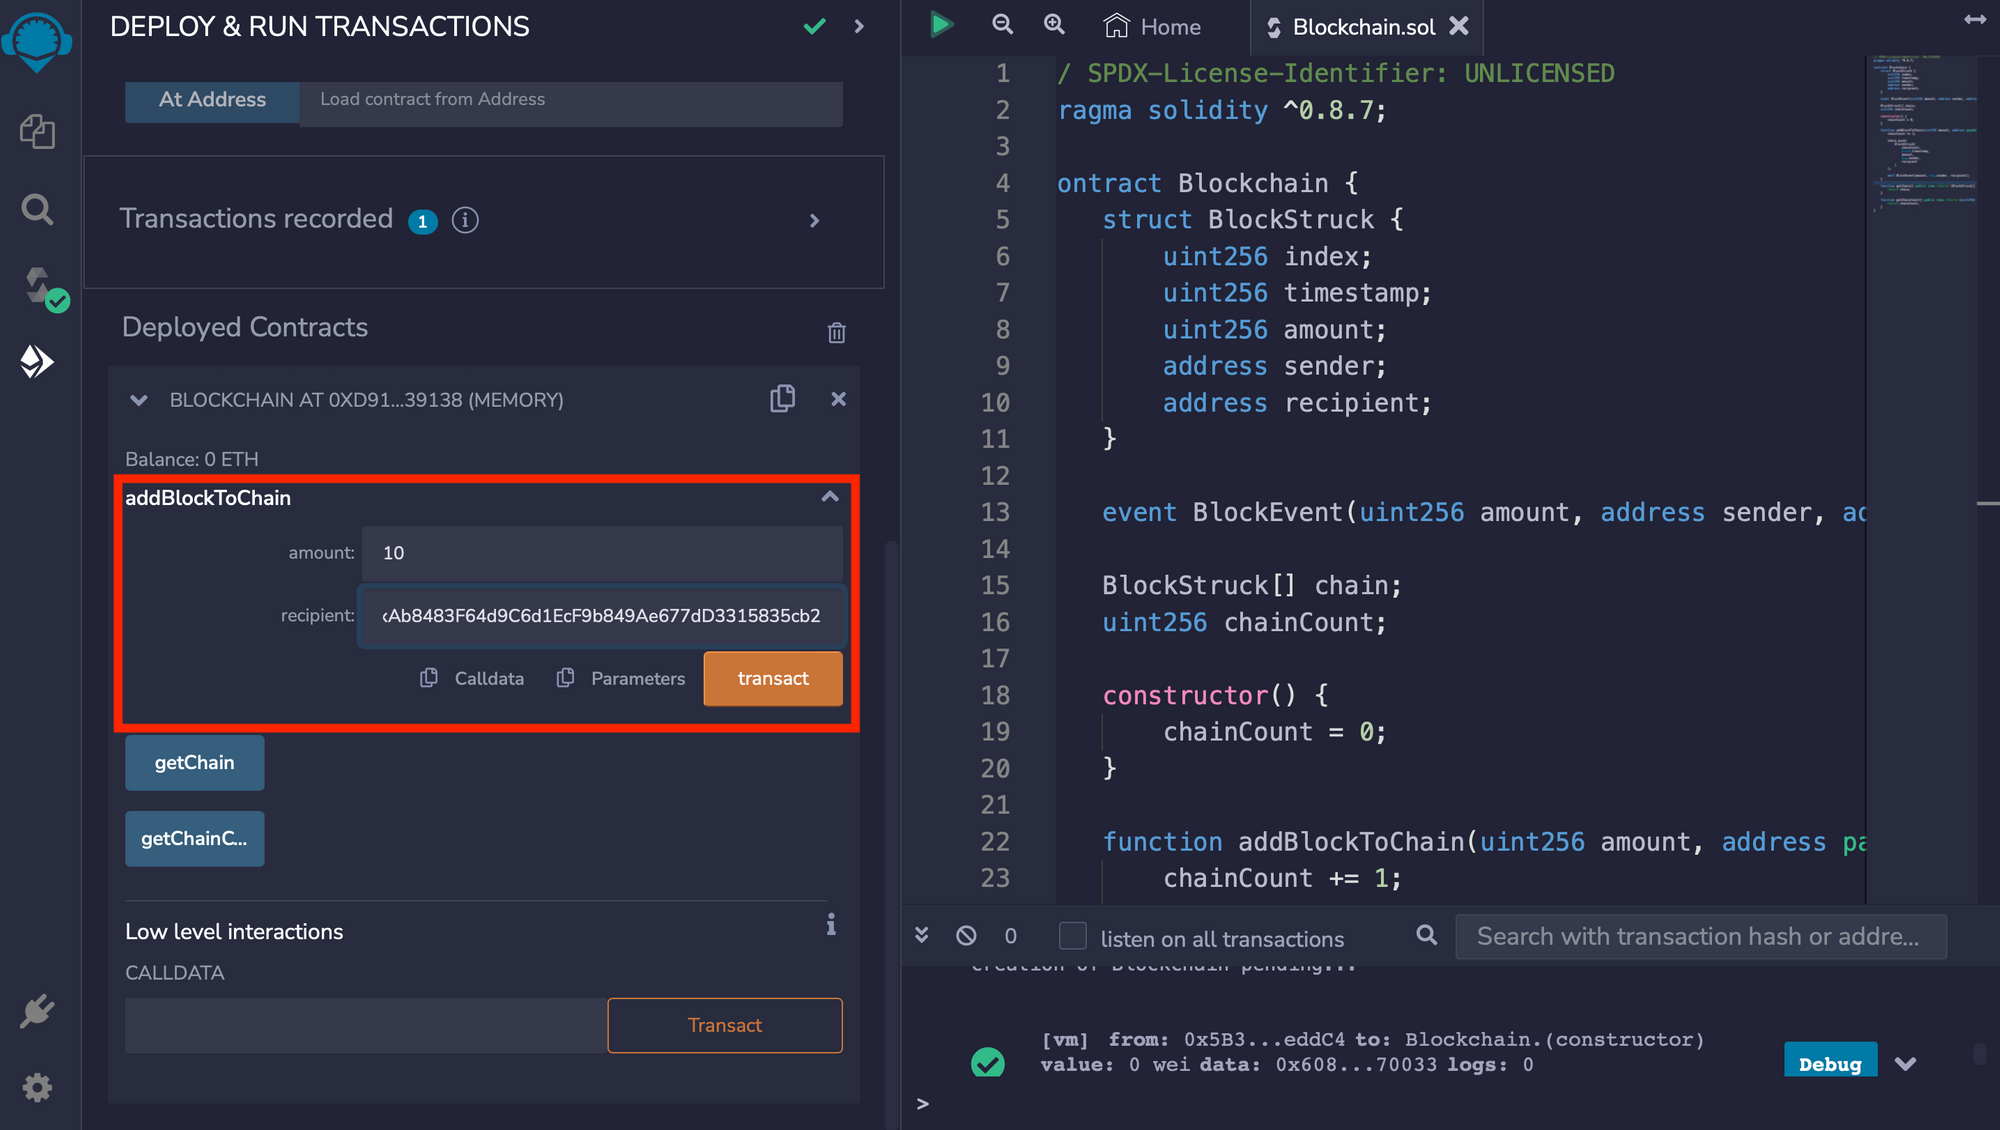
Click the transact button.
Note that you cannot send funds to the same address you used to deploy the contract. You must choose a different account.
How to test the getChain function
Click the getChain button to reveal the blocks in the chain so far:
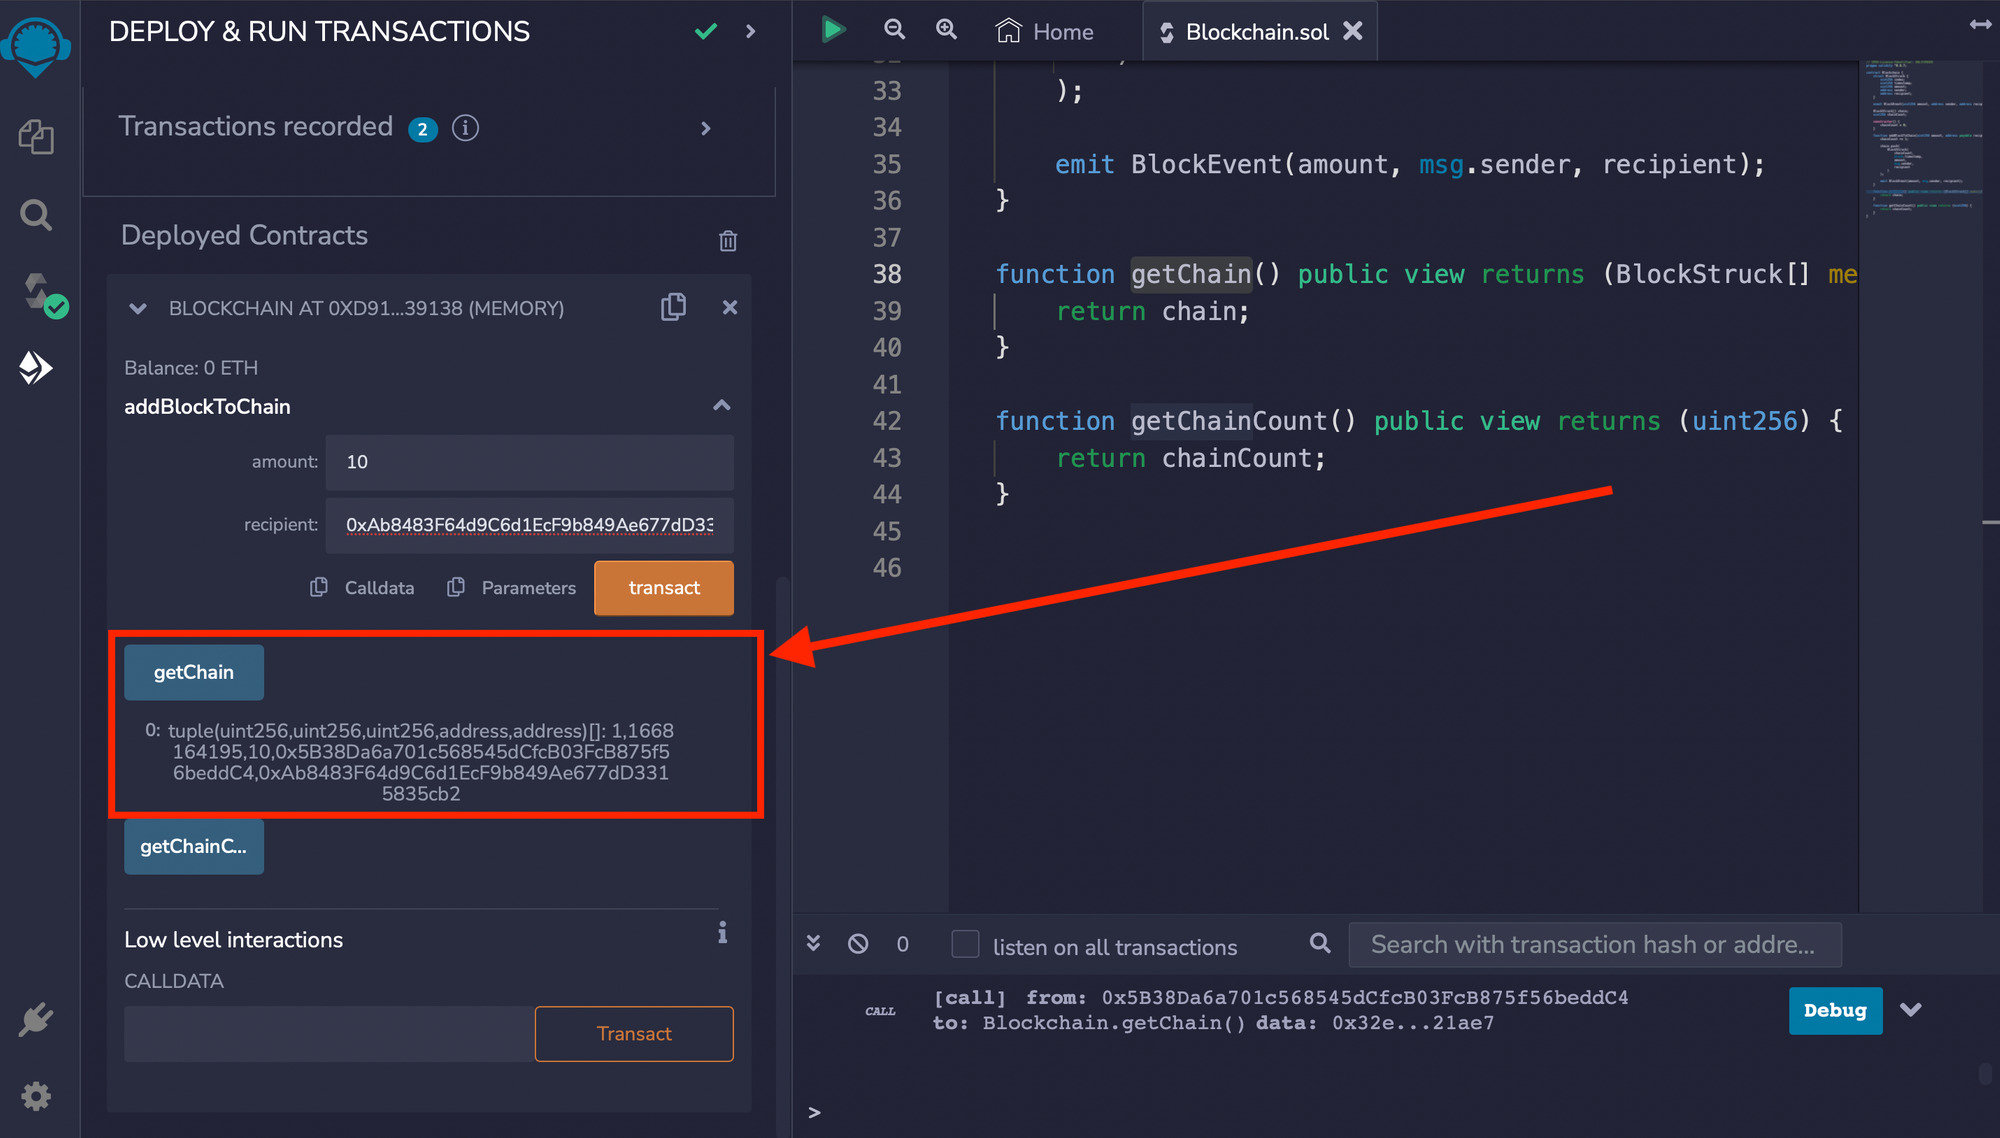
It returns a tuple, which is a kind of array. Recall that chain is supposed to be an array containing a list of blocks.
How to test the getChainCount function
To get the number of blocks added, click the getChainCount button:
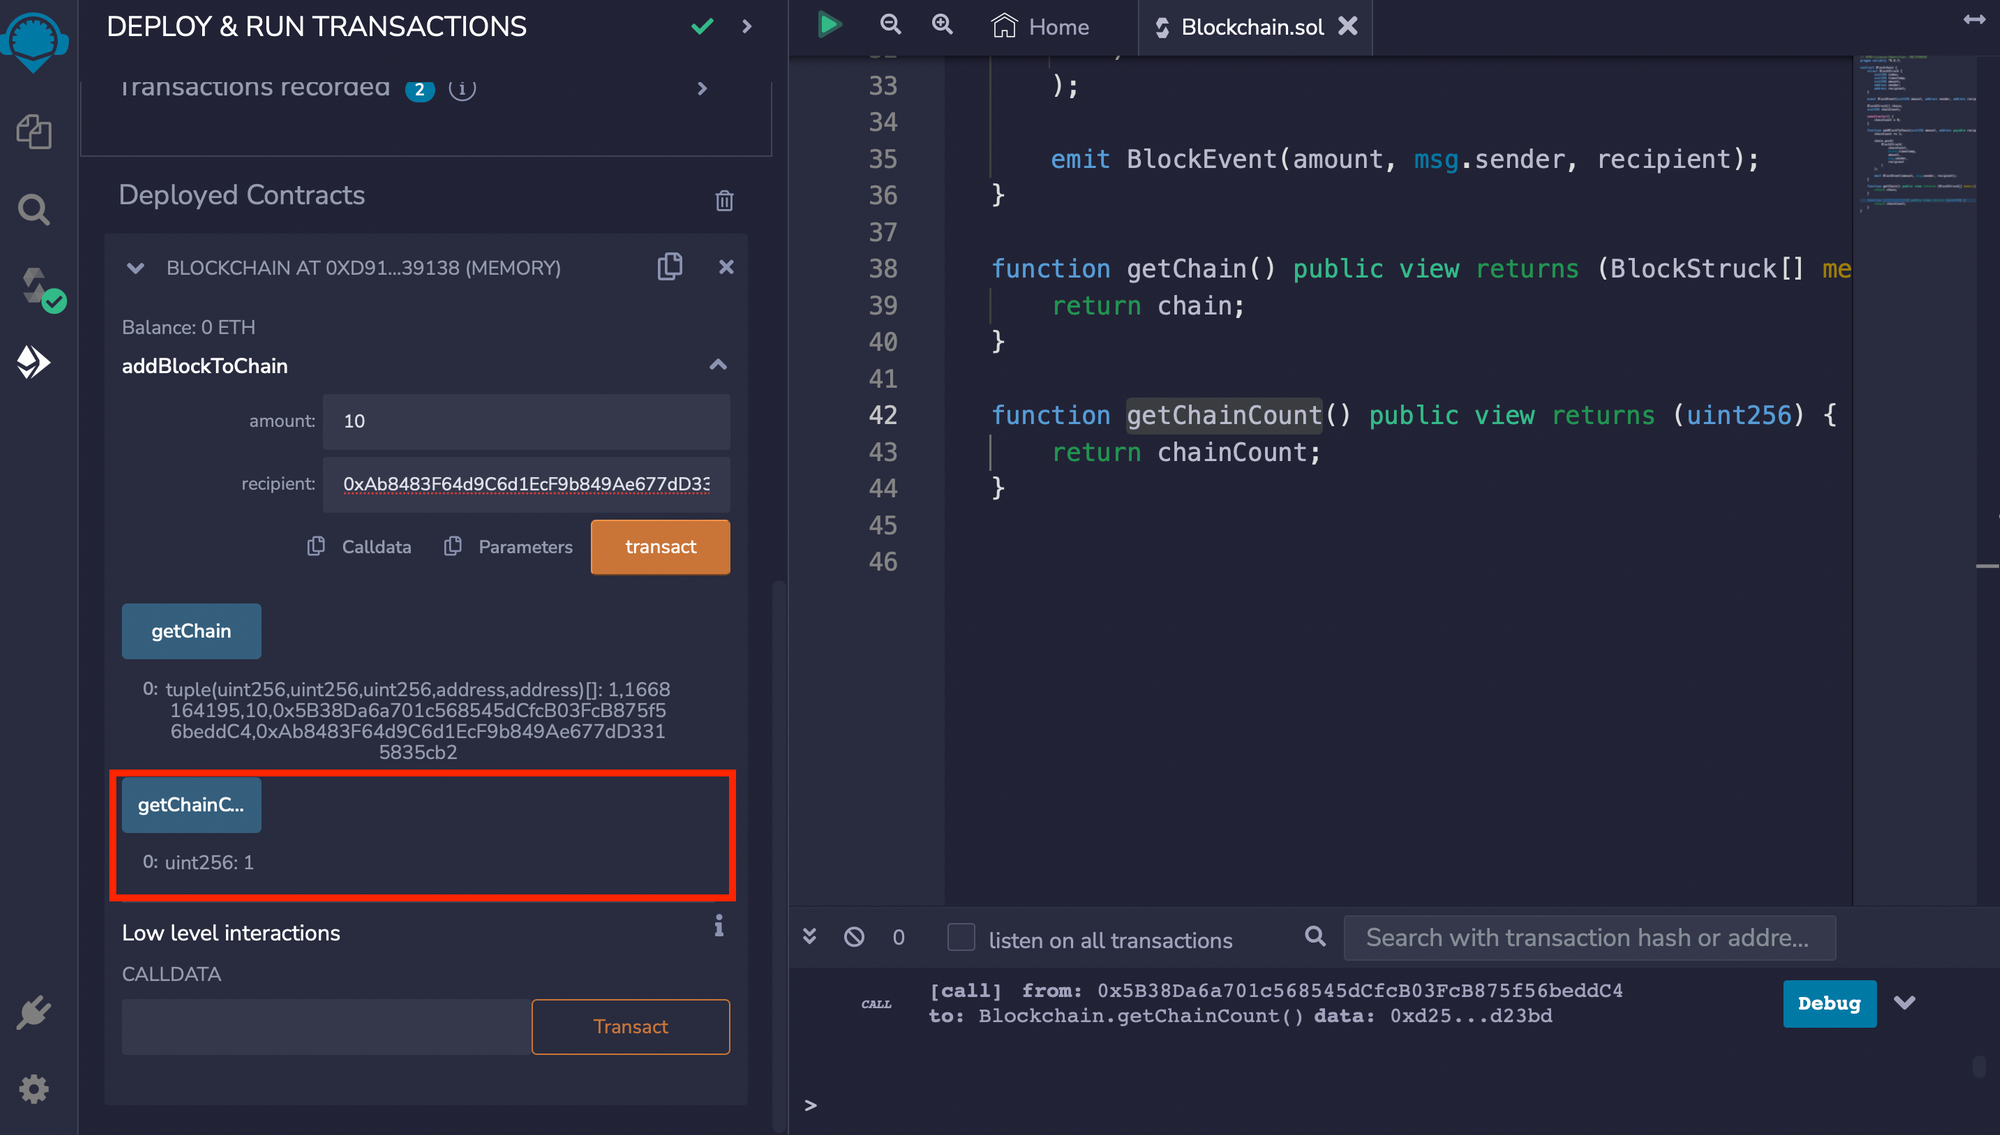
And just as we defined it, it returns a uint. There is just one item in the chain for now, but as you keep adding more blocks, the number will increase.
Walah! Did we come this far? 😳 How Awesome 😍.
Congratulations on sticking to the end of this tutorial!
You are now ready to explore all that you can do with blockchain.
Conclusion
Blockchain is redefining the internet and has come to stay. The difficulty I encountered trying to learn the ropes of this new technology moved me to document this beginner-friendly guide. I hope that it helps everyone still struggling out there.
In this tutorial, you learned what blockchain is, how it works and what goes on behind the scenes. We demonstrated how it works using the OOP pattern of JavaScript and then concluded with a brief introduction to how to build smart contracts using the solidity programming language and remix IDE.
I recommend that you keep learning and getting better at building blockchain applications by creating the following projects in the order they are listed (by increasing difficulty):
Hello World
Simple Storage
Voting Smart Contract
Ether Wallets
Multi Send
Time Lock Smart Contract
ERC20 Token
Token Wallet
Air Drop
ICO
These projects will challenge you to do research and sharpen your blockchain skill.
Happy Chaining!