
By Nick Karnik
Mongoose is an Object Data Modeling (ODM) library for MongoDB and Node.js. It manages relationships between data, provides schema validation, and is used to translate between objects in code and the representation of those objects in MongoDB.
MongoDB is a schema-less NoSQL document database. It means you can store JSON documents in it, and the structure of these documents can vary as it is not enforced like SQL databases. This is one of the advantages of using NoSQL as it speeds up application development and reduces the complexity of deployments.
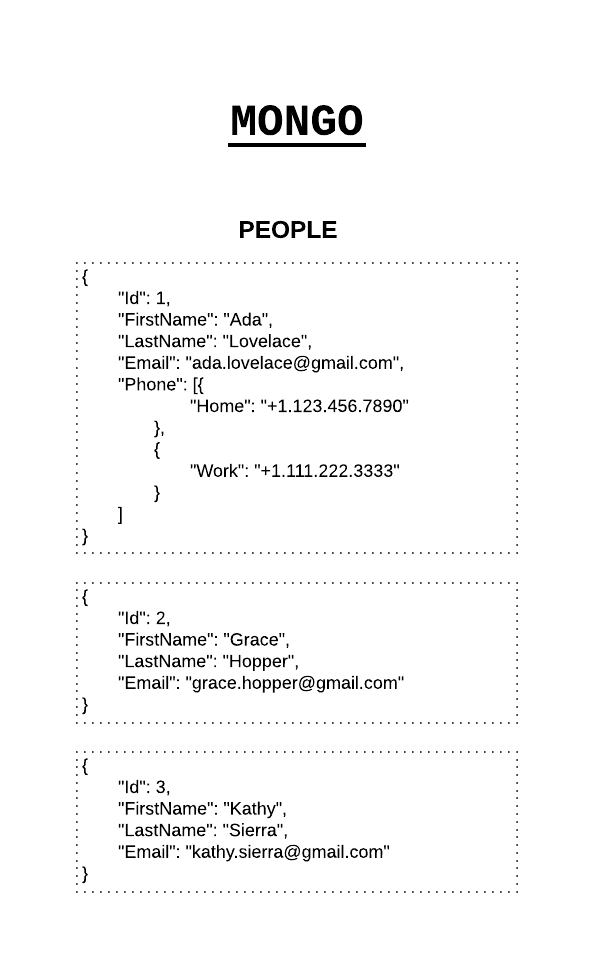
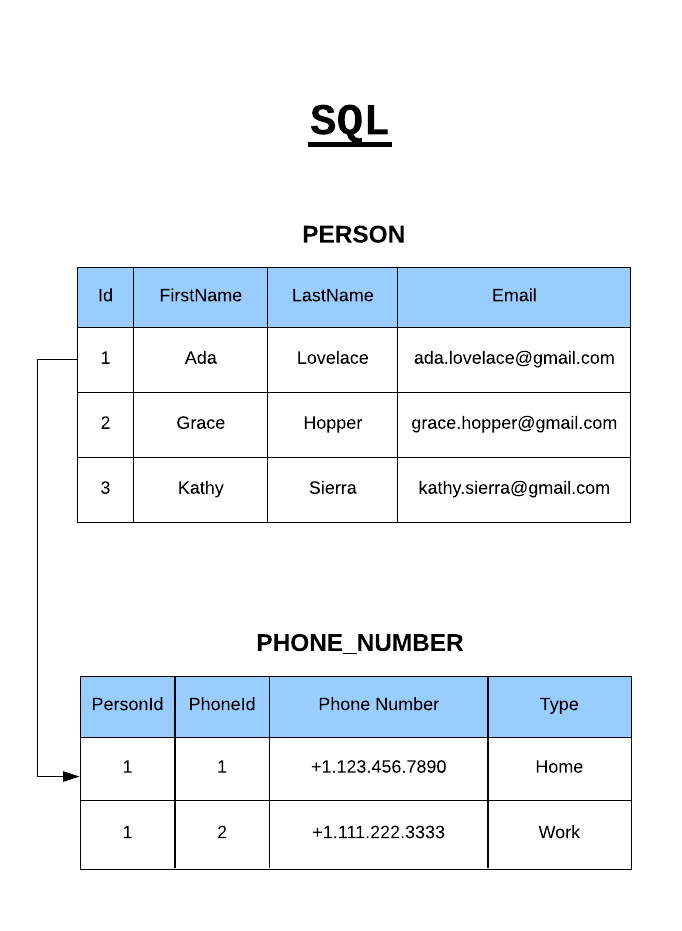
Below is an example of how data is stored in Mongo vs. SQL Database:
Terminologies
Collections
Collections in Mongo are equivalent to tables in relational databases. They can hold multiple JSON documents.
Documents
Documents are equivalent to records or rows of data in SQL. While a SQL row can reference data in other tables, Mongo documents usually combine that in a document.
Fields
Fields, also known as properties or attributes, are similar to columns in a SQL table. In the image above, FirstName, LastName, Email, and Phone are all fields.
Schema
While Mongo is schema-less, SQL defines a schema via the table definition. A Mongoose schema is a document data structure (or shape of the document) that is enforced via the application layer.
SchemaTypes
While Mongoose schemas define the overall structure or shape of a document, SchemaTypes define the expected data type for individual fields (String, Number, Boolean, and so on).
You can also pass in useful options like required to make a field non-optional, default to set a default value for the field, and many more.
Models
Models are higher-order constructors that take a schema and create an instance of a document equivalent to records in a relational database.
Example
Here's a small code snippet to illustrate some of the terminology above:
const puppySchema = new mongoose.Schema({
  name: {
    type: String,
    required: true
  },
  age: Number
});

const Puppy = mongoose.model('Puppy', puppySchema);
In the code above, puppySchema defines the shape of the document which has two fields, name, and age.
The SchemaType for name is String and for age is Number. Note that you can define the SchemaType for a field by using an object with a type property like with name. Or you can apply a SchemaType directly to the field like with age.
Also, notice that the SchemaType for name has the option required set to true. To use options like required and lowercase for a field, you need to use an object to set the SchemaType.
At the bottom of the snippet, puppySchema is compiled into a model named Puppy, which can then be used to construct documents in an application.
Getting Started
Mongo Installation
Before we get started, let’s setup Mongo. You can choose from one of the following options (we are using option #1 for this article):
- Download the appropriate MongoDB version for your Operating System from the MongoDB Website and follow their installation instructions
- Create a free sandbox database subscription on mLab
- Install Mongo using Docker if you prefer to use Docker
Let’s navigate through some of the basics of Mongoose by implementing a model that represents data for a simplified address book.
I am using Visual Studio Code, Node 8.9, and NPM 5.6. Fire up your favorite IDE, create a blank project, and let’s get started! We will be using the limited ES6 syntax in Node, so we won’t be configuring Babel.
NPM Install
Let’s go to the project folder and initialize our project
npm init -y
Let’s install Mongoose and a validation library with the following command:
npm install mongoose validator
The above install command will install the latest version of the libraries. The Mongoose syntax in this article is specific to Mongoose v5 and beyond.
Database Connection
Create a file ./src/database.js under the project root.
Next, we will add a simple class with a method that connects to the database.
Your connection string will vary based on your installation.
let mongoose = require('mongoose');

const server = '127.0.0.1:27017'; // REPLACE WITH YOUR DB SERVER
const database = 'fcc-Mail'; // REPLACE WITH YOUR DB NAME

class Database {
  constructor() {
    this._connect();
  }

  _connect() {
    mongoose
      .connect(`mongodb://${server}/${database}`)
      .then(() => {
        console.log('Database connection successful');
      })
      .catch((err) => {
        console.error('Database connection error');
      });
  }
}

module.exports = new Database();
The require(‘mongoose’) call above returns a Singleton object. It means that the first time you call require(‘mongoose’), it is creating an instance of the Mongoose class and returning it. On subsequent calls, it will return the same instance that was created and returned to you the first time because of how module import/export works in ES6.
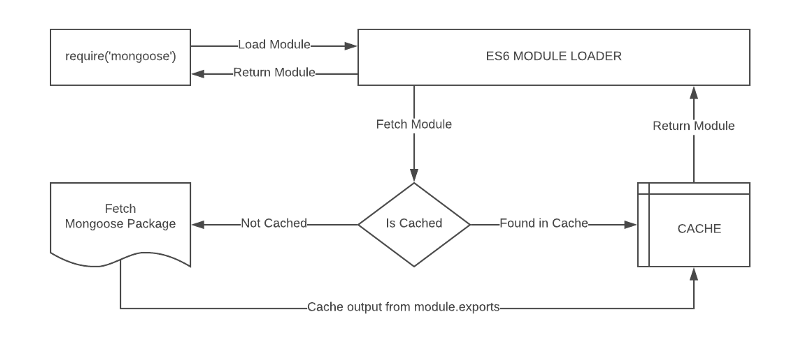
Similarly, we have turned our Database class into a singleton by returning an instance of the class in the module.exports statement because we only need a single connection to the database.
ES6 makes it very easy for us to create a singleton (single instance) pattern because of how the module loader works by caching the response of a previously imported file.
Mongoose Schema vs. Model
A Mongoose model is a wrapper on the Mongoose schema. A Mongoose schema defines the structure of the document, default values, validators, etc., whereas a Mongoose model provides an interface to the database for creating, querying, updating, deleting records, etc.
Creating a Mongoose model comprises primarily of three parts:
1. Referencing Mongoose
let mongoose = require('mongoose');
This reference will be the same as the one that was returned when we connected to the database, which means the schema and model definitions will not need to explicitly connect to the database.
2. Defining the Schema
A schema defines document properties through an object where the key name corresponds to the property name in the collection.
let emailSchema = new mongoose.Schema({
  email: String
});
Here we define a property called email with a schema type String which maps to an internal validator that will be triggered when the model is saved to the database. It will fail if the data type of the value is not a string type.
The following Schema Types are permitted:
- Array
- Boolean
- Buffer
- Date
- Mixed (A generic / flexible data type)
- Number
- ObjectId
- String
Mixed and ObjectId are defined under require(‘mongoose’).Schema.Types.
3. Exporting a Model
We need to call the model constructor on the Mongoose instance and pass it the name of the collection and a reference to the schema definition.
module.exports = mongoose.model('Email', emailSchema);
Let’s combine the above code into ./src/models/email.js to define the contents of a basic email model:
let mongoose = require('mongoose');

let emailSchema = new mongoose.Schema({
  email: String
});

module.exports = mongoose.model('Email', emailSchema);
A schema definition should be simple, but its complexity is usually based on application requirements. Schemas can be reused and they can contain several child-schemas too. In the example above, the value of the email property is a simple value type. However, it can also be an object type with additional properties on it.
We can create an instance of the model we defined above and populate it using the following syntax:
let EmailModel = require('./email');

let msg = new EmailModel({
  email: 'ada.lovelace@gmail.com'
});
Let’s enhance the Email schema to make the email property a unique, required field and convert the value to lowercase before saving it. We can also add a validation function that will ensure that the value is a valid email address. We will reference and use the validator library installed earlier.
let mongoose = require('mongoose');
let validator = require('validator');

let emailSchema = new mongoose.Schema({
  email: {
    type: String,
    required: true,
    unique: true,
    lowercase: true,
    validate: (value) => {
      return validator.isEmail(value);
    }
  }
});

module.exports = mongoose.model('Email', emailSchema);
Basic Operations
Mongoose has a flexible API and provides many ways to accomplish a task. We will not focus on the variations because that is out of scope for this article, but remember that most of the operations can be done in more than one way either syntactically or via the application architecture.
Create Record
Let’s create an instance of the email model and save it to the database:
let EmailModel = require('./email');

let msg = new EmailModel({
  email: 'ADA.LOVELACE@GMAIL.COM'
});

msg
  .save()
  .then((doc) => {
    console.log(doc);
  })
  .catch((err) => {
    console.error(err);
  });
The result is a document that is returned upon a successful save:
{
  _id: 5a78fe3e2f44ba8f85a2409a,
  email: 'ada.lovelace@gmail.com',
  __v: 0
}
The following fields are returned (internal fields are prefixed with an underscore):
- The
_idfield is auto-generated by Mongo and is a primary key of the collection. Its value is a unique identifier for the document. - The value of the
emailfield is returned. Notice that it is lower-cased because we specified thelowercase: trueattribute in the schema. __vis the versionKey property set on each document when first created by Mongoose. Its value contains the internal revision of the document.
If you try to repeat the save operation above, you will get an error because we have specified that the email field should be unique.
Fetch Record
Let’s try to retrieve the record we saved to the database earlier. The model class exposes several static and instance methods to perform operations on the database. We will now try to find the record that we created previously using the find method and pass the email as the search term.
EmailModel.find({
  email: 'ada.lovelace@gmail.com' // search query
})
  .then((doc) => {
    console.log(doc);
  })
  .catch((err) => {
    console.error(err);
  });
The document returned will be similar to what was displayed when we created the record:
{
  _id: 5a78fe3e2f44ba8f85a2409a,
  email: 'ada.lovelace@gmail.com',
  __v: 0
}
Update Record
Let’s modify the record above by changing the email address and adding another field to it, all in a single operation. For performance reasons, Mongoose won’t return the updated document so we need to pass an additional parameter to ask for it:
EmailModel.findOneAndUpdate(
  {
    email: 'ada.lovelace@gmail.com' // search query
  },
  {
    email: 'theoutlander@live.com' // field:values to update
  },
  {
    new: true, // return updated doc
    runValidators: true // validate before update
  }
)
  .then((doc) => {
    console.log(doc);
  })
  .catch((err) => {
    console.error(err);
  });
The document returned will contain the updated email:
{
  _id: 5a78fe3e2f44ba8f85a2409a,
  email: 'theoutlander@live.com',
  __v: 0
}
Delete Record
We will use the findOneAndRemove call to delete a record. It returns the original document that was removed:
EmailModel.findOneAndRemove({
  email: 'theoutlander@live.com'
})
  .then((response) => {
    console.log(response);
  })
  .catch((err) => {
    console.error(err);
  });
Helpers
We have looked at some of the basic functionality above known as CRUD (Create, Read, Update, Delete) operations, but Mongoose also provides the ability to configure several types of helper methods and properties. These can be used to further simplify working with data.
Let’s create a user schema in ./src/models/user.js with the fieldsfirstName and lastName:
let mongoose = require('mongoose');

let userSchema = new mongoose.Schema({
  firstName: String,
  lastName: String
});

module.exports = mongoose.model('User', userSchema);
Virtual Property
A virtual property is not persisted to the database. We can add it to our schema as a helper to get and set values.
Let’s create a virtual property called fullName which can be used to set values on firstName and lastName and retrieve them as a combined value when read:
userSchema.virtual('fullName').get(function () {
  return this.firstName + ' ' + this.lastName;
});

userSchema.virtual('fullName').set(function (name) {
  let str = name.split(' ');

  this.firstName = str[0];
  this.lastName = str[1];
});
Callbacks for get and set must use the function keyword as we need to access the model via the this keyword. Using fat arrow functions will change what this refers to.
Now, we can set firstName and lastName by assigning a value to fullName:
let model = new UserModel();

model.fullName = 'Thomas Anderson';

console.log(model.toJSON()); // Output model fields as JSON
console.log();
console.log(model.fullName); // Output the full name
The code above will output the following:
{ _id: 5a7a4248550ebb9fafd898cf,
  firstName: 'Thomas',
  lastName: 'Anderson' }

Thomas Anderson
Instance Methods
We can create custom helper methods on the schema and access them via the model instance. These methods will have access to the model object and they can be used quite creatively. For instance, we could create a method to find all the people who have the same first name as the current instance.
In this example, let’s create a function to return the initials for the current user. Let’s add a custom helper method called getInitials to the schema:
userSchema.methods.getInitials = function () {
  return this.firstName[0] + this.lastName[0];
};
This method will be accessible via a model instance:
let model = new UserModel({
  firstName: 'Thomas',
  lastName: 'Anderson'
});

let initials = model.getInitials();

console.log(initials); // This will output: TA
Static Methods
Similar to instance methods, we can create static methods on the schema. Let’s create a method to retrieve all users in the database:
userSchema.statics.getUsers = function () {
  return new Promise((resolve, reject) => {
    this.find((err, docs) => {
      if (err) {
        console.error(err);
        return reject(err);
      }

      resolve(docs);
    });
  });
};
Calling getUsers on the Model class will return all the users in the database:
UserModel.getUsers()
  .then((docs) => {
    console.log(docs);
  })
  .catch((err) => {
    console.error(err);
  });
Adding instance and static methods is a nice approach to implement an interface to database interactions on collections and records.
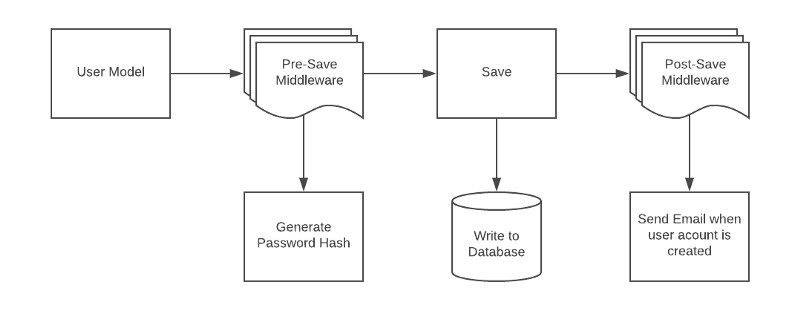
Middleware
Middleware are functions that run at specific stages of a pipeline. Mongoose supports middleware for the following operations:
- Aggregate
- Document
- Model
- Query
For instance, models have pre and post functions that take two parameters:
- Type of event (‘init’, ‘validate’, ‘save’, ‘remove’)
- A callback that is executed with this referencing the model instance
Let’s try an example by adding two fields called createdAt and updatedAt to our schema:
let mongoose = require('mongoose');

let userSchema = new mongoose.Schema({
  firstName: String,
  lastName: String,
  createdAt: Date,
  updatedAt: Date
});

module.exports = mongoose.model('User', userSchema);
When model.save() is called, there is a pre(‘save’, …) and post(‘save’, …) event that is triggered. For the second parameter, you can pass a function that is called when the event is triggered. These functions take a parameter to the next function in the middleware chain.
Let’s add a pre-save hook and set values for createdAt and updatedAt:
userSchema.pre('save', function (next) {
  let now = Date.now();

  this.updatedAt = now;
  // Set a value for createdAt only if it is null
  if (!this.createdAt) {
    this.createdAt = now;
  }

  // Call the next function in the pre-save chain
  next();
});
Let’s create and save our model:
let UserModel = require('./user');

let model = new UserModel({
  fullName: 'Thomas Anderson'
});

msg
  .save()
  .then((doc) => {
    console.log(doc);
  })
  .catch((err) => {
    console.error(err);
  });
You should see values for createdAt and updatedAt when the record that is created is printed:
{ _id: 5a7bbbeebc3b49cb919da675,
  firstName: 'Thomas',
  lastName: 'Anderson',
  updatedAt: 2018-02-08T02:54:38.888Z,
  createdAt: 2018-02-08T02:54:38.888Z,
  __v: 0 }
Plugins
Suppose that we want to track when a record was created and last updated on every collection in our database. Instead of repeating the above process, we can create a plugin and apply it to every schema.
Let’s create a file ./src/model/plugins/timestamp.js and replicate the above functionality as a reusable module:
module.exports = function timestamp(schema) {
  // Add the two fields to the schema
  schema.add({
    createdAt: Date,
    updatedAt: Date
  });

  // Create a pre-save hook
  schema.pre('save', function (next) {
    let now = Date.now();

    this.updatedAt = now;
    // Set a value for createdAt only if it is null
    if (!this.createdAt) {
      this.createdAt = now;
    }
    // Call the next function in the pre-save chain
    next();
  });
};
To use this plugin, we simply pass it to the schemas that should be given this functionality:
let timestampPlugin = require('./plugins/timestamp');

emailSchema.plugin(timestampPlugin);
userSchema.plugin(timestampPlugin);
Query Building
Mongoose has a very rich API that handles many complex operations supported by MongoDB. Consider a query where we can incrementally build query components.
In this example, we are going to:
- Find all users
- Skip the first 100 records
- Limit the results to 10 records
- Sort the results by the firstName field
- Select the firstName
- Execute that query
UserModel.find()               // find all users
  .skip(100)                   // skip the first 100 items
  .limit(10)                   // limit to 10 items
  .sort({ firstName: 1 })      // sort ascending by firstName
  .select({ firstName: true }) // select firstName only
  .exec()                      // execute the query
  .then((docs) => {
    console.log(docs);
  })
  .catch((err) => {
    console.error(err);
  });
Closing
We have barely scratched the surface exploring some of the capabilities of Mongoose. It is a rich library full of useful and and powerful features that make it a joy to work with data models in the application layer.
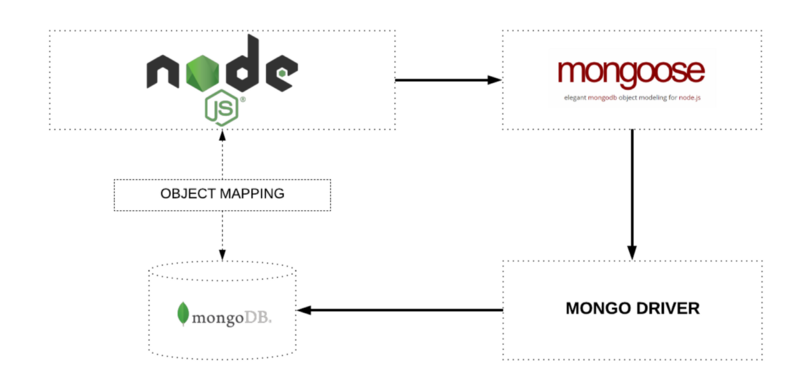
While you can interact with Mongo directly using Mongo Driver, Mongoose will simplify that interaction by allowing you to model relationships between data and validate them easily.
Fun Fact: Mongoose is created by Valeri Karpov who is an incredibly talented engineer! He coined the term The MEAN Stack.
If this article was helpful, follow me on Twitter.
 _[How to Build a REST API with Node | Express | Mongo](https://twitter.com/intent/follow?screen_name=theoutlander" rel="noopener" target="_blank" title="">You may also like my workshop on youtube: <a href="https://youtu.be/egeHq-lYyxo" rel="noopener" target="blank" title=")