

In this blog post I'll walk you through a real life example which uses the concept of classes in JavaScript.
I think it's helpful to work with a practical use case because it is much simpler to understand the concepts when you can relate them to real life.
So in this guide, you will learn about classes in JavaScript, inheritance, abstract functions, how to use keywords such as super and extends, static keywords, and private members of classes.
Let's dive in.
Table of contents
- Prerequisites
- What Are Classes in JavaScript?
- Use Case Description
- Abstract Functions and Inheritance in Chair Management System
- Static Keyword in JavaScript
- Private members in JavaScript
Prerequisites
Before you start reading this blog post you should have a basic understanding of the following topics:
- Class Diagrams: We are going to use them to showcase our example
- Context Diagram and Container Diagrams
- Knowledge of OOPs
- Introduction to Prototypal Inheritance, and Prototype chaining
- Introduction to constructor functions in JS
What are classes in JavaScript?
Classes were introduced in EcmaScript 2015 (ES6) to provide a cleaner way to follow object-oriented programming patterns.
JavaScript still follows a prototype-based inheritance model. Classes in JavaScript are syntactic sugar over the prototype-based inheritance model which we use to implement OOP concepts.
Thus the introduction of classes in JS made it easier for developers to build software around OOP concepts. It also brought in similarities to different OOP-based programming languages such as C++ and Java.
Before classes, we used constructor functions to do OOP in JavaScript. Have a look at the example below:
function Pen(name, color, price) {
    this.name = name;
    this.color = color;
    this.price = price;
}

const pen1 = new Pen("Marker", "Blue", "$3");
console.log(pen1);
The above code shows a Pen constructor function that has name, color, and price properties. We are using the new keyword with the Pen constructor to create an object pen1.
Now let's say we want to add a new function to the Pen constructor. To do this we need to add the function into the prototype property of Pen. Have a look at the showPrice function below:
function Pen(name, color, price) {
    this.name = name;
    this.color = color;
    this.price = price;
}

const pen1 = new Pen("Marker", "Blue", "$3");

Pen.prototype.showPrice = function(){
    console.log(`Price of ${this.name} is ${this.price}`);
}

pen1.showPrice();
If these concepts aren't making sense to you, then I would recommend brushing up on your JS/background knowledge through the articles mentioned in the Prerequisites section. In particular, check out the article about Prototype and Constructor functions.
Looking at the above code, we can say that we have done what we wanted to do – that is, add a showPrice function to the constructor Pen. But you can see that it's not that readable compared to OOP concepts we implement in C++ or Java.
We can re-create the above example with the help of the class keyword. Have a look at the below code:
class Pen {
    constructor(name, color, price){
        this.name = name;
        this.color = color;
        this.price = price;
    }

    showPrice(){
        console.log(`Price of ${this.name} is ${this.price}`);
    }
}

const pen1 = new Pen("Marker", "Blue", "$3");
pen1.showPrice();
Noticed the difference! We have achieved the same results but with much cleaner syntax. The addition of a new member function like showPrice is much easier as compared to adding a function directly into the constructor's prototype.
Let's dive into classes in JS a bit deeper using an example use case. With this use case, we are going to see how these concepts can be useful to solve some real-life problems.
Use Case Description
Just a quick note: the Context, Container, and Classes diagrams drawn in this blog post don't exactly follow the conventions of the above diagrams. I've approximated the diagrams to help you understand the concepts in general.
Before we start, I would suggest reading up on c4models, container diagrams, and context diagrams if you need a refresher. You can find them in the prerequisites section.
We are going to solve the following problem: helping a shopkeeper classify the chairs in their inventory and display them on the screen.
The use case is simple and pretty self-explanatory. Have a look at the diagram below which showcases the overall proposed system:
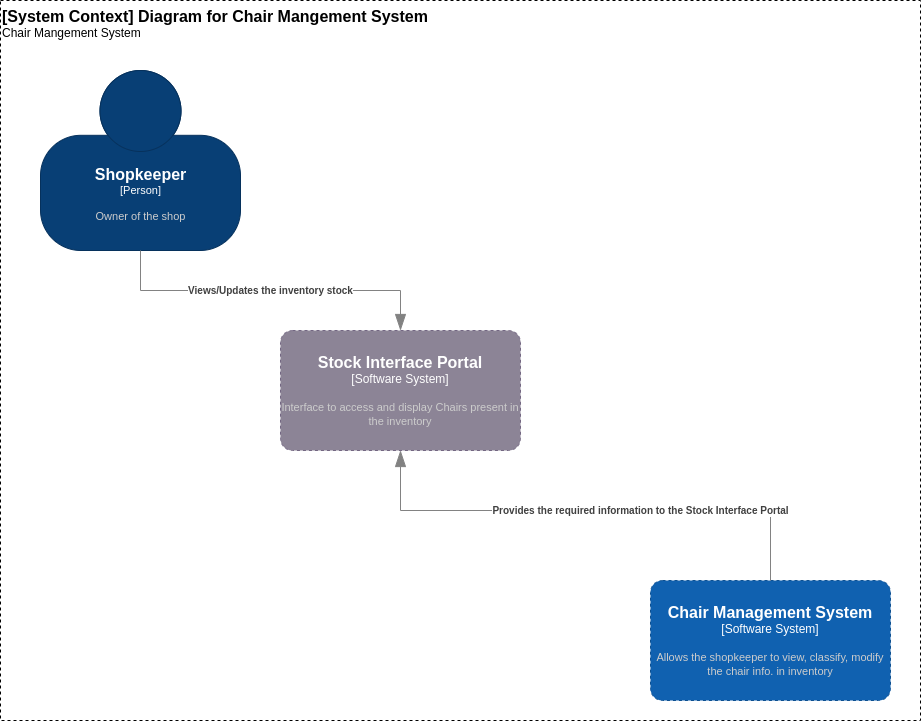 Context Diagram for the Chair Management System
As you can see from the above diagram, there are 3 main components to it:
- Person: The shopkeeper is going to interact with our system.
- Software System: Stock Interface Portal - This is an interface that allows the shopkeeper to view or modify the chair information present in the inventory.
- Software System: Chair Management System - This system will allow the interface to fetch or modify the required details requested by the shopkeeper.
Now that we understand the use case, let's start with the target system that we are going to focus on in this blog post. It is the Chair Management System.
We'll start off by creating some major components in our Chair Management System. Our components in this system are just different classes which will help facilitate the different needs of the shopkeeper.
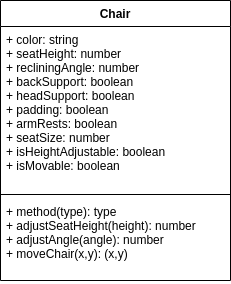 Chair component of Chair Management System
Let's add one component called Chair. Since it is a class, it will have its own attributes (properties) and behavior (methods).
Have a look at the above diagram. We can see that:
- The second row contains attributes of the chair class, for example color, seatHeight, recliningAngle, and so on.
- The third row corresponds to the methods that tell us what functions the chair can perform, for example adjustSeatHeight, adjustAngle, moveChair, and so on.
We'll follow the above representation for all the components that we'll create throughout this article.
The Chair component will be our base component. This means that all the other types of chairs such as office chairs, dining chairs, and so on will come under this class/component.
Let's start off by creating our base chair class in JS. Have a look at the below code:
class Chair {
    constructor(color, seatHeight, recliningAngle, backSupport, headSupport, padding, armRests, seatSize, isHeightAdjustable, isMovable){
        this.color = color;
        this.seatHeight = seatHeight;
        this.recliningAngle = recliningAngle;
        this.backSupport = backSupport;
        this.headSupport = headSupport;
        this.padding = padding;
        this.armRests = armRests;
        this.seatSize = seatSize;
        this.isHeightAdjustable = isHeightAdjustable;
        this.isMovable = isMovable;
    }

    adjustableHeight() {};
    adjustAngle(){};
    moveChair(){};
}

const newChair = new Chair("Blue","25 inch","20 deg",true,false,"3 inch",true,"16 inch",false,false);

console.dir("Chair Prototype", Chair);
console.log("Chair Object", newChair);
The chair class has the following members:
- Attributes: These will define the attributes of the chair such as color, seat height, backSupport, and so on.
- Functions: These define the behavior of the chair. For example, if the chair has
isHeightAdjustableset to true then it can use the functionadjustableHeight. You can see that all the functions are declared in theChairclass. These are the abstract functions. We will talk more about these functions later in this article.
At the bottom of the code, we have two console log statements. The first one will print out the definition of the class Chair . The second object will print the newChair instance.
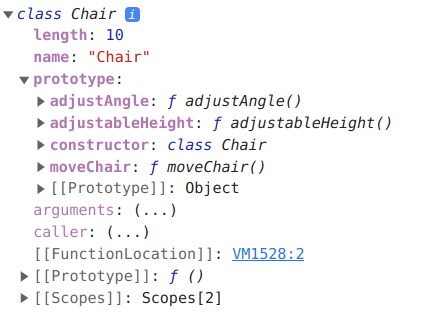 First console.dir output
If you look at the first output, it prints out the Chair class. Let's have a look at the contents of it:
- It consists of a property
prototype. This is the prototype that all the instances of class Chair will have. - The
nameproperty is the name of the object. - Lastly, we have the
__proto__or[[Prototype]]property. This is the actual prototype of the classChair.
{
    "color": "Blue",
    "seatHeight": "25 inch",
    "recliningAngle": "20 deg",
    "backSupport": true,
    "headSupport": false,
    "padding": "3 inch",
    "armRests": true,
    "seatSize": "16 inch",
    "isHeightAdjustable": false,
    "isMovable": false,
    [[Prototype]]: {
        adjustAngle: ƒ adjustAngle()
        adjustableHeight: ƒ adjustableHeight()
        constructor: class Chair
        moveChair: ƒ moveChair()
        [[Prototype]]: Object
    }
}
The second log statement prints out the information of the chair object instance. It will consist of all of the Chair class attributes. If you notice closely you can see that the prototype of this instance is similar to that of the prototype property of the chair class. This happens because of prototypical inheritance.
Now let's see how we can use this concept by adding a new component/class into our Chair Management System.
Abstract Functions and Inheritance in Chair Management System
The abstract function is just a function signature in a class without any implementation. It helps us generalize the code so that the subclasses can use them and add their own implementation to it.
To demonstrate this in our use case, let's add one more component to our Chair Management System.
I have modified the chair class so that it now consists of defaults. These defaults will be used by all the instances. Later the subclass can modify it. We will see shortly how we can achieve this. Have a look at the new Chair class below:
class Chair {
    constructor(color, seatHeight, recliningAngle, backSupport, headSupport, padding, armRests, seatSize, isHeightAdjustable, isMovable){
        //Defaults which can be changed by the subclass class.
        this.color = color;
        this.seatHeight = seatHeight;
        this.recliningAngle = recliningAngle;
        this.backSupport = true;
        this.headSupport = false;
        this.padding = "3 inch";
        this.armRests = true;
        this.seatSize = "16 inch";
        this.isHeightAdjustable = false;
        this.isMovable = false;
        this.type = "Chair";
    }

    adjustableHeight() {};
    adjustAngle(){};
    moveChair(){};
}

const newChair = new Chair();

newChair;
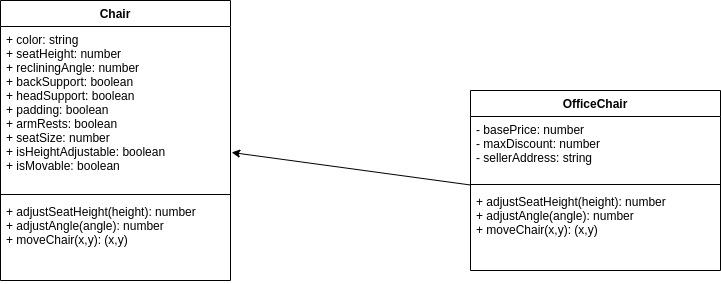
Now let's add a new component/class called OfficeChair. This will inherit the attributes and methods from the Chair class. The new modified class diagram will look like this:
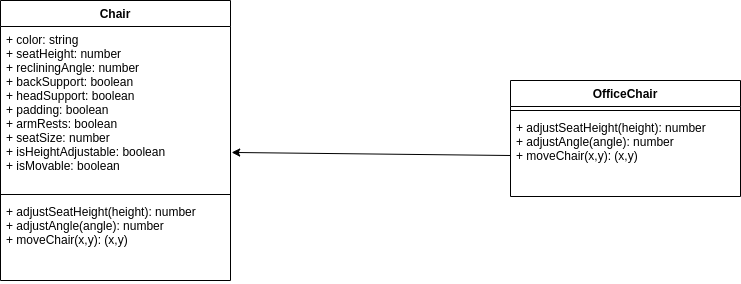 Class diagram
Notice that the new class OfficeChair consists of only the methods and not the attributes. We assume here that all the attributes will be inherited from the Chair class.
For the OfficeChair class, we have implemented the abstract methods present in the Chair class.
Have a look at the below code for the OfficeChair class:
class OfficeChair extends Chair{
    constructor(color, isHeightAdjustable, seatHeight, recliningAngle){
        super();
        this.type = "Office Chair";
        this.color = color;
        this.isHeightAdjustable = isHeightAdjustable;
        this.seatHeight = seatHeight;
        this.recliningAngle = recliningAngle;
        this.isMovable = true;
    }

    adjustableHeight(height){
        if(height > this.seatHeight){
            console.log(`Chair height changed to ${height}`);
        } else {
            console.log(`Height cannot be decreased more than the seat height ${this.seatHeight}`);
        }
    }

    adjustAngle(angle){
        if(angle >= this.recliningAngle){
            console.log(`Chair angle changed to ${angle}`);
        } else {
            console.log(`Angle cannot be decreased more than the min reclining angle ${this.recliningAngle}`);
        }
    }

    moveChair(x,y){
        console.log(`Chair moved to co-ordinates = (${x}, ${y})`);
    }
}

const newOfficeChair = new OfficeChair("Red", true, 30, 30);

console.log(newOfficeChair.adjustableHeight(31));
console.log(newOfficeChair.adjustAngle(40));
console.log(newOfficeChair.moveChair(10,20));
This is a class that inherits the functions and attributes from the superclass chair. It uses the extends keyword to allow the OfficeChair class to perform inheritance.
The extends keyword has the following syntax:
class ChildClass extends ParentClass{...}
Next, we have a constructor function and the implementation of some of the functions from the superclass. Notice that we are using the super keyword in the constructor.
We use the super keyword to call the constructor of the parent class. We can also use it to call functions and properties of the parent class.
A word of caution when you're using the super keyword:
- Make sure you call the
superfunction at the start of the constructor. If you don't, and you try to access the parent class's properties before you usesuperin the child class constructor, it will throw an error. - Once the
superfunction is called, then you can access all the attributes and functions of the parent class. - Super is not just related to the classes – you can also use it to call functions on the object's parent.
You can read more about super in the MDN docs.
Lastly, if you notice, we have added the implementation for the abstract functions. The functions are as follows:
adjustableHeight: This function will check if the input height is greater than the minimum height of the chair. If yes, we can change the height or else display the error message. A person can also increase or decrease the height of the chair. Note thatthis.seatHeightis the minimum height of the chair from the ground below which the person cannot lower the height.adjustAngle: This function will check if the input angle is greater than the default valuethis.recliningAngle. If the input angle is greater than the default angle, then the angle will change or else an error message will be displayed.moveChair: Any chair whoseisMovableproperty is true then the corresponding class will have an implementation of themoveChairfunction. It simply helps to move the chair based on the input x and y coordinates.
Note that we have also reinitialized some of the attributes of the Chair class such as type. We will be explicitly defining the type attribute for each subclass. This will help us classify the chairs present in the inventory by assigning these classes to each of them.
You should now have an idea of what abstract functions are and how useful they can be. Some advantages of having abstract functions:
- Reduces redundancy in the codebase.
- Provides a proper way of generalizing classes.
- Allows flexibility for subclasses to implement whichever abstract function they need.
Static Keyword in Javascript
The static keyword in JavaScript helps you define functions and properties in the class that cannot be called by the instance of the object. They can only be called by the class itself which consists of these static functions and properties.
Generally, we use static methods in the classes for utility purposes such as printing out all the properties of the class, creating a new object, clearing other objects of the classes, and so on.
The advantage of using static functions or properties in a class is that:
- They can be used to create functions/properties which need not be present in the instances. This helps to maintain some isolation in the codebase.
- They reduce code redundancy in some cases.
Now let's have a look at how we can implement this concept in our Chair class. We will also take a look at some use cases where we can use the static keyword.
Here are the scenarios where you can use the static keyword:
- Usage in classes
- Static within static
- Calling static from a constructor
- Class static initialization blocks
For more information on the above scenarios, please visit the MDN docs.
We are going to see all the variants of the Chair class via these scenarios:
How to use the static keyword in classes
Like any other programming language, this is one of the most beginner-friendly ways to use the static keyword. Let's define some methods and properties of the classes as static and observe the behavior.
Have a look at the below code:
class Chair {
//Defaults that will be common for all the instances:
    static backSupport = true;
    static armRests = true;

    constructor(color, seatHeight, recliningAngle, headSupport, padding, seatSize, isHeightAdjustable, isMovable){
        //Defaults which can be changed by the subclass class.
        this.color = color;
        this.seatHeight = seatHeight;
        this.recliningAngle = recliningAngle;
        this.headSupport = false;
        this.padding = "3 inch";
        this.seatSize = "16 inch";
        this.isHeightAdjustable = false;
        this.isMovable = false;
        this.type = "Chair";
    }

    static logObjectProps(){
        console.dir(this);
    }

    adjustableHeight() {};
    adjustAngle(){};
    moveChair(){};
}
Below is the output of the above code:
 Static variables
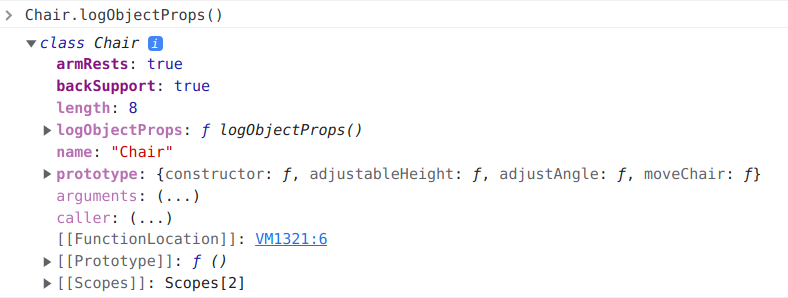 The output of the static function
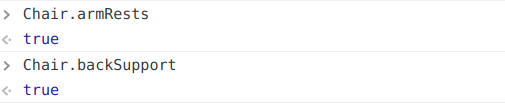
As you can see above, the static methods are only accessible via the class itself. It cannot be accessed by instances of the Chair class. Instances of the class do not have the static attributes present:
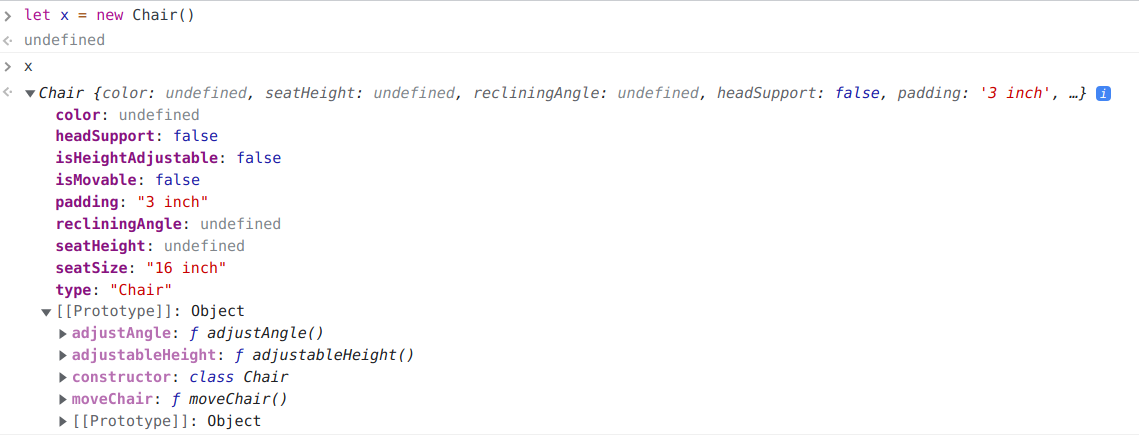 No static members in instances
As you can see above, the instance x of the Chair class does not have the static method or properties present in its definitions.
If you try to access a static method or a property using a class instance then it will throw a reference error or simply return undefined.
How to use the static keyword within another static function
There can be a situation where you might need to use the static properties or function inside another static function. You can do this by referring to your other property/function using this keyword inside the static function.
Let's modify our Chair class to show how this works:
class Chair {
//Defaults that will be common for all the instances:
static backSupport = true;
static armRests = true;
constructor(color, seatHeight, recliningAngle, headSupport, padding, seatSize, isHeightAdjustable, isMovable){
//Defaults which can be changed by the subclass class.
this.color = color;
this.seatHeight = seatHeight;
this.recliningAngle = recliningAngle;
this.headSupport = false;
this.padding = "3 inch";
this.seatSize = "16 inch";
this.isHeightAdjustable = false;
this.isMovable = false;
this.type = "Chair";
}
static logObjectProps(){
console.dir(this);
}
//Static within static usage
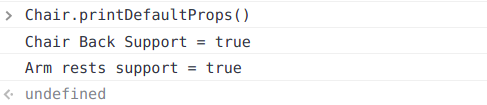
static printDefaultProps(){
console.log(`Chair Back Support = ${this.backSupport}`);
console.log(`Arm rests support = ${this.armRests}`);
}
adjustableHeight() {};
adjustAngle(){};
moveChair(){};
}
 Output of the above code
As you can see the printDefaultProps function has access to the static properties backSupport and armRests.
How to call static properties/functions from a constructor
Similar to what we saw above, you can also access these static properties/functions in a constructor. To do this, things are a bit different over here.
Within a constructor to call a static property/function you need to use the <classname>.property or <classname>.functionName(). This happens because the this keyword does not have direct access to the static members. This is not only true for constructors but any non-static functions.
Let's try to understand this by modifying the Chair class.
class Chair {
//Defaults that will be common for all the instances:
    static backSupport = true;
    static armRests = true;

    constructor(color, seatHeight, recliningAngle, headSupport, padding, seatSize, isHeightAdjustable, isMovable){
        //Defaults which can be changed by the subclass class.
        this.color = color;
        this.seatHeight = seatHeight;
        this.recliningAngle = recliningAngle;
        this.headSupport = false;
        this.padding = "3 inch";
        this.seatSize = "16 inch";
        this.isHeightAdjustable = false;
        this.isMovable = false;
        this.type = "Chair";
        console.log(Chair.printDefaultProps()); //Usage of static method inside constructor
    }

    static logObjectProps(){
        console.dir(this);
    }

        //Static within static usage
        static printDefaultProps(){
                console.log(`Chair Back Support = ${this.backSupport}`);
                console.log(`Arm rests support = ${this.armRests}`);
        }

    adjustableHeight() {};
    adjustAngle(){};
    moveChair(){};
}
In the above code, the last line console.log(Chair.printDefaultProps()); showcases how we can use a static method inside a constructor.
Private members of classes in Javascript
Private members are members of the class which can only be used internally by the class itself. They cannot be accessed outside the class. Even the instances of the class cannot access these private members.
All private members are declared using #<propertName> syntax. They are generally called hash names.
Let's have a look at an example based on our use case.
We'll define some new properties inside the OfficeChair class. Suppose we want to add default billing information for all the office chairs. We also want these to be only accessible to the OfficeChair class so that the other utility functions can use these variables.
We don't want other classes to interfere with the billing information of other classes. To handle this we can use private fields.
Consider the addition of the following fields:
- Price
- Maximum Discount
- Seller Address
 Updated Class Diagram
Note that we can represent private fields in a class diagram using a dash, like this: -.
Have a look at the code below which demonstrates how we have added these fields into the class OfficeChair:
class OfficeChair extends Chair {
    //Newly Added Properties
    #basePrice;
    #maxDiscount;
    #sellerAddress;

    constructor(type, color, isHeightAdjustable, seatHeight, recliningAngle) {
        super();
        this.type = type;
        this.color = color;
        this.isHeightAdjustable = isHeightAdjustable;
        this.seatHeight = seatHeight;
        this.recliningAngle = recliningAngle;
        this.isMovable = true;
        this.#basePrice = 1000;
        this.#maxDiscount = 5; //In percentage
        this.#sellerAddress = "XYZ, street";
    }

    adjustableHeight(height) {
        if (height > this.seatHeight) {
            console.log(`Chair height changed to ${height}`);
        } else {
            console.log(`Height cannot be decreased more than the seat height ${this.seatHeight}`);
        }
    }

    adjustAngle(angle) {
        if (angle >= this.recliningAngle) {
            console.log(`Chair angle changed to ${angle}`);
        } else {
            console.log(`Angle cannot be decreased more than the min reclining angle ${this.recliningAngle}`);
        }
    }

    moveChair(x, y) {
        console.log(`Chair moved to co-ordinates = (${x}, ${y})`);
    }

    //Newly Added function
    #getChairAmount(taxCharge) {
        return this.#basePrice + (this.#basePrice - this.#basePrice * this.#maxDiscount / 100) + taxCharge;
    }

    //Newly Added function
    generateBill() {
        console.log("**** BILLING INFORMATION ****");
        console.log(`Chair Price = ${this.#getChairAmount(20)}`);
        console.log(`Seller Address = ${this.#sellerAddress}`);
    }
}
When you run the above code in the console, you should see the following output:
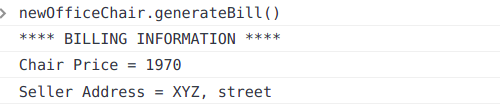 Output of private members
As you can see from the above output, we have executed the generateBill function. This function accesses the private fields and function within the class to generate the billing information.
These private variables will only be accessible within the class itself. If you try to reference any of the private members of the class then it will throw a syntax error like below:
Uncaught SyntaxError: Private field '#basePrice' must be declared in an enclosing class
Let me demonstrate how it will look if a subclass tries to access the private variables of the base class:
class DinningChair extends OfficeChair{}

let dineChair = new DinningChair();
dineChair.#basePrice(); //Throws syntax error
The above code will throw a syntax error since you are trying to access the private property of another class.
Static private variables are out of the scope of this blog post, so we won't discuss them further. But you can read about them here.
Summary
These are some of the ways we can leverage classes in JavaScript to implement object-oriented programming concepts in a real-world example.
You can read more about advanced object-oriented concepts below:
Thank you for reading!