
By Cem Eygi
Promises are one of the ways we can deal with asynchronous operations in JavaScript. Many people struggle with understanding how Promises work, so in this post I will try to explain them as simply as I can.
Promises are a broad topic so I can't go into every detail in this article. But you'll find an overall introduction to what Promises are, explanations of terms like resolve, reject, and chaining, and a code example for creating and using Promises.
Prerequisite: To understand this article better, check out my other post about JavaScript Callbacks.
What is a Promise?
A promise in JavaScript is similar to a promise in real life. When we make a promise in real life, it is a guarantee that we are going to do something in the future. Because promises can only be made for the future.
A promise has 2 possible outcomes: it will either be kept when the time comes, or it won’t.
This is also the same for promises in JavaScript. When we define a promise in JavaScript, it will be resolved when the time comes, or it will get rejected.
Promises in JavaScript
First of all, a Promise is an object. There are 3 states of the Promise object:
- Pending: Initial State, before the Promise succeeds or fails
- Resolved: Completed Promise
- Rejected: Failed Promise
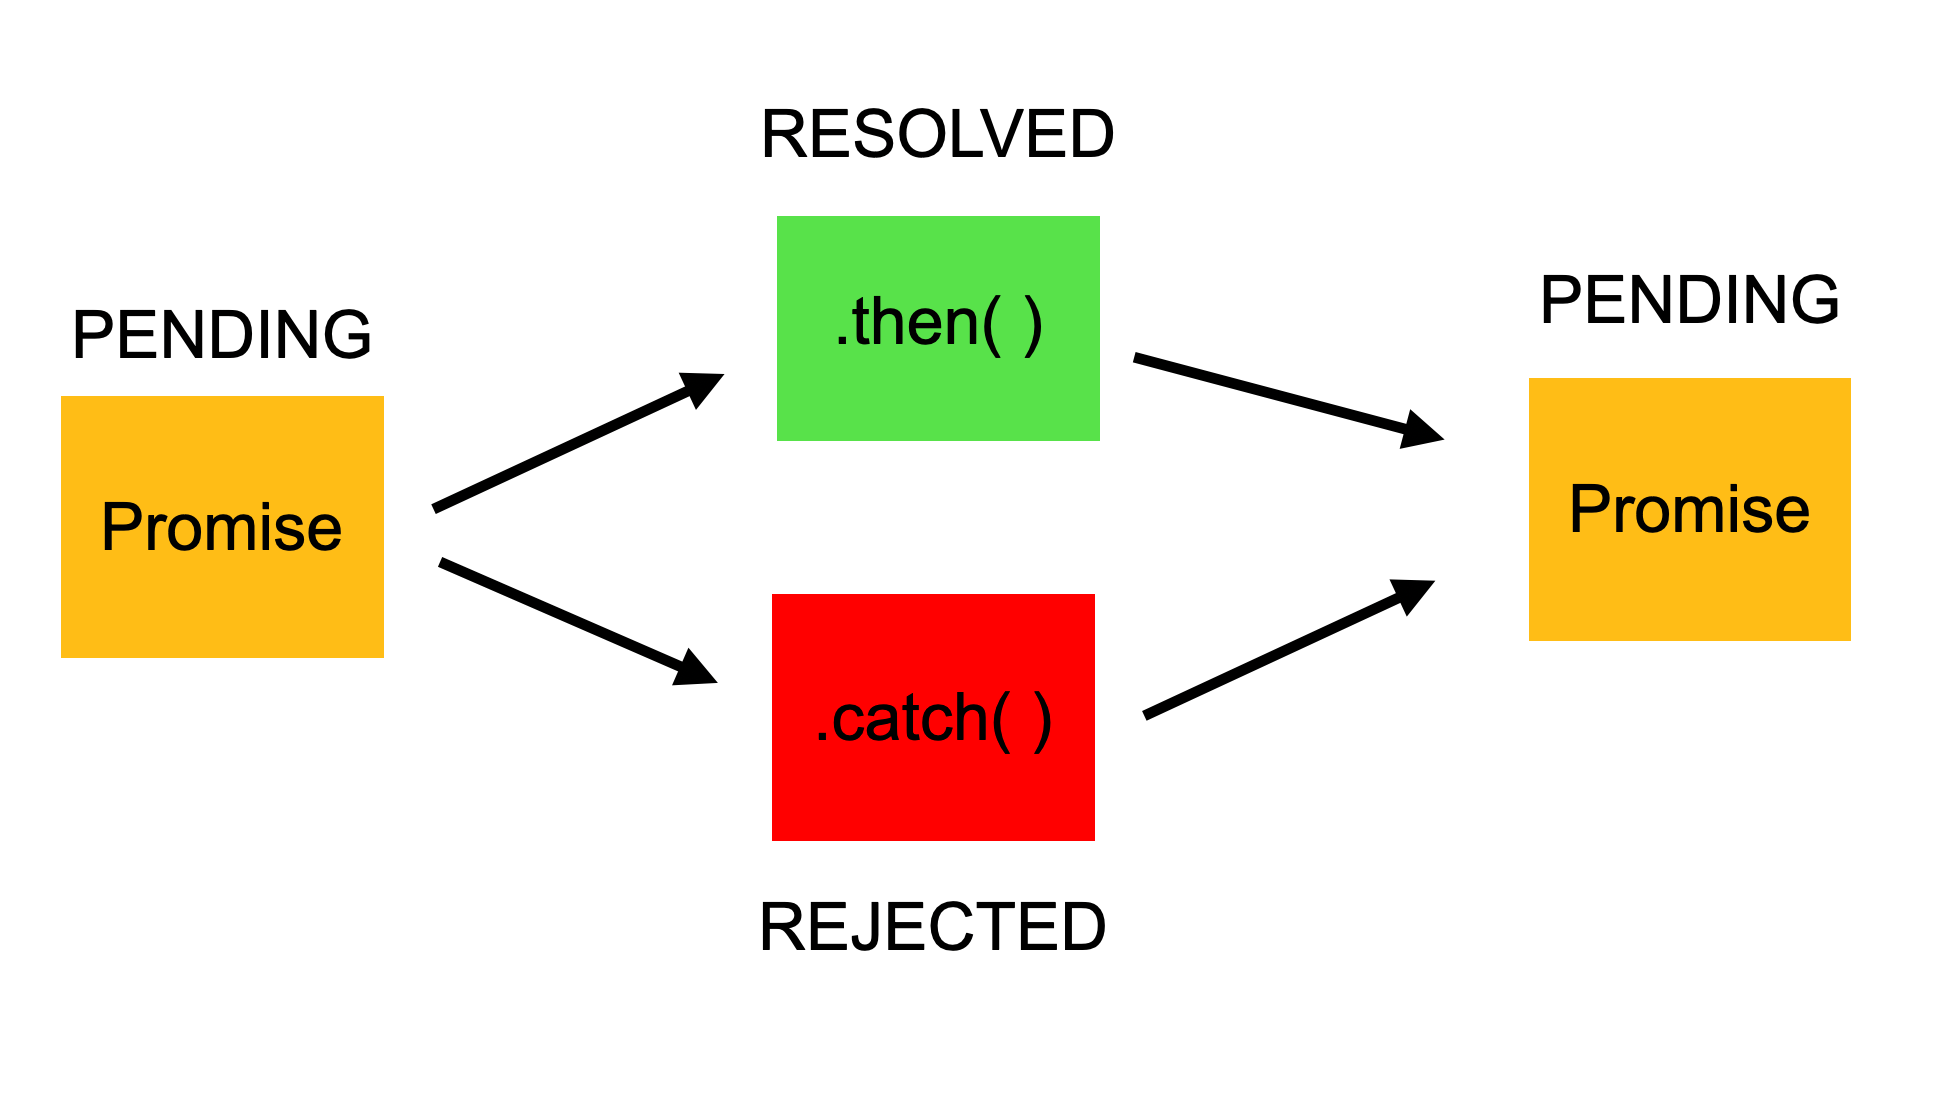 Representation of the process of Promises
For example, when we request data from the server by using a Promise, it will be in pending mode until we receive our data.
If we achieve to get the information from the server, the Promise will be resolved successfully. But if we don’t get the information, then the Promise will be in the rejected state.
Additionally, if there are multiple requests, then after the first Promise is resolved (or rejected), a new process will start to which we can attach it directly by a method called chaining.
If you prefer, you can also watch the video version below:
What is the difference between Callbacks and Promises?
The main difference between Callback Functions and Promises is that we attach a callback to a Promise rather than passing it. So we still use callback functions with Promises, but in a different way (chaining).
This is one of the greatest advantages of using Promises, but why?
What is Chaining?
Callback functions have been used alone for asynchronous operations in JavaScript for many years. But in some cases, using Promises can be a better option.
If there are multiple async operations to be done and if we try to use good-old Callbacks for them, we’ll find ourselves quickly inside a situation called Callback hell:
firstRequest(function(response) {
    secondRequest(response, function(nextResponse) {
        thirdRequest(nextResponse, function(finalResponse) {
            console.log('Final response: ' + finalResponse);
        }, failureCallback);
    }, failureCallback);
}, failureCallback);
However if we handle the same operation with Promises, since we can attach Callbacks rather than passing them, this time the same code above looks much cleaner and easier to read:
firstRequest()
  .then(function(response) {
    return secondRequest(response);
}).then(function(nextResponse) {
    return thirdRequest(nextResponse);
}).then(function(finalResponse) {
    console.log('Final response: ' + finalResponse);
}).catch(failureCallback);
The code just above shows how multiple callbacks can be chained one after another. Chaining is one of the best features of Promises.
Creating and Using A Promise Step by Step
Firstly, we use a constructor to create a Promise object:
const myPromise = new Promise();
It takes two parameters, one for success (resolve) and one for fail (reject):
const myPromise = new Promise((resolve, reject) => {
    // condition
});
Finally, there will be a condition. If the condition is met, the Promise will be resolved, otherwise it will be rejected:
const myPromise = new Promise((resolve, reject) => {
    let condition;

    if(condition is met) {
        resolve('Promise is resolved successfully.');
    } else {
        reject('Promise is rejected');
    }
});
So we have created our first Promise. Now let's use it.
then( ) for resolved Promises:
If you revisit the picture at the beginning of this post, you'll see that there are 2 cases: One for resolved promises and one for rejected. If the Promise gets resolved (success case), then something will happen next (depends on what we do with the successful Promise).
myPromise.then();
The then( ) method is called after the Promise is resolved. Then we can decide what to do with the resolved Promise.
For example, let’s log the message to the console that we got from the Promise:
myPromise.then((message) => {
    console.log(message);
});
catch( ) for rejected Promises:
However, the then( ) method is only for resolved Promises. What if the Promise fails? Then, we need to use the catch( ) method.
Likewise we attach the then( ) method. We can also directly attach the catch( ) method right after then( ):
myPromise.then((message) => {
    console.log(message);
}).catch((message) => {
    console.log(message);
});
So if the promise gets rejected, it will jump to the catch( ) method and this time we will see a different message on the console.
Wrap Up
So this is how we create a Promise in JavaScript and use it for resolved and rejected cases. Promises are a broader topic, and there are many more things to learn about them. So understanding how they work takes time.
This post is just an introduction to Promises, and I hope you found it helpful for getting an idea about what JavaScript Promises are and how to use them.
If you want to learn more about Web Development, feel free to visit my Youtube Channel for more.
Thank you for reading!