By Deepu K Sasidharan
You can find a more up to date version of this post that uses JHipster 6 and latest Istio & Kubernetes versions here.
Istio is the coolest kid on the DevOps and Cloud block now. For those of you who aren’t following close enough — Istio is a service mesh for distributed application architectures, especially the ones that you run on the cloud with Kubernetes. Istio plays extremely nice with Kubernetes, so nice that you might think that it’s part of Kubernetes.
If you are still wondering, what the heck is a service mesh or Istio? then let's have an overview of Istio.
Istio provides the following functionality in a distributed application architecture:
- Service discovery — Traditionally provided by platforms like Netflix Eureka or Consul.
- Automatic load balancing — You might have used Netflix Zuul for this.
- Routing, circuit breaking, retries, fail-overs, fault injection — Think of Netflix Ribbon, Hytrix and so on.
- Policy enforcement for access control, rate limiting, A/B testing, traffic splits, and quotas — Again you might have used Zuul to do some of these.
- Metrics, logs, and traces — Think of ELK or Stack driver
- Secure service-to-service communication
Below is the architecture of Istio.
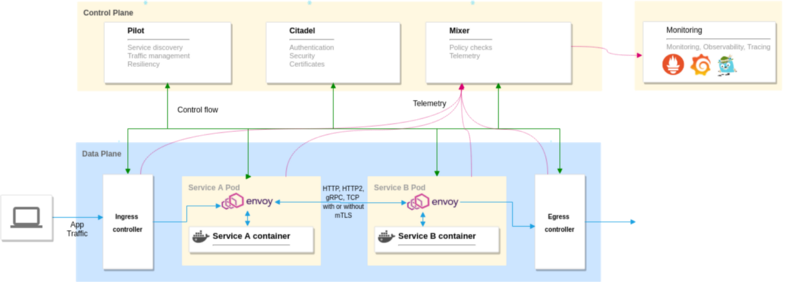 Istio architecture
It can be classified into 2 distinct planes.
Data plane: Is made of Envoy proxies deployed as sidecars to the application containers. They control all the incoming and outgoing traffic to the container.
Control plane: It uses Pilot to manages and configure the proxies to route traffic. It also configures Mixer to enforce policies and to collect telemetry. It also has other components like Citadel, to manage security, and Galley, to manage configurations.
Istio also configures an instance of Grafana, Prometheus and Jaeger for Monitoring and Observability. You can use this or use your existing monitoring stack as well.
I hope this provides an overview of Istio, now let's focus on the goal of this article.
Devoxx 2018
I did a talk at Devoxx 2018 along with Julien Dubois doing the same demo and promised that I’d write a detailed blog about it.
You can watch the video to see JHipster + Istio in action.
You can watch the slides on Speaker Deck as well.
Preparing the Kubernetes cluster
First, let us prepare a Kubernetes cluster to deploy Istio and our application containers. Follow the instructions for any one of the platforms you prefer.
Prerequisites
kubectl: The command line tool to interact with Kubernetes. Install and configure it.
Create a cluster on Azure Kubernetes Service(AKS)
If you are going to use Azure, then install Azure CLI to interact with Azure. Install and log in with your Azure account (you can create a free account if you don’t have one already).
First let us create a resource group. You can use any region you like here instead of East US.
$ az group create --name eCommerceCluster --location eastus
Create the Kubernetes cluster:
$ az aks create \
--resource-group eCommerceCluster \
--name eCommerceCluster \
--node-count 4 \
--kubernetes-version 1.11.4 \
--enable-addons monitoring \
--generate-ssh-keys
The node-count flag is important as the setup requires at least four nodes with the default CPU to run everything. You can try to use a higher kubernetes-version if it is supported, else stick to 1.11.4
The cluster creation could take while so sit back and relax. ?
Once the cluster is created, fetch its credentials to be used from kubectl by running the below command. It automatically injects the credentials to your kubectl configuration under ~/.kube/config
$ az aks get-credentials \
--resource-group eCommerceCluster \
--name eCommerceCluster
You can view the created cluster in the Azure portal:
 Kubernetes cluster in AKS
Run kubectl get nodes to see it in the command line and to verify that kubectl can connect to your cluster.
 Cluster Nodes
Proceed to the Install and setup Istio section.
Create a cluster on Google Kubernetes Engine(GKE)
If you are going to use Google Cloud Platform(GCP) then install Gcloud CLIto interact with GCP. Install and log in with your GCP account (you can create a free account if you don’t have one already).
First, we need a GCP project, you can either use an existing project that you have or create a new one using GCloud CLI with below command:
$ gcloud projects create jhipster-demo-deepu
Set the project you want to use as the default project:
$ gcloud config set project jhipster-demo-deepu
Now let us create a cluster for our application with the below command:
$ gcloud container clusters create hello-hipster \

   --cluster-version 1.10 \

   --num-nodes 4 \

   --machine-type n1-standard-2
The num-nodes and machine-type flags are important as the setup requires at least four nodes with a bigger CPU to run everything. You can try to use a higher cluster-version if it is supported, else stick to 1.10.
The cluster creation could take while so sit back and relax.
Once the cluster is created, fetch its credentials to be used from kubectl by running the below command. It automatically injects the credentials to your kubectl configuration under ~/.kube/config
$ gcloud container clusters get-credentials hello-hipster
You can view the created cluster in the GCP GUI.
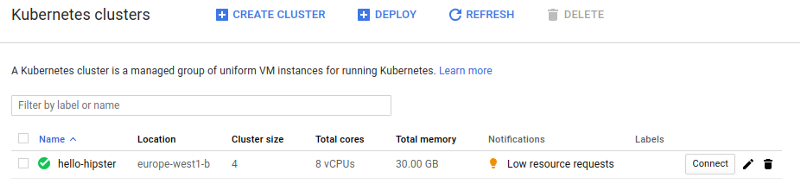 Kubernetes cluster on GKE
Run kubectl get nodes to see it in the command line and to verify that kubectl can connect to your cluster.
 Cluster Nodes
Install and setup Istio
Install Istio on your machine by following these steps:
$ cd ~/

$ export ISTIO_VERSION=1.0.2

$ curl -L https://git.io/getLatestIstio | sh -

$ ln -sf istio-$ISTIO_VERSION istio

$ export PATH=~/istio/bin:$PATH
Make sure to use version 1.0.2 since the latest version seems to have issues connecting to the MySQL database containers.
Now let us install Istio on our Kubernetes cluster by applying the provided Kubernetes manifests and helm templates from Istio.
$ kubectl apply -f ~/istio/install/kubernetes/helm/istio/templates/crds.yaml
$ kubectl apply -f ~/istio/install/kubernetes/istio-demo.yaml \
    --as=admin --as-group=system:masters
Wait for the pods to run, these will be deployed to the istio-system namespace.
$ watch kubectl get pods -n istio-system
Once the pods are in running status, exit the watch loop and run the below to get the Ingress gateway service details. This is the only service that is exposed to an external IP.
$ kubectl get svc istio-ingressgateway -n istio-system

NAME                   TYPE           CLUSTER-IP     EXTERNAL-IP
istio-ingressgateway   LoadBalancer   10.27.249.83   35.195.81.130
The external IP is very important here, let us save this to an environment variable so that we can use it in further commands.
$ export \
  INGRESS_IP=$(kubectl -n istio-system get svc \
  istio-ingressgateway \
  -o jsonpath='{.status.loadBalancer.ingress[0].ip}')
Now our Kubernetes cluster is ready for Istio. ?
For advanced Istio setup options refer to https://istio.io/docs/setup/kubernetes/
Creating the microservice application stack
In one of my previous posts, I showcased how to create a full stack microservice architecture using JHipster and JDL. You can read the post here if you want to learn more details about it. For this exercise, we will use the same application but we will not use the Eureka service discovery option we used earlier. Also, note that the store application is further split into Gateway and Product applications.
Architecture
Here is the architecture of the microservice that we are going to create and deploy today.
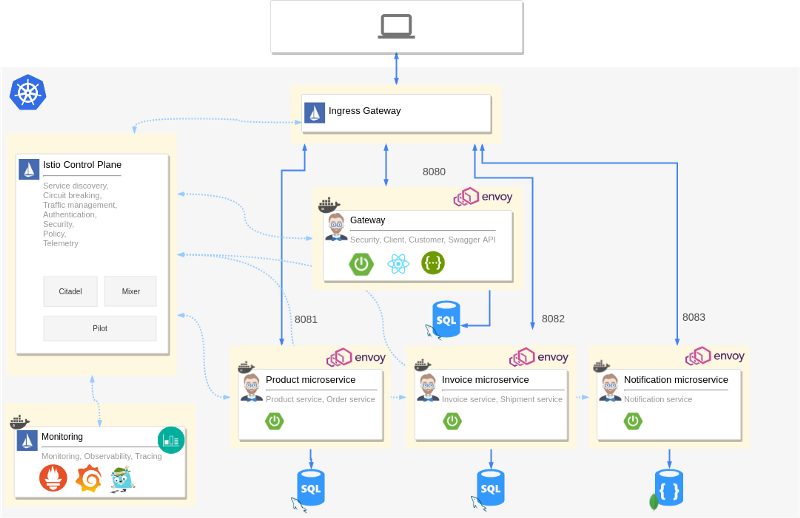 Microservice architecture with Istio
It has a gateway application and three microservice applications. Each of them has its own database. You can see that each application has an Envoy proxy attached to the pod as a sidecar. Istio control plane components are also deployed to the same cluster along with Prometheus, Grafana, and Jaeger.
The Ingress gateway from Istio is the only entry point for traffic and it routes traffic to all microservices accordingly. Telemetry is collected from all the containers running in the cluster, including the applications, databases, and Istio components.
Compared to the architecture of the original application here, you can clearly see that we replaced the JHipster registry and Netflix OSS components with Istio. The ELK monitoring stack is replaced with Prometheus, Grafana and Jaeger configured by Istio. Here is the original architecture diagram without Istio for a quick visual comparison.
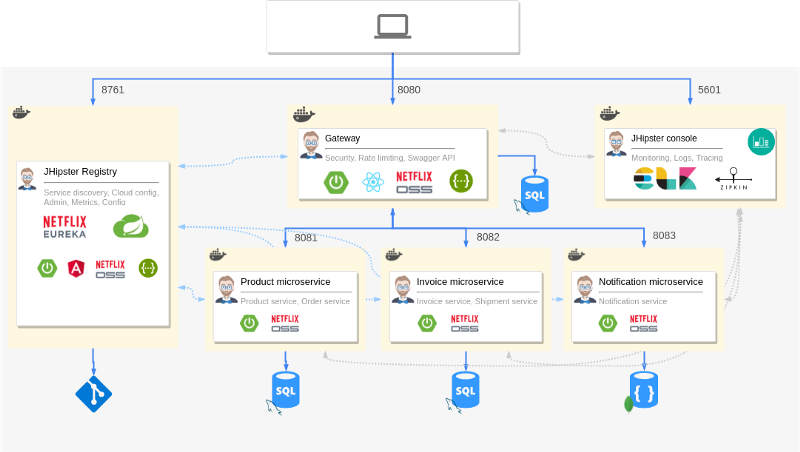 Microservice architecture with Netflix OSS
Application JDL
Let’s take a look at the modified JDL declaration. You can see that we have declared serviceDiscoveryType no here since we will be using Istio for that.
application {
  config {
    baseName store
    applicationType gateway
    packageName com.jhipster.demo.store
    serviceDiscoveryType no
    authenticationType jwt
    prodDatabaseType mysql
    cacheProvider hazelcast
    buildTool gradle
    clientFramework react
    useSass true
    testFrameworks [protractor]
  }
  entities *
}


application {
  config {
    baseName product
    applicationType microservice
    packageName com.jhipster.demo.product
    serviceDiscoveryType no
    authenticationType jwt
    prodDatabaseType mysql
    cacheProvider hazelcast
    buildTool gradle
    serverPort 8081
  }
  entities Product, ProductCategory, ProductOrder, OrderItem
}

application {
  config {
    baseName invoice
    applicationType microservice
    packageName com.jhipster.demo.invoice
    serviceDiscoveryType no
    authenticationType jwt
    prodDatabaseType mysql
    buildTool gradle
    serverPort 8082
  }
  entities Invoice, Shipment
}

application {
  config {
    baseName notification
    applicationType microservice
    packageName com.jhipster.demo.notification
    serviceDiscoveryType no
    authenticationType jwt
    databaseType mongodb
    cacheProvider no
    enableHibernateCache false
    buildTool gradle
    serverPort 8083
  }
  entities Notification
}

/**
 * Entities for Store Gateway
 */

// Customer for the store
entity Customer {
    firstName String required
    lastName String required
    gender Gender required
    email String required pattern(/^[^@\s]+@[^@\s]+\.[^@\s]+$/)
    phone String required
    addressLine1 String required
    addressLine2 String
    city String required
    country String required
}

enum Gender {
    MALE, FEMALE, OTHER
}

relationship OneToOne {
    Customer{user(login) required} to User
}

service Customer with serviceClass
paginate Customer with pagination


/**
 * Entities for product microservice
 */


// Product sold by the Online store
entity Product {
    name String required
    description String
    price BigDecimal required min(0)
    size Size required
    image ImageBlob
}

enum Size {
    S, M, L, XL, XXL
}

entity ProductCategory {
    name String required
    description String
}

entity ProductOrder {
    placedDate Instant required
    status OrderStatus required
    code String required
    invoiceId Long
    customer String required
}

enum OrderStatus {
    COMPLETED, PENDING, CANCELLED
}

entity OrderItem {
    quantity Integer required min(0)
    totalPrice BigDecimal required min(0)
    status OrderItemStatus required
}

enum OrderItemStatus {
    AVAILABLE, OUT_OF_STOCK, BACK_ORDER
}

relationship ManyToOne {
    OrderItem{product(name) required} to Product
}

relationship OneToMany {
   ProductOrder{orderItem} to OrderItem{order(code) required} ,
   ProductCategory{product} to Product{productCategory(name)}
}

service Product, ProductCategory, ProductOrder, OrderItem with serviceClass
paginate Product, ProductOrder, OrderItem with pagination
microservice Product, ProductOrder, ProductCategory, OrderItem with product


/**
 * Entities for Invoice microservice
 */


// Invoice for sales
entity Invoice {
    code String required
    date Instant required
    details String
    status InvoiceStatus required
    paymentMethod PaymentMethod required
    paymentDate Instant required
    paymentAmount BigDecimal required
}

enum InvoiceStatus {
    PAID, ISSUED, CANCELLED
}

entity Shipment {
    trackingCode String
    date Instant required
    details String
}

enum PaymentMethod {
    CREDIT_CARD, CASH_ON_DELIVERY, PAYPAL
}

relationship OneToMany {
    Invoice{shipment} to Shipment{invoice(code) required}
}

service Invoice, Shipment with serviceClass
paginate Invoice, Shipment with pagination
microservice Invoice, Shipment with invoice


/**
 * Entities for notification microservice
 */


entity Notification {
    date Instant required
    details String
    sentDate Instant required
    format NotificationType required
    userId Long required
    productId Long required
}

enum NotificationType {
    EMAIL, SMS, PARCEL
}

microservice Notification with notification

/**
 * Deployments
 */

deployment {
  deploymentType kubernetes
  appsFolders [store, invoice, notification, product]
  dockerRepositoryName "deepu105"
  serviceDiscoveryType no
  istio true
  kubernetesServiceType Ingress
  kubernetesNamespace jhipster
  ingressDomain "34.90.236.124.nip.io"
}
Deployment JDL
JHipster version 5.7.0 introduced support for deployment declaration straight in the JDL
We have the below in our JDL which declares our Kubernetes deployment:
deployment {
  deploymentType kubernetes
  appsFolders [store, invoice, notification, product]
  dockerRepositoryName "deepu105"
  serviceDiscoveryType no
  istio autoInjection
  istioRoute true
  kubernetesServiceType Ingress
  kubernetesNamespace jhipster
  ingressDomain "35.195.81.130.nip.io"
}
The serviceDiscoveryType is disabled and we have enabled Istio with autoInjection support — the Envoy sidecars are injected automatically for the selected applications. Istio routes are also generated for the applications by enabling istioRoute option.
The kubernetesServiceType is set as Ingress, which is very important as Istio can only work with an Ingress controller service type. For Ingress, we need to set the domain DNS and this is where the Istio ingress gateway IP is needed. Now we need a DNS for our IP. For real usecases, you should map a DNS for the IP, but for testing and demo purposes we can use a wildcard DNS service like nip.io to resolve our IP. Just append nip.io to our IP and use that as the ingress domain.
Generate the applications and deployment manifests
Now that our JDL is ready, let us scaffold our applications and Kubernetes manifests. Create a new directory and save the above JDL in the directory. Let us name it app-istio.jdl and then run the import-jdl command.
$ mkdir istio-demo && cd istio-demo
$ jhipster import-jdl app-istio.jdl
This will generate all the applications and install the required NPM dependencies in each of them. Once the applications are generated the deployment manifests will be generated and some useful instruction will be printed to the console.
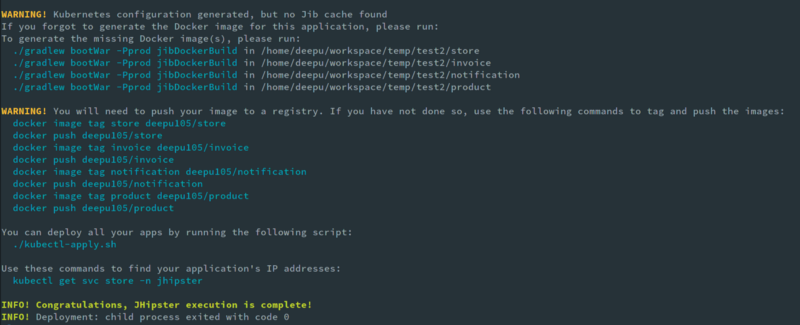
Open the generated code in your favorite IDE/Editor and explore the code.
Deploy to Kubernetes cluster using Kubectl
Now let us build and deploy our applications. Run the ./gradlew bootWar -Pprod jibDockerBuild command in the store, product, invoice, and notification folders to build the docker images. Once the images are built, push them to the docker repo with these commands:
$ docker image tag store deepu105/store

$ docker push deepu105/store

$ docker image tag invoice deepu105/invoice

$ docker push deepu105/invoice

$ docker image tag notification deepu105/notification

$ docker push deepu105/notification

$ docker image tag product deepu105/product

$ docker push deepu105/product
Once the images are pushed, navigate into the generated Kubernetes directory and run the provided startup script. (If you are on windows you can run the steps in kubectl-apply.sh manually one by one.)
$ cd kubernetes
$ ./kubectl-apply.sh
Run watch kubectl get pods -n jhipster to monitor the status.
Deployed applications
Once all the pods are in running status we can explore the deployed applications
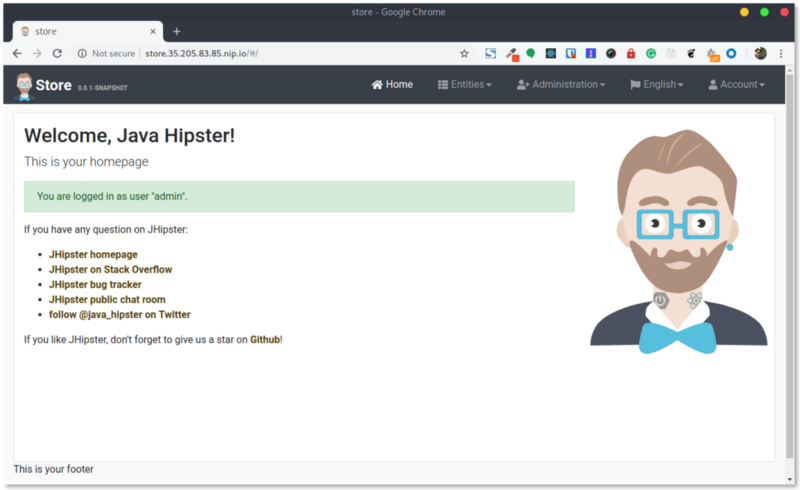
Application gateway
The store gateway application is the entry point for our microservices. Get the URL for the store app by running echo store.$INGRESS_IP.nip.io, we already stored the INGRESS_IP to environment variables while creating the Istio setup. Visit the URL in your favorite browser and explore the application. Try creating some entities for the microservices:
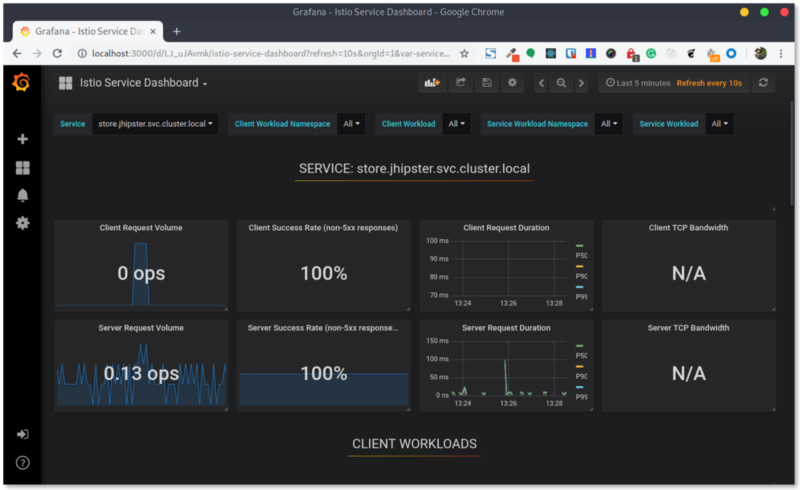
Monitoring
Istio setup includes Grafana and Prometheus configured to collect and show metrics from our containers. Let's take a look.
By default, only the Ingress gateway is exposed to external IP and hence we will use kubectl port forwarding to set up a secure tunnel to the required services
Let us create a tunnel for Grafana:
$ kubectl -n istio-system \
port-forward $(kubectl -n istio-system get pod \

-l app=grafana -o jsonpath='{.items[0].metadata.name}') 3000:3000
Open localhost:3000 to view the Grafana dashboard.
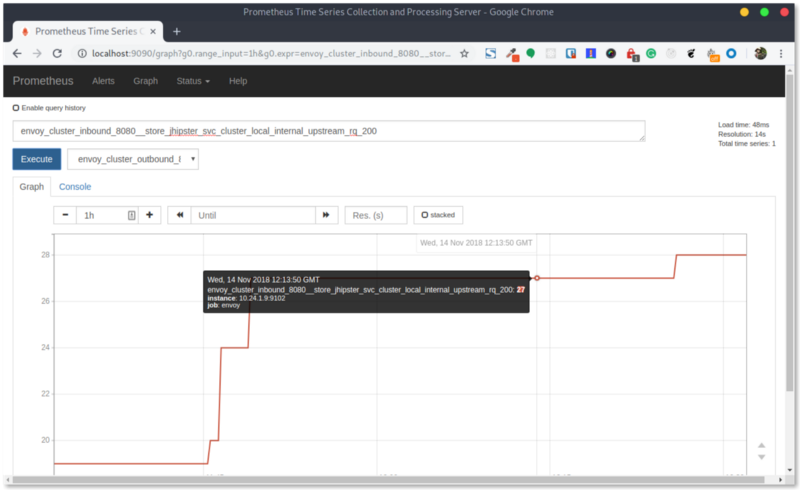
Grafana uses the metrics scrapped by Prometheus. We can look at Prometheus directly by creating a tunnel for it and opening localhost:9090:
$ kubectl -n istio-system \
port-forward $(kubectl -n istio-system get pod -l \

app=prometheus -o jsonpath='{.items[0].metadata.name}') 9090:9090
Observability
Istio configures Jaeger for distributed tracing and service graph for service observability. Let us take a look at them.
Create a tunnel for Jaeger and open localhost:16686
$ kubectl -n istio-system \
port-forward $(kubectl -n istio-system get pod -l \

app=jaeger -o jsonpath='{.items[0].metadata.name}') 16686:16686
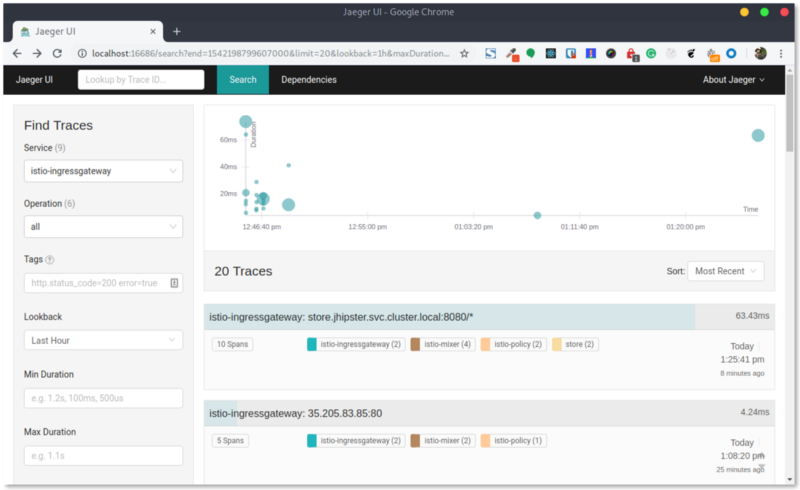
You can make some requests in the application and find it in the tracing dashboard by querying for the service. Click on the request to see tracing details:
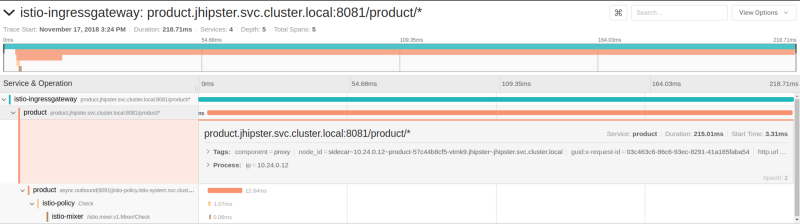 Tracing for product category listing request
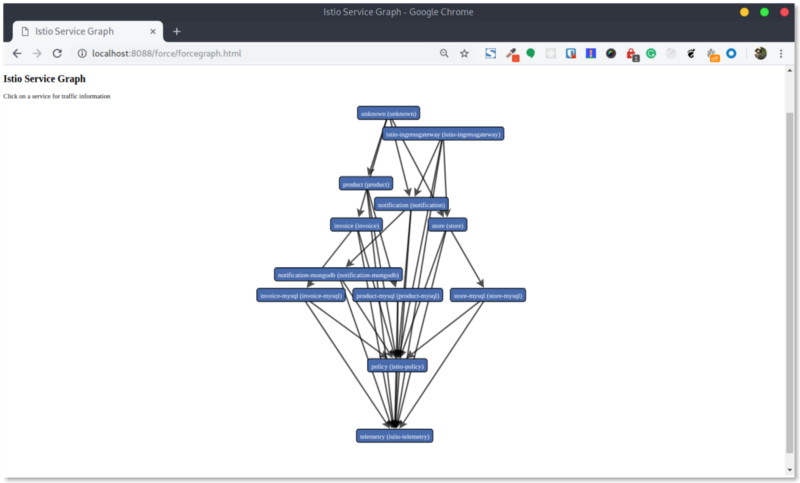
Let us now create a tunnel for the service graph and open it in localhost:8080/force/forcegraph.html:
$ kubectl -n istio-system \
port-forward $(kubectl -n istio-system get pod -l \

app=servicegraph -o jsonpath='{.items[0].metadata.name}') 8088:8088
Conclusion
Istio provides building blocks to build distributed microservices in a more Kubernetes-native way and takes the complexity and responsibility of maintaining those blocks away from you. This means you do not have to worry about maintaining the code or deployments for service discovery, tracing and so on.
Istio documentation says
Deploying a microservice-based application in an Istio service mesh allows one to externally control service monitoring and tracing, request (version) routing, resiliency testing, security and policy enforcement, etc., in a consistent way across the services, for the application as a whole.
Werner Vogels (CTO of AWS) quoted at AWS Re:Invent
“In the future, all the code you ever write will be business logic.”
Istio Service mesh helps with that statement. This lets you worry only about the applications that you are developing and with JHipster that future is truly here and you just need to worry about writing your business logic.
While this is great, it is not a silver bullet. Keep in mind that Istio is fairly new compared to other stable and battle-tested solutions like JHipster Registry (Eureka) or Consul.
Also, another thing to keep in mind is the resource requirements. The same microservices with JHipster Registry or Consul can be deployed to a 2 node cluster with 1 vCPU and 3.75 GB of memory per node in GCP while you need a 4 node cluster with 2 vCPUs and 7.5 GB of memory per node for Istio enabled deployments. The default Kubernetes manifest from Istio doesn’t apply any request limits for resources, and by adding and tuning those, the minimum requirement could be reduced. But still I don’t think you can get it as low as that is needed for the JHipster registry option.
In a real-world use case, the advantages of not having to maintain the complex parts of your infra vs having to pay for more resources might be a decision that has to be taken based on your priorities and goals.
A huge shout out to Ray Tsang for helping me figure out an optimal cluster size for this application. Also a huge thank you from myself and the community to both Ray and Srinivasa Vasu for adding the Istio support to JHipster.
JHipster provides a great Kubernetes setup to start with which you can further tweak as per your needs and platform. The Istio support is recent and will improve further over time, but it's still a great starting point especially to learn.
To learn more about JHipster and Full stack development, check out my book “Full Stack Development with JHipster” on Amazon and Packt.
There is a great Istio tutorial from Ray Tsang here.
If you like JHipster don’t forget to give it a star on Github.
If you like this article, please leave some claps (Did you know that you can clap multiple times in Medium? ?) I hope to write more about Istio in the near future.
You can follow me on Twitter and LinkedIn.
My other related posts: