

JSX is one of the core concepts of React. So if you understand it well, you'll be able to write better React code.
In this article, we'll explore:
- What is JSX in React and how to use it
- How JSX is transformed to
React.createElement - What is a JSX expression and what we can write inside it
- Common issues in JSX
And much more. So let's get started.
What is JSX?
JSX is a JavaScript Extension Syntax used in React to easily write HTML and JavaScript together.
Take a look at the below code:
const jsx = <h1>This is JSX</h1>
This is simple JSX code in React. But the browser does not understand this JSX because it's not valid JavaScript code. This is because we're assigning an HTML tag to a variable that is not a string but just HTML code.
So to convert it to browser understandable JavaScript code, we use a tool like Babel which is a JavaScript compiler/transpiler.
You can set up your own babel configuration using Webpack as I show in this article. Or you can use create-react-app which internally uses Babel for the JSX to JavaScript conversion.
We can use the above JSX in our React code like this:
class JSXDemo extends React.Component {
    render() {
        return <h1>This is JSX</h1>;
    }
}

ReactDOM.render(<JSXDemo />, document.getElementById('root'));
Here, we're returning the JSX from the JSXDemo component and rendering that on the screen using the ReactDOM.render method.
Here's a Code Sandbox Demo.
When the Babel executes the above JSX, it converts it to the following code:
class JSXDemo extends React.Component {
    render() {
        return React.createElement("h1", null, "This is JSX");
    }
}
Here's a Code Sandbox Demo.
As you can see in the above Code Sandbox, the code still correctly prints the contents to the screen using React.createElement.
This was the old way of writing code in React – but it's tedious to write the React.createElement every time, even for adding a simple div.
So React introduced the JSX way of writing code which makes code easy to write and understand.
Knowing how to convert JSX to
React.createElementis very important as a React developer (it's also a popular interview question).
What is the React.createElement Function?
Every JSX is converted to the React.createElement function call that the browser understands.
The React.createElement has the following syntax:
React.createElement(type, [props], [...children])
Let’s look at the parameters of the createElement function.
- type can be an HTML tag like h1, div or it can be a React component
- props are the attributes you want the element to have
- children contain other HTML tags or can be a component
The React.createElement call will also be converted to the object representation like this:
{
 type: 'h1',
 props: {
   children: 'This is JSX'
 }
}
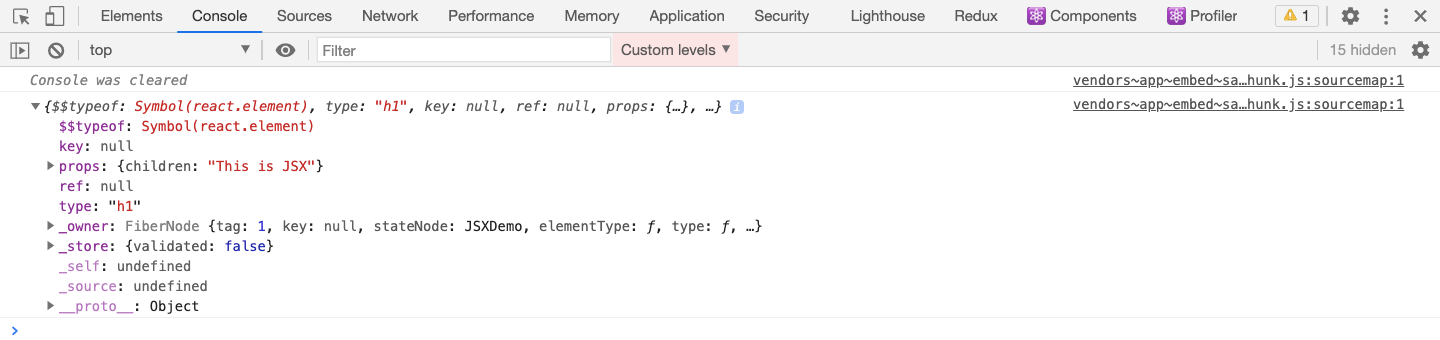
You can see this object representation if you assign the JSX to some local variable and log it as shown below:
class JSXDemo extends React.Component {
    render() {
        const jsx = <h1>This is JSX</h1>;
        console.log(jsx);
        return jsx;
    }
}

ReactDOM.render(<JSXDemo />, document.getElementById('root'));
Here's a Code Sandbox Demo.
You will see the log printed as shown below:
Now, take a look at the below code:
class JSXDemo extends React.Component {
  render() {
    const jsx = <h1 id="jsx">This is JSX</h1>;
    console.log(jsx);
    return jsx;
  }
}

ReactDOM.render(<JSXDemo />, document.getElementById("root"));
Here, we've used the JSX like this:
<h1 id="jsx">This is JSX</h1>
So React, will convert this JSX to the below code:
React.createElement("h1", { id: "jsx" }, "This is JSX");
If there are any attributes added to the HTML tag as in our case, they will be passed as the second parameter for the React.createElement call. The object representation will look like this:
{
  type: 'h1',
  props: {
   id: 'jsx',
   children: 'This is JSX'
  }
}
Here's a Code Sandbox Demo.
You will see the log printed as shown below:

Now, let's add some complexity to the JSX to see how it's converted to the React.createElement call.
class JSXDemo extends React.Component {
  handleOnClick = () => {
    console.log("clicked");
  };
  render() {
    return (
      <button id="btn" onClick={this.handleOnClick}>
        Click Here
      </button>
    );
  }
}

ReactDOM.render(<JSXDemo />, document.getElementById("root"));
Here, we've added an onClick handler to the button.
For the above code, the React.createElement call will look like this:
React.createElement("button", {
  id: "btn",
  onClick: function() {}
}, "Click Here")
Here's a Code Sandbox Demo.
The object representation will look like this:

So from all the above examples, it's clear that JSX is converted to a React.createElement call and it's then converted to its object representation.
If you want to see the JSX to React.createElement conversion code, you can navigate to this application which I created in this article. There you can write JSX code on left and see the converted code on the right side as shown below:

How to Return Complex JSX
Take a look at the below code:
import React from "react";
import ReactDOM from "react-dom";

const App = () => {
  return (
      <p>This is first JSX Element!</p>
      <p>This is another JSX Element</p>
  );
};

const rootElement = document.getElementById("root");
ReactDOM.render(<App />, rootElement);
Here's a Code Sandbox demo.
Here, we're returning two paragraphs from the App component. But if you run the code, you will get this error:
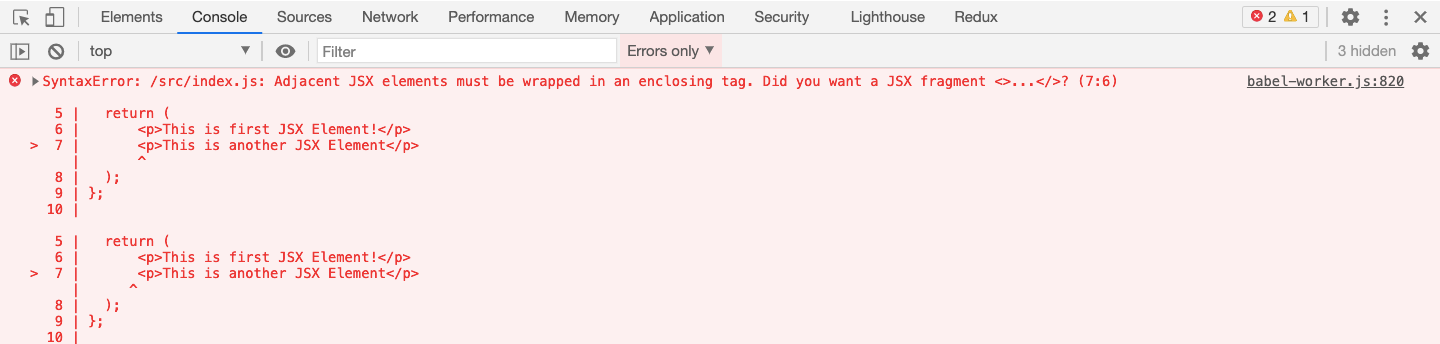
We're getting an error because React requires adjacent elements to be wrapped in a parent tag.
As we have seen, <p>This is first JSX Element!</p> will be converted to React.createElement("p", null, "This is first JSX Element!") and <p>This is another JSX Element</p> will be converted to React.createElement("p", null, "This is another JSX Element").
The converted code will look like this now:
import React from "react";
import ReactDOM from "react-dom";

const App = () => {
  return (
            React.createElement("p", null, "This is first JSX Element!"); React.createElement("p", null, "This is another JSX Element");
        );
};

const rootElement = document.getElementById("root");
ReactDOM.render(<App />, rootElement);
Here we are returning two things from the App component which will not work because there is no parent element to wrap both of them.
To make it work, the obvious solution is to wrap both of them in some parent element, most probably a div like this:
import React from "react";
import ReactDOM from "react-dom";

const App = () => {
  return (
    <div>
      <p>This is first JSX Element!</p>
      <p>This is another JSX Element</p>
    </div>
  );
};

const rootElement = document.getElementById("root");
ReactDOM.render(<App />, rootElement);
Here's a Code Sandbox Demo.
But there are also other ways of making it work.
First, you can try returning it as an array as shown below:
import React from "react";
import ReactDOM from "react-dom";

const App = () => {
  return (
    [<p>This is first JSX Element!</p>,<p>This is another JSX Element</p>]
  );
};

const rootElement = document.getElementById("root");
ReactDOM.render(<App />, rootElement);
Here's a Code Sandbox Demo.
This will get the job done, but as you can see in the browser console, you will get a warning saying Warning: Each child in a list should have a unique "key" prop.
Because in React, every element in the array (when displayed using JSX) needs to have a unique key added to it.
We can fix it by adding a unique key for the adjacent elements:
import React from "react";
import ReactDOM from "react-dom";

const App = () => {
  return (
    [<p key="first">This is first JSX Element!</p>,<p key="second">This is another JSX Element</p>]
  );
};

const rootElement = document.getElementById("root");
ReactDOM.render(<App />, rootElement);
Here's a Code Sandbox Demo.
The other way to fix it is by using the React.Fragment component:
import React from "react";
import ReactDOM from "react-dom";

const App = () => {
  return (
    <React.Fragment>
      <p>This is first JSX Element!</p>
      <p>This is another JSX Element</p>
    </React.Fragment>
  );
};

const rootElement = document.getElementById("root");
ReactDOM.render(<App />, rootElement);
Here's a Code Sandbox Demo.
React.Fragment was added in React version 16.2 because we always have to wrap multiple adjacent elements in some tag (like div) inside every JSX returned by a component. But that adds unnecessary div tags.
This is fine most of the time but there are certain cases where it's not fine.
For example, if we're using Flexbox, then there is a special parent-child relationship in Flexbox's structure. And adding divs in the middle makes it hard to keep the desired layout.
So using React.Fragment fixes this issue.
Fragments let you group a list of children without adding extra nodes to the DOM.
How to Add Comments to JSX Code
If you have a line of code like this:
<p>This is some text</p>
and you want to add a comment for that code, then you have to wrap that code in JSX expresssion syntax inside the /* and */ comment symbols like this:
{/* <p>This is some text</p> */}
Tip: Instead of manually typing the comment, you can use Cmd + / (Mac) or Ctrl + / shortcut keys to add or remove the comment.
How to Add JavaScript Code in JSX
Up to this point, we have only used HTML tags as a part of JSX. But JSX becomes more useful when we actually add JavaScript code inside it.
To add JavaScript code inside JSX, we need to write it in curly brackets like this:
const App = () => {
 const number = 10;
 return (
  <div>
   <p>Number: {number}</p>
  </div>
 );
};
Here's a Code Sandbox Demo.
Inside the curly brackets we can only write an expression that evaluates to some value.
So, often this syntax of using curly brackets is known as JSX Expression Syntax.
Following are the valid things you can have in a JSX Expression:
- A string like "hello"
- A number like 10
- An array like [1, 2, 4, 5]
- An object property that will evaluate to some value
- A function call that returns some value which may be JSX
- A map method that always returns a new array
- JSX itself
Following are the invalid things and cannot be used in a JSX Expression:
- A for loop or while loop or any other loop
- A variable declaration
- A function declaration
- An if condition
- An object
We can write arrays in JSX Expressions because <p>{[1, 2, 3, 4]}</p> is finally converted to <p>{1}{2}{3}{4}</p> when rendering (which can be rendered without any issue).
In the case of an object, it’s not clear how the object should be displayed. For example, should it be comma-separated key-value pairs or should it be displayed as JSON? So you will get an error if you try to display the object in a JSX expression. But we can use object properties instead.
Also note that undefined, null, and boolean are not displayed on the UI when used inside JSX.
So if you have a boolean value and you want to display it on the UI you need to wrap it in ES6 template literal syntax like this:
const App = () => {
  const isAdmin = true;
  return (
    <div>
      <p>isAdmin is {`${isAdmin}`} </p>
    </div>
  );
};
Here's a Code Sandbox Demo.
Conditional Operators in JSX Expressions
We can’t write if conditions in JSX expressions, which you might think of as an issue. But React allows us to write conditional operators, like ternary operators as well as the logical short circuit && operator like this:
<p>{a > b ? "Greater" : "Smaller"}</p>
<p>{shouldShow && "Shown"}</p>
Here's a Code Sandbox Demo describing various ways of writing JSX expressions.
How to Nest JSX Expressions
You can even do nesting of JSX expressions like this:
const App = () => {
  const number = 10;
  return (
    <div>
      {number > 0 ? (
        <p>Number {number} is positive</p>
      ) : (
        <p>Number {number} is Negative</p>
      )}
    </div>
  );
};
Here's a Code Sandbox Demo.
How to Add a Class in JSX
We can add attributes to the JSX elements, for example id and class, the same as in HTML.
import React from "react";
import ReactDOM from "react-dom";

const App = () => {
  const id = "some-id";
  return (
    <div>
      <h1 id={id}>This is a heading</h1>
      <h2 className="active">This is another heading</h2>
    </div>
  );
};

const rootElement = document.getElementById("root");
ReactDOM.render(<App />, rootElement);
Here's a Code Sandbox Demo.
Note that in React, we need to use className instead of class.
This is because if you use class instead of className, you will get a warning in the console as shown below:

Here's a Code Sandbox Demo.
To understand why the warning is being shown, print the object representation of it and you will see the following:
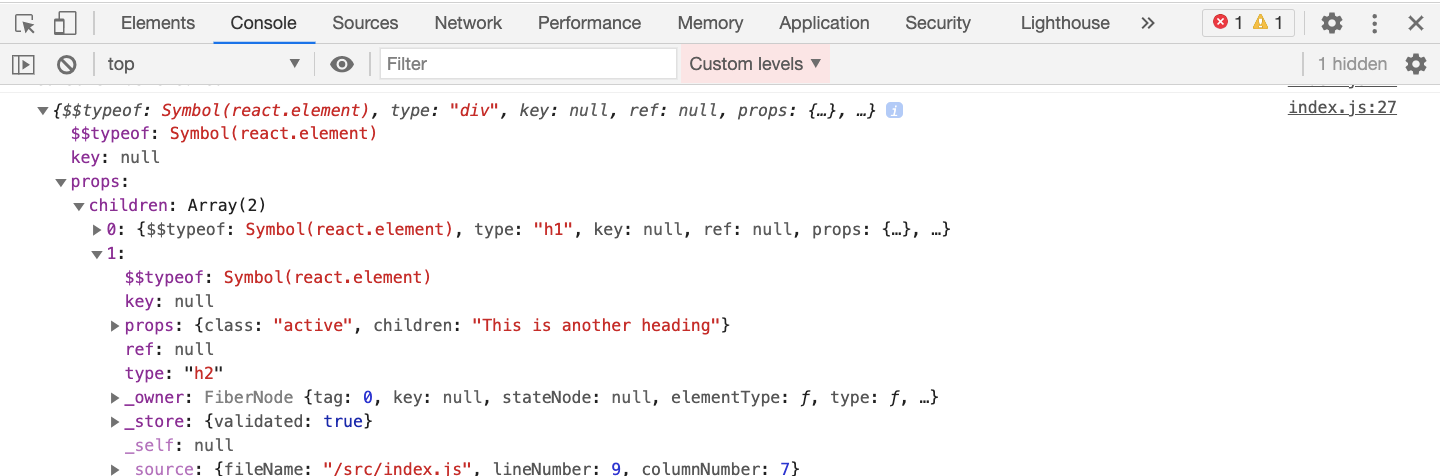
Here's a Code Sandbox Demo.
As you can see, the props object has the class property with a value active. But in JavaScript, class is a reserved keyword so accessing props.class will result in an error.
This is why React decided to use className instead of class.
This use of className instead of class is a frequently asked question in React interviews.
Note that in React, all the attribute names are written in camelCase.
You can find all the changed and unchanged attributes list here.
Conclusion
In this article, we have seen how to use JSX in React. Here are some major takeaways:
- Every JSX tag is converted to
React.createElementcall and its object representation. - JSX Expressions, which are written inside curly brackets, allow only things that evaluate to some value like string, number, array map method and so on.
- In React, we have to use
classNameinstead ofclassfor adding classes to the HTML element - All attribute names in React are written in camelCase.
undefined,null, andbooleanare not displayed on the UI when used inside JSX.
Thanks for reading!
Check out my free Introduction to React Router course.
Also, check out my Mastering Modern JavaScript book to learn all the latest ES6+ features in detail to become better at JavaScript and React.
Subscribe to my weekly newsletter to join 1000+ other subscribers to get amazing tips, tricks, articles and discount deals directly in your inbox.