

I’ve been a professional software engineer for many years, and I can testify that there are few things worse than getting the dreaded BSOD (Blue Screen of Death). Especially when you are about to write a piece of mind bending code at 2am to meet a looming deadline.
That’s just my perspective as a software engineer, but let’s face it – using a computer these days is absolutely essential for most professionals.
The point is the blue screen of death is about as welcome as a pigeon on a chessboard at a world champion chess tournament under almost any circumstances.
What You'll Learn
In this article, we are going to look at one particularly pernicious cause of the BDOS, the dreaded "Kernel Security Check Failure" issue. We'll also see how you can fix this, should you be faced with this abominable issue.
Common Causes for the BSOD
Common reasons you might get the "Kernel Security Check Failure" issue are corrupted system files, faulty hardware, or outdated drivers.
Corrupted system files
Malware is the most likely cause of corrupted system files. The nomenclature of ‘Malware’ is a contraction of the term ‘Malicious Software’. This is software deliberately designed to be intrusive and cause disruption when you're working on your computer.
You have probably heard of terms like virus, trojan horse virus, worms, spyware, ransom ware, and so on. These are all examples of malicious software, Malware.
Faulty hardware
Faulty RAM (memory) or a corrupted or damaged hard disk drive could be the cause of the issue.
Outdated drivers
Out of all the possible causes of this "Kernel Security Check Failure" issue, the most likely cause is outdated drivers.
The outdated drivers issue may have arisen from upgrading from an older version of Windows to Windows 10. The relevant driver may have worked perfectly on the older version of Windows but may be incompatible with Windows 10.
What is the Blue Screen of Death?
Typically you become aware of the "Kernel Security Check Failure" issue during Windows startup. This is where Windows performs a check process. If, during this process, Windows detects corruption in any critical data structures, the Kernel_Security_check_failure error is thrown.
As you can see by the screenshot below there is very little detail about the error. Thankfully, the message does include a stop code (highlighted in yellow) to help identify why you're presented with the dreaded BSOD.

How to Fix the Kernel Security Check Failure Error
Fortunately there are many potential fixes available to resolve the "Kernel Security Check Failure" issue.
To solve the issue, you can go through an investigation process in order to pinpoint the cause of the issue. Once you have learned the cause of the issue, you'll know which of the fixes to apply.
But a quick fix which is the first item in the list of possible fixes provided in this article might be as simple as updating your system to the latest version of Windows 10.
You can see below a list of fixes discussed in this article. The subsequent sections contain step by step instructions for each potential fix in the list.
- Update to the Latest Released Version of Windows 10
- Update Drivers that Need to be Updated
- Check for Viruses
- Investigate Possible Corrupted Windows File System
- Test to see if Disabling Antivirus Software Fixes the Issue
- Investigate Possible Issues with RAM
- Investigate Possible Hard Disk Drive Issues
- Test to see if Disabling Antivirus Software Fixes the Issue
- Start PC in Safe Mode
Update to the Latest Released Version of Windows 10
This maybe the easiest way to fix the issue. To update Windows 10 to the latest version of Windows, you can take the following steps:
- Click Windows key + I to invoke the Settings App.
- Click the “Update & Security” tile.
- Click the “Check for Updates” button (status information will be presented on the screen regarding the download and installation progress)
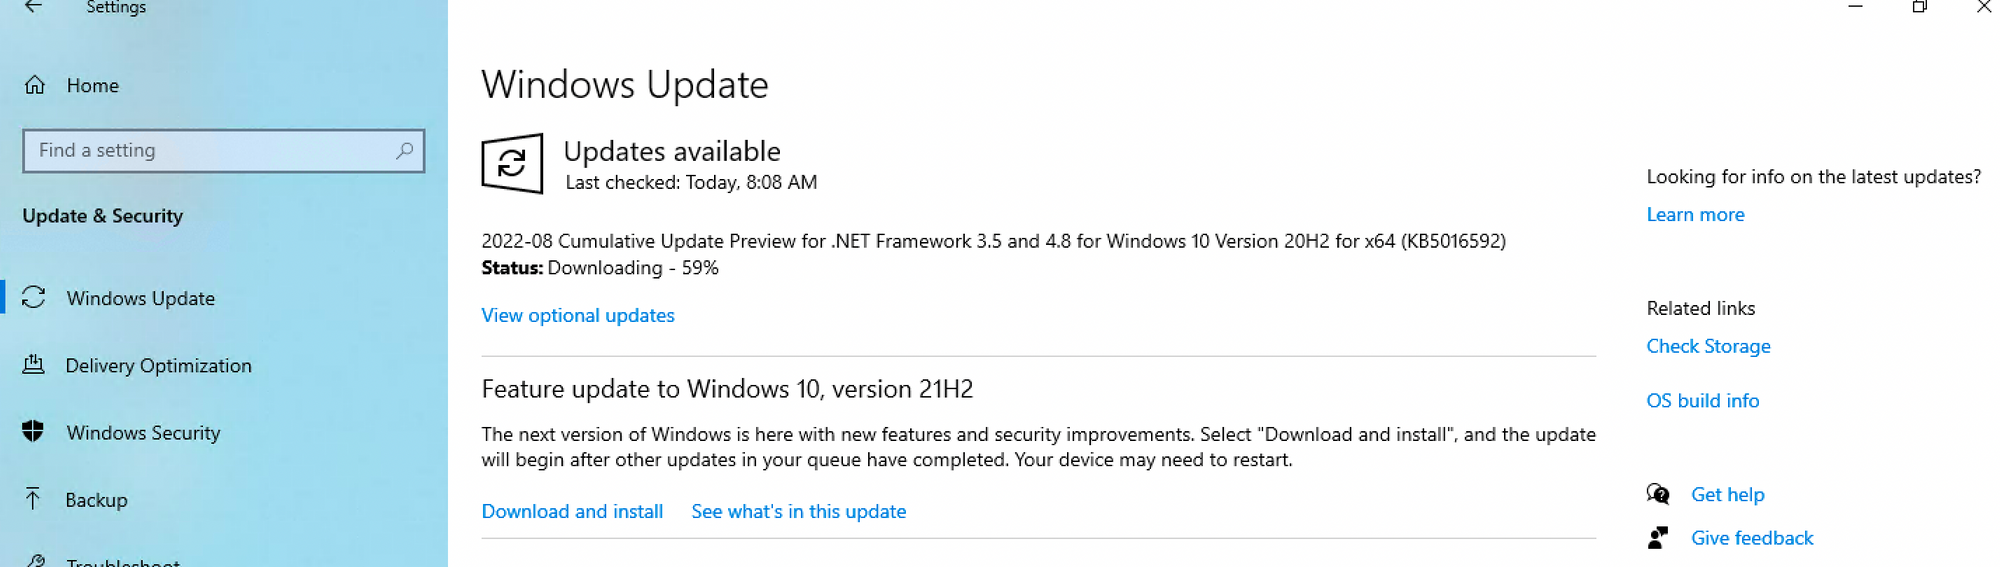
- After the update is complete, check to see if the BSOD still occurs.
Update Drivers that Need to be Updated
One easy way to check for drivers with issues is by using Device Manager.
To invoke Device Manager, press the Windows key + X. In the dialog that will be presented to you, a tree structure is displayed.
If you expand all of the nodes in the tree structure it should be apparent as to which drivers need to be updated – you'll see an exclamation mark with a yellow background colour next to the nodes that represent the drivers that need to be updated.
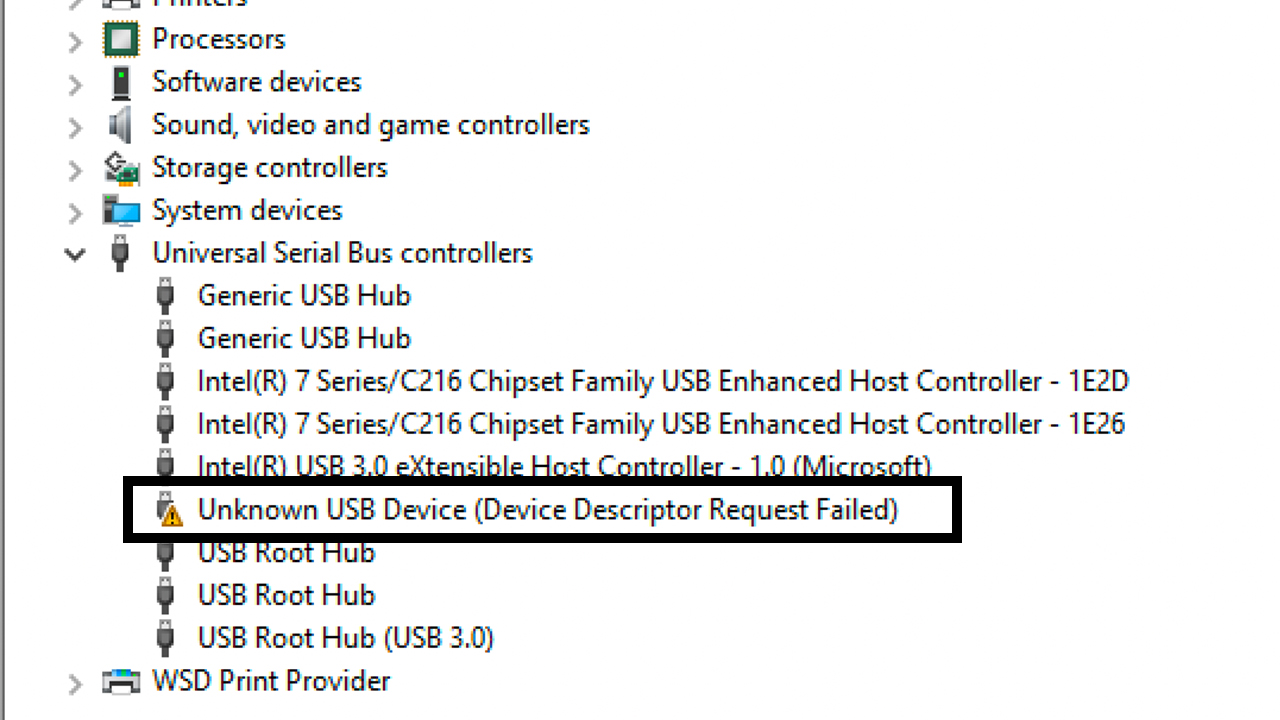
To update a driver, simply right click on the node that represents the relevant driver (that needs to be updated) and click the “Update driver” context menu item.
You'll then see two options: you can either select the option whereby Windows 10 will search for the driver automatically, or you can choose the manual option and search your computer for the relevant new driver file that may already exist on your computer.
The next step is to allow the driver installation update to complete.
You can then continue to check for other problematic drivers by inspecting Device Manager for nodes that contain exclamation marks with yellow backgrounds. If you find any more, you can update those drivers until all the problematic drivers have been appropriately updated.
Then you just need to restart your computer so that the changes created by the new drivers are completed. Hopefully this eliminates your BSOD issue.
If the issue still occurs, your investigation must continue…
Check for Viruses
You must ensure that you have installed the latest Windows updates on your PC and use the antivirus software to check for viruses.
If one or more viruses are found, take the necessary action to remove the virus or viruses from your computer.
Investigate Possible Corrupted Windows File System
You can use the System File checker (SFC) tool to fix corrupt system files. Below are the steps that you can follow in order to run the System File checker tool.
- From the desktop, use the Windows + R key to open the “Run” box
- In the the “Run” box, type in “cmd” then press ctrl+shift+enter to launch the command prompt with administrative privileges.
- Click the "Yes" button on the "User Account Control"ss (UAC) prompt
- Type “SFC /scannow” in the command prompt window and press “Enter”.
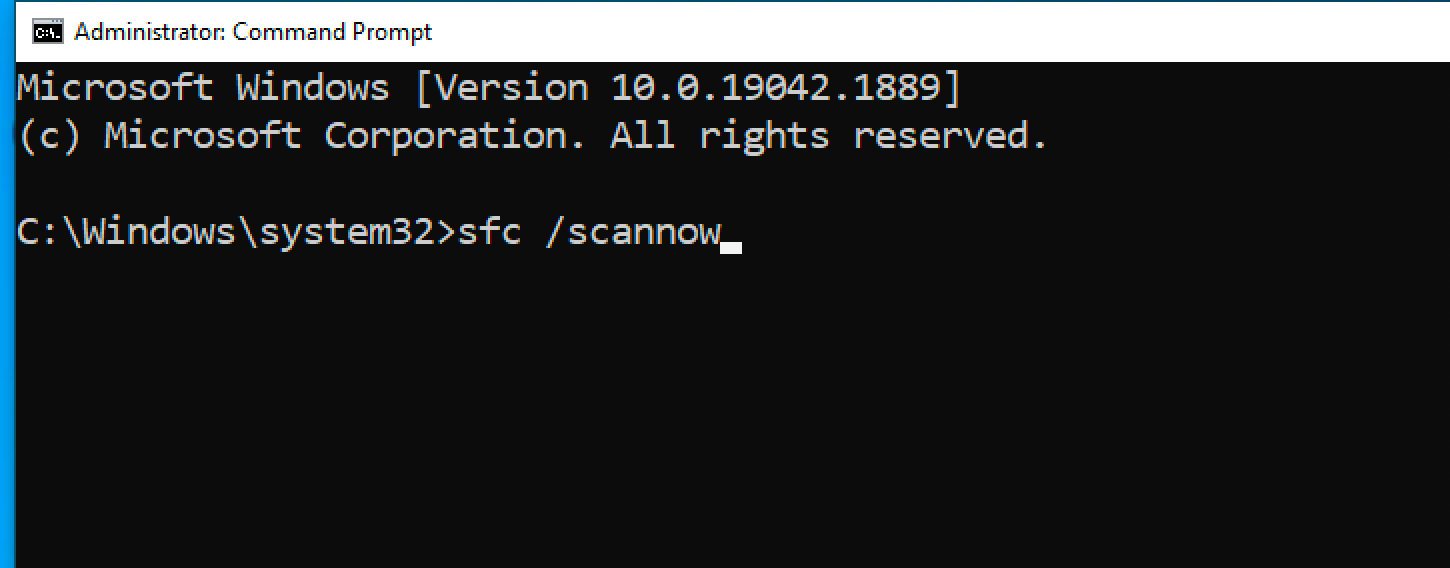
The System file checker utility will check the integrity of Windows system files and will perform appropriate repair operations if required.
Reboot your computer after the process is completed.
Test to see if Disabling Antivirus Software Fixes the Issue
Antivirus software, even though well-intentioned, can inadvertently block non-harmful services and apps from running correctly.
This method will tell you (as it were) that your antivirus software may be the cause of your issue – but please be aware that it is not recommended that you run your computer without the protection of appropriate antivirus software.
To temporarily disable your antivirus software, you can simply invoke the task manager window. You can do this by pressing ctrl+shift+escape on your keyboard.
If task manager loads in compact mode, click the “More details” option. Then select the "Startup" tab at the top of the "Task Manager" Window.
Find the name representing your antivirus application and click the relevant list item.
Then click the disable button that will be present in the right hand corner of the Task Manager window.
Finally, restart computer and see if the BSOD still appears.
Again, remember that even if this fixes the issue, you shouldn't run your computer without antivirus software. So you'll likely need to look into alternatives for protection.
Investigate Possible Issues with RAM
To identify RAM (memory) issues you can invoke the built-in Windows 10 scanner. To do this click on the search magnifying glass icon in the taskbar or press the Windows Key + S.
Type "Memory Diagnostics" in the search text box and run the first option presented in the search results.
In the popup dialog box that is presented, select “Restart now and check for problems (recommended)” option to kick off the diagnostic process.
During the boot process the memory diagnostic process will attempt to identify possible errors and issues regarding RAM. If issues are found, they will be reported to you.
Investigate Possible Hard Disk Drive Issues
You can scan your hard disks for any inconsistencies and errors using the check disk tool.
To run the check disk tool, make sure that you are logged onto windows with an administrator account. Then follow these steps:
- At the desktop, click Windows Key + R to launch the “Run” box.
- In the "Run" box, type in “cmd” then press ctrl+shift+enter to run the command prompt as administrator.
- Click the "Yes" button on the "User Account Control" (UAC) prompt.
- Type in “chkdsk c: /f” and press enter

The “/f” option will attempt to fix any found errors
You could also include the “/r” option and the “/x” option with this command. The “/r” option will locate bad sectors and recover any readable information, while the “/x” option forces the disk drive (about to be checked) to dismount before the utility begins a scan.
Start PC in Safe Mode
You can start your PCs in safe mode so that Windows 10 is booted with minimal files and drivers. To boot up Windows 10 in safe mode, you can follow these steps:
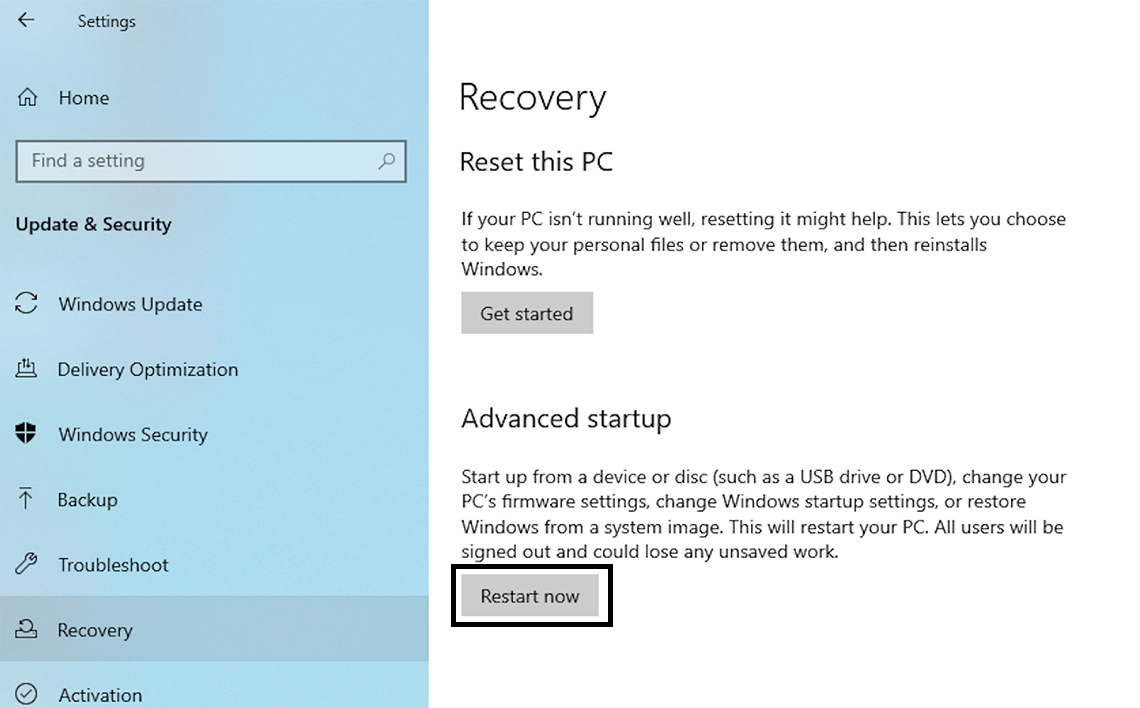
- Press Windows Key + I to invoke the Settings App.
- Under the "Update & Security" heading, select the "Recovery" tab.
- Under the "Advanced Startup" heading in the right pane, press the "Restart Now" button.
- After the PC restarts to the “Choose an option” screen, select Troubleshoot > Advanced options > Startup Settings > Restart.
After the PC restarts, you are presented with a list of options. Select “4” or press “F4” to start PC in Safe Mode. Or if you need to use the internet, you can select “5” or press “F5” for Safe Mode with Networking.
If the issue does not occur in safe mode, this means that the default settings and basic device drivers aren't causing the issue.
Assuming the problem does not occur in safe mode, you now know that the issue must be caused by an additional driver or application that runs in normal mode.
Using a process of elimination, you can now focus on the relevant additional drivers and applications. You can systematically uninstall each of the relevant applications starting with the most recently installed ones and working your way from most recently installed to the least recently installed.
With each uninstall you can test for the problem. This will hopefully pinpoint the application or program that was the cause of the issue. Then you can uninstall the relevant software to hopefully get rid of the issue.
Conclusion
In conclusion, the Kernel Security Check Failure issue can be a huge inconvenience. But hopefully the steps provided in this article will help you fix the issue.