
Modern web applications usually perform more than one function. They often have more than one section, offer more than one service, and have a couple of clients.
But the more functionality the app has, the clumsier your route paths will get.
What if there was a way to separate all these parts into smaller components with better and cleaner routes? Something that users could easily access and use independently, under the same website?
Fortunately, there is such a way: Subdomains.
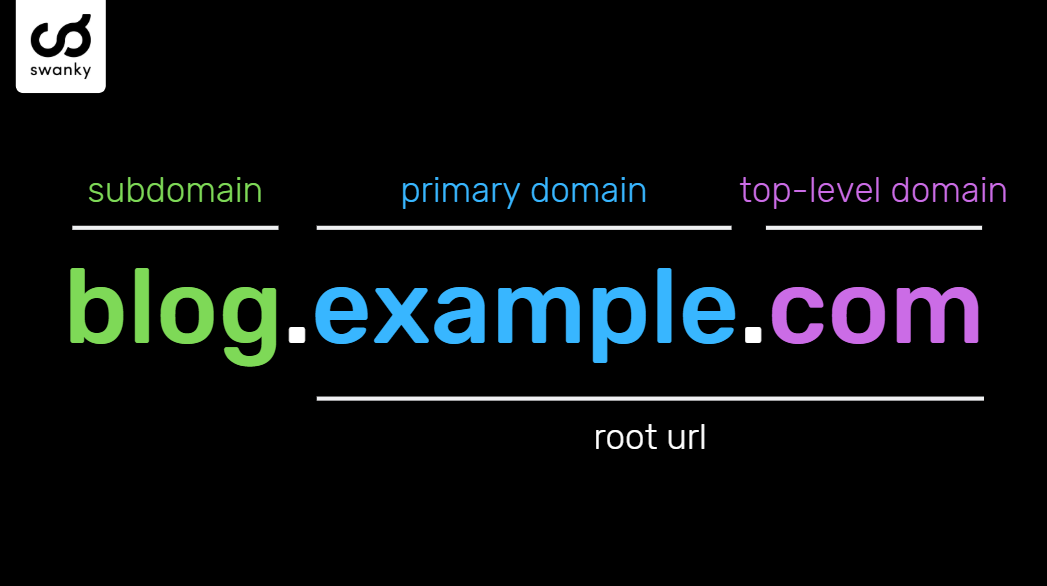
What is a Subdomain?
 Credit: Electroica Blog
Here's a basic definition of a subdomain:
A subdomain is, as the name would suggest, an additional section of your main domain name. You create subdomains to help organize and navigate to different sections of your main website. Within your main domain, you can have as many subdomains as necessary to get to all of the different pages of your website.
So let's say you have a website called mysite.com. You have a blog section, a store section, and a general website section for about and contact pages. The website could have subdomains like blog.mysite.com and store.mysite.com, where the main website would use the main domain.
Why Should You Use Subdomains?
Subdomains are pretty useful, and here are some of their main advantages:
- Users can easily remember you website domains, which means they'll likely use your site more.
- You'd be able to split your large application into smaller groups, so it will be easier to manage, debug, and update or upgrade.
- Subdomains also allow for personalisation – for example, a blog app could give each user their own subdomain (like username.domain.com).
- Subdomains also let developers test version of their application before pushing to production. You could have a beta.site.com to preview changes before deploying them to the main site.
Let's see how all this works by building an actual project and testing it out.
How to Create New Laravel Project
I have Docker setup on my laptop, so I'll be using the Sail setup that Laravel ships with.
curl -s "https://laravel.build/example-app" | bash
You can use any other method you feel comfortable with. See the docs for help.
Start the Laravel Server
./vendor/bin/sail up -d
How to Configure the Route Files
In your web.php file, you can define individual routes with their domain (or subdomain) like this:
Route::get('/', function () {
    return 'First sub domain';
})->domain('blog.' . env('APP_URL'));
Now you can access the page at blog.domain.com.
But more often than not, you'll have more than one path in an application, like a domain and subdomains. So, it's a good idea to use a route group to cover all the routes in the same domain or subdomain.
Route::domain('blog.' . env('APP_URL'))->group(function () {
    Route::get('posts', function () {
        return 'Second subdomain landing page';
    });
    Route::get('post/{id}', function ($id) {
        return 'Post ' . $id . ' in second subdomain';
    });
});
Now, all the routes for the domain can be handled in one place.
How to Make Subdomains Dynamic
As I mentioned earlier, you can use subdomains to allow personalisation in web applications, so they need to be dynamic. For example, Medium gives authors domains like username.domain.com.
You can do this easily in Laravel as subdomains may be assigned route parameters just like route URIs. This allows you to capture a portion of the subdomain for usage in your route closure or controller.
Route::domain('{username}.' . env('APP_URL'))->group(function () {
    Route::get('post/{id}', function ($username, $id) {
        return 'User ' . $username . ' is trying to read post ' . $id;
    });
});
In this example, you could have a domain like zubair.domain.com with route parameters, too.
Route Service Providers
For very large applications, the web.php could get a bit messy if the routes keep increasing. It is best to split the routes into different files, preferably by subdomain.
In your RouteServiceProvider.php file, you'll see this code in the boot method:
public function boot()
    {
        $this->configureRateLimiting();

        $this->routes(function () {
            Route::prefix('api')
                ->middleware('api')
                ->namespace($this->namespace)
                ->group(base_path('routes/api.php'));

            Route::middleware('web')
                ->namespace($this->namespace)
                ->group(base_path('routes/web.php'));
        });
    }
This is Laravel's default route configuration to separate API routes from web routes. We'll use this same file to separate subdomains.
Add the following to the method:
Route::domain('blog.' . env('APP_URL'))
                ->middleware('web')
                ->namespace($this->namespace)
                ->group(base_path('routes/blog.php'));
This is telling Laravel that whenever someone hits the blog.domain.com endpoint, look for the route in the blog.php (that we are yet to create).
We can go on to create the blog.php file in the routes folder, and add the following content:
<?php

use Illuminate\Support\Facades\Route;

Route::get('/', function () {
    return 'Route using separate file';
});
At this point, you're done with all the code! All that's left is some server configuration.
Server Configuration
If you're using a service such as Laravel Valet, it is way easier to setup.
In the root directory of your project, run:
valet link domain
valet link blog.domain
And if you're not using Laravel Valet, you can add this to your /etc/hosts/ file:
127.0.0.1       domain.test
127.0.0.1       blog.domain.test
This is basically just mapping the domain to the IP.
Summary
Now you know how to set up and manage subdomains in your Laravel apps. You can find all the code for this article here.
If you have any questions or relevant advice, please get in touch with me to share them.
To read more of my articles or follow my work, you can connect with me on LinkedIn, Twitter, and Github. It’s quick, it’s easy, and it’s free!