

Hi! If you speak Spanish and you want to learn JavaScript for DOM manipulation, you are in the right place.
In this article, you will find a brief introduction to JavaScript for DOM manipulation. You will learn why this is a very powerful tool for developing interactive web applications and why you should learn them if your goal is to be a front-end web developer.
Then, you will find a 5.5 hour course on JavaScript for DOM manipulation on freeCodeCamp's Spanish YouTube channel where you can learn the fundamentals in Spanish and build projects step by step.
If you have Spanish-speaking friends, you are welcome to share the Spanish version of this article with them.
Let's begin! ✨
◼️ What is the DOM?
 The DOM represents the structure of an HTML file.
DOM is an acronym that stands for Document Object Model. It is an interface that allows computer programs to access and update the content, structure, and style of a document, such as an HTML file.
The DOM allows web developers to interact with the elements and components of their websites using programming languages like JavaScript.
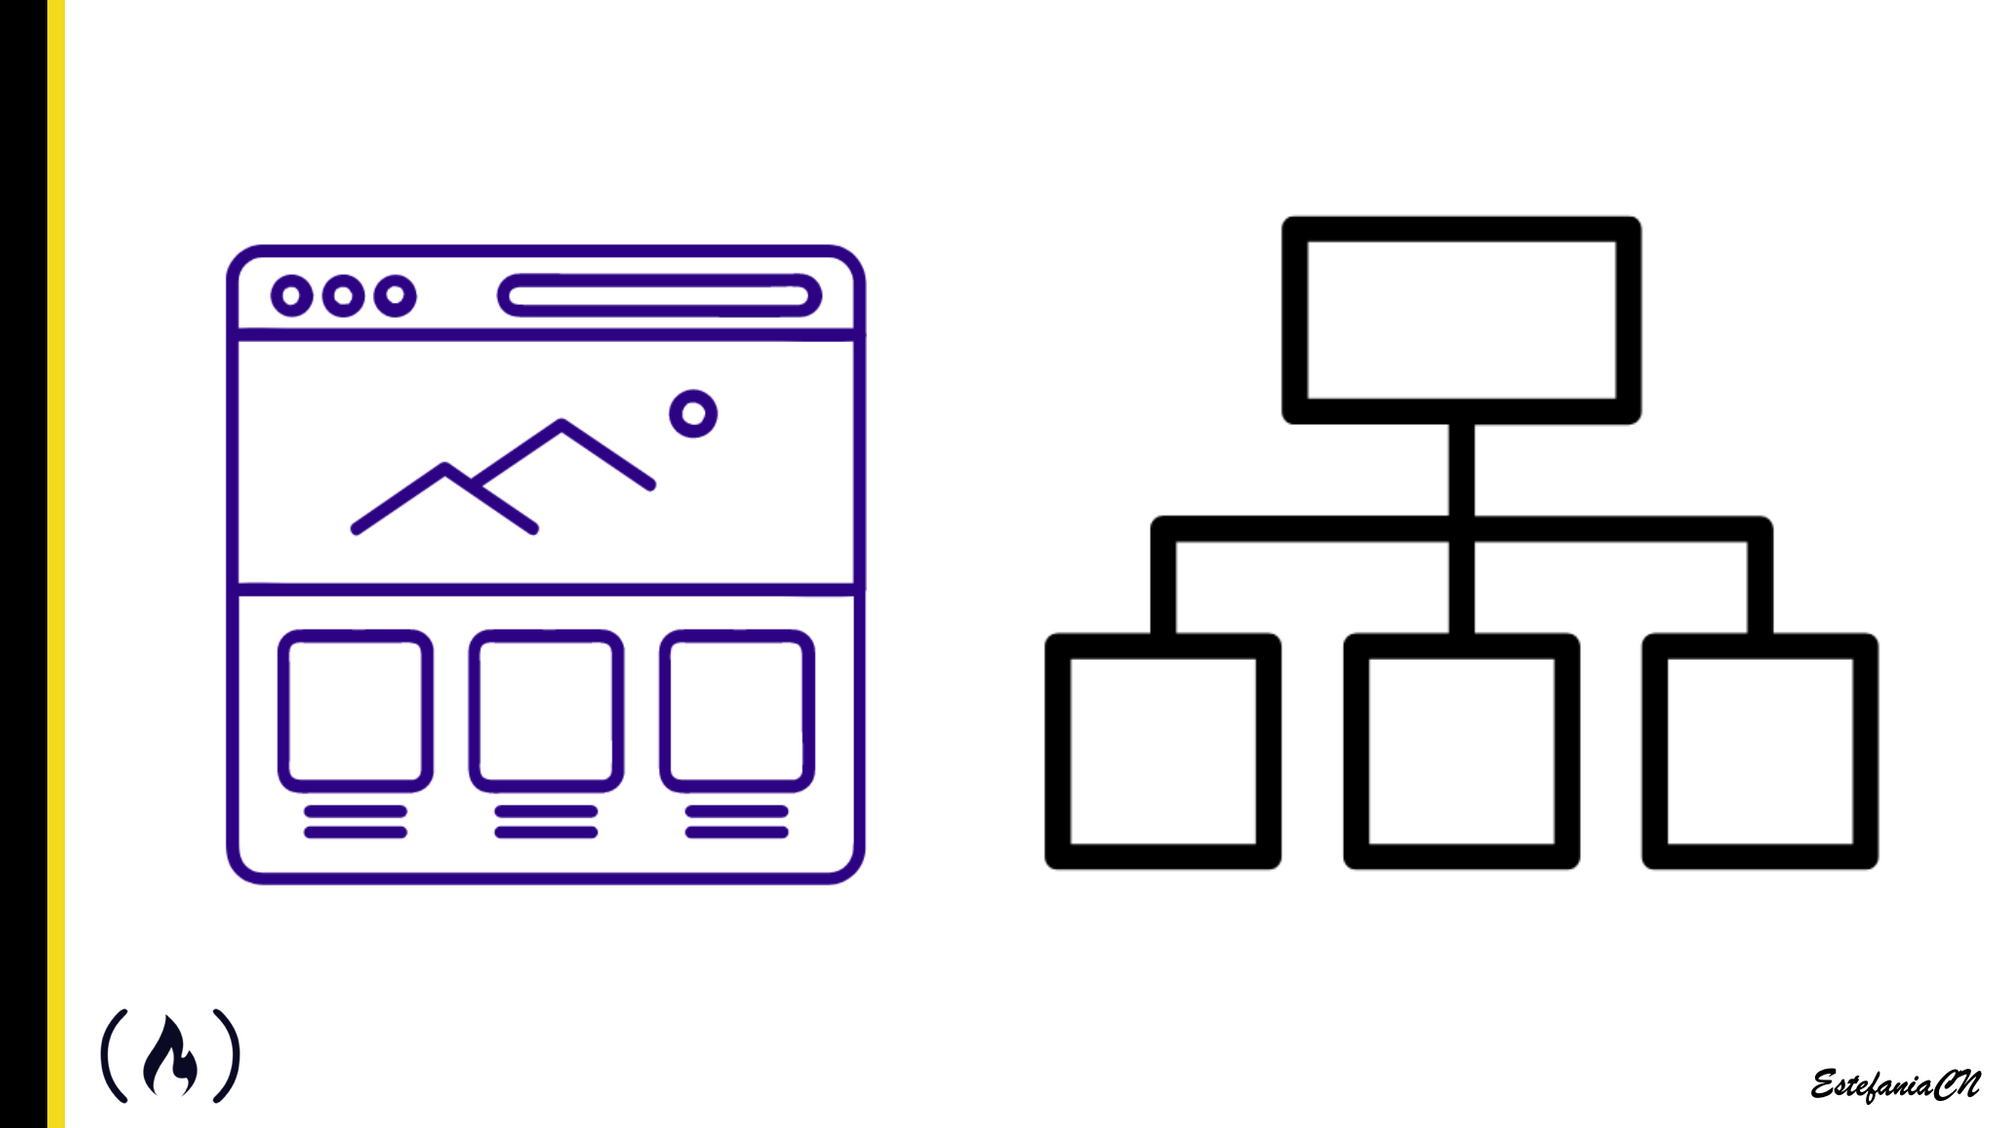
The DOM is like a Tree
The DOM works by creating a representation of all the elements of a web page. This representation looks like an inverted tree with nodes and connections that represent their hierarchy in the document.
The first object that we find in the hierarchy from top to bottom is the topmost object in the document. For HTML, this would be the <html> root element, which contains all the other objects in the web page.
Below this first object, the structure creates ramifications that look like tree branches.
Every object has a particular place in the DOM. The DOM hierarchy follows the hierarchy of the objects in the document.
💡 Tip: A heading, a paragraph, an image, or a link are examples of HTML elements that are represented as objects in the DOM.
◼️ Why is the DOM Important?
The DOM is the browser's way of representing the structure of a document. Thanks to the DOM, we can access the elements of a web page in JavaScript and manipulate them in our code.
The DOM also has a set of methods that allow developers to access, manipulate, and even remove objects from the tree. We can even modify what the user sees dynamically.
For example, we could change the text of an element or add new elements dynamically as we receive updated information for the user.
This is why the DOM is super important for developers. It allows us to create interactive web pages that go beyond just displaying content and information.
With the DOM, we can create interactive user experiences.We can create animations, change the information that the user sees, and react to events that occur as the user interacts with the web page.
Basically, the DOM makes the web the amazing tool that we know and love nowadays, so it is very important for you as a web developer. In this course, you will learn how it works and how to use it.
◼️ Important DOM Concepts
 The DOM looks like a tree (but inverted upside down).
As we work with the DOM, we will often find terminology used to describe the relationship between the nodes in the hierarchy.
These are some of the most important terms that you should be familiar with to start working with the DOM:
- Root node: The root node is the topmost node in the DOM tree. It's the only node in the hierarchy that does not have a parent node.
- Parent node: a node that contains another node.
- Child node: a node that is directly contained within another node.
- Descendant node: a node that is within another node (directly or indirectly).
- Sibling nodes: nodes that are at the same level in the DOM hierarchy and within the same parent node.
In this example, we could represent the DOM that will be generated for this HTML file with the diagram that you can see here on the right.
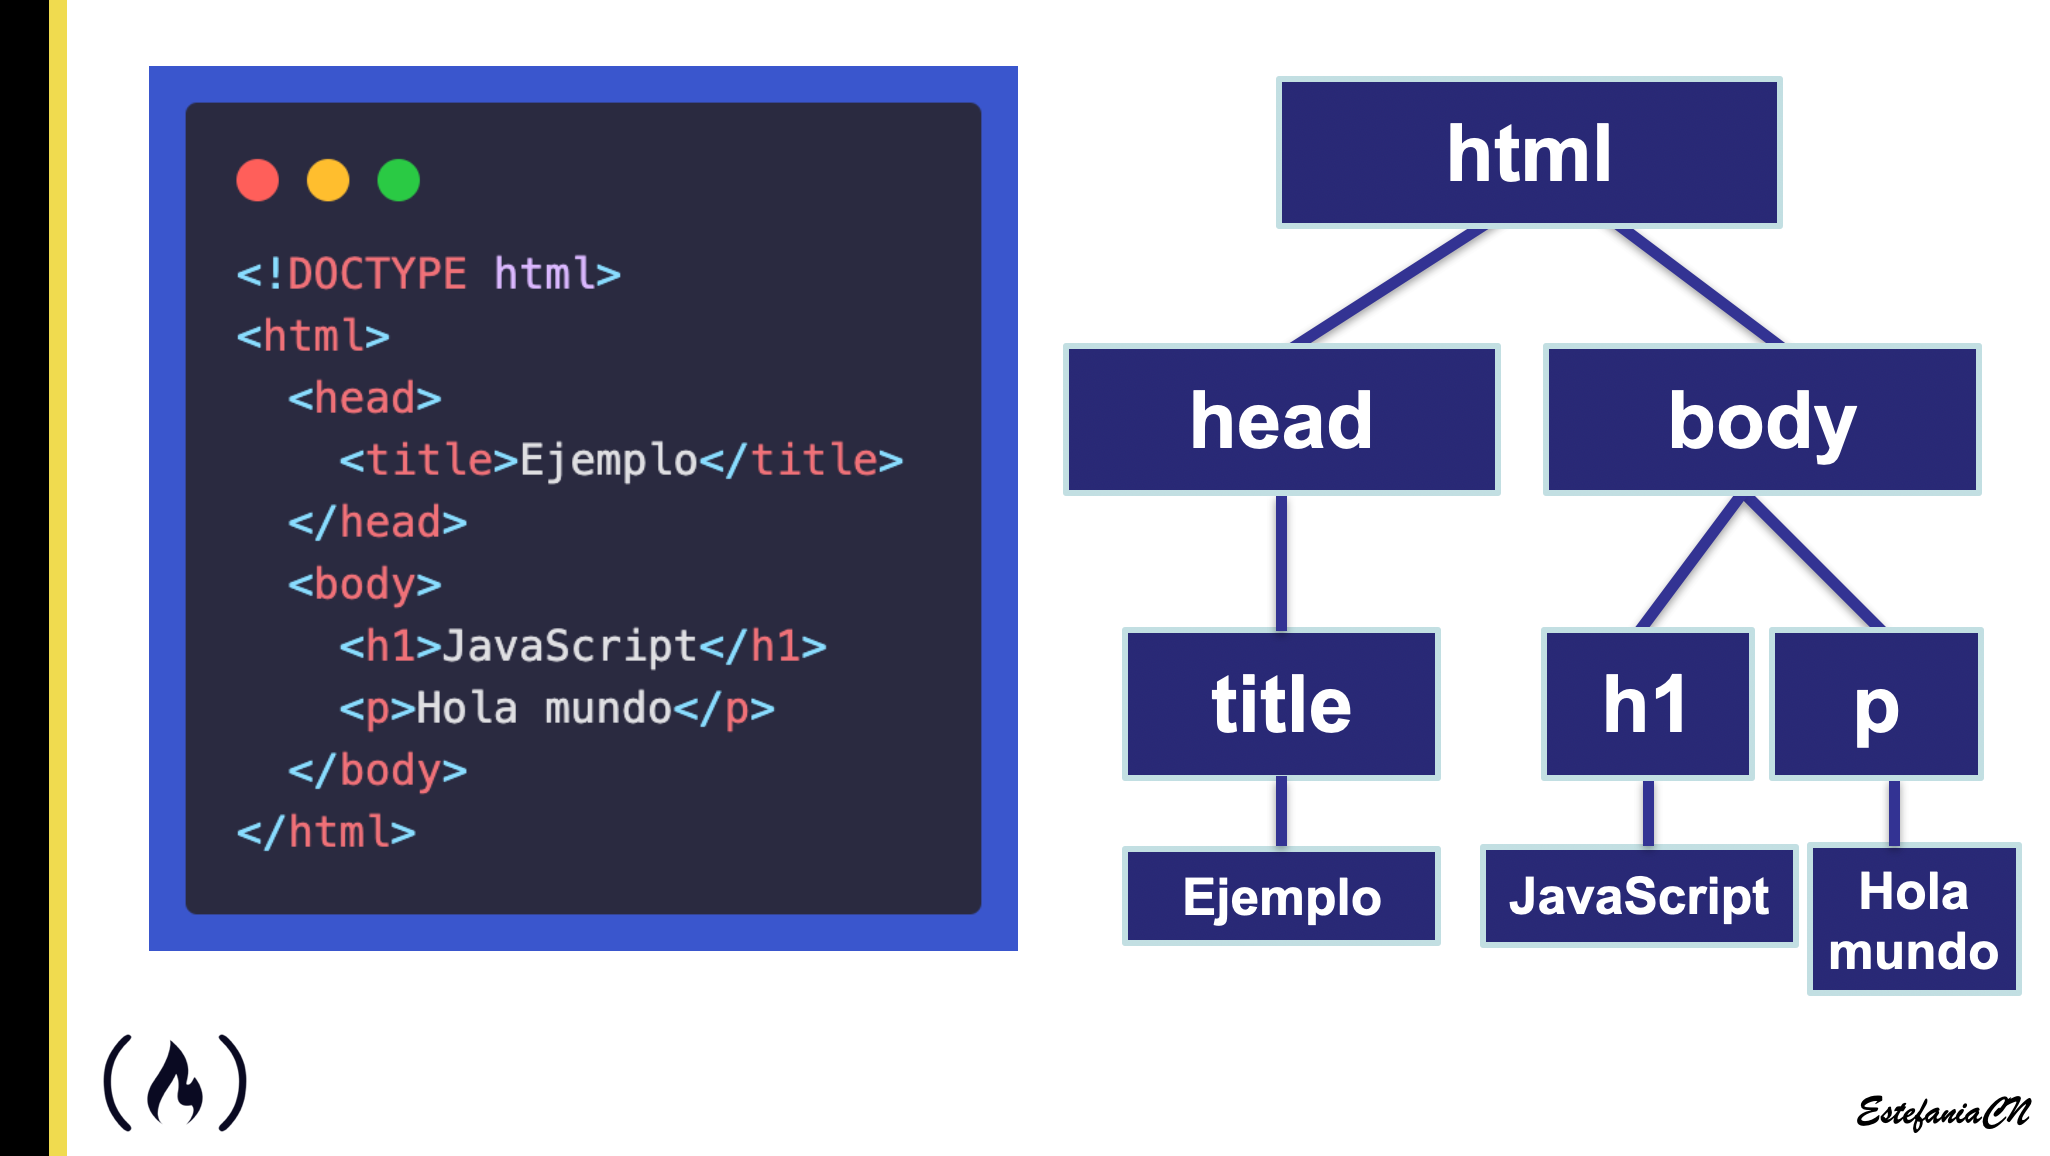
Let's see this DOM in more detail:
- We can see a root node (
**html**). - The root node has two child nodes (
headandbody). - The
headnode has one child node (title). - The
bodynode has two child nodes (h1andp). - The
h1andpnodes are siblings. They are at the same level in the hierarchy and they share the same parent node. - The nodes at the bottom do not have any child nodes because they represent text. In addition to HTML elements, nodes can represent text and comments.
💡 Tip: during the course, you will learn the difference between a node and an element. This is very important.
◼️ How to Select Elements from the DOM
Being able to select an HTML element from the DOM is very helpful to have access to the structure of the website. The elements are represented as objects with properties and methods that we can work with in JavaScript.
We have five methods to select an element from the DOM:
The .getElementById() method
This method is used to get an element by its id. Since the id of an element should be unique per page, this is a perfect way to select a specific element from the DOM hierarchy, even if there are multiple similar or identical elements.
This is an example:
const container = document.getElementById('container');
💡 Tip: this will only return one element because ids should be unique.
The .getElementsByClassName() method
However, if our goal is to get all the elements with a particular class, we should use this method instead.
const pizzaToppings = document.getElementsByClassName('topping');
This returns an HTMLCollection object. This type of object is an array-like object that contains a collection of HTML elements.
The .getElementsByTagName() method
Sometimes, we may also need to select all the elements of a particular type, such as all the divs or all the **p**s. To do this, we have this very helpful method.
const myToppings = document.getElementsByTagName('li');
This method also returns an HTMLCollection because we can have multiple elements with the same tag name.
The .querySelect() method
We also have a way to select the first element that matches a specific selector. With this method, we can write more complex selectors similar to the ones that we use in CSS to select elements based on more complex criteria.
const firstNotBrownTopping = document.querySelector('ul li:not(.brown-topping)');
💡 Tip: this method only returns one element – the first element that matches the selector in the order that they appear in the DOM hierarchy.
The .querySelectAll() method
And if we need to select all the elements that match a specific selector, we just need to add All at the end.
const orangeToppings = document.querySelectorAll('.topping.orange-background');
✨ Awesome. These are the main JavaScript methods that we can use to select elements from the DOM. Now let's see how you can add and remove elements.
◼️ How to Manipulate the DOM
Another key aspect of why the DOM is so powerful is that it allows us to manipulate the initial hierarchy of the document to add, remove, and modify elements.
First, we can create an element.
For example:
const newTopping = document.createElement('li');
And once we have the new element, we can add it to our existing DOM hierarchy.
If we have a reference to the parent element where we want to append it, **toppingsList**, we can add it by calling the **.append()** method, like this:
toppingsList.append(newTopping);
We can also remove an element with the **.remove()** method:
newTopping.remove();
And we can modify the content of an element, such as its inner HTML or inner text:
newTopping.innerText = 'Extra Cheese';
newTopping.innerText = '<div class="new-topping">Extra Cheese</div>';
◼️ How to Assign Styles
We can also use dot notation to access and modify the style of an element. We can even add and remove the classes of the elements.
newTopping.classList.add('topping', 'brown-background');
newTopping.style.backgroundColor = 'blue';
newTopping.style.color = '#6dff00';
newTopping.style.textTransform = 'uppercase';
This is very powerful, and you will learn how to do this during the course as we build the projects.
💡 Tip: we can also detect and handle DOM events in JavaScript. Events can be triggered by user interactions, such as clicking a mouse button, or by the browser, such as when an image has finished loading.
◼️ Course Content
Great. Now that you know more about the DOM and why web developers should learn to manipulate the DOM in JavaScript, let's see an outline of what you will learn during the course.
💡 Tip: the course assumes basic knowledge of HTML, CSS, and JavaScript. We will work on the examples and projects step by step but it is recommended to have previous knowledge on the fundamentals of JavaScript.
Introduction to the DOM
- What is the DOM?
- What is the DOM used for?
- Basic DOM hierarchy.
- Important concepts.
- Node relationships.
- Node vs. element in the DOM.
Chrome Developer Tools and the DOM
- Introduction to Chrome Developer Tools.
- The Elements tab.
- How to inspect a web page.
- How to use the console.
- Visualizing and understanding the DOM.
- Manipulating the DOM in the preview.
💡 Tip: during the course, we will work with Visual Studio Code and we will install the Live Server extension to see our changes automatically.
Selecting an Element from the DOM
**.getElementById()****.getElementsByClassName()****.getElementsByTagName()****.querySelect()****.querySelectAll()**
Assigning Style with JavaScript
- The
**style**property. - Customize CSS properties with JavaScript.
- Get the value of a CSS property.
Setting the Content of an Element
- The
**.innerText**property. - The
**.innerHTML**property. - The
**.textContent**property. - Their differences and how to get them.
Modifying and Traversing the DOM
- How to create an element.
- How to add an element.
- How to remove an element.
- Traverse the DOM to access the parent node, the children nodes, and sibling nodes.
DOM Events
- What is an event?
- Event triggers
- Types of DOM events
- Important concepts
- Event listeners
- How to handle events
Sounds great, right? You will learn all of this and much more during the course.
◼️ Course Projects
During the course we will create five interactive projects step by step. Let's see what you will learn in each one of them in more detail.
Random Hex Color Generator
Our first project will be a random hexadecimal color generator. We will generate a random hexadecimal color and we will assign it as the background color of the **body** element.
💡 Tip: you will practice how to attach an event listener, how to handle an event, and how to update the inner text and the style of an element.
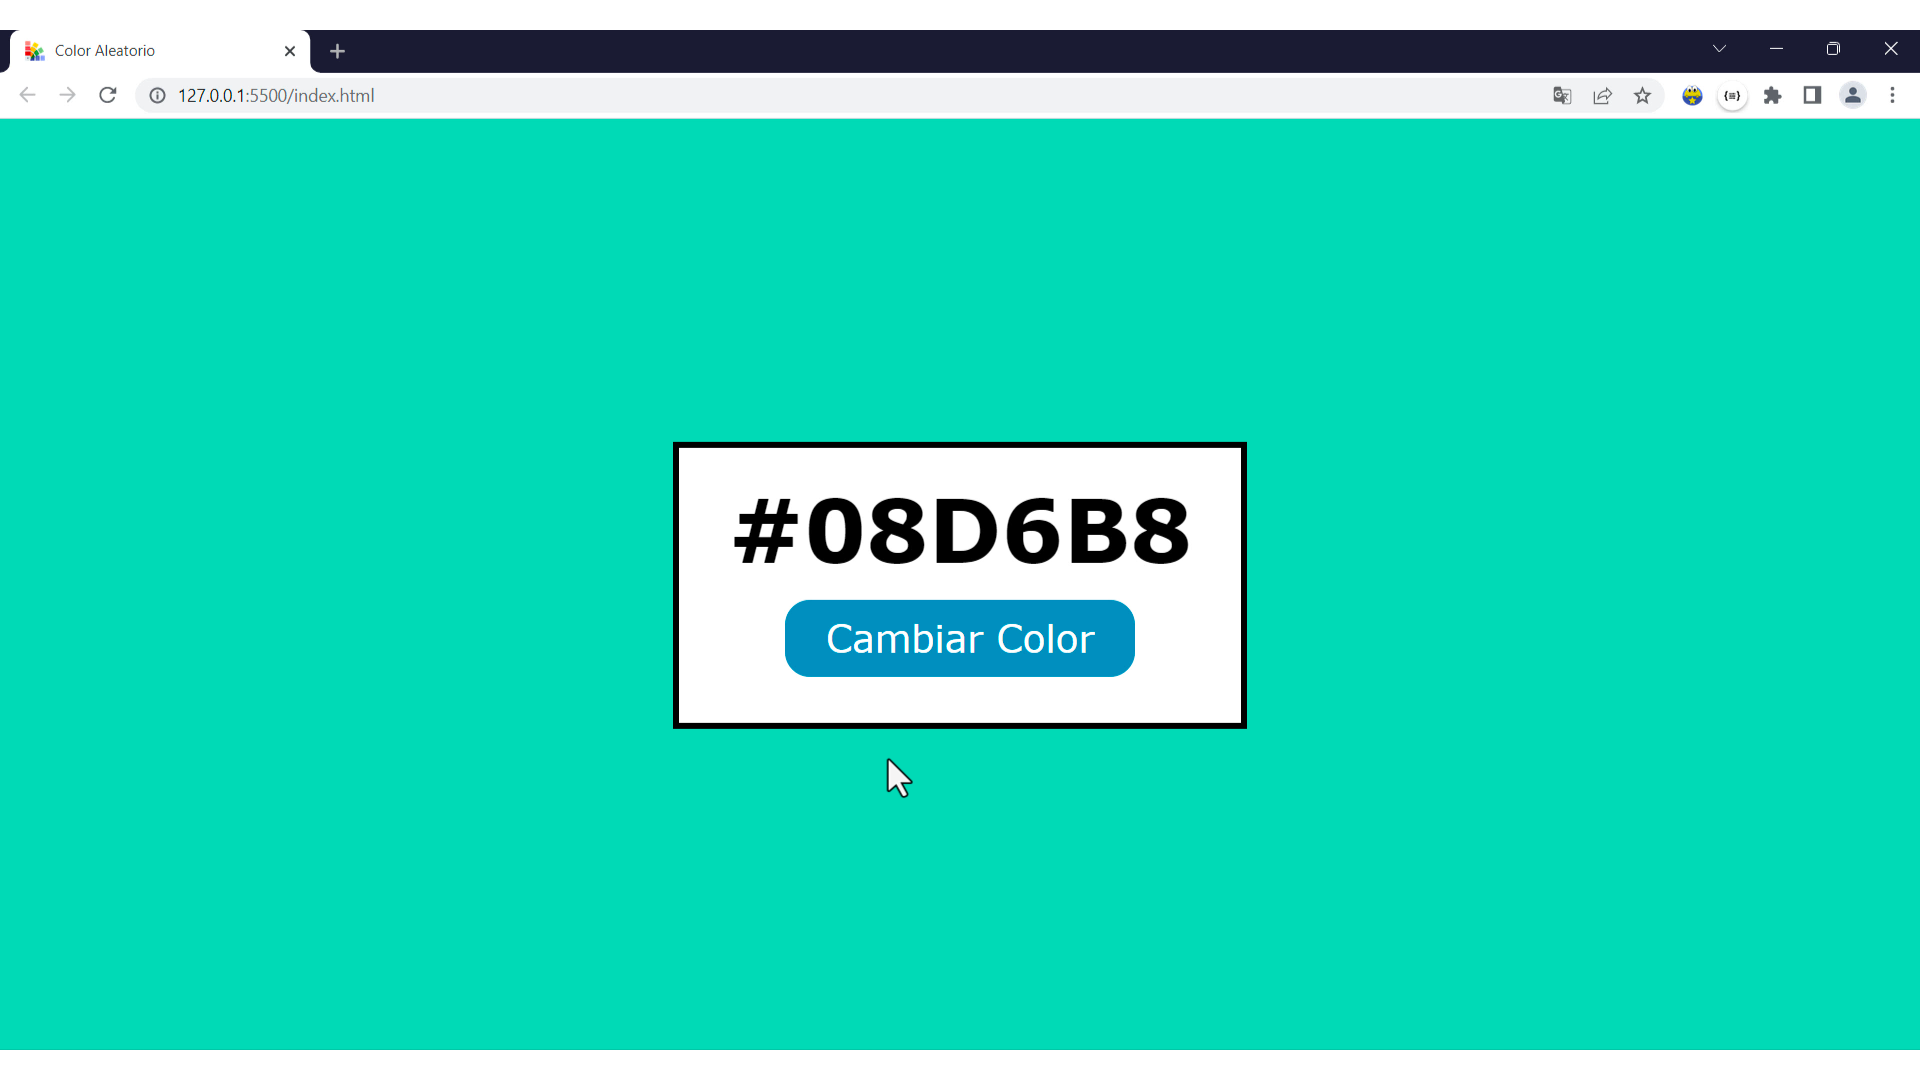 Project 1: Random Hex Color Generator
RGB Color Picker with Sliders
Our second project will also feature colors, but this time the color will not be random. It will be an RGB color and you will be able to choose the values of red, green, and blue to generate a new color and update the background.
💡 Tip: you will practice how to handle a new type of event and how to get the values of the sliders every time the event is triggered.
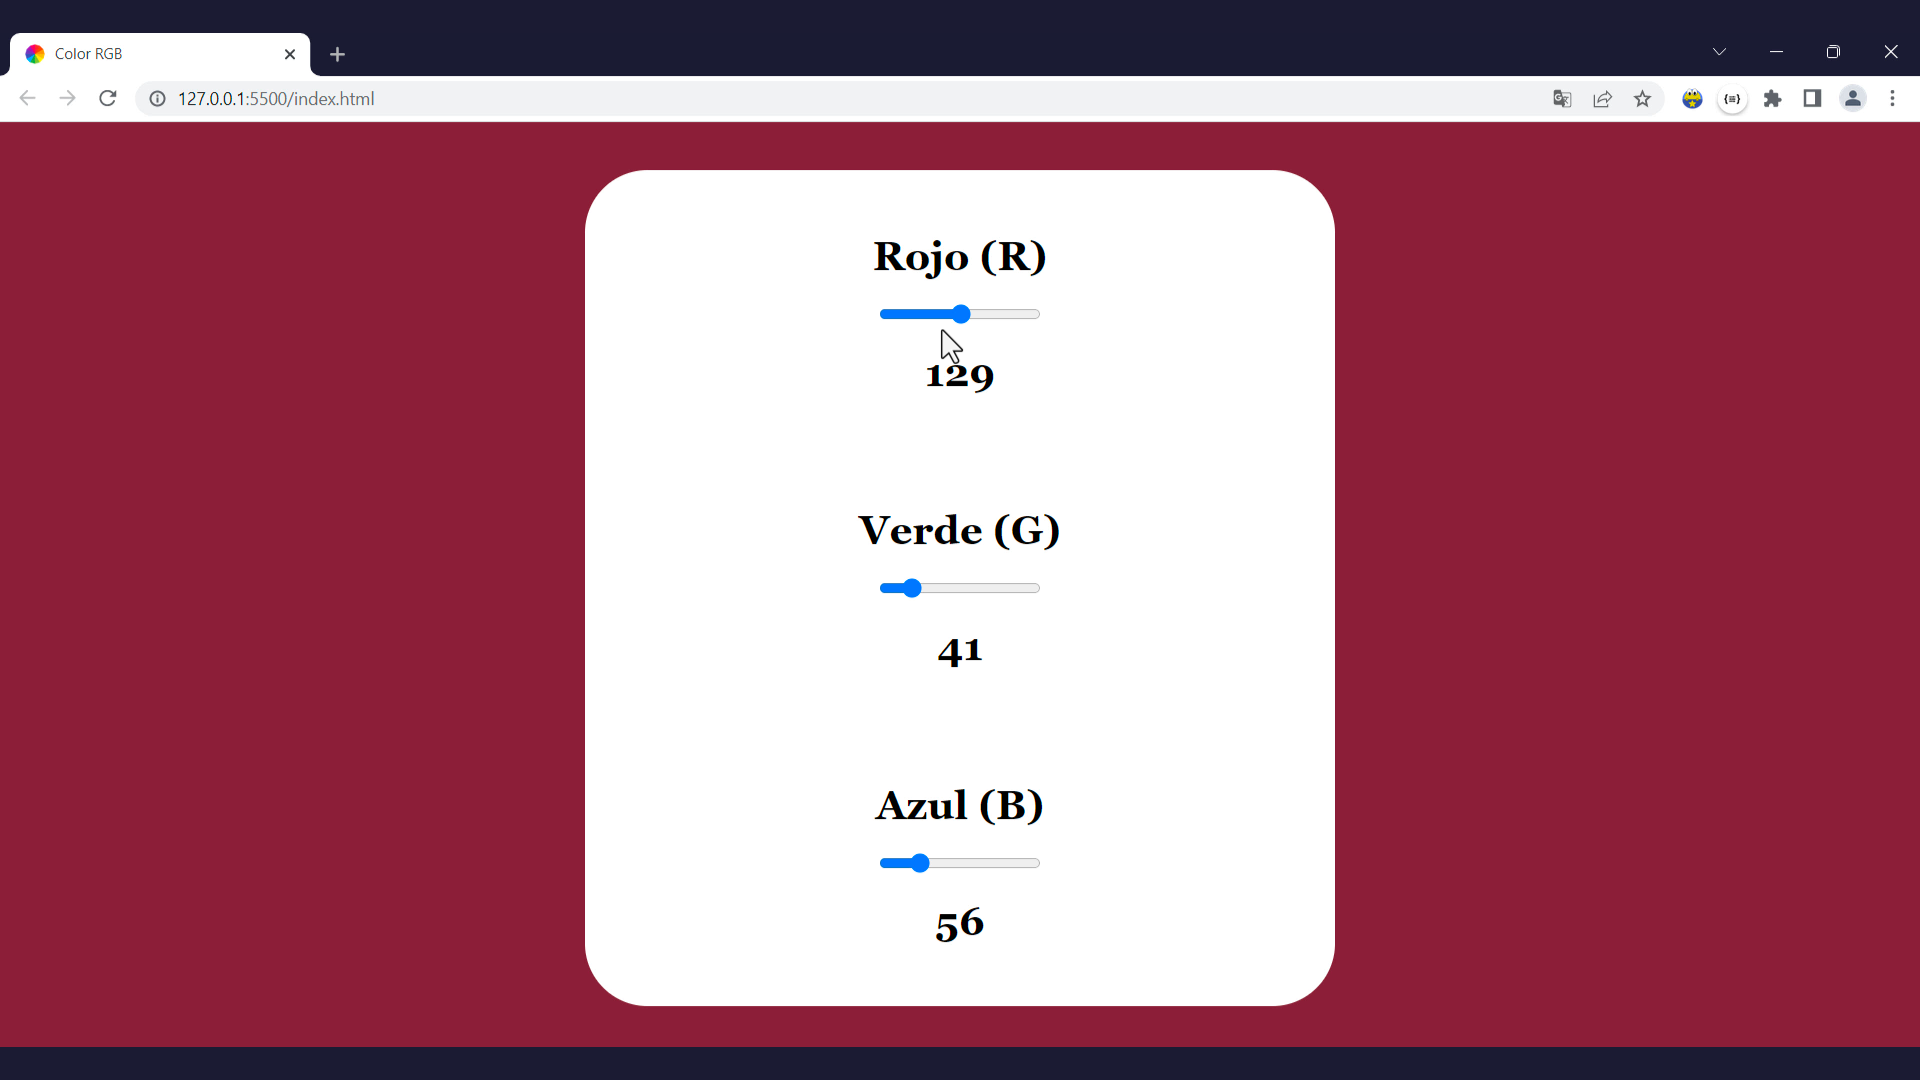 Project 2: RGB Color Picker with Sliders
Random Quotes Generator
Our third project will display a random quote and its author. The use will be able to click on the blue button to change the current quote.
💡 Tip: you will practice working with random numbers in JavaScript, updating the text of an element, and handling DOM events.
 Project 3: Random Quotes Generator
Stopwatch
Our fourth project will be a stopwatch. Users will be able to start, pause, and stop the stopwatch and update the time and the icons appropriately.
💡 Tip: you will learn how to update the content of an element continuously at a fixed time interval, how to reset the time interval, and how to update the inner HTML of an element in the DOM.
 Project 4: Stopwatch
To-do List App
Finally, our fifth project will be a to-do list app. The user will be able to write a task in the text input field and click on the button or press Enter on the keyboard to add the new task. Tasks will have the text, a button to mark it as complete, and a button to remove it from the list. Each action will update its style.
💡 Tip: you will learn how to handle keyboard events and you will practice how to create an element, assign and remove classes, and remove elements from the DOM.
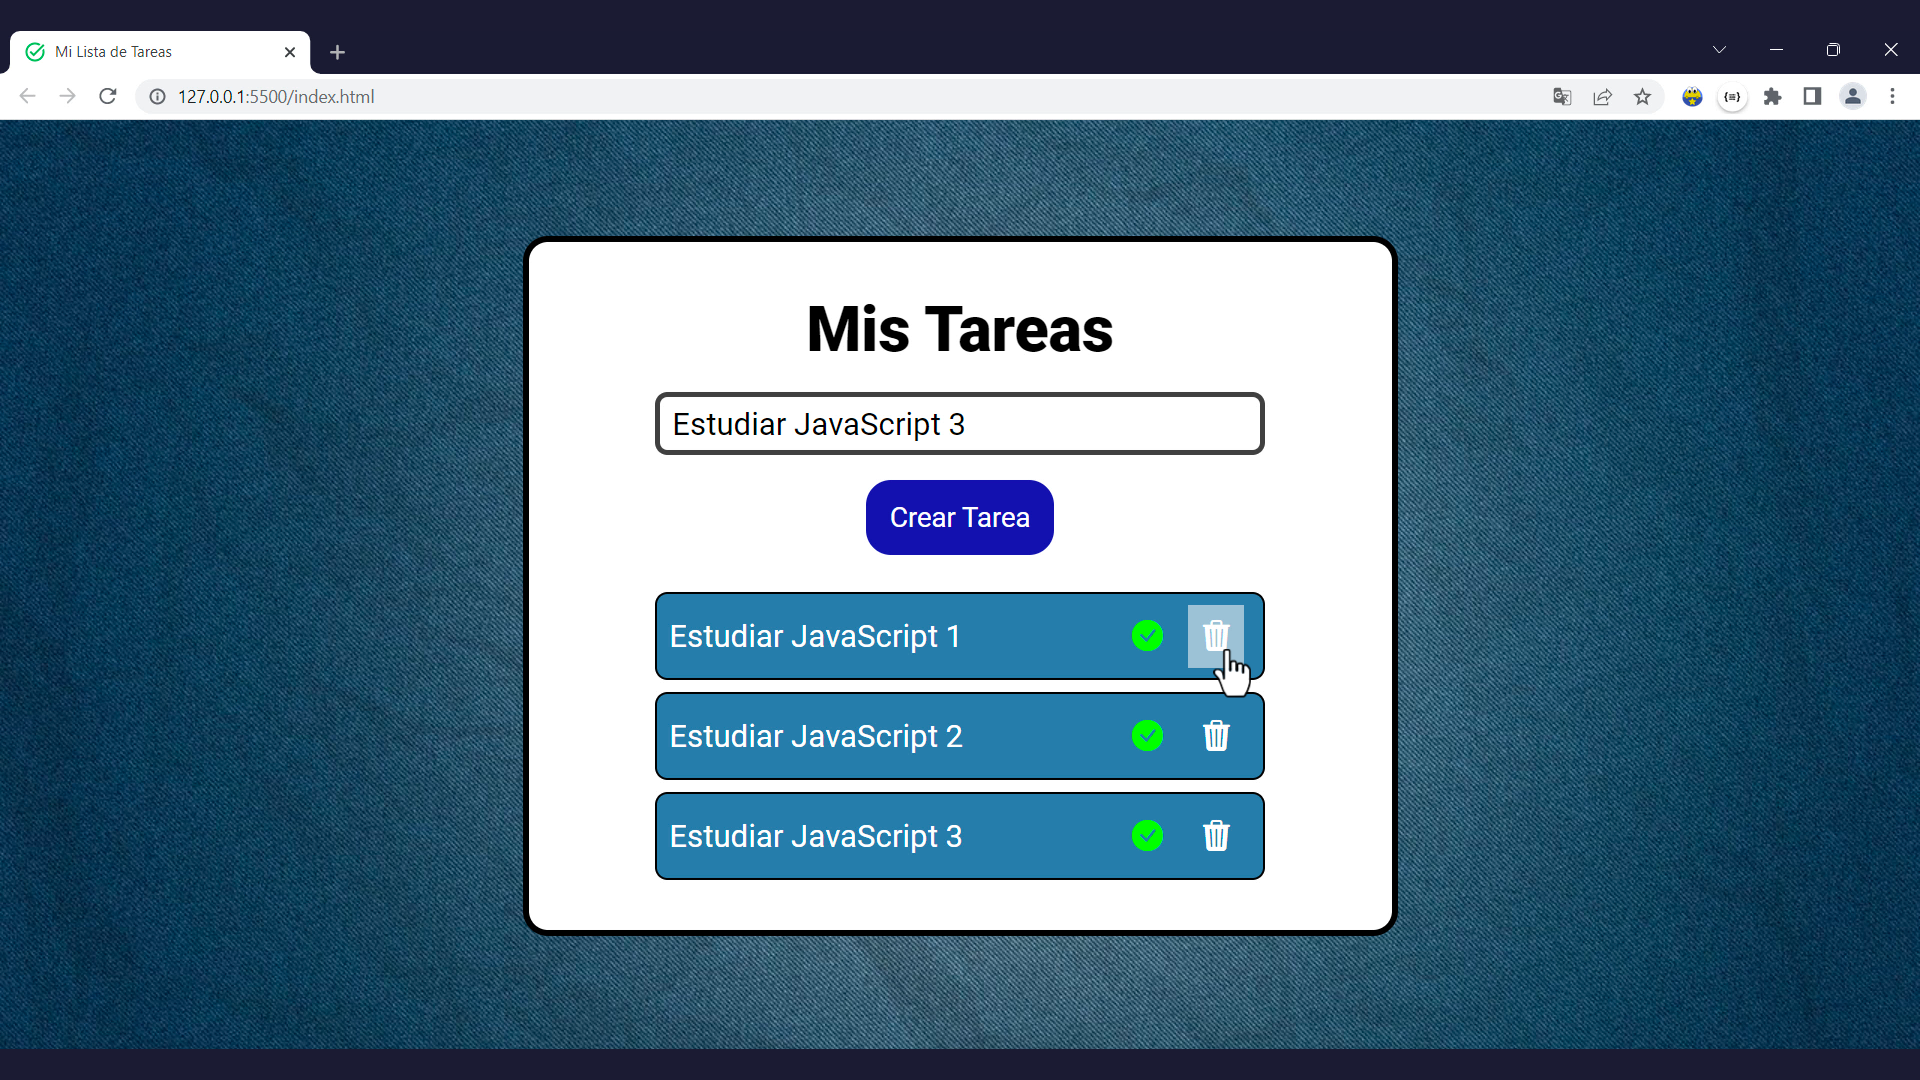 Project 5: To-do List App
💡 Tip: during the projects, we will also work with Bootstrap icons, Flexbox, and Google Fonts.
📌 JavaScript for DOM Manipulation Course on YouTube
Great. Now that you know more about JavaScript for DOM manipulation and what you will learn during the course, you can start taking the course:
✍️ Course created by Estefania Cassingena Navone (Twitter: @EstefaniaCassN, YouTube: Coding with Estefania).
I really hope you like the course and find it helpful to dive deeper into the world of front-end web development.
You are also welcome to continue learning with our other Spanish courses: