

React is an open-source JavaScript library that helps you build user interfaces. It's a component-based, declarative, "learn once and write anywhere" tool.
With 164K+ GitHub stars, 30K+ forks, and close to ~10 million weekly downloads, React is undoubtedly a great user interface library to learn and use.
If you are a developer getting started with React or thinking of using it in your side-projects or enterprises, this article is for you. If you started learning React a while ago but you're finding it hard to grasp the basics, give this article a read.
TL;DR
This article is lengthy but should be a fun read if you want to learn React or if you're working with it already. It answers these questions:
- How does modern JavaScript knowledge make you an efficient React developer?
- What kind of changes do you need in your mindset when you design and develop a React application?
- What are the ecosystems you need to be aware of and why?
Just chill, grab your favorite beverage, and enjoy the article.
Why I Wrote this Article
At the beginning, when I was learning React, I made the mistake of not focusing on a few essential fundamentals. As my knowledge grew more substantial, I started learning those concepts and found myself more comfortable with React.
Many of my mentees discussed the challenges they faced when dealing with React which also centered around these fundamentals. So this motivated me to write this article and share what I've learned.
Modern JavaScript Concepts You'll Need to Know for React
 Flexibility with Modern JavaScript
The standardized name of JavaScript is ECMAScript. ECMAScript 2015 (which is also the 6th edition, and why it's called ES6) brought lots of cool features and new syntax to the JavaScript language.
React, and many other modern user interface frameworks and libraries, work well with ES6. It is essential to know its modern syntax and new features to make coding much easier.
This doesn't mean you can not write a React application with ES5. You can if you have to, but you'll kind of be doing things the hard way.
Here are a few concepts you need to learn well.
1. How to Use Let and Const in JavaScript
Until ES5, the only way to declare a variable was to use the var keyword. ES6 introduced two more ways to declare variables, using the let and const keywords. Using these modern keywords gives us more predictability and fewer chances of introducing bugs in the code.
The var Keyword
A variable declared with var is function scoped. This means we will get a ReferenceError when we try to access the variable outside of the function.
var x = 10;
function someFunc(){
    var y = 10;
    console.log('inside someFunc', x, y);
}
Now, if you call someFunc(), it will log the following in the browser console:
inside someFunc 10 10
But try accessing the variable y outside of sumFunc() and you will get the following error:
Uncaught ReferenceError: y is not defined
The let keyword
let is block scoped. This is the main difference between let and var. Take this function where we loop using a for loop and access the variable i inside and outside of the loop.
function letsLoop() {
 for (var i=0; i<5; i++) {
   console.log('i inside the loop: ', i);
 }

 console.log('i outside of loop', i);
}
When you call the function letsLoop(), the output will be this:
i inside the loop:  0
i inside the loop:  1
i inside the loop:  2
i inside the loop:  3
i inside the loop:  4
i outside of loop 5
Now, let's change the keyword var to let while declaring and assigning the variable i.
function letsLoop() {
 for (let i=0; i<5; i++) {
   console.log('i inside the loop: ', i);
 }

 console.log('i outside of loop', i);
}
If you execute the letsLoop() function now, you will get a ReferenceError while accessing the variable i outside of the for loop. It is because the visibility and accessibility (or scope) of the variable i is limited to the for block.
i inside the loop:  0
i inside the loop:  1
i inside the loop:  2
i inside the loop:  3
i inside the loop:  4
Uncaught ReferenceError: i is not defined
    at letsLoop (<anonymous>:6:35)
    at <anonymous>:1:1
The const Keyword
const is almost the same as let. The only difference is that once you have assigned a value to a variable defined with the const keyword, you can not reassign a new value to it.
const name = 'freeCodeCamp';

name = 'My freeCodeCamp'; // Uncaught TypeError: Assignment to constant variable.
This applies to all types of variables we can create in JavaScript. You need to be careful when it comes to a complex data structure like object. When an object is declared and assigned value with const, you can still change the value of its properties. But you can not reassign the variable another object. Please have a look:
const publication = {
 'name': 'freeCodeCamp'
}

publication.name= 'My freeCodeCamp'; // Allowed

publication = {}; // Uncaught TypeError: Assignment to constant variable.
And now to compare the three keywords:
| var | let | const | |
| Scope | function | block | block |
| Reassigning a new value | Allowed | Allowed | Not Allowed |
| When accessed before declaring | undefined | ReferenceError | ReferenceError |
Here are some rules for using var, let, and const:
- Don't use
varanymore. Useletorconst. - Use
constmore often. Useletwhen you need to reassign another value to a variable.
In a React app, you will see code using let and const very often. A React component is usually declared using const. Have a look at the example below.
The variable DifficultyLevels is declared using const and is assigned a function as a value. This function defines a React component. It makes sense to use const here, as it will not be reassigned with another value.
Now, notice the usages of the variable level inside the useEffect. We need to reassign the values of it based on a condition. So it makes sense to use the let keyword there. But, you won't see any var anywhere!
const DifficultyLevels = () => {

    const userDataLS = getFromLS(LS_KEY_USER_DATA);
    const [userData, setUserData] = useState(userDataLS || {
        'fullName': '',
        'age': '',
        'email': '',
        'gender': 'F',
        'difficultyLevel': BEGINNER
    });

    //... other code

    useEffect(() => {
        let level = 'beginner';
        if (userData.age >=10 && userData.age <= 13) {
            level = 'intermediate';
        } else if (userData.age > 13) {
            level = 'advanced';
        }

        setUserData({
            ...userData,
            'difficultyLevel': level
        });
    }, [userData.age]);

    //... other code

    return(
        <>
            {/*...other code */}

              <span> { userData.level } </span>

              {/*...other code */}
        </>
    )

}
2. How to Use Template Literals in JavaScript
Gone are the days when we used to concatenate strings like this:
var name = 'Tapas';
var publication = 'freeCodeCamp';
var greeting = 'Hello'; // Or Hola

// It produces output like, "Hello Tapas, welcome to freeCodeCamp."
var message = greeting + ' ' + name + ', welcome to ' + publication + '.';
The above way of handling string concatenation and dynamic values into it is too much work, it's hard to read, and it's error-prone. How about we get the same output by writing code naturally without worrying about +, spaces, and so on?
With ES6, we have template literals, which are string literals that allow embedding expressions. We use backticks (`) instead single or double-quotes in template literals. We can define the dynamic values (or expressions) as placeholders using the dollar sign ($) and curly braces (like${expression}`).
Let's write the above example using template literals.
// We are expecting the values to change dynamically, hence `let`
let name = 'Tapas';
let publication = 'freeCodeCamp';
let greeting = 'Hello'; // Or Hola

// A much better way of wrting like natural language sentence
let message = `${greeting} ${name}, welcome to ${publication}.`;
So do we use it in our React code? Yes, why not? You may want to use the above greeting message in your React component and render it in a UI element. Here is an article to help you learn about template literals in detail.
Do you use styled-components in your React project? In that case, you are using template literals already!
3. How to Import and Export Modules in JavaScript
To code efficiently in React, you need to think in React. One of the primary ways you need to think is to break the UI into a suitable Component Hierarchy.
We will learn more about what this means below. But at a high level, every component in React can be a JavaScript module. You have to export that module to import it elsewhere in the code for better component composition. This is why it is essential to get a good grip on module concepts and import/export functionalities.
Here is a simple example of how we can export a React component and import it into another component.
// under-construction.js under the directory src/components/utility

import React from "react";

const UnderConstruction = () => {

    return(
        <div className="column">
            <p style={{marginTop:"10px"}}>
                If you are seeing this, I am probably working on it!
                Please give it a few days to get constructed.
            </p>
        </div>
    )
};

export default UnderConstruction;
In another component:
import UnderConstruction from './components/utility/under-construction'
Please read this article to familiarize yourself with JavaScript modules and the import/export keywords.
4. How to Use Arrow Functions in JavaScript
Just a heads up – you can write React code without JavaScript arrow functions.
That's right. Then, why are we talking about them? An arrow function is useful in many ways:
- It makes function writing much easier. You mostly type fewer characters when using arrow functions than with standard functions.
const double = (num) => {return num * 2;};
- Unlike standard functions, an arrow function doesn't redefine the value of
thiswithin its definition. This behavior makes it an easy choice for developers to use arrow functions as callbacks. Who wants more bugs because ofthis?
Here is an excellent article to get you started with the arrow functions and their usages.
5. How Destructuring Works in JavaScript
Destructuring is the JavaScript syntax for extracting values from an object property and assigning them to a variable. Destructuring is also possible for JavaScript Arrays.
Once you learn destructuring well, it will help make things very simple.
You can use destructuring in loops, like this:
for(let { name, age } of users) {
    console.log(`${name} is ${age} years old!`);
}
With a function's return value:
const getUser = () => {
    return{
        'name': 'Alex',
        'address': '15th Park Avenue',
        'age': 43
    }
}

const { name, age } = getUser();

console.log(name, age); // Alex 43
In a function parameter:
function logDetails({name, age}) {
    console.log(`${name} is ${age} year(s) old!`)
}
Here is an example of Array destructuring:
let emojis = ['🔥', '⏲️', '🏆', '🍉'];

let [fire, clock, , watermelon] = emojis;

console.log(fire, clock, watermelon); // 🔥 ⏲️ 🍉
Of course, we could have done, emojis[0], emojis[1], so on. But, that's too much to write and assign to variables one by one.
In a React app, you will see heavy usage of both object and array destructuring. An experienced React developer who may review your code would expect to see these implementations as well.
Here is an in-depth article that covers object destructuring. You need to know about Array destructuring as well.
6. How the Spread Operator and Rest Parameter Work in JavaScript
The Spread Syntax (also known as the Spread Operator) is another excellent feature of ES6. As the name indicates, it takes an iterable (like an array) and expands (spreads) it into individual elements.
We can also expand objects using the spread syntax and copy its enumerable properties to a new object.
Spread syntax helps us clone an object and array with the most straightforward syntax using the three dots ..., like this:
const clone_some_object = {...some_object}
This is extremely useful in React when you're setting back a state variable with a new instance of an object and array to help re-render the component.
The Rest parameter is kind of opposite to the spread syntax. While spread syntax helps expand or spread elements and properties, the rest parameter helps collect them together.
Check out the last half of this article to know more about the Spread Operator and Rest parameter.
7. How to Use Classes in JavaScript
ES6's class is another great inclusion that helps you write Object Oriented Programming in JavaScript.
class Employee {
    constructor(name) {
        this.name = name;
    }

    greeting() {
        return `Hello, ${this.name}`;
    }
}


let emp = new Employee("Tapas");
emp.greeting(); // "Hello, Tapas"
We can also create a class by extending it from an existing class. In React, we can create components in two ways:
- Using Class
- Using Function.
Here is an example of how we can create a React component using an ES6 class:
class Greeting extends React.Component {
    render() {
        return <span>Hello World!</span>;
    }
}
You can watch this video on the freeCodeCamp YouTube channel to learn more about ES6 classes.
Apart from these, knowing about the for-of loop, async-await, ternary operator, and so on would be very helpful.
Component Architecture
 Component Architecture - Many is better than One.
Welcome to the second section of the article. Let's talk about Components. If we are talking about React, we have to talk about components.
A single source code file consists of all the functionalities of an app. But it creates some of the problems you want to avoid as a developer. Here are a few I have faced (and there could be many more):
- More than one developer working on the app may increase collaboration problems like merge conflicts, independently working, and so on.
- Code reusability decreases, and repetition increases.
- The team ends up working in a single-threaded model, and the end delivery becomes slow.
- Testing your app as a Unit is no longer possible. You always touch the entire application as you modify the single file.
- Your designer will not like it.
When you are working with React, you'll be breaking your app into as many small units as possible, called Components. Each of the components should ideally only do one thing.
So how do we put this into practice? Let's learn how with an example.
How to Visualize a React App as a Bunch of Components
Let's assume we are building a web app using React that lists down each students' results by their grades. Our designer has come up with a mockup, as shown below. What we see is the following:
- A top navigation with a logo and the app's name.
- A clear break up of results by grades.
- It shows the result of the top three students of each grade.
- There is a
view alloption to see all the results for a grade. - We can search for the result of any student by searching the student's name.
 An Imaginary Web application: e-results
Now we need to start thinking about Components. This means how to break this app into logical units that take care of a single responsibility.
There's not necessarily just one answer. That's fine, but we need to make sure we do a better job of creating components.
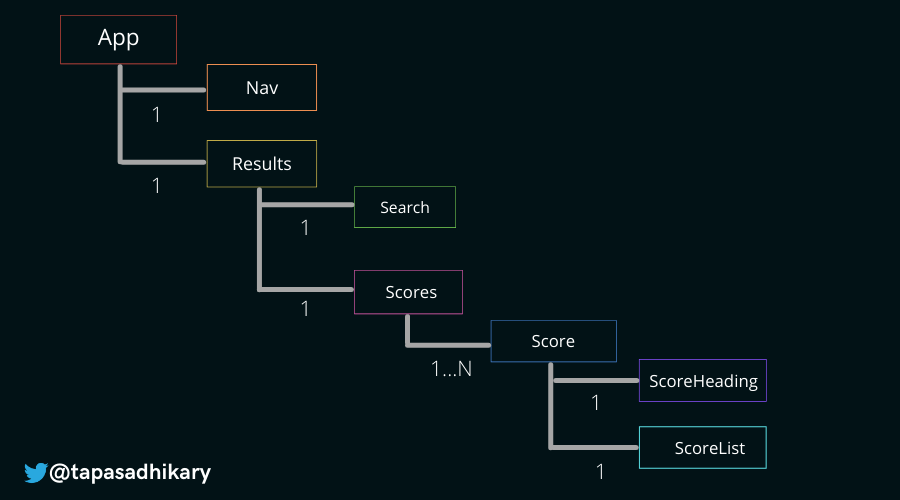
Here is how we can do it:
- A root component called
App. - A
Navcomponent for the top navigation. - A
Resultscomponent that is the whole page except theNav. - A
Searchcomponent. - A
Scorescomponent that may include all the scores. - A
Scorecomponent that contains a heading, score table, and the view all linked. - A
ScoreHeadingcomponent that contains a heading like,Grade 1. - A
ScoreListcomponent that contains the score table.
The image below shows them by marking them with different colors.
 Thinking in Components
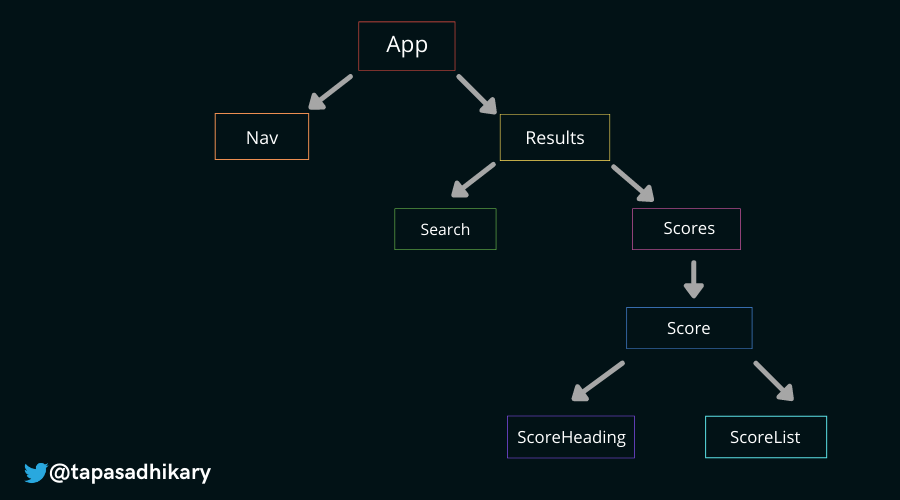
Great, we have all the components now. So, we need to start thinking about component composition. What does this mean?
These components are indeed isolated units that are each supposed to do a single thing. However, most of the components in a React application will be tied to each other by data.
We also need to add components to each other so that these units eventually build the entire app.
From the image below, you can understand how these components can be composed.
- The
Appcomponent is a root level component that has two other components,NavandResults. - The
Navcomponent has a logo and a heading. - The
Resultscomponent has aSearchcomponent and aScorescomponent. - A
Scorescomponent can have manyScorecomponents. - Each of the
Scorecomponents has aScoreHeadingandScoreListcomponent.
Does the image below make sense to you?
 The Component Tree
Here is another way to visualize it:
 The Component Hierarchy
Each of these components manage and use data using two important concepts, which are props, and state.
Props vs State in React
In React, props and state are the basic ways you can manage data inside and among components.
Props: are the variables passed by a parent component to its children. Using the props component, we can pass the required data to its children down in the hierarchy.State: On the other side,stateis the variable that a component manages within itself. In many cases, a component's state variable can be initialized by the data passed to it using props.
The NPM Ecosystem
 NPM Ecosystem - Build, Test, and Publish
Here we are at the last section of the article. This section will explain why knowing about the NPM ecosystem makes you more comfortable with React.
What is NPM?
NPMis the package manager for the Node.js platform. It consists of modules that Node can find and it helps Node manage dependency conflicts intelligently. Most commonly, it is used to publish, discover, install, and develop programs.
You can find more information on NPM here.
Why do I need to know about NPM?
React by itself is a tiny library that lets you create components and build complete web apps. However, you will often need to use something that React may not offer out-of-the-box.
For example, for extensive state management, you may want to use Redux. You may want to opt for an external library that helps with it, and that library is available in the form of an NPM package you can download and install.
Similarly, npm packages exist for various utilities, chart libraries, string externalization, routing – you name it, and there's likely a package for it.
The Open-Source Mindset
What if you are unable to find a specific functionality you are looking for as an existing npm module? Yes, it can happen. Also, it may be available as an exiting npm package, but it does not fit your needs as is. What do you do then?
There are two straightforward ways to handle this situation:
- You build that functionality as a component, test it, and publish it as an open-source npm package.
- You contribute to an existing open-source npm package and make it better.
It's quite natural to have an open-source mindset as a React developer. Proactively seek out opportunities to either create something new or contribute to something that already exists. It is a great feeling when your work is used and appreciated by someone the same way you use someone else's.
I have created an open-source project to help to publish npm packages quickly using a script. Please feel free to have a look, fork, and contribute. You may find it useful.
Before We End...
I hope you've found this article insightful, and that it helps you start using these concepts more effectively. Let's connect. You will find me active on Twitter (@tapasadhikary). Please feel free to give a follow.
You may also like these articles: