

Linux is a multi user OS which means that it supports multiple users at a time.
As many people can access the system simultaneously and some resources are shared, Linux controls access through ownership and permissions.
Linux file ownership
In Linux, there are three types of owners: user, group, and others .
Linux User
A user is the default owner and creator of the file. So this user is called owner as well.
Linux Group
A user-group is a collection of users. Users that belonging to a group will have the same Linux group permissions to access a file/ folder.
You can use groups to assign permissions in a bulk instead of assigning them individually. A user can belong to more than one group as well.
Other
Any users that are not part of the user or group classes belong to this class.
Linux File Permissions
File permissions fall in three categories: read, write, and execute.
Read permission
For regular files, read permissions allow users to open and read the file only. Users can't modify the file.
Similarly for directories, read permissions allow the listing of directory content without any modification in the directory.
Write permission
When files have write permissions, the user can modify (edit, delete) the file and save it.
For folders, write permissions enable a user to modify its contents (create, delete, and rename the files inside it), and modify the contents of files that the user has write permissions to.
Execute permission
For files, execute permissions allows the user to run an executable script. For directories, the user can access them, and access details about files in the directory.
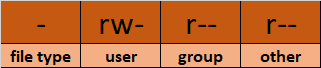
Below is the symbolic representation of permissions to user, group, and others.
 Symbolic representation of permissions
Note that we can find permissions of files and folders using long listing (ls -l) on a Linux terminal.
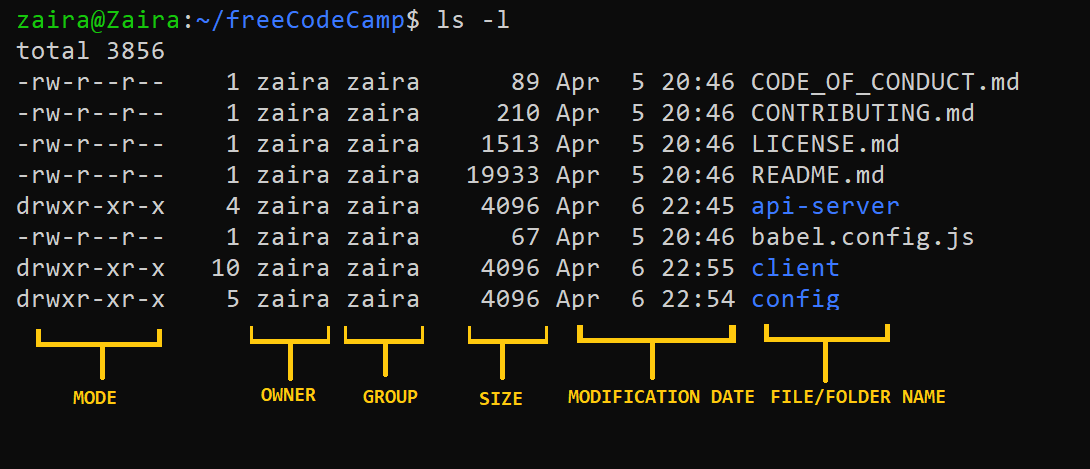 Output of long listing
In the output above, d represents a directory and- represents a regular file.

How to Change Permissions in Linux Using the chmod Command
Now that we know the basics of ownerships and permissions, let's see how we can modify permissions using the chmod command.
Syntax of chmod:
chmod permissions filename
Where,
permissionscan be read, write, execute or a combination of them.filenameis the name of the file for which the permissions need to change. This parameter can also be a list if files to change permissions in bulk.
We can change permissions using two modes:
- Symbolic mode: this method uses symbols like
u,g,oto represent users, groups, and others. Permissions are represented asr, w, xfor read write and execute, respectively. You can modify permissions using +, - and =. - Absolute mode: this method represents permissions as 3-digit octal numbers ranging from 0-7.
Now, let's see them in detail.
How to Change Permissions using Symbolic Mode
The table below summarize the user representation:
| User representation | Description |
|---|---|
| u | user/owner |
| g | group |
| o | other |
We can use mathematical operators to add, remove, and assign permissions. The table below shows the summary:
| Operator | Description |
|---|---|
| + | Adds a permission to a file or directory |
| – | Removes the permission |
| = | Sets the permission if not present before. Also overrides the permissions if set earlier. |
Example:
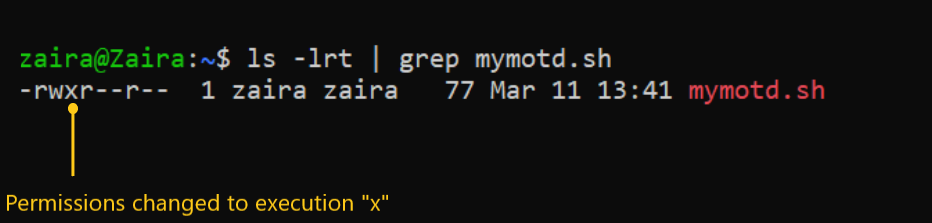
Suppose, I have a script and I want to make it executable for owner of the file zaira.
Current file permissions are as follows:

Let's split the permissions like this:
To add execution rights (x) to owner (u) using symbolic mode, we can use the command below:
chmod u+x mymotd.sh
Output:
Now, we can see that the execution permissions have been added for owner zaira.
Additional examples for changing permissions via symbolic method:
- Removing
readandwritepermission forgroupandothers:chmod go-rw. - Removing
readpermissions forothers:chmod o-r. - Assigning
writepermission togroupand overriding existing permission:chmod g=w.
How to Change Permissions using Absolute Mode
Absolute mode uses numbers to represent permissions and mathematical operators to modify them.
The below table shows how we can assign relevant permissions:
| Permission | Provide permission |
|---|---|
| read | add 4 |
| write | add 2 |
| execute | add 1 |
Permissions can be revoked using subtraction. The below table shows how you can remove relevant permissions.
| Permission | Revoke permission |
|---|---|
| read | subtract 4 |
| write | subtract 2 |
| execute | subtract 1 |
Example:
- Set
read(add 4) foruser,read(add 4) andexecute(add 1) for group, and onlyexecute(add 1) for others.
chmod 451 file-name
This is how we performed the calculation:
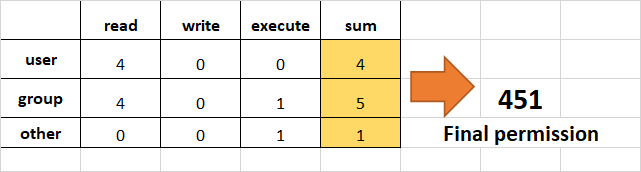
Note that this is the same as r--r-x--x.
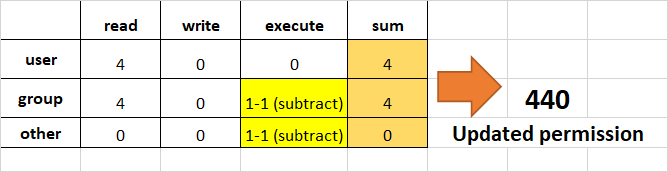
- Remove
executionrights fromotherandgroup.
To remove execution from other and group, subtract 1 from the execute part of last 2 octets.
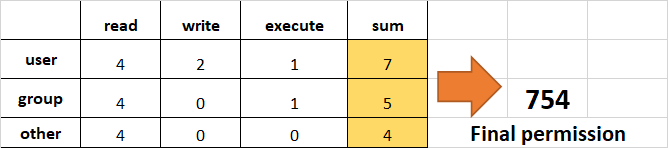
- Assign
read,writeandexecutetouser,readandexecutetogroupand onlyreadto others.
This would be the same as rwxr-xr--.
How to Change Ownership using the chown Command
Next, we will learn how to change the ownership of a file. You can change the ownership of a file or folder using the chown command. In some cases, changing ownership requires sudo permissions.
Syntax of chown:
chown user filename
How to change user ownership with chown
Let's transfer the ownership from user zaira to user news.
chown news mymotd.sh

Command to change ownership: sudo chown news mymotd.sh
Output:

How to change user and group ownership simultaneously
We can also use chown to change user and group simultaneously.
chown user:group filename
How to change directory ownership
You can change ownership recursively for contents in a directory. The example below changes the ownership of the /opt/script folder to allow user admin.
chown -R admin /opt/script
How to change group ownership
In case we only need to change the group owner, we can use chown by preceding the group name by a colon :
chown :admins /opt/script
Linux Permissions Guided Exercise
Up until now we have explored permissions, ownerships, and the methods to change them. Now we will reinforce our learning with a guided exercise.
Goal: To create groups and assign relevant permissions to its members. Verify access by accessing it from unauthorized users.
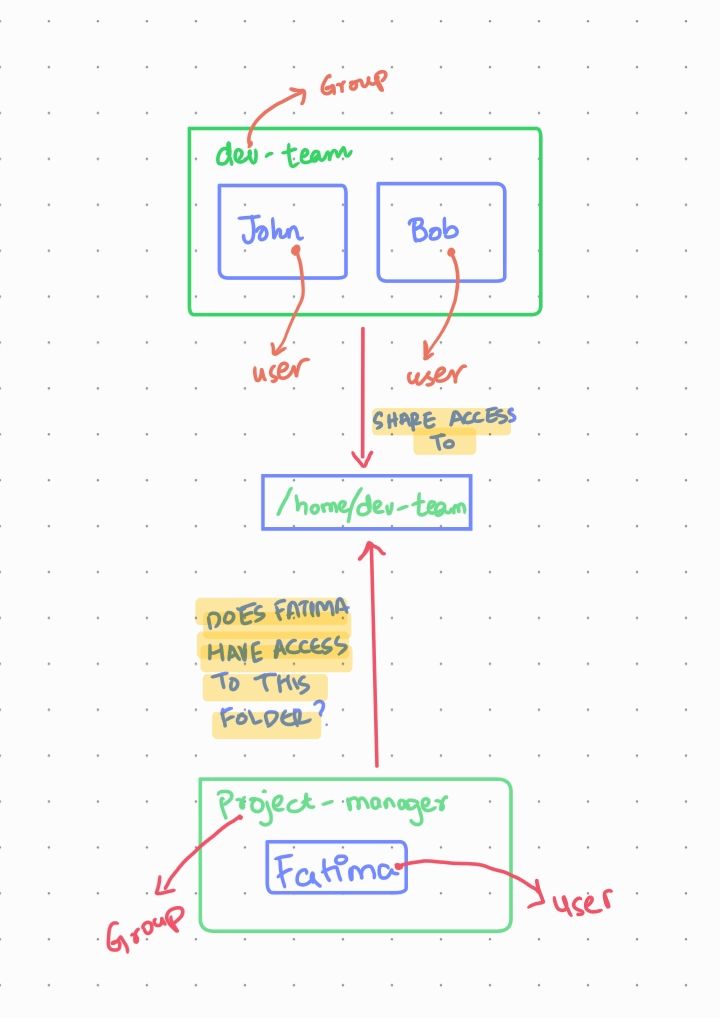
Task: Create a group called dev-team and add two members (John and Bob) to it. Create a folder /home/dev-team and change ownership to group dev-team. Verify that both users in the dev-team group have read and write access to the folder.
Create another group project-manager and add a user Fatima to it. Verify if the folder /home/dev-team is accessible by Fatima.
Visualization of the problem
We can visualize the problem like this:
Step 1: Switch to root user. Switch to root user so that we have the rights to create new users and groups.
Show hint
Use the
sudo command with flag i.
If you have the root password, you can login using that as well.
Show solution
Enter
sudo -i to switch to the root user.
Enter whoami to find out if you are the root user:
 If you do not have
 root access, use the commands with appending sudo.
Step 2: Create a group dev-team
Show hint
Use the
groupadd command.
Syntax: groupadd group-name
Show solution
Enter
groupadd dev-team to create the dev-team group
Verify: cat /etc/group | grep dev-team
Step 3: Create two new users John and Bob and add them to the dev-team group
Show hint
Use command
useradd.
useradd creates a new user and adds to the specified group.
Syntax: useradd -G groupname username
Where -G specifies the group.
Show solution
useradd -G dev-team John
useradd -G dev-team Bob
Verify: cat /etc/group | grep dev-team

Step 4: Provide passwords for users John and Bob
Show hint
Use command
passwd
passwd creates a password for users.
Syntax: passwd username
Show solution
passwd John
passwd Bob
Step 5: Create a directory in /home and name it dev-team
Show hint
Use command
mkdir
mkdir creates a directory.
Syntax: mkdir directory-name
Show solution
mkdir /home/dev-team
Verify:

Step 6: Change the group ownership of the folder dev-team to group dev-team
Show hint
Use command
chown
Syntax: chown :group-name folder
Show solution
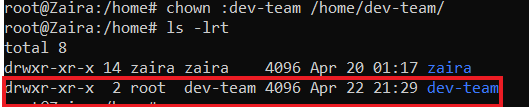
chown :dev-team /home/dev-team/
Step 7: Make sure the permissions of folder dev-team allow group members to create and delete files.
Show hint
Use command
chmod
Write permissions allow users and groups to create and delete files.
Syntax: chmod permissions folder
Show solution
chmod g+w /home/dev-team/

Step 8: Ensure that 'others' don't have any access to the files of dev-team folder.
Show hint
Use command
chmod
Remove read, write, execute permissions from 'others' if they exist.
Syntax: chmod permissions folder
Show solution
chmod o-rx dev-team

Step 9: Exit the root session and switch to John
Show hint
Use command
exit to logout of the root user.
Use su to switch users.
Syntax: su - user
To confirm current user, use command whoami.
Show solution
exit
su - John
Verify with command whoami.
Step 10: Navigate to folder: /home/dev-team
Show hint
Use command
cd to switch folders.
Syntax: cd /path/to/folder
Confirm current path with pwd.
Show solution
cd /home/dev-team
Step 11: Create an empty file in the folder: /home/dev-team
Show hint
Use command
touch to create an empty file.
Syntax: touch filename
Show solution
touch john-file.txt
Verify: ls -lrt

Step 12: Change the group ownership of the created file to dev-team and verify.
Show hint
Use command
chown to change ownership.
Syntax: chown :group file-name
Show solution
chown :dev-team john-file.txt
Once group ownership is modified, all members of the group can access this file.
Verify ls -lrt

Step 13: Exit the shell and switch to user Bob
Show hint
Use command
exit to exit the terminal.
Use su to switch users.
Syntax: su - user
To confirm current user, use command whoami.
Show solution
exit
su - Bob
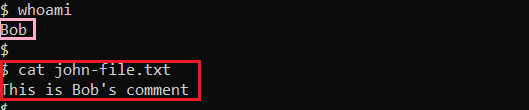
Verify the current user with command whoami.
Step 14: Navigate to the path /home/dev-team
Show hint
Use command
cd to switch folders.
Syntax: cd /path/to/folder
Confirm current path with pwd.
Show solution
cd /home/dev-team
Step 15: Find out Bob's privileges to access john-file.txt
Show hint
Use command
ls -l for long listing.
Syntax: ls -l | grep file-name
Does group have rw- permissions?
Show solution
ls -l | grep john-file.txt

Step 16: Modify the file john-file.txt while logged in as Bob
Show hint
Use command
echo to add some text to the file.
Syntax: echo "Some text" >>file-name
This would redirect the quoted text to end of the file.
Show solution
echo "This is Bob's comment" > john-file.txt
If all the permissions are correctly set, Bob would be allowed to edit and save this file. Otherwise you would get an error like this: Permission denied.
Verify cat john-file.txt
Step 17: Create another group project-manager and assign a member Fatima to it
Show hint
Use commandgroupadd to add a new group.
Syntax: groupadd group-name
Create a new user with command useradd.
Use flag -G to assign a user to it.
Show solution
groupadd project-manager
useradd -G project-manager Fatima
passwd Fatima
Step 18: Navigate to folder /home/dev-team and verify if Fatima can access it
Show hint
Usecd to navigate to /home/dev-team.
Show solution
cd /home/dev-team.
We get this error:
 This is because,
 others don't have any access to the folder dev-team.
If we recall, below are the rights of the dev-team folder.

Wrapping up
Permissions and ownerships are useful concepts for enforcing security across multi-user operating systems. I hope you were able to learn about changing permissions and ownerships in depth.
What’s your favorite thing you learned from this tutorial? Let me know on Twitter!
You can also read my other posts here.
Thanks to Tom Mondloch for his help with the guided exercise.