

Managing state is something most developers need to deal with when working on applications.
You might be familiar with the model-view-viewmodel (MVVM) pattern, where the ViewModel is the one responsible for a view’s state. But in Flutter, things are a bit different.
If you are reading this, then you are probably aware of the many ways you can manage state in Flutter. There are numerous articles that try to explain this, but they usually cover one specific solution and provide a very minimal example.
Like you, I’ve looked over them and I have tried to grasp this intangible concept in Flutter. But nothing beats getting your hands dirty and trying things out by yourself.
After much tribulation and my fair share of trial and error, I’m beginning to see the light in my understanding of managing state in Flutter based applications.
As Flutter grows in popularity and as your application can become more and more complex, you will come to a point where creating stateful widgets isn’t going to cut it.
When you reach that point, you can try and hack a solution that provides you with the desired functionality, but it will probably not follow the correct paradigms. Or you can come face to face with the monolith that is Flutter state management.
Taking it on alone can feel overwhelming, so I’m hoping that this article provides a compass for you when you are in need.
We will go over several basic fundamental concepts in state management in Flutter and I’ll be working with a real use case example to make things as clear as possible (none of that counter application nonsense 😁).
Ready to SetState?
Flutter State Background
For the unassuming, below is a list of all the state solutions offered by the Flutter team (as of April 2022):
- Provider
- Riverpod
- setState
- InhertiedWidget and InheritedModel
- Redux
- Fish-Redux
- BLoC/Rx
- GetIt
- MobX
- Flutter Commands
- Binder
- GetX
- States Rebuilder
- Triple Pattern
😱 H-o-l-y crap! Can you believe that list?
The list above is taken directly from the Flutter documentation for state management and I wanted to show it to you for two reasons:
- Shock value
- To give you a better understanding of what I was talking about earlier
Now, before you keep on reading, it is important to understand that, depending on the logic and complexity of your application, you might not need one of the aforementioned solutions. It might be just fine for you to manage state with stateful widgets and setState.
You will know when that is not enough anymore once you try to develop a component and use those two options and figure out you need something else to make things work.
How will you know? Great question.
At some point in developing my application, I decided I wanted to have a Settings screen. In this Settings screen, the user can make some application level configurations.
The application itself is not very complex and I did not have to use any of the state solutions listed above. I used state that was bound to a stateful widget and it did not have to be shared between many different components. In cases where one widget needed to inform of a user action in another widget, I passed around callbacks.
Now, when I created the Settings page, a user action taken there had to be reflected in another place entirely in the application. For example, I added the ability to switch between light and dark mode in the application.
This affects the entire UI of the application and needs to be reflected instantly when the user toggles this option. So, having another stateful widget for the Settings screen was not going to help me here.
How would I be able to reflect the changes happening in the Settings screen to the rest of my application?
This sure sounds like a state-related problem.
The Foundation – ChangeNotifier
The state in Flutter needs to be declared above (in the widget tree) the components that use it. This is so the state can be passed down to child widgets.
In order for that state to trickle up, you need to use components that can help you do that.
Say hello to ChangeNotifier.
It is a class that allows other places in the code to listen in on changes through a notification API. This might sound familiar to you if you have ever come across the concept of an observable. If it doesn't, don’t worry. The concept is pretty simple.
In the same way setState makes a stateful widget rebuild the widget, ChangeNotifier has a method called notifyListeners that makes places in your code able to react to the change that happened. This functionality comes out of the box in Flutter, as ChangeNotifier is part of the flutter:foundation package.
Take the Settings screen I mentioned earlier. Once the user changes the theme of the application, other places in the application can listen in to this change and update their respective UI accordingly.
In order to minimize the logic required here, let’s take the vanilla starter project that you get when you create a Flutter project (the counter one) and add a settings screen to it.
Here is how the main.dart file looks like (without all the counter logic):
import 'package:flutter/material.dart';
import 'settings_screen.dart';
void main() {
runApp(const MyApp());
}
class MyApp extends StatelessWidget {
const MyApp({Key? key}) : super(key: key);
@override
Widget build(BuildContext context) {
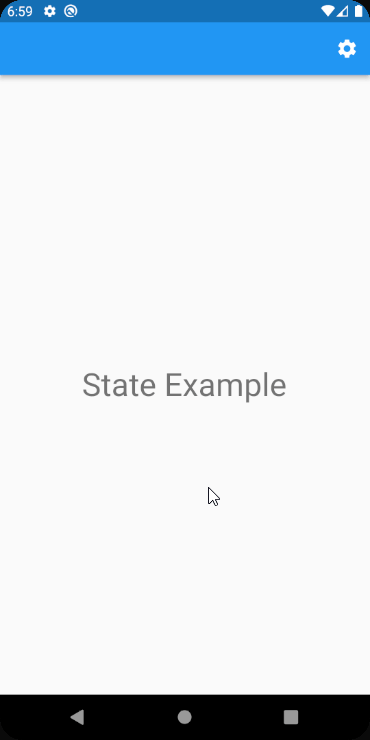
return MaterialApp(
title: 'State Example',
theme: ThemeData(
primarySwatch: Colors.blue,
),
darkTheme: ThemeData.dark(),
themeMode: ThemeMode.light,
home: const MyHomePage(title: 'State Example'),
);
}
}
class MyHomePage extends StatefulWidget {
const MyHomePage({Key? key, required this.title}) : super(key: key);
final String title;
@override
State<MyHomePage> createState() => _MyHomePageState();
}
class _MyHomePageState extends State<MyHomePage> {
@override
Widget build(BuildContext context) {
return Scaffold(
appBar: AppBar(
actions: [
IconButton(
icon: const Icon(
Icons.settings,
color: Colors.white,
),
onPressed: () {
Navigator.push(
context,
MaterialPageRoute(builder: (context) => const SettingsScreen()
),
);
},
)
],
),
body: Center(
child: Column(
mainAxisAlignment: MainAxisAlignment.center,
children: <Widget>[
Text(
'State Example',
style: Theme.of(context).textTheme.headline4,
),
],
),
),
);
}
}
Here is what the settings_screen file looks like:
import 'package:flutter/material.dart';

class SettingsScreen extends StatelessWidget {
  const SettingsScreen({Key? key}) : super(key: key);

  @override
  Widget build(BuildContext context) {
    return Scaffold(
        appBar: AppBar(
            title: const Text("Settings"),
        ),
      body:
         Column(
        mainAxisAlignment: MainAxisAlignment.start,
        children: [
            SwitchListTile(
              title: const Text('Dark Mode'),
              value: false,
              secondary:  const Icon(Icons.dark_mode,
                  color: Color(0xFF642ef3)
                ),
               onChanged: (bool value) {

              }
              )
            ]
          )
        );
      }
}
Right now, there isn’t much there and there is no logic at all to update when the user presses on the SwitchTile. You can also notice that we have not filled out the onChanged callback.
Let’s create our ChangeNotifer class, SettingsScreenNotifier.
import 'package:flutter/cupertino.dart';

class SettingsScreenNotifier extends ChangeNotifier { /// 1
  bool _isDarkModeEnabled = false;                    /// 2
  get isDarkModeEnabled => _isDarkModeEnabled;        /// 3
  void toggleApplicationTheme(bool darkModeEnabled) { /// 4
    _isDarkModeEnabled = darkModeEnabled;
    notifyListeners();
  }

}
- Our class extends the ChangeNotifier class
- We declared a private member called _isDarkModeEnabled
- We exposed a getter for this member
- Notice how inside the toggleApplicationTheme method, the last line is the call to
notifyListeners(). This makes sure that whenever that method is called, any listeners will be updated.
As mentioned earlier, we need a way to expose the state in our SettingsScreenNotifier to our application. Since in this specific scenario, this state will be used by our main application (since it involves the theme of the entire application), we need to place it at the top of our application.
We can do this using the ChangeNotifierProvider. This is a widget that provides an instance of our ChangeNotifier to any descendant widgets and comes from the provider package. This is a package that wraps a lot of functionality around the InheritedWidget.
☝️ Be mindful where you place your ChangeNotifierProvider widget. If you place it too high in your widget tree, it may cause widgets you don’t want to re -render (and also pollute the scope).
Let’s add the provider package to the pubspec.yaml file:
dependencies:
  flutter:
    sdk: flutter
  provider: ^6.0.2
Press Pub get to download the package.
Next, we'll wrap our application with ChangeNotifierProvider (don’t forget to import the provider package).
class MyApp extends StatelessWidget {
  const MyApp({Key? key}) : super(key: key);

  @override
  Widget build(BuildContext context) {
    return ChangeNotifierProvider(
      create: (context) => SettingsScreenNotifier(),  /// 1
      builder: (context, provider) {                  /// 2
        return MaterialApp(
          title: 'State Example',
          theme: ThemeData(
            primarySwatch: Colors.blue,
          ),
          darkTheme: ThemeData.dark(),
          themeMode: ThemeMode.light,
          home: const MyHomePage(title: 'State Example'),
        );
      }
    );
  }
}
The first argument is the create method where we create an instance of our ChangeNotifier.
The second argument is a builder function that accepts the context and the provider that got created.
Great! Now our application will be able to listen in on changes from our ChangeNotifier.
 _Photo by [Unsplash](https://unsplash.com/@zuzi_ruttkay?utm_source=medium&utm_medium=referral" rel="noopener ugc nofollow">Zuzana Ruttkay on <a href="https://unsplash.com/?utm_source=medium&utmmedium=referral" rel="noopener ugc nofollow)
How to Connect It All Together
We have infused our application with a provider, but how do we connect the data from our ChangeNotifier into it?
For that we use a Consumer widget. This widget exposes the data held by our ChangeNotifier. Whenever we declare a Consumer widget, we must also provide it with the type of the object it provides.
In our case, that will be our SettingsScreenNotifier. The Consumer widget has an argument called builder (much like ChangeNotifierProvider and other widgets) and it gets called whenever the ChangeNotifier object you gave to it changes (meaning notifyListeners has been called).
The builder function accepts three arguments:
- The context
- Instance of the ChangeNotifier
- A child widget (this can be used in the instance where the part of your widget tree under the Consumer widget doesn’t change and you don’t want to rebuild it)
We need to wrap our MaterialApp with a Consumer widget so that the theme can change when the user makes a selection inside the Settings screen.
@override
  Widget build(BuildContext context) {
    return ChangeNotifierProvider(
      create: (context) => SettingsScreenNotifier(),
      builder: (context, provider) {
        return Consumer<SettingsScreenNotifier>(
          builder: (context, notifier, child) {
            return MaterialApp(
              title: 'State Example',
              theme: ThemeData(
                primarySwatch: Colors.blue,
              ),
              darkTheme: ThemeData.dark(),
              themeMode: notifier.isDarkModeEnabled ? ThemeMode.dark : ThemeMode.light,
              home: const MyHomePage(title: 'State Example'),
            );
          },
        );
      }
    );
  }
}
And in our Settings Screen, we will need to:
- Wrap our SwitchTile with a Consumer widget so that the UI can respond correctly when an interaction is made
- Call the toggleApplicationTheme in the onChanged callback
import 'package:flutter/material.dart';
import 'package:state_example/settings_screen_notifier.dart';
import 'package:provider/provider.dart';

class SettingsScreen extends StatelessWidget {
  const SettingsScreen({Key? key}) : super(key: key);

  @override
  Widget build(BuildContext context) {
          return Scaffold(
              appBar: AppBar(
                title: const Text("Settings"),
                ),
                body:
                  Column(
                      mainAxisAlignment: MainAxisAlignment.start,
                      children: [
                        Consumer<SettingsScreenNotifier> (                   /// 1
                         builder: (context, notifier, child) {
                           return SwitchListTile(
                               title: const Text('Dark Mode'),
                               value: notifier.isDarkModeEnabled,
                               secondary:  const Icon(Icons.dark_mode,
                                   color: Color(0xFF642ef3)
                               ),
                               onChanged: (bool value) {
                                 notifier.toggleApplicationTheme(value);    /// 2
                               }
                           );
                         }
                        )
                      ]
                  )
                );
          }
}
Witness the awesomeness 🕶 ☀️🌙
This article is just the tip of the iceberg regarding state in Flutter and using the provider package. There is a lot more to learn and I really encourage you to try things out for yourself.
The provider package has great documentation, and in the case where you see an error in the logs, it has a pretty robust explanation of what went wrong and how you can fix it.
Where to go from here?
- Provider Documentation
- GetIt Package – another state management solution, which might be easier to grasp
- ValueNotifier – similar to ChangeNotifier but for only one value
- Suragch – An avid Flutter developer that has written many great articles about Flutter development and managing state in particular. His articles have helped me immensely 🙏
The examples shown in this article are taken from an application I made called BirthdayCalendar. You can check it out here:
You can see the source code here: