
Performance testing is an important yet underrated field of software development. And it’s a must-have skill that can help you prevent common software failures that occur in production applications.
Performance testing is a routine software practice which is carried out to determine the stability of a system in terms of scalability, reliability, and data management, among other parameters.
In this tutorial, I'll walk you through what performance testing entails, and the common tools used for backend testing. We'll also walk through a demo performance testing project together.
The tutorial is simplified and suitable for beginners, mid-level developers, and professional developers. Being proficient in performance testing is fundamental to growing as a backend developer, and this guide will serve as a good review even if you're more advanced in your career. With that said, let's dive in.
Prerequisites:
- Intermediate knowledge of Node.js
- Basic knowledge of JavaScript operations
- Knowledge of API development\
Table of Contents:
What is Performance Testing?
Performance testing serves quite a lot of purposes – one of the most important of which is to test system efficiency in performing and sustaining tasks. It also serves as a standard you can use to compare systems of varying efficiency and builds and enables you to choose the most effective one.
Performance testing also helps reveal vulnerabilities. State-of-the-art testing tools are well optimized to efficiently analyze the code to detect any errors. They're quick to highlight the areas where these errors occur.
The end goal of performance testing is dependent how you're using the application. It might be concurrency-oriented or transaction rate-oriented, depending on whether the app involves end users or not.
Performance testing could also involve load testing, which is usually carried out to evaluate the behavior of a web service under a specific expected load. Other types of testing you can do include integration testing, spike testing, soak testing, and stress testing.
Examples of Performance Testing Tools
There are many tools commonly used to test the efficacy and latency of web applications. In this section, I'll discuss some of the popular tools used, and highlight their strengths and use cases.
Jest
Jest is a multi-platform testing tool used to assess the correctness of JavaScript-based applications. It's the one we'll be using in this demo.
Jest was initially created to test the efficiency of React applications, but has since been extended to test the efficiency of Node.js apps as well. It also offers a code coverage feature.
Mocha
Mocha is a concise asynchronous JavaScript-based testing tool for Node.js applications. It is also used with assertion libraries such as [Chai]( https://www.npmjs.com/package/chai) and [should]( https://www.npmjs.com/package/should).
Pythagora
Pythagora offers a unique integrating testing feature to help test how different part of the application works together. It also has a code coverage feature.
Artillery
Artillery is a stack agnostic testing tool. This means it can be used for multiple web applications based on different programming languages and still produce an optimal test outcome.
This tool provides efficient load testing features which help to determine the optimal status of the application when exposed to a large load of traffic. It also checks the speed at which an app responds to a user request without crashing.
Ava
Ava is a JavaScript-based performance unit testing tool used to test the efficacy of Node.js applications. It works asynchronously, running multiple concurrent tests to determine the suitability of multiple code units.
Loadtest
Loadtest is a special Node package which is used to load test Node.js applications. It evaluates their ability to cope with requests of varying volumes and it evaluates for efficiency and concurrency.
Apache J-meter
Apache J-meter offers load-testing features for web applications. It has an in-built IDE to enable interaction with the user. It is multithreaded, increasing its ability to mimic several users.
There are other testing tools which are also useful. But in this tutorial, we will be utilizing Jest to test our back-end application.
Demo Project
Install Jest
We'll now perform a unit test on our code using the Jest testing tool. To do this, you'll need to install the Jest package in your code folder. Type npm install jest in the command prompt. A success message will be displayed when the installation is completed.
Configure package.json
In this tutorial, we'll test the efficiency of some selected routes in our Node.js application. This will necessitate writing different unit tests for each route and evaluating its correctness.
Now let’s optimize our file structure to successfully unit test our application. Navigate to the package.json file and edit it to include the following code:
"scripts": {
    "test": " jest",
    "start": "nodemon index.js"
  },
Modifying the package.json file to include this code ensures that the Node.js server recognizes Jest as our default unit testing tool for the project. By so doing, any time we enter npm test in the command prompt, Jest gets activated.
Set up the test environment
Create a folder in the root directory named “tests”. This helps the Jest operator locate the specific files housing the routes to be tested.
Within the test folder, create a test file. The file can be named whatever you prefer, but the suffix .test.js should be added to enable Jest to recognize it and execute it.
After completing these steps, let’s get into the core details of unit testing in our project.
Run the unit tests
The demo project we'll test in this tutorial is an eBook library application which contains some functions such as a get all books route, Get a single book route, upload a book route, and delete a book route. We'll create unit tests for the GetAllBooks route in the example below, and then you can try to create your own for the other routes.
So firstly, we'll import the book database into the test.js file like this:
const Book = require('../models/Book')
The code above imports and initializes our default book MongoDB database model.
Then we'll import the functions that we'll test in each route:
const Book =  require("../models/Book")

async function GetAllBooks (req, res)  {
    try {
const allBooks =  await Book.find();
res.status(200)
res.send(allBooks)
    }
    catch (err) {
res.status(500)
res.send(err)
    }
}
module.exports = {GetAllBooks};
const {GetAllBooks} = require("../controllers/Books");
The code above imports the getAllBooks function from a controller folder.
Having imported the function, let's now go ahead to setup our Jest unit test function.
jest.mock("../models/Book");

const req = {};
const res = {
  status: jest.fn((x) => x),
  send: jest.fn((x) => x),
};

it("it should return all the books in the database", async () => {

Book.find.mockImplementationOnce(() => ({
    Title: "black is king",
    Author: "black",
    price: "$23",
    Summary: "Hello",
  }));

  await GetAllBooks(req, res);


expect(res.status).toHaveBeenCalledWith(200);

expect(res.send).toHaveBeenCalledTimes(1);
});
First of all, Jest offers you the ability to create a fake database by copying the structure of the default database. This is known as mocking. This enables the unit test to operate faster and eliminate the lag that comes with getting responses from large databases.
Testing which involves the real database is referred to as end-to-end testing as opposed to unit testing.
Here's how you can do that in Jest:
jest.mock("../models/Book");
The code above illustrates database mocking. In order to get a faster unit test, we have to mock the existing Book database model we're using in our application.
const req = {};
const res = {
  status: jest.fn((x) => x),
  send: jest.fn((x) => x),
};
The above code contains the default sample requests and response objects. The sample response object contains both the status and send functions, which return a defined output if executed successfully or not.
it("it should return all the books in the database", async () => {
Book.find.mockImplementationOnce(() => ({
    Title: "black is king",
    Author: "black",
    price: "$23",
    Summary: "Hello",
  }));
  await GetAllBooks(req, res);
expect(res.status).toHaveBeenCalledWith(200);
expect(res.send).toHaveBeenCalledTimes(1);
});
Now the It function contains a short description of what the test should be about. This is then coupled to an anonymous asynchronous function which contains a mock implementation of the database model with some dummy data.
After that, the getAllBooks request is triggered and executed with a null request passed to it and the format of the response object is included.
The expect statement returns passed if the function satisfies the requirements expected. For this code, the requirements are that the response object should return a status code of 200 and the response.send object should be called at least once with the response object included. If it fails, a failed status will be returned.
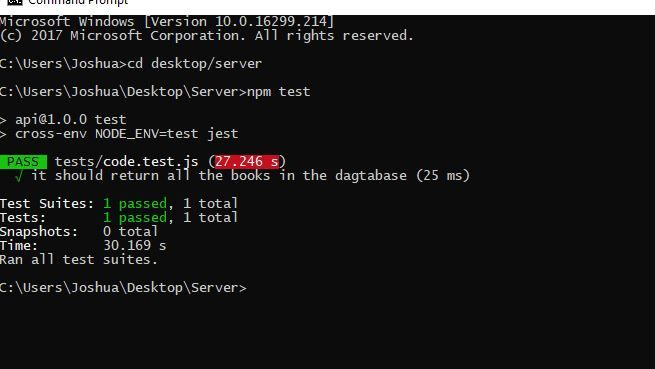 Tests passing
You now know the basics of how to unit test functions. You can also try to test the delete book route, upload a book route and find a specific book route.
Conclusion
In this tutorial, you've been able to harness the usefulness of testing tools in optimizing your web applications.
You've learned about various testing tools available and their use cases, and you also implemented a unit test in a web application.
Following the steps highlighted in this tutorial, you will be able to perform unit tests on your coding projects.
I sincerely hope you learned something new and enjoyed this tutorial. Until next time, keep on coding.