

Authentication is a major part of any serious React application. You need to have a good and reliable way to authenticate your users in your developer tool belt.
There are dozens of authentication solutions to choose from today, many of which come with a price tag. Which one should you choose?
In this tutorial, we're going to take a look at how you can add authentication to your React apps for free using the industry-standard library Passport.js.
By the end, you will understand how Passport works within a real project, plus you will have all the starter code to be able to set up authentication in your future React projects.
Why Use Passport.js?
Passport.js is a battle-tested library. It has been the go-to solution for authentication in Node.js apps for many years with over 1.7 million weekly downloads.
 The Passport.js Node Library
It allows your users to sign up easily with email and password at no cost. Additionally, Passport also gives us the ability to use different strategies for authentication such as social login through Google or Twitter, among hundreds of other options.
You can view authentication as an essential gateway for your users. You'll need authentication in many cases to not only separate the casual from the serious users of your applications. Authentication is used to provide the necessary experience for different categories of users.
Why Not Use a Dedicated (Paid) Auth Service?
The need to authenticate your users is a very common problem, but it doesn't mean it's an easy problem to solve.
In fact, this is why so many companies such as Auth0, Clerk.dev, Okta and many others have emerged to provide authentication as a service. In many developers' eyes, getting authentication right comes at a price.
Fortunately for us JavaScript and Node developers, we have a great library in Passport.js, which allows us to wire up authentication in Node environments quite easily.
We are going to take a look at a complete integration of Passport.js within a React application and break down how it works line-by-line.
Download the Project Code
To get the complete code which is available from the official Next.js GitHub, you can go to the following repo with NPM or Yarn.
This is going to give you all the project files that we will be looking through, plus it will give you an ideal template to use Passport.js in your next React project.
I would recommend that you download the entire examples folder from https://github.com/vercel/next.js and grab the with-passport folder. The template script included in the README includes broken code.
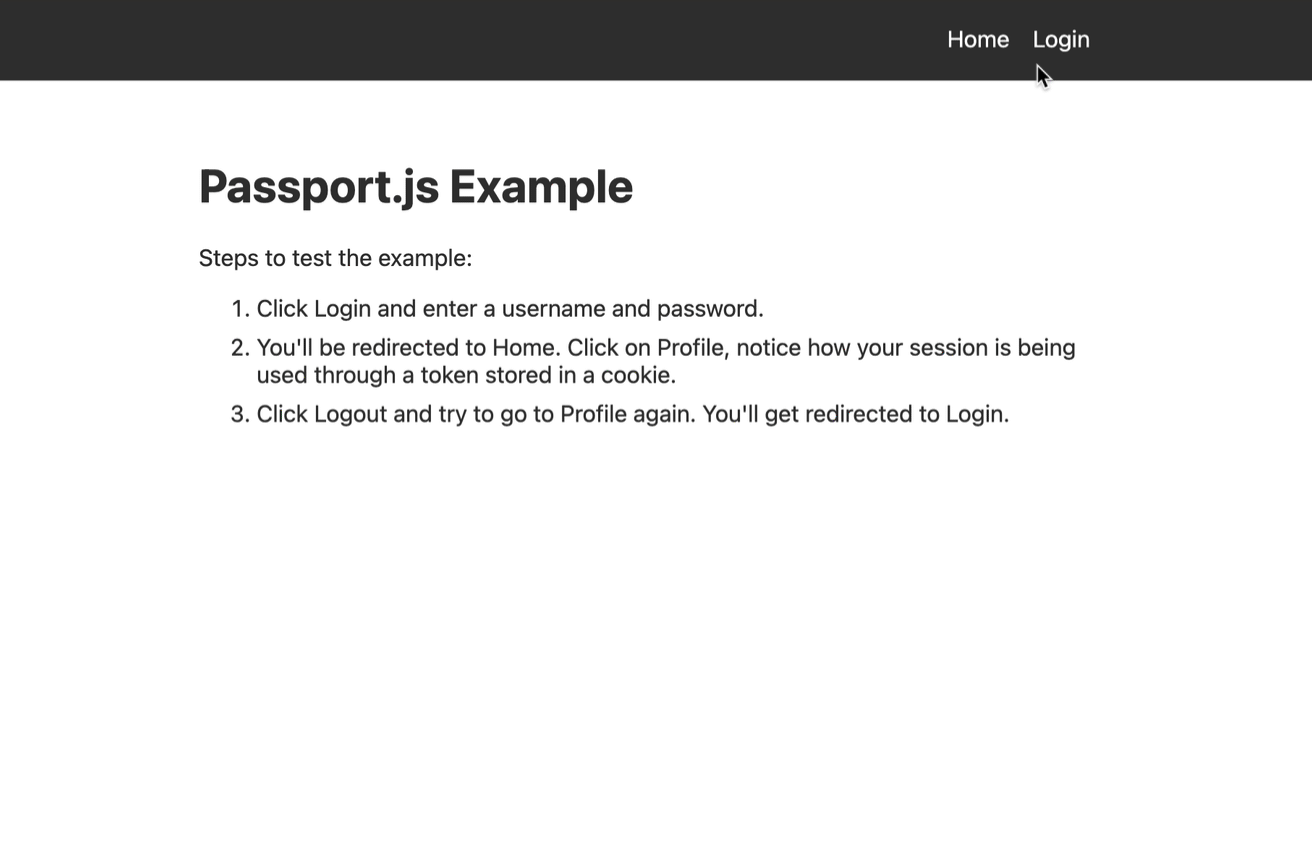 Passport App Demo
How the Passport Local Strategy Works
To start using Passport in your projects, you'll need to install the main passport library as well as a specific strategy.
Strategies are different methods with which your users can authenticate themselves. Passport Local is the strategy that Passport provides to enable users to sign up and login in the most traditional way–with email and password.
Both of these are included in the package.json file.
If you look in the lib folder, you can see how passport-local is set up.
// /lib/password-local.js

import Local from 'passport-local'
import { findUser, validatePassword } from './user'

export const localStrategy = new Local.Strategy(function (
  username,
  password,
  done
) {
  findUser({ username })
    .then((user) => {
      if (user && validatePassword(user, password)) {
        done(null, user)
      } else {
        done(new Error('Invalid username and password combination'))
      }
    })
    .catch((error) => {
      done(error)
    })
})
In the password-local.js file, the strategy is created and takes care of finding a user based off of their username and validating their password. If a user is found it will be returned via the done callback. If not, an error will be thrown.
If you look in /pages/api, you will see all of the server-related code which uses passport. The names of the files correspond to the actions you will need: login logout and sign up.
How to Sign Up Users with Passport
If you look at the signup file, it is simply creating a user based off of the data that's provided on the request body and is passed along with the request.
// /pages/api/signup.js

import { createUser } from '../../lib/user'

export default async function signup(req, res) {
  try {
    await createUser(req.body)
    res.status(200).send({ done: true })
  } catch (error) {
    console.error(error)
    res.status(500).end(error.message)
  }
}
When that's done, the server responds with a 200 success code, meaning your user has been created with the email and password they provided.
If you go back to the lib folder, into user.js, you can see how this createUser function works:
// /lib/user.js

const users = []

export async function createUser({ username, password }) {
  // Here you should create the user and save the salt and hashed password (some dbs may have
  // authentication methods that will do it for you so you don't have to worry about it):
  const salt = crypto.randomBytes(16).toString('hex')
  const hash = crypto
    .pbkdf2Sync(password, salt, 1000, 64, 'sha512')
    .toString('hex')
  const user = {
    id: uuidv4(),
    createdAt: Date.now(),
    username,
    hash,
    salt,
  }

  // This is an in memory store for users, there is no data persistence without a proper DB
  users.push(user)

  return { username, createdAt: Date.now() }
}
createUser takes a username and password and hashes the password so it can be saved securely and not as plain text. Then the created user is added to an array of users.
If and when you connect a database to this project, this is where you would actually create a new user in your database and swap that out with users.push
How to Log In Users with Passport
If you look at how your app works, after signing up and creating your user, the user then has to log in. When a user logs in, they make requests to /api/login.
This is where Passport actually steps in and does authentication for you. In this example, we're using the next-connect library to initialize passport before the POST request is made (upon login form submission).
// /api/login.js

passport.use(localStrategy)

export default nextConnect()
  .use(passport.initialize())
  .post(async (req, res) => {
    try {
      const user = await authenticate('local', req, res)
      // session is the payload to save in the token, it may contain basic info about the user
      const session = { ...user }

      await setLoginSession(res, session)

      res.status(200).send({ done: true })
    } catch (error) {
      console.error(error)
      res.status(401).send(error.message)
    }
  })
The login endpoint receives the data from your front end. When the POST request is made with the user's credentials, namely the email and password, it uses this authenticate function from passport to take care of authenticating your request.
Then another function, setLoginSession, takes care of creating a session for the logged-in user with the package @hapi/iron.
// /lib/auth.js

import Iron from '@hapi/iron'
import { MAX_AGE, setTokenCookie, getTokenCookie } from './auth-cookies'

const TOKEN_SECRET = process.env.TOKEN_SECRET

export async function setLoginSession(res, session) {
  const createdAt = Date.now()
  // Create a session object with a max age that we can validate later
  const obj = { ...session, createdAt, maxAge: MAX_AGE }
  const token = await Iron.seal(obj, TOKEN_SECRET, Iron.defaults)

  setTokenCookie(res, token)
}
This takes care of creating a cookie for your user which can now be used to identify and therefore authenticate them on future requests until the cookie expires or the user logs out.
If a user goes through the process of logging in they'll be redirected to the homepage. This is due to a special hook called useUser within your login page.
// /pages/login.js

const Login = () => {
  useUser({ redirectTo: '/', redirectIfFound: true })

  // ...
}
useUser makes a request to the /api/user endpoint. In this endpoint, it takes care of getting the session from the request that was made and finding a user based off of it and finally returning that user.
// /api/user.js

import { getLoginSession } from '../../lib/auth'
import { findUser } from '../../lib/user'

export default async function user(req, res) {
  try {
    const session = await getLoginSession(req)
    const user = (session && (await findUser(session))) ?? null

    res.status(200).json({ user })
  } catch (error) {
    console.error(error)
    res.status(500).end('Authentication token is invalid, please log in')
  }
}
For this request, we use the package swr which allows us to make GET requests using a convenient hook called useSWR.
When the user data is sent back to the useUser hook, it redirects the user to a given route based off of the provided redirectTo property. Since this was set to forward slash, it will redirect your user to the homepage. You can change this property's value to be whatever page you want the user to visit immediately after logging in instead of staying on the login page.
How to Log Out Users with Passport
Finally, the last action Passport takes care of in this app is logging out the user. Fortunately logging them out is as simple as removing the cookie you created on login.
You log out your user and remove the cookie on the server side. You do this by making a GET request to /api/logout.
// /api/logout

import { removeTokenCookie } from '../../lib/auth-cookies'

export default async function logout(req, res) {
  removeTokenCookie(res)
  res.writeHead(302, { Location: '/' })
  res.end()
}
In it, you use a function removeTokenCookie to delete the cookie that you created when the session was made. After doing so, the user is redirected back to the homepage using a server-side redirect.
How to Get Better at Authenticating Users
The best way to get a good understanding of Passport and authentication in general is to work with it. As long as you are a developer, it will be an essential component to understand and implement.
Beyond my explanations here, be sure to run this application on your own. Play around with signing up logging in and logging out users so you can get a good understanding of what's actually going on when you authenticate them.
I hope this project serves as a good starting point for any React application you have where you want to feature authentication. If you want to extend this example beyond email and password auth, be sure to check out Passport's website for all 500+ available strategies that your users can use to sign in.
Become a Professional React Developer
React is hard. You shouldn't have to figure it out yourself.
I've put everything I know about React into a single course, to help you reach your goals in record time:
Introducing: The React Bootcamp
It’s the one course I wish I had when I started learning React.
Click below to try the React Bootcamp for yourself:
 Click to get started